 Operation and Maintenance
 Linux Operation and Maintenance
 Summary and sharing of ten alternative tools in Linux environment
Summary and sharing of ten alternative tools in Linux environment
This article brings you knowledge about alternative tools under the Linux operating system, including installing and using the bat command in Linux. I hope it will be helpful to everyone.
Under the Linux operating system, we often use the cat command to connect multiple files and print to standard output, synthesize several files into one target file, and append several files into the target file.
Recently I discovered a command with a similar function on GitHub called "Bat". It is a replacement for the cat command and has some very cool features such as syntax highlighting, Git integration, and automatic paging.
In this article, I will introduce to you how to install and use the bat command in Linux.
1.bat
Install bat
Arch Linux
bat is available in the default software repositories of the Arch Linux operating system and can be installed directly on any Arch-based system using the pacman command.
pacman -S bat
Fedora
dnf install bat
macOS
brew install bat
Ubuntu 21.10
i It is installed through bat in the Ubuntu environment. Download the .deb file from the release page of bat. You can execute the following commands to download and install.
sudo apt-get install wget
wget https://github.com/sharkdp/bat/releases/tag/v0.18.3/bat_0.18.3_amd64.deb
sudo dpkg -i bat_0.18.3_amd64.deb
For other systems, you may need to compile and install from the software source, or refer to other operating system installation methods of bat on GitHub.
Usage of bat command
The use of bat command is very similar to the use of cat command.
Use the bat command to create a new file:
bat > jiaoben1.sh
Use the bat command to view the file content:
bat jiaoben1.sh
Use the bat command to view multiple files at the same time:
bat jiaoben1.sh jiaoben2.sh
Use the bat command to merge the contents of multiple files into a single file:
bat jiaoben1.sh jiaoben2.sh > test.txt
The above introduces bat to create new files, view file contents, and merge the contents of multiple files into a single file. The way.
Next, let’s take a look at some very cool features of the bat command.
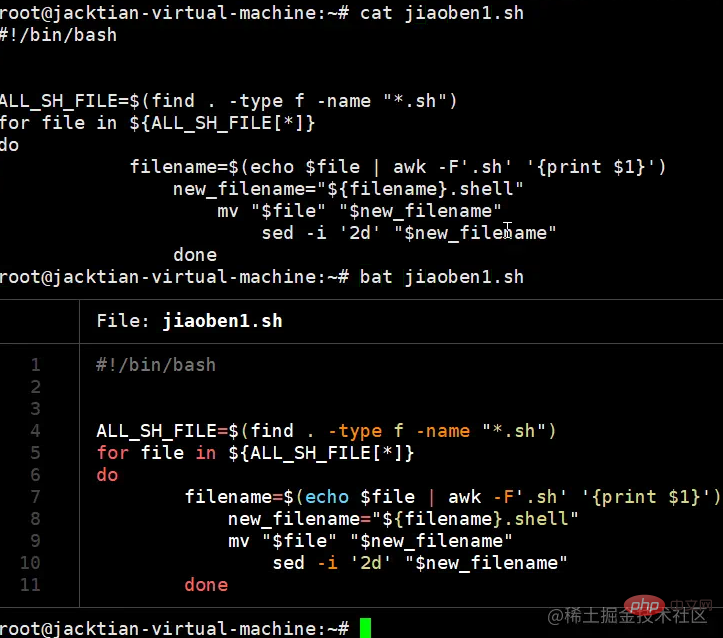
The bat command supports syntax highlighting for most programming and markup languages, so let’s use the cat and bat commands to display the contents of jiaoben1.sh for a sharp comparison.

As can be seen, the cat command displays the contents of the file in plain text format, while the bat command displays syntax highlighting and neat text alignment.
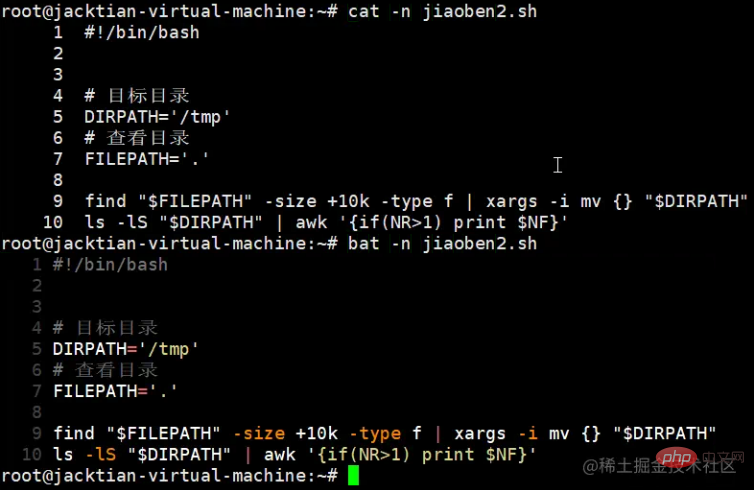
From the output of the bat command above, we can see that there are table lines. If you only want to display line numbers (without tables), you can use the -n parameter to achieve this. Although cat execution will also display line numbers. , but still not as beautiful as the output after bat execution.
bat -n jiaoben2.sh
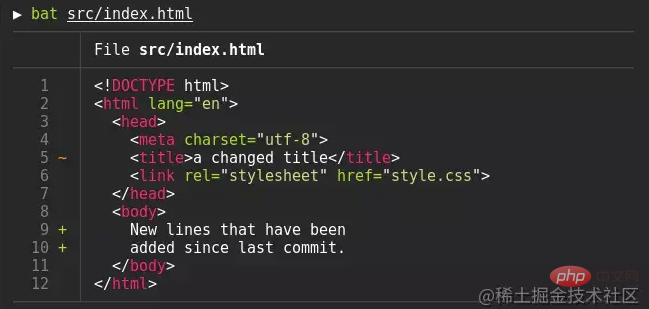
bat command supports Git integration, making it easy to view and edit files in Git repositories. Bat is connected to Git to display modifications on the index.
#bat supports automatic paging. This feature also needs attention.
Support paging, which means that when the output content of the file exceeds the screen display, the bat command will automatically transfer its output content to the less command, and you will be able to use the Enter key to page one page View the output content, use the space bar to jump directly to the last line at the end of the text.
These are unnecessary when you use the bat command, which will automatically transfer the output of a file that spans multiple pages.
bat jiaoben3.sh
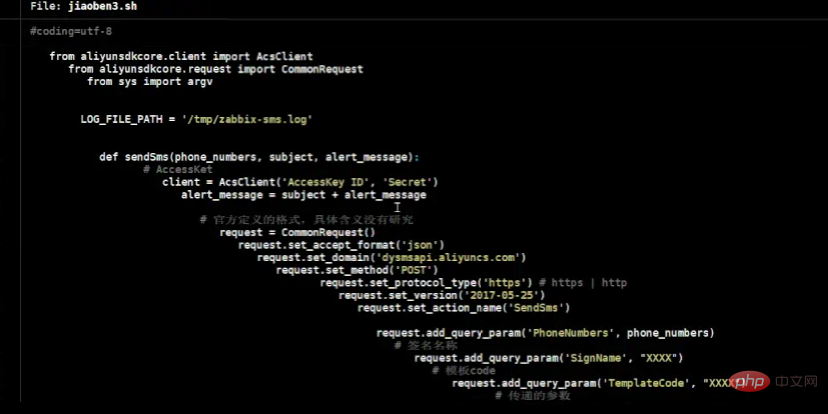
Compare the cat command to view the content of the jiaoben3.sh file across multiple pages. The prompt will jump directly to the last page of the file, and you will not be able to see the span of the file. The content at the beginning and middle of multiple page files.
cat jiaoben3.sh
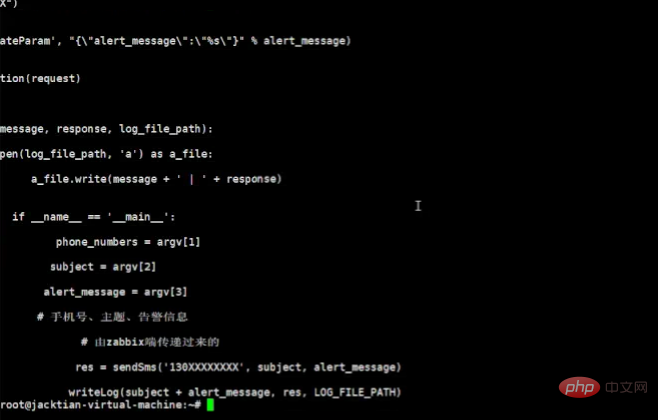
If you want to use cat to achieve the effect of the bat command, you need to use the output of cat to transfer to the less command, so that you can start from the beginning View the content page by page.
cat jiaoben3.sh | less
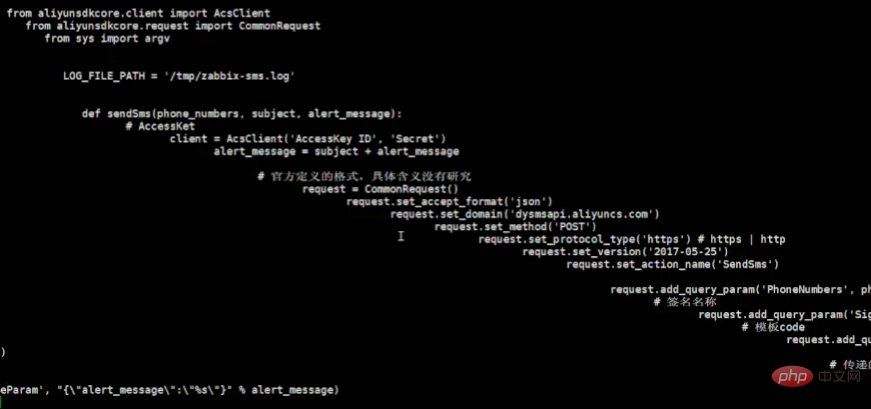
Similarly, in this way, you can use the Enter key to view the output content page by page and use the space bar to jump directly to the last line at the end of the text.
bat custom themes
Currently there are 24 bat custom themes, including: Coldark-Cold, GitHub, Monokai Extended Light, OneHalfDark, Solarized (light), TwoDark, Visual Studio Dark, base16, zenburn, etc.;
如果你不喜欢默认主题,也是可以根据自己的风格进行修改,只需执行:bat --list-themes命令,即可显示可用的主题。
# bat --list-themes
Theme: 1337
  // Output the square of a number.
  fn print_square(num: f64) {
      let result = f64::powf(num, 2.0);
      println!("The square of {:.2} is {:.2}.", num, result);
  }
......例如你要选择Dracula主题,可直接执行:bat --theme=Dracula 文件名
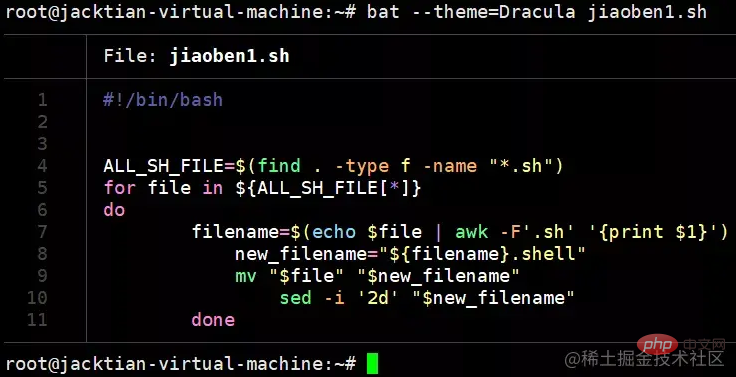
如果你想永久改变某一个主题,可使用export BAT_THEME="Dracula"在你的 shell 启动文件,以使更改为永久。
您可以使用--style参数选项来控制bat输出的外观,配置元素包括:行号、文件头、网格边框、Git修改来显示除文件内容之外的东西,参数是一个逗号分隔的列表。
--style=numbers,changes可以使用仅显示 Git修改和行号,而不显示网格和文件标题,设置BAT_STYLE环境变量以使这些更改为永久。
关于更多 bat 的使用方法可通过执行命令man bat或bat --help。
除此之外,也可以通过 bat 项目的 GitHub 库查看更多详细信息,我用过 bat 后就不会再想用回 cat 了!
2、duf
在 Linux 环境下,我们知道 df 命令是用于显示磁盘分区上可使用的磁盘空间,默认显示单位为 KB,你还可以利用该命令来获取硬盘被占用了多少空间,目前还剩下多少空间等信息。
# df
Filesystem     1K-blocks    Used Available Use% Mounted on
/dev/sda3       18439940 4943264  12559972  29% /
tmpfs             506176      76    506100   1% /dev/shm
/dev/sda1          99150   30003     64027  32% /boot
/dev/sr0         4363088 4363088         0 100% /media/CentOS_6.5_Final
除此之外,du 命令也是查看使用空间的,但与 df 命令不同的是 Linux du 命令是对文件和目录磁盘使用的空间的查看,和 df 命令还是有一些区别的。
# du
4    ./.abrt
8    ./.dbus/session-bus
12    ./.dbus
4    ./.nautilus
40    ./.local/share/gvfs-metadata
24    ./.local/share/applications
68    ./.local/share
72    ./.local
接下来就跟大家介绍一款终端工具,你可以理解为传统的 Linux 命令 df 和 du 整合版 —— duf。
duf 是一个用 Golang 编写的跨平台磁盘使用情况工具,可以让你轻松地检查可用磁盘空间,对输出进行分类,并以用户友好的方式进行呈现,适用于 Linux、Windows、macOS、Android、FreeBSD;
Ubuntu 安装方式:
$ sudo apt install gdebi
#如果报错,Failed to fetch http://security.ubuntu.com......
# sudo apt-get update
$ sudo gdebi duf_0.5.0_linux_amd64.deb
#要先在下载duf_0.5.0_linux_amd64.deb,下载地址为:https://github.com/muesli/duf/releases/download/v0.5.0/duf_0.5.0_linux_amd64.deb
MacOS 安装方式:
#先安装Homebrew,按照提示安装即可。
/bin/zsh -c "$(curl -fsSL https://gitee.com/cunkai/HomebrewCN/raw/master/Homebrew.sh)"
#安装duf
brew install duf
#或者
sudo port selfupdate && sudo port install duf
Windows 安装方式:
choco install duf
#或者
scoop install duf
安装完毕后,可直接使用 duf,方法也非常简单。
不添加任何参数,会输出所有本地设备、已挂载的任何云存储设备以及任何其他特殊设备(包括临时存储位置等)的详细信息;
$ duf
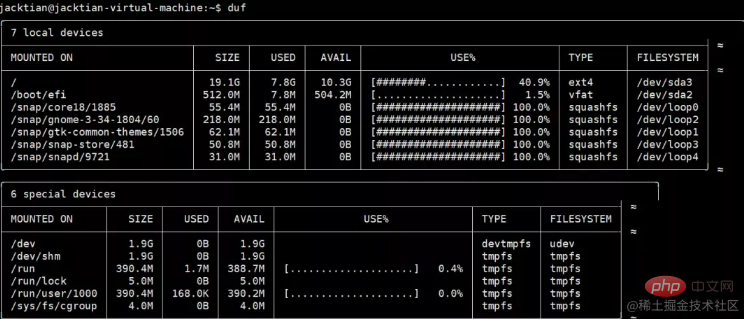
如果你只想查看本地连接设备的详细信息,而不想看其他的,可执行:
$ duf --only local

如果你只想根据大小按特定顺序对输出信息进行排序,可执行:
$ duf --sort size
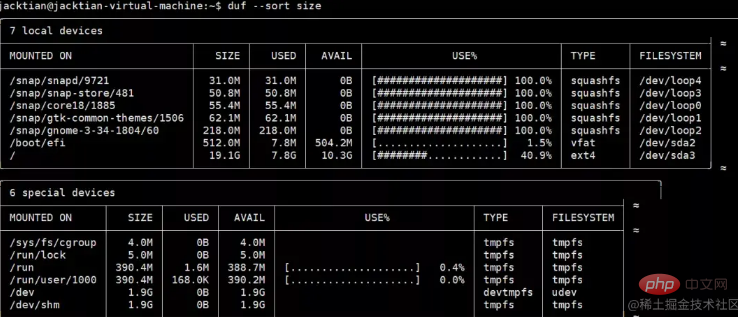
更多参数使用方式:
duf /home /some/file 根据参数,则 duf 将仅列出特定的设备和安装点
duf --all 列出所有内容
duf --hide-network 隐藏网络文件系统,与之对应的 --hide-fuse --hide-special --hide-loops --hide-binds
duf --inodes 列出inodes
duf --output mountpoint,size,usage 指定输出的格式 对应的还有(mountpoint, size, used, avail, usage, inodes, inodes_used, inodes_avail, inodes_usage, type, filesystem)
duf --json 以json格式输出
duf --theme light 如果 duf 无法正确检测终端的颜色,可以设置一个主题
duf --help 查看所有 duf 的可用命令
3、tldr
对于初学者学习 Linux 来说,遇到最多的问题就是在 Linux 操作系统下有记不完的命令以及包括各种参数的使用方法,其实你根本不用死记硬背它,当你用到时去查找相关资料或通过man命令来查看相关文档,man手册输出的信息也比较多,而对于参数较多的命令来说,翻看man手册也非常吃力。
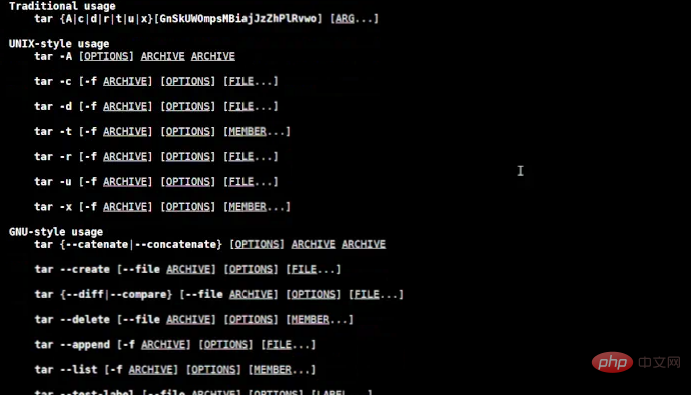
这次就给大家介绍一款工具:tldr,它的全称是:Too Long, Don't Read,中文意思:太长不看的意思。
其实跟man命令的结果基本上就是太长不看,tldr这个工具你可以理解为简化了 man 命令的帮助文档,把 Linux 命令最常用的一些命令用法列举出来,非常容易看懂。
同时,tldr包括非常多语言编写的客户端,比如:C、Go、iOS、Python、nodejs 等等,你可以使用不同的客户端来安装;
我这里的环境是 Ubuntu,需要先安装 Node.js,然后根据下述安装方式操作:
sudo apt-get install nodejs
sudo apt-get install npm
sudo npm install -g tldr
执行完上述三条命令后,还需要再执行tldr --update,更新tldr至最新的状态,然后就可以直接使用了;
tldr --update
tldr 的使用:
tldr 命令的使用也非常简单,只需 tldr + 你所要查询的命令即可;
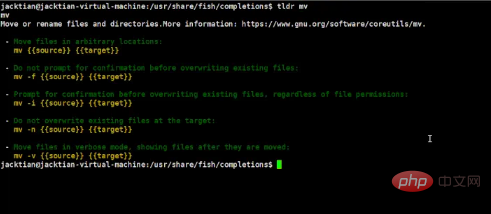
4、htop
在 Linux 操作系统上显示进程运行状态信息最常用工具是我们熟悉的 top,它是每位系统管理员的好帮手。
htop can be said to be an excellent substitute for top. It is written in C and is a cross-platform interactive process monitoring tool. It has better visual effects and makes it easier to understand the current system status at a glance. It allows Scroll the list of processes vertically and horizontally to view their complete command lines and related information such as memory and CPU consumption. System-wide information such as load average or swap usage is also displayed.
The information displayed is configurable through the graph settings and can be sorted and filtered interactively, and process-related tasks such as termination and reprocessing can be completed without entering its PID.
The installation is also very simple, just execute the command: apt install htop to complete.
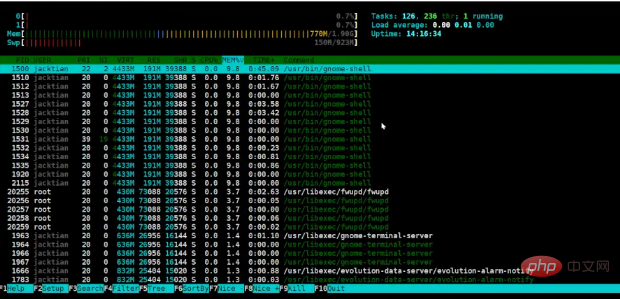
htop has obvious advantages over top. In addition to its more complete functions, it also has rich color combinations and is overall more user-friendly.
5. Glances
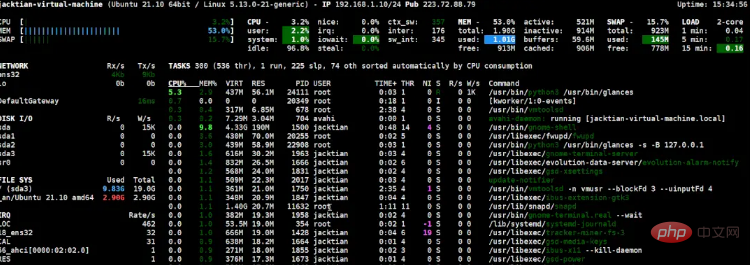
Glances is a cross-platform monitoring tool written in Python and designed to be presented through curses or a web-based interface Extensive system monitoring information that dynamically adjusts to the size of the user interface, top/htop replacement for GNU/Linux, BSD, Mac OS and Windows operating systems.
It can work in client/server mode, remote monitoring can be done via terminal, web interface or API (XML-RPC and RESTful), statistics can also be exported to a file or external time/value database.
In addition to listing all processes and their CPU and memory usage, it can also display other information about the system, such as:
Network and disk usage
File system used space and total space
Data from different sensors (e.g. battery)
And a list of processes that have recently consumed too many resources
##6、exa
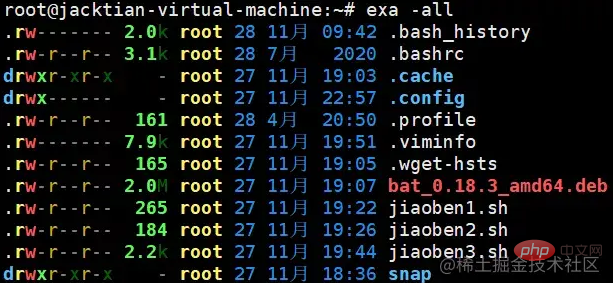
Everyone is familiar with the ls command. In the Linux environment, its main function is to list the files and subdirectories contained in the current directory. If there are too many files in the current directory, use the command ls. No Very good, because the output result is not consistent with the file you are looking for. First: a second filter search is required; second: when there are too many files, the terminal output result is slower; EXA Is a modern replacement for ls, the command-line program included with Unix and Linux operating systems, giving it more functionality and better defaults. It uses colors to differentiate file types and metadata. It understands symbolic links, extended properties, and Git. It's small, fast, and has only one binary file.What is the difference between EXA and LS?
- The terminal screen is no longer the bottleneck: exa is powerful, more friendly than ls, and the output results will be faster;
- Color :exa uses a lot of colors;
- does not conflict with the ls command
Features of EXA
- Color: List of file types and how to differentiate files;
- Grid view: Display files in a grid the same size as the terminal window;
- Long view: displays files and their metadata in a table;
- Tree view: displays files and their descendants in a tree;
- Git integration: View the Git status of a file while in the repository;
- Filtering: Hide files in the list, show invisible files, and filter the output Sort;
- Display options
-1, --oneline: Display one entry per line
- ## -G, --grid: Display entries as grid (default)
- -l, --long: Display extended details and attributes
- -R, --recurse: recurse into the directory
- -T, --tree: recurse into the directory as a tree
- - x, --across: Sort grid instead of down
- -F, --classify: Show type indicator by filename
- --colo[u]r: When to use terminal colors
- --colo[u]r-scale: Clearly highlight levels of file size
- --icons: Display icons
- --no-icons: Do not display icons (always override --icons)
- Filter options
-a, --all: Show hidden and "dot" files
- -d, --list-dirs: List directories like ordinary files
- -L, --level=(depth): Limit recursion depth
- -r, --reverse: Reverse the sort order
- -s, --sort=(field): Sort by which field
- --group-directories-first: List directories before other files
- -D, --only-dirs: List only directories
--git-ignore:忽略中提到的文件.gitignore
-I,--ignore-glob=(globs):要忽略的文件的全局模式(管道分隔)
传递该--all选项两次以同时显示.和..目录。
7、fd
fd 是一个在文件系统中查找条目的程序,它是 find 命令的一个简单、快速且用户友好的替代品,fd 目的不是取代 find 命令所提供的全部功能,而是在多数用例中提供了合理的默认值,在某些情况下非常有用。
fd 输出是彩色的,类似于某些 ls 模式,它是递归的,在包含 Git 存储库的目录中搜索源代码文件时,fd 会自动排除隐藏的文件和目录,包括.、.git目录,并忽略.gitignore文件中的模式。一般来说,搜索速度更快,而且第一次搜索时会提供了更多相关结果。
默认情况下,fd 在当前目录中执行不区分大小写的模式搜索,但是,如果你的搜索模式包含一个大写字母,fd 将以区分大小写的模式进行执行。当然,也可以重写默认值,但在许多情况下还是有利的。同样使用 find 进行相同的搜索需要你提供额外的命令行参数。
fd 可用于许多 Linux 发行版,执行以下命令,可以使用标准存储库在 Ubuntu 中安装:
sudo apt install fd-find
在 Ubuntu 操作系统中,命令是 fdfind,避免与其他现有的实用程序名称发生冲突,如果希望它是 fd,可以设置一个别名:
alias fd=fdfind
要使别名保持不变,在重启后仍然可用,请将其放入“.bashrc”或“.bash_aliases”文件中。
使用不带参数选项的 fd,则类似于 ls,不同之处在于它默认情况下也会将子目录中的文件进行列出。
fd
bat_0.18.3_amd64.deb
fd_8.3.0_amd64.deb
jiaoben1.sh
jiaoben2.sh
jiaoben3.sh
snap
snap/firefox
snap/firefox/631
snap/firefox/731
snap/firefox/common
snap/firefox/current
snap/snap-store
snap/snap-store/557
snap/snap-store/558
snap/snap-store/common
snap/snap-store/current
test.md
在当前目录中搜索所有的 markdown 文件(.md 或.MD ),find 命令如下:
find . -iname "*.md"
./test.md
使用 fd 进行同样的搜索:
fd *.md
test.md
在某些情况下,fd 需要额外的选项;例如,如果你想包含隐藏文件和目录,则必须使用选项 -H,而这在 find 中是不需要的,关于 fd 更多命令行参数选项的使用方法,可查阅 fd GitHub 存储库。
8、ag
ack和ag是两个文本搜索工具,比自带的grep要好用得多。
在指定目录下搜索文本时,不需要像 grep 那样指定各种命令行选项,输出结果也会包含文件名和行号,并且会高亮显示搜索关键字。
ag是可以比grep、ack更快的递归搜索文件内容。
Ubuntu 21.10 安装 ag 和 ack
apt-get install silversearcher-ag
apt install ack
ag 命令常用参数
ag -g (文件名):类似于 find . -name (文件名)
ag -i sed:忽略大小写搜索含 sed 文本
ag -A sed:搜索含 sed 文本,并显示匹配内容之后的 n 行文本
ag -B sed:搜索含 sed 文本,并显示匹配内容之前的 n 行文本
ag -C sed:搜索含 sed 文本,并同时显示匹配内容以及它前后各 n 行文本的内容
ag -w sed:全匹配搜索,只搜索与所搜内容完全匹配的文本
ag --java sed:在 java 文件中搜索含 sed 的文本
ag --xml sed:在 XML 文件中搜索含 sed 的文本
ag 命令的使用
根据文件名进行搜索对应的文件,可使用-g参数选项。
ag -g jiaoben
jiaoben2.sh
jiaoben1.sh
jiaoben3.sh
搜索当前目录下有关 sed 关键字的文本。
ag -w sed
jiaoben1.sh
10:                sed -i '2d' "$new_filename"

更多参数选项,大家可根据自身实际场景进行运用。
9、axel
axel 是命令行多线程下载工具,下载文件时可以替代 curl、wget。
Ubuntu 21.10 安装 axel
apt-get install axel
axel 参数选项
-n:指定线程数
-o:指定另存为目录
-s:指定每秒的最大比特数
-q:静默模式
案例
# axel -n 10 -o /tmp/ http://mirrors.163.com/ubuntu/ls-lR.gz
# exa /tmp/ls-lR.gz
/tmp/ls-lR.gz
可以看出,我们通过 axel 也是可以把 ls-lR.gz 这个文件正常下载到 /tmp 目录下的。
10、pydf
在 Linux 系统下,我们可以使用df命令来显示磁盘的相关信息。
# df
文件系统          1K-块     已用    可用 已用% 挂载点
tmpfs            199180     1660  197520    1% /run
/dev/sda3      19946096 10317864 8589692   55% /
tmpfs            995884        0  995884    0% /dev/shm
tmpfs              5120        4    5116    1% /run/lock
/dev/sda2        524252     5344  518908    2% /boot/efi
tmpfs            199176      100  199076    1% /run/user/1000
/dev/sr0        3043440  3043440       0  100% /media/jacktian/Ubuntu 21.10 amd64
tmpfs            199176       60  199116    1% /run/user/0
Ubuntu 21.10 安装 pydf
apt install pydf
pydf 可以说是 df 的替代品,它以更简洁的方式显示磁盘使用状态。

相关推荐:《Linux视频教程》
The above is the detailed content of Summary and sharing of ten alternative tools in Linux environment. For more information, please follow other related articles on the PHP Chinese website!

Hot AI Tools

Undresser.AI Undress
AI-powered app for creating realistic nude photos

AI Clothes Remover
Online AI tool for removing clothes from photos.

Undress AI Tool
Undress images for free

Clothoff.io
AI clothes remover

AI Hentai Generator
Generate AI Hentai for free.

Hot Article

Hot Tools

Notepad++7.3.1
Easy-to-use and free code editor

SublimeText3 Chinese version
Chinese version, very easy to use

Zend Studio 13.0.1
Powerful PHP integrated development environment

Dreamweaver CS6
Visual web development tools

SublimeText3 Mac version
God-level code editing software (SublimeText3)

Hot Topics
 deepseek web version entrance deepseek official website entrance
Feb 19, 2025 pm 04:54 PM
DeepSeek is a powerful intelligent search and analysis tool that provides two access methods: web version and official website. The web version is convenient and efficient, and can be used without installation; the official website provides comprehensive product information, download resources and support services. Whether individuals or corporate users, they can easily obtain and analyze massive data through DeepSeek to improve work efficiency, assist decision-making and promote innovation.
 How to install deepseek
Feb 19, 2025 pm 05:48 PM
There are many ways to install DeepSeek, including: compile from source (for experienced developers) using precompiled packages (for Windows users) using Docker containers (for most convenient, no need to worry about compatibility) No matter which method you choose, Please read the official documents carefully and prepare them fully to avoid unnecessary trouble.
 Ouyi okx installation package is directly included
Feb 21, 2025 pm 08:00 PM
Ouyi OKX, the world's leading digital asset exchange, has now launched an official installation package to provide a safe and convenient trading experience. The OKX installation package of Ouyi does not need to be accessed through a browser. It can directly install independent applications on the device, creating a stable and efficient trading platform for users. The installation process is simple and easy to understand. Users only need to download the latest version of the installation package and follow the prompts to complete the installation step by step.
 BITGet official website installation (2025 beginner's guide)
Feb 21, 2025 pm 08:42 PM
BITGet is a cryptocurrency exchange that provides a variety of trading services including spot trading, contract trading and derivatives. Founded in 2018, the exchange is headquartered in Singapore and is committed to providing users with a safe and reliable trading platform. BITGet offers a variety of trading pairs, including BTC/USDT, ETH/USDT and XRP/USDT. Additionally, the exchange has a reputation for security and liquidity and offers a variety of features such as premium order types, leveraged trading and 24/7 customer support.
 Get the gate.io installation package for free
Feb 21, 2025 pm 08:21 PM
Gate.io is a popular cryptocurrency exchange that users can use by downloading its installation package and installing it on their devices. The steps to obtain the installation package are as follows: Visit the official website of Gate.io, click "Download", select the corresponding operating system (Windows, Mac or Linux), and download the installation package to your computer. It is recommended to temporarily disable antivirus software or firewall during installation to ensure smooth installation. After completion, the user needs to create a Gate.io account to start using it.
 Ouyi Exchange Download Official Portal
Feb 21, 2025 pm 07:51 PM
Ouyi, also known as OKX, is a world-leading cryptocurrency trading platform. The article provides a download portal for Ouyi's official installation package, which facilitates users to install Ouyi client on different devices. This installation package supports Windows, Mac, Android and iOS systems. Users can choose the corresponding version to download according to their device type. After the installation is completed, users can register or log in to the Ouyi account, start trading cryptocurrencies and enjoy other services provided by the platform.
 How to automatically set permissions of unixsocket after system restart?
Mar 31, 2025 pm 11:54 PM
How to automatically set the permissions of unixsocket after the system restarts. Every time the system restarts, we need to execute the following command to modify the permissions of unixsocket: sudo...
 Why does an error occur when installing an extension using PECL in a Docker environment? How to solve it?
Apr 01, 2025 pm 03:06 PM
Causes and solutions for errors when using PECL to install extensions in Docker environment When using Docker environment, we often encounter some headaches...


