Docker summarizes and shares data volume technology
This article brings you the relevant knowledge of data volume technology summarized and shared by Docker. I hope it will be helpful to everyone.
Docker data volume technology
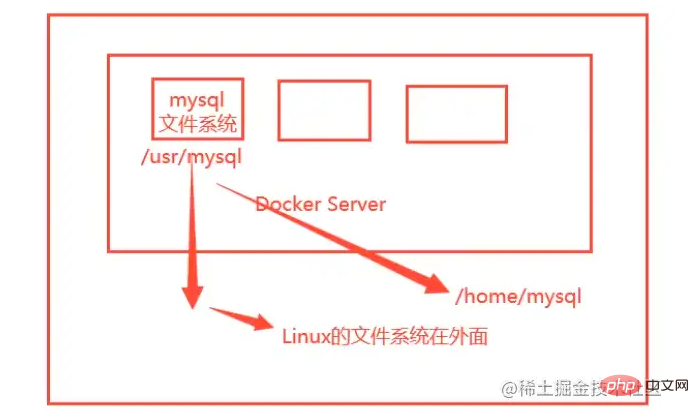
##What is a container data volume
Docker’s concept reviewPackage the application and environment into a mirror! data? If the data is in the container, then if we delete the container, the data will be lost! Requirement: Data can be persisted MySQL. If the container is deleted, the database will be deleted and run away ---> Requirement: MySQL data can be stored locally! There can be a data sharing technology between containers! The data generated in the Docker container is synchronized to the local! This is roll technology! Directory mounting, mount the directory in our container to Linux×!
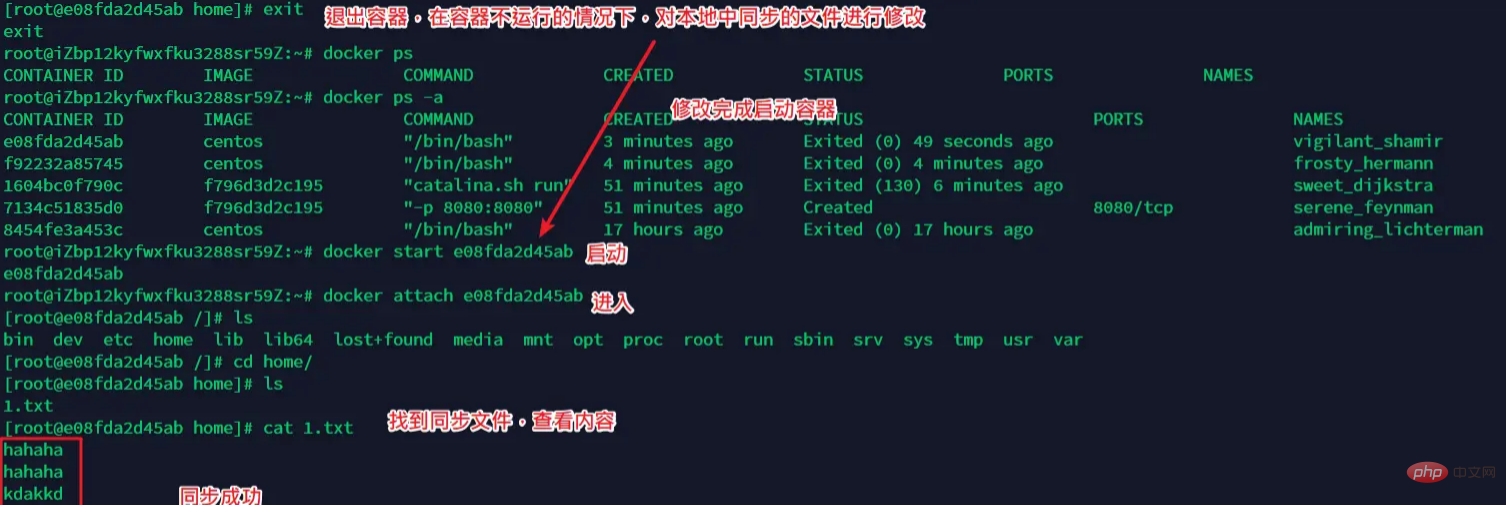
Using data volumes
docker run -it -v 宿主机目录: 容器目录 -p 主机端口:容器端口 容器id


Mysql actual combat
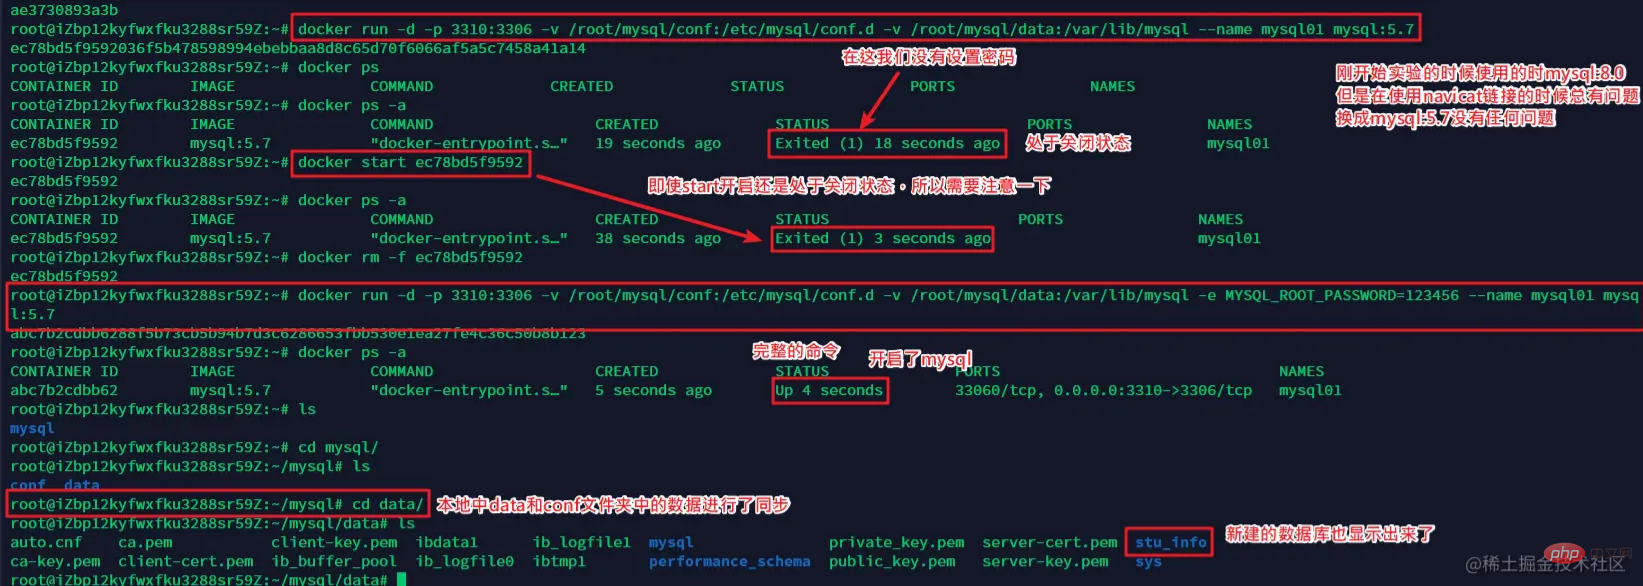
Commanddocker run -d -p 3310:3306 -v /root/mysql/conf:/etc/mysql/conf.d -v /root/mysql/data:/var/lib/mysql -e MYSQL_ROOT_PASSWORD=123456 --name mysql01 mysql:5.7
 ##Test result: Connection successful
 Problems encountered
The latest version of mysql used first: 8.0----When using navicat to connect, an inexplicable error is always reported
Solution: Switch to version 5.7, there is no problem
When we run the mirror mysql, we do not add -e MYSQL_ROOT_PASSWORD=123456 to set the password. The container will always be closed, even if it is restarted. It will be turned on
Add the -e MYSQL_ROOT_PASSWORD=123456 parameter to turn it on perfectly
Even if we delete the container, the data volume we mounted to the local is still not lost, which realizes the container data Persistence function
Named mount and anonymous mount
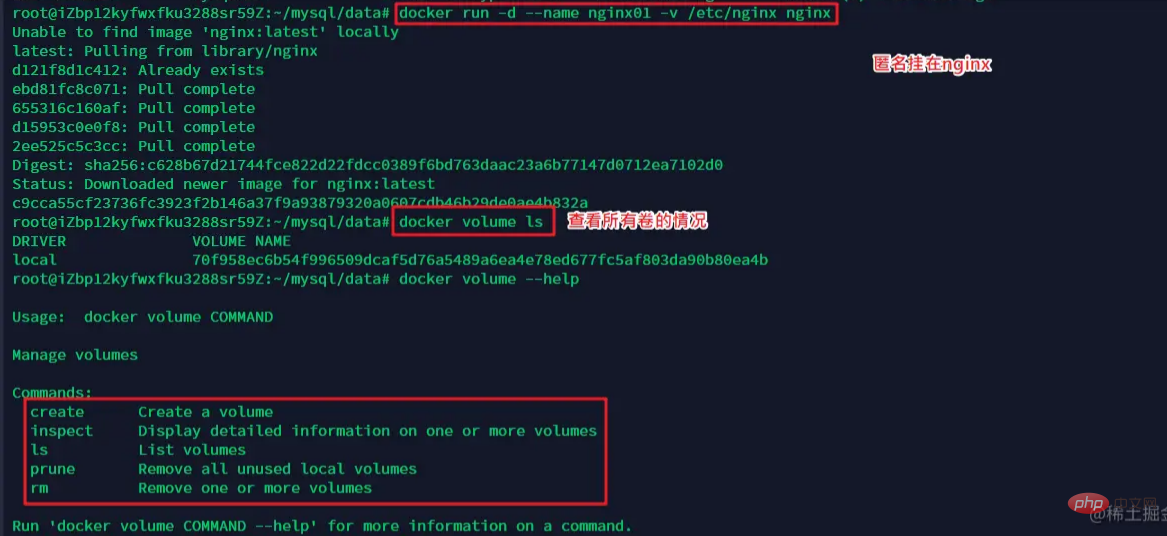
Anonymous mount-v Path within the container!
docker run -d --name nginx01 -v /etc/nginx nginx
Here we found that this is an anonymous mount. We only wrote the path inside the container after -v, but did not write the path outside the container.
View the situation of all volumes
docker volume ls

Named mount-v Name of the mounted volume: path within the container
docker run -d --name nginx01 -v 具名挂在名称:/etc/nginx nginx
Here we find that this is an anonymous mount. We write the path inside the container after -v, and there is no path outside the container, but there is a name
 Docker’s content directory:/var/lib/docker
All volumes in the docker container, if no directory is specified, are in:/var/lib/docker/volume /xx/_data
We can easily find one of our volumes through named mounting, and the most commonly used method when using volumes is named mounting

Additional knowledgeHow to distinguish between named mounting and anonymous mounting, specify the path to mount
-v path inside the container # Anonymous mount
-v Volume name: path inside the container #Named mount
-v /path outside the container: path inside the container #Specify path mount
Extension
-v Path within the container: ro rw Change read and write permissions
ro readonly Read only
rw readwrite Readable and writable
一旦设置了这个容器权限,容器对我们挂载出来的内容就有限定了
docker run -d --name nginx01 -v 具名挂在名称:/etc/nginx:ro nginx
docker run -d --name nginx01 -v 具名挂在名称:/etc/nginx:rw nginx
Ro 只要看到ro就说明这个路径只能通过宿主机来进行操作,容器内是无法操作的!
初识Dockerfile
dockerfile
dockerfile就是用来构建docker镜像文件的!命令脚本!先体验一下
通过这个脚本可以生成镜像,镜像是一层一层的,脚本是一个个的命令,每个命令都是一层!
写一个dockerfile
# 创立一个dockerfile文件,名字可以随便的取,最好叫做dockerfile
# 文件中的内容 指令(大写) 参数
FROM centos
VOLUME ["volme01","volume02"]
CMD echo "--------end----------"
CMD /bin/bash
#这里每个指令就是镜像的一层
使用dockerfile生成镜像
docker build -f dockerfile文件位置 -t 镜像名称和版本 镜像生成的位置
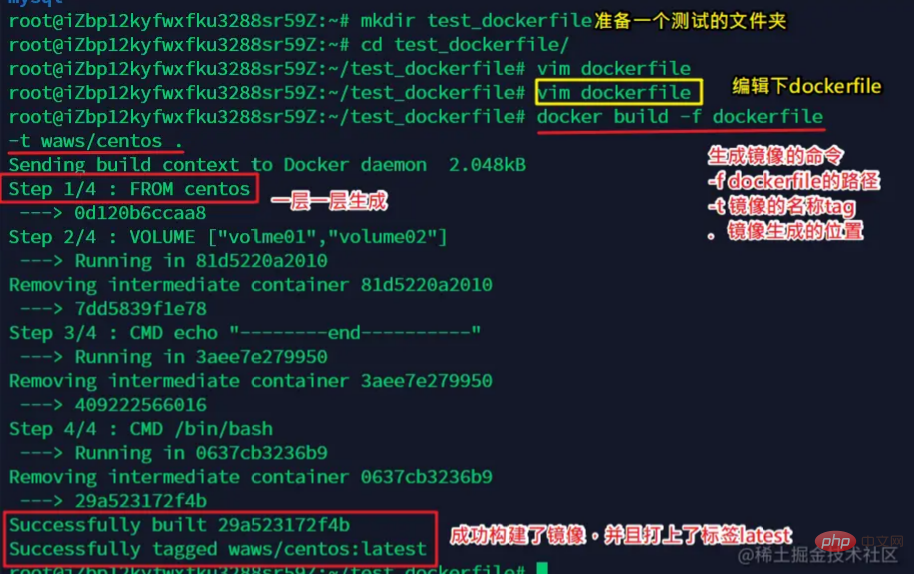
进入镜像查看详情

查看卷的同步目录
docker ps -a
docker inspect 容器id
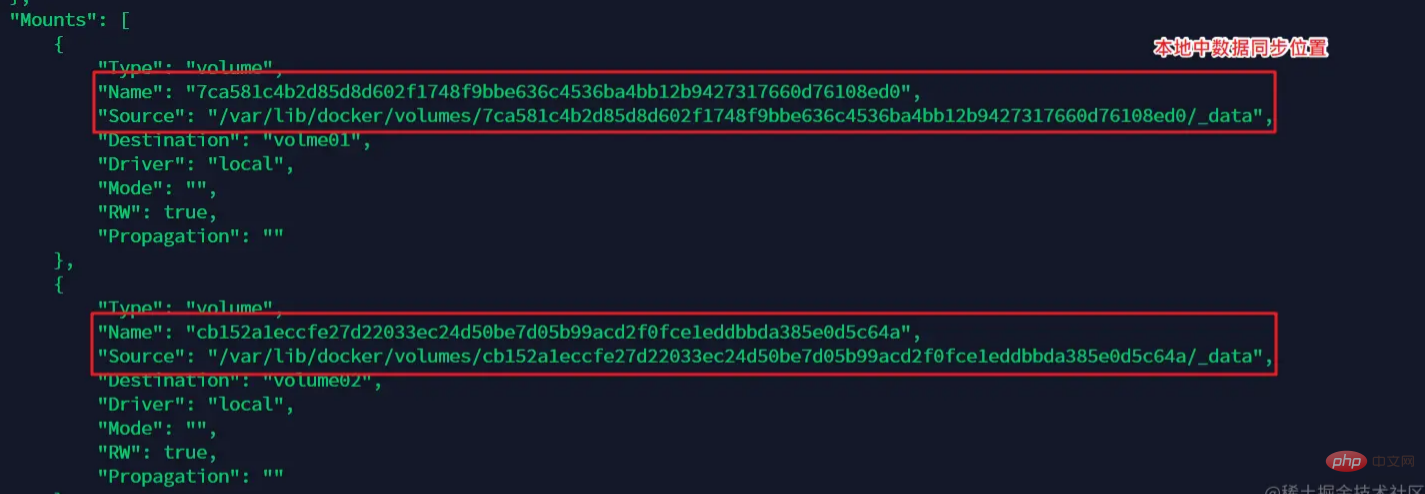
最后测试两个文件夹中是不是同步
同步成功
总结
使用dockerfile构建镜像的方式在我们未来的使用中非常的多,因为我们通常会构建自己的镜像
假设构建镜像时候没有挂载卷,要手动镜像挂载-v
数据卷容器
实际上即使保证的容器之间的数据共享的问题

数据卷容器实际上就是被拷贝数据的容器(A- volumes-from ->B,B是数据卷容器)
测试两个镜像之间同步
首先先开三个容器
创建docker01
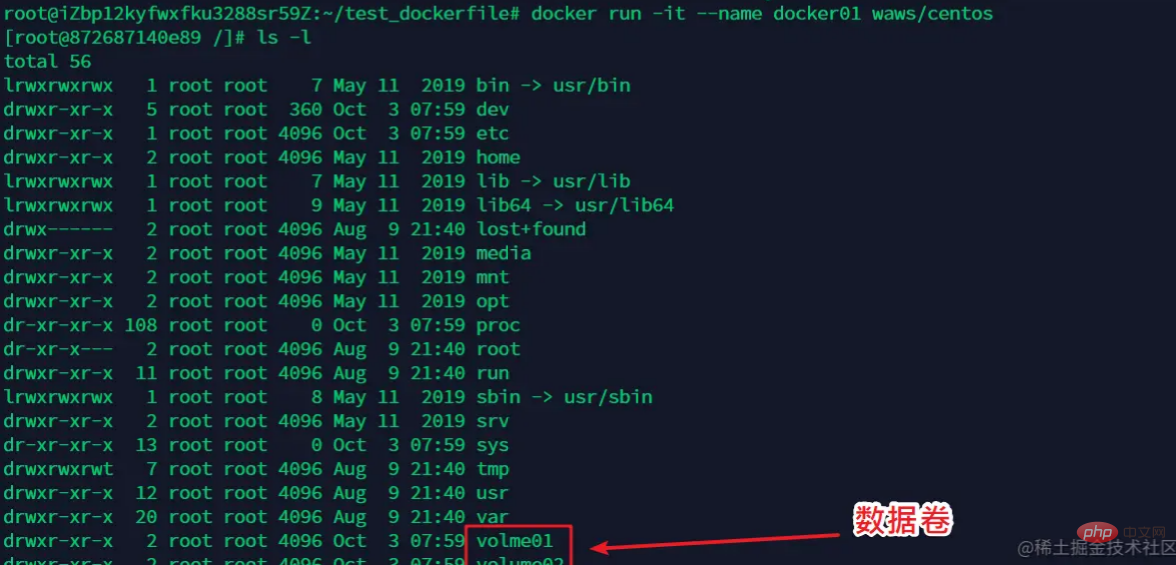
创建docker02 --volumes-from docekr01
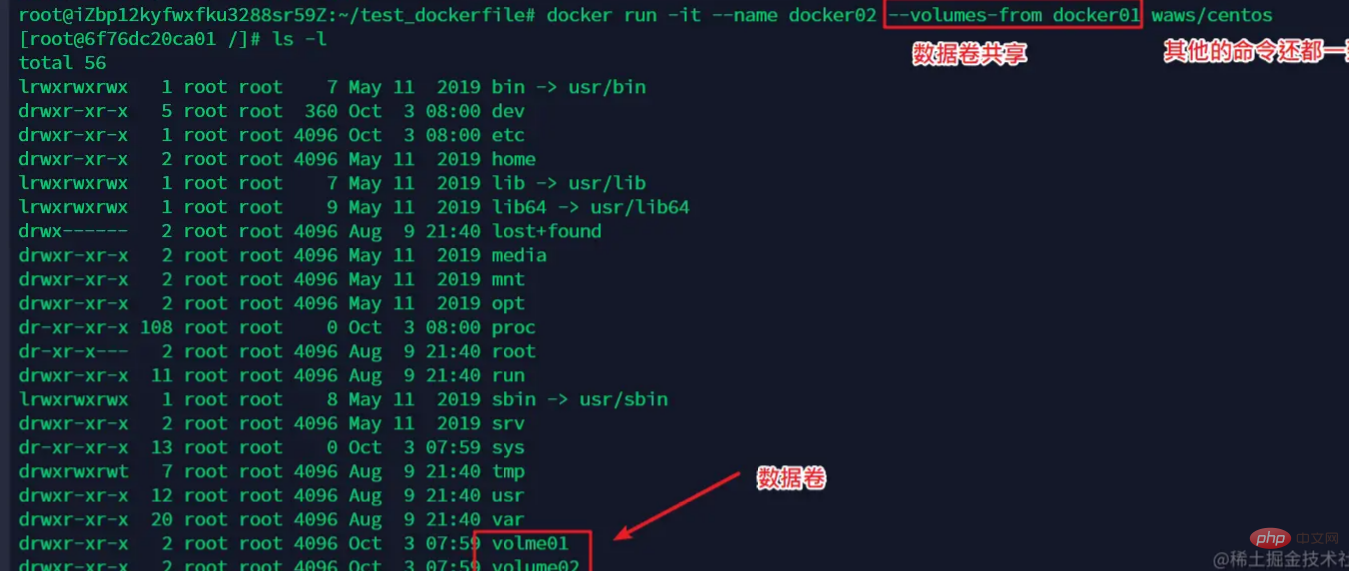
创建docker03 --volumes-from docekr02

查看docker01和docker03之间的数据共享

接着我们将docker02删除,查看docker01和docker03之间的数据共享

总结:
实现多个mysql之间的数据共享
  docker run -d -p 3310:3306 -v /root/mysql/conf:/etc/mysql/conf.d -v /root/mysql/data:/var/lib/mysql -e MYSQL_ROOT_PASSWORD=123456 --name mysql01 mysql:5.7
  docker run -d -p 3310:3306 --volumes-from mysql01 -e MYSQL_ROOT_PASSWORD=123456 --name
  mysql02 mysql:5.7
总结:
容器之间配置信息的传递。数据卷容器的声明周期一直持续到没有容器使用位置
理解:容器之间只要是共享就会数据copy,即使有的容器被删除,数据依然存在,直到所有共享 的容器都删除,数据才会被彻底删除
但是一旦你持久化到了本地,这个时候,本地的数据是不会删除的。
推荐学习:《docker视频教程》
The above is the detailed content of Docker summarizes and shares data volume technology. For more information, please follow other related articles on the PHP Chinese website!

Hot AI Tools

Undresser.AI Undress
AI-powered app for creating realistic nude photos

AI Clothes Remover
Online AI tool for removing clothes from photos.

Undress AI Tool
Undress images for free

Clothoff.io
AI clothes remover

Video Face Swap
Swap faces in any video effortlessly with our completely free AI face swap tool!

Hot Article

Hot Tools

Notepad++7.3.1
Easy-to-use and free code editor

SublimeText3 Chinese version
Chinese version, very easy to use

Zend Studio 13.0.1
Powerful PHP integrated development environment

Dreamweaver CS6
Visual web development tools

SublimeText3 Mac version
God-level code editing software (SublimeText3)

Hot Topics
 1386
1386
 52
52
 How to update the image of docker
Apr 15, 2025 pm 12:03 PM
The steps to update a Docker image are as follows: Pull the latest image tag New image Delete the old image for a specific tag (optional) Restart the container (if needed)
 How to use docker desktop
Apr 15, 2025 am 11:45 AM
How to use Docker Desktop? Docker Desktop is a tool for running Docker containers on local machines. The steps to use include: 1. Install Docker Desktop; 2. Start Docker Desktop; 3. Create Docker image (using Dockerfile); 4. Build Docker image (using docker build); 5. Run Docker container (using docker run).
 How to create a mirror in docker
Apr 15, 2025 am 11:27 AM
Steps to create a Docker image: Write a Dockerfile that contains the build instructions. Build the image in the terminal, using the docker build command. Tag the image and assign names and tags using the docker tag command.
 How to exit the container by docker
Apr 15, 2025 pm 12:15 PM
Four ways to exit Docker container: Use Ctrl D in the container terminal Enter exit command in the container terminal Use docker stop <container_name> Command Use docker kill <container_name> command in the host terminal (force exit)
 How to check the name of the docker container
Apr 15, 2025 pm 12:21 PM
You can query the Docker container name by following the steps: List all containers (docker ps). Filter the container list (using the grep command). Gets the container name (located in the "NAMES" column).
 What to do if the docker image fails
Apr 15, 2025 am 11:21 AM
Troubleshooting steps for failed Docker image build: Check Dockerfile syntax and dependency version. Check if the build context contains the required source code and dependencies. View the build log for error details. Use the --target option to build a hierarchical phase to identify failure points. Make sure to use the latest version of Docker engine. Build the image with --t [image-name]:debug mode to debug the problem. Check disk space and make sure it is sufficient. Disable SELinux to prevent interference with the build process. Ask community platforms for help, provide Dockerfiles and build log descriptions for more specific suggestions.
 How to copy files in docker to outside
Apr 15, 2025 pm 12:12 PM
Methods for copying files to external hosts in Docker: Use the docker cp command: Execute docker cp [Options] <Container Path> <Host Path>. Using data volumes: Create a directory on the host, and use the -v parameter to mount the directory into the container when creating the container to achieve bidirectional file synchronization.
 How to save docker image
Apr 15, 2025 am 11:54 AM
To save the image in Docker, you can use the docker commit command to create a new image, containing the current state of the specified container, syntax: docker commit [Options] Container ID Image name. To save the image to the repository, you can use the docker push command, syntax: docker push image name [: tag]. To import saved images, you can use the docker pull command, syntax: docker pull image name [: tag].


