 Operation and Maintenance
 Linux Operation and Maintenance
 Take you through disk management and mounting hard drives under Linux
Take you through disk management and mounting hard drives under Linux
This article brings you the hard disk mounting in disk management under Linux and some knowledge you need to know about mounting the hard disk in the Linux operating system. I hope everyone has to help.

This may be the most practical article on Linux hard disk mounting introduced so far, it is quite detailed. Due to work reasons, I usually use it more often. The main purpose is just to let more people know that mounting a disk under Linux is not that difficult.
There are several common file systems, the old file system ext file system (ext2, ext3, ext4).
In the Redhat7 series, we still recommend an excellent xfs file system, which has surpassed the ext file system in terms of performance. The XFS file system is a file system developed by Silicon Graphics Inc (SGI) for IRIX (a Unix operating system) and later ported to the Linux operating system. XFS is an advanced journaling file system that has the advantage of being extremely scalable and also extremely robust.
There is also a btrfs (B-tree file system usually read as Buffer FS, Better FS, B-tree FS) file system which is also excellent and comes with Redhat7 installation.
btrfs has many features. For example: write snapshot, snapshot of snapshot, built-in RAID (commonly called disk array), subvolume (subvolume), the core concept is to design
fault tolerance, repair and easy management. The maximum capacity volume of btrfs is 16EB, and the maximum single file is 16EB.
Note: This article uses the simplified Chinese version of the installation selection language, so please don’t be surprised when you see Chinese characters displayed.

There is a picture at the beginning, and the article is all edited. Just a joke, just to make everyone laugh. The picture below has highlighted the core content of this article.

Recommendation: For testing, you can use a virtual machine with Linux (Redhat series or Ubuntu build environment) for testing.
1. Check the system partition situation
fdisk parameter description
Delete the existing hard disk partition, and you will be prompted to do so Which serial number was deleted.
Delete partition: d
Add new partition: n
View partition information: p
Save partition change information: w
Do not save and exit: q
Get help information :m
1. List the partition table
List the partition table from the options listed below It can be seen that the original disk /dev/sda: 21.5 GB was allocated during the initial installation of the Linux operating system. The other disk is the sdb disk I added for testing and demonstration.
fidsk -l
[root@cnwangk /]# fdisk -l
磁盘 /dev/sda:21.5 GB, 21474836480 字节,41943040 个扇区
Units = 扇区 of 1 * 512 = 512 bytes
扇区大小(逻辑/物理):512 字节 / 512 字节
I/O 大小(最小/最佳):512 字节 / 512 字节
磁盘标签类型:dos
磁盘标识符:0x0001805e
   设备 Boot      Start         End      Blocks   Id  System
/dev/sda1   *        2048      411647      204800   83  Linux
/dev/sda2          411648     4507647     2048000   83  Linux
/dev/sda3         4507648     8603647     2048000   82  Linux swap / Solaris
/dev/sda4         8603648    41943039    16669696    5  Extended
/dev/sda5         8605696    41943039    16668672   83  Linux
磁盘 /dev/sdb:10.7 GB, 10737418240 字节,20971520 个扇区
Units = 扇区 of 1 * 512 = 512 bytes
扇区大小(逻辑/物理):512 字节 / 512 字节
I/O 大小(最小/最佳):512 字节 / 512 字节
磁盘标签类型:dos
磁盘标识符:0x95df3b22
   设备 Boot      Start         End      Blocks   Id  System
/dev/sdb2        10485760    20971519     5242880   83  Linux
Directly enter the fdisk command, the Chinese version will prompt help information and usage methods
fdisk [选项] <磁盘>    更改分区表
#例如新增的磁盘sdb
fdisk /dev/sdb
fdisk [选项] -l <磁盘> 列出分区表
fdisk -s <分区>        给出分区大小(块数)
2. Create a linux file system
1. xfs file system
As shown below, I will create a new xfs file system, pointing to the newly added disk file path /dev/sdb . It is also the default recommended format for the Redhat7 series.
mkfs.xfs /dev/sdb
A brief explanation: The xfs file system provides the backup partition tool xfsdump for users to use. The advantage is that users can back up data on the xfs file system without resorting to third-party software. The backup process is as follows:
xfsdump /backup/dump_sdc1 /sdc1
2. btrfs file system
As shown below, I will create a new btrfs file system, pointing to The newly added disk file path /dev/sdb, the final demonstration below is also the configuration of the btrfs file system.
mkfs.btrfs /dev/sdb
3. ext file system
In Redhat6 and before, the ext file system was still used. Later, it was recommended to use the xfs file system in the 7 series.
mkfs.ext4 /dev/sdb
3. Create the path to be mounted
1. Create the mounted file data
Use the mkdir command to create a data directory for subsequent mounting of new disks.
mkdir /data
Check the created mount path data, which is empty initially
ls /data
2. Use disk
to write Enter a simple shell script as a demonstration
echo -e "echo "hello linux"\necho "create btrfs filesystem"" >> /data/data.sh
After writing the simple shell script, test, view and execute the script
#再次查看data盘下的文件
[root@cnwangk /]# ls /data/
data.sh
sh /data/data.sh
#运行脚本
[root@cnwangk /]# sh /data/data.sh
hello linux
create btrfs filesystem
From the above, we can see that a basic disk management will lead to The use of some basic commands, such as ls, mkdir, echo, etc. The audience for this article needs to know some basic Linux command knowledge. Of course, if you can read this article, it also shows that you still have some basics.
4. Use fdisk to partition /dev/sdb
1. Partition command fdisk
使用fdisk对新增的磁盘/dev/sdb进行分区,之前演示我已经使用主分区2,现在演示是逻辑扩展分区,使用参数e。
新增分区:n
新增主分区:p
扩展分区:e
注意:你可以自定义大小,也可以回车就是使用默认大小和扇区。
fdisk /dev/sdb
[root@cnwangk /]# fdisk /dev/sdb
欢迎使用 fdisk (util-linux 2.23.2)。
更改将停留在内存中,直到您决定将更改写入磁盘。
使用写入命令前请三思。
命令(输入 m 获取帮助):n #新增分区,p则为主分区,e则为扩展分区
Partition type:
   p   primary (1 primary, 0 extended, 3 free)
   e   extended
Select (default p): e
分区号 (1,3,4,默认 1):1
起始 扇区 (2048-20971519,默认为 2048):
将使用默认值 2048
Last 扇区, +扇区 or +size{K,M,G} (2048-10485759,默认为 10485759):
将使用默认值 10485759
分区 1 已设置为 Extended 类型,大小设为 5 GiB
命令(输入 m 获取帮助):p #此时用参数p查看未保存的分区信息
磁盘 /dev/sdb:10.7 GB, 10737418240 字节,20971520 个扇区
Units = 扇区 of 1 * 512 = 512 bytes
扇区大小(逻辑/物理):512 字节 / 512 字节
I/O 大小(最小/最佳):512 字节 / 512 字节
磁盘标签类型:dos
磁盘标识符:0x95df3b22
#查看到新增分区的设备信息
   设备 Boot      Start         End      Blocks   Id  System
/dev/sdb1            2048    10485759     5241856    5  Extended
/dev/sdb2        10485760    20971519     5242880   83  Linux
命令(输入 m 获取帮助):w #输入w参数进行保存,输入q进行不保存退出。
The partition table has been altered!
Calling ioctl() to re-read partition table.
WARNING: Re-reading the partition table failed with error 16: 设备或资源忙.
The kernel still uses the old table. The new table will be used at
the next reboot or after you run partprobe(8) or kpartx(8)
正在同步磁盘。五、建立btrfs文件系统
1、建立文件系统
新建btrfs文件系统,在确定进行分区之后执行此命令,最后进行挂载磁盘。
mkfs.btrfs /dev/sdb2
同样可以使用如下命令
mkfs -t btrfs /dev/sdb2
六、挂载文件系统
1、挂载命令mount
接着上面建立好btrfs文件系统,此时再挂载到新建的data目录下。虽然是挂载成功了,但只是临时生效,重启会掉盘挂载后硬盘。而且卷标还会显示成字母加数字的一串长字符串,类似这种s1k544y55fsa445dda44sd4545eff4字符串。究其原因,Linux还是以文件系统为核心的。没有目录这个概念,只是方便大家理解,都习惯这样称呼。
1.1、使用mount挂载,看到的是sdb2,是因为之前已经创建了一个分区sdb1。
mount /dev/sdb2 /data
1.2、使用umount卸载
umount /dev/sdb2 /data
2、写入fstab文件
2.1、永久生效需要写入/etc/fstab文件中,使用echo命令追加数据到fstab文件中。
#第一项参数/dev/sdb这里也可以写入UUID的信息
# 第一项参数 第二项参数  第三项参数第四项参数第五项参数
echo /dev/sdb1    /data     btrfs      defaults     0 0  >>  /etc/fstab
echo /dev/sdb2    /data     btrfs      defaults     0 0  >>  /etc/fstab
2.2、输入blkid命令查看卷标或者UUID
# blkid命令
[root@cnwangk /]# blkid
/dev/sda5: UUID="d4708f44-beed-4a9b-bb11-94706e6c0cf5" TYPE="xfs"
/dev/sda1: UUID="7d56f743-a42d-42e2-876e-d839cc583fa7" TYPE="xfs"
/dev/sda2: UUID="953b1070-a13a-4b67-ac63-cc376c1dee8d" TYPE="xfs"
/dev/sda3: UUID="b075b6d0-4d37-4f18-ae59-bf380862b440" TYPE="swap"
/dev/sdb2: UUID="294c0c25-04be-4791-ab06-520c4283cb58" UUID_SUB="a8b7194a-a694-4a8a-bee1-0ab49821e6bb" TYPE="btrfs"
2.3、当然,你可以使用btrfs自带的命令查看磁盘文件的uuid
[root@cnwangk /]# btrfs filesystem show
Label: none  uuid: 294c0c25-04be-4791-ab06-520c4283cb58
        Total devices 1 FS bytes used 192.00KiB
devid 1 size 5.00GiB used 536.00MiB path /dev/sdb2七、永久写入配置文件
1、配置文件fstab展示
注意:解决重启掉盘的问题。强调一点,一旦写入配置文件的参数出现错误异常,大概率导致服务器无法启动,所以修改时需谨慎操作。最好先做备份,再进行操作。
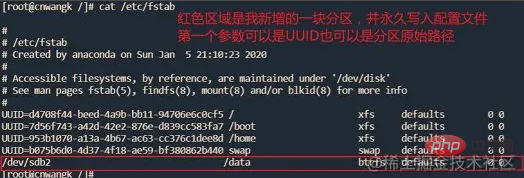
如下我的/ect/fstab配置文件内容,可以看到/dev/sdb2是我测试新增的一块盘进行分区后的配置,使用文件系统格式为btrfs。
# /etc/fstab
# Created by anaconda on Sun Jan  5 21:10:23 2020
#
# Accessible filesystems, by reference, are maintained under '/dev/disk'
# See man pages fstab(5), findfs(8), mount(8) and/or blkid(8) for more info
#
UUID=d4708f44-beed-4a9b-bb11-94706e6c0cf5 /                       xfs     defaults        0 0
UUID=7d56f743-a42d-42e2-876e-d839cc583fa7 /boot                   xfs     defaults        0 0
UUID=953b1070-a13a-4b67-ac63-cc376c1dee8d /home                   xfs     defaults        0 0
UUID=b075b6d0-4d37-4f18-ae59-bf380862b440 swap                    swap    defaults        0 0
/dev/sdb2                                /data                    btrfs   defaults        0 0
2、部分参数详解
写入卷标信息到/etc/fstab文件(Redhat7系列默认推荐格式为xfs,从我文中给出的展示就可看出)
第一项参数:/dev/sdb1(原始磁盘分区路径)
第二项参数:/data(新建的挂载磁盘文件路径,Linux核心是一个文件系统,所以说是文件路径)
第三项参数:btrfs(挂载磁盘文件系统格式)
第四项参数:defaults
第五项参数:0 0
#第一项参数/dev/sdb这里也可以写入UUID的信息
# 第一项参数 第二项参数 第三项参数 第四项参数 第五项参数
echo /dev/sdb1 /data btrfs defaults 0 0 >> /etc/fstab
3、修改配置文件
可以直接编辑文件新增磁盘挂载信息:vim /etc/fstab
写入到/etc/fstab配置文件,文件系统推荐xfs或者btrfs,具体视实际情况而定:
/dev/sdb2    /data     ext4    defaults    0 0
/dev/sdb2    /data     xfs     defaults    0 0
/dev/sdb2    /data     btrfs   defaults    0 0
重启生效:reboot 或者 shutdown -r now
验证挂载是否成功,此时重启系统后可以看到我的新挂载的磁盘/dev/sdb2已经生效了并写入了fstab配置文件。
df -h
[root@cnwangk /]# df -h
文件系统        容量  已用  可用 已用% 挂载点
devtmpfs        907M     0  907M    0% /dev
tmpfs           917M     0  917M    0% /dev/shm
tmpfs           917M  9.3M  908M    2% /run
tmpfs           917M     0  917M    0% /sys/fs/cgroup
/dev/sda5        16G  7.1G  8.9G   45% /
/dev/sdb2       5.0G   17M  4.5G    1% /data
/dev/sda2       2.0G   34M  2.0G    2% /home
/dev/sda1       197M  154M   43M   79% /boot
tmpfs           184M     0  184M    0% /run/user/0
八、磁盘管理
其实,上面对硬盘进行分区已经使用到了磁盘管理命令格式化分区mkfs、分区fdisk,属于基本的磁盘管理。还有最常用的df,用来查看磁盘空间占用情况;mount与umount命令进行挂载与卸载磁盘。主要想引出的是如下的第三方ssm管理工具。
看到这个ssm不要与Javaweb中的框架组合ssm(Spring Springmvc Mybatis)混淆了。
1、ssm管理工具
ssm(System Storage Manager)管理逻辑卷。默认没有安装,需要手动安装,下载rpm包或者直接yum源在线安装都行:
#提供yum在线安装方式
yum -y install system-storage-manager.noarch
安装完后,如下使用ssm命令即可展示效果:
[root@cnwangk /]# ssm list
-----------------------------------------------------------------
Device        Free       Used      Total  Pool        Mount point
-----------------------------------------------------------------
/dev/fd0                         4.00 KB
/dev/sda                        20.00 GB
/dev/sda1                      200.00 MB              /boot
/dev/sda2                        1.95 GB              /home
/dev/sda3                        1.95 GB              SWAP
/dev/sda4                        1.00 KB
/dev/sda5                       15.90 GB              /
/dev/sdb                        10.00 GB
/dev/sdb1                        1.00 MB
/dev/sdb2  4.48 GB  536.00 MB    5.00 GB  btrfs_sdb2
-----------------------------------------------------------------
-----------------------------------------------------
Pool        Type   Devices     Free     Used    Total
-----------------------------------------------------
btrfs_sdb2  btrfs  1        5.00 GB  5.00 GB  5.00 GB
-----------------------------------------------------
-----------------------------------------------------------------------------------
Volume      Pool        Volume size  FS       FS size      Free  Type   Mount point
-----------------------------------------------------------------------------------
btrfs_sdb2  btrfs_sdb2      5.00 GB  btrfs    5.00 GB   5.00 GB  btrfs  /data
/dev/sda1                 200.00 MB  xfs    196.66 MB  42.79 MB         /boot
/dev/sda2                   1.95 GB  xfs      1.94 GB   1.91 GB         /home
/dev/sda5                  15.90 GB  xfs     15.89 GB   8.87 GB         /
-----------------------------------------------------------------------------------
2、linux自带的磁盘命令
比如,查看磁盘空间状态,加上参数-h以(K、M、G)形式显示。虽然df可以以多种形式展示,但个人工作中最常用的,还是加上-h参数使用的最为频繁。下面以加上参数-h为例子进行展示:
df -h
[root@cnwangk /]# df -h
文件系统        容量  已用  可用 已用% 挂载点
devtmpfs        907M     0  907M    0% /dev
tmpfs           917M     0  917M    0% /dev/shm
tmpfs           917M  9.3M  908M    2% /run
tmpfs           917M     0  917M    0% /sys/fs/cgroup
/dev/sda5        16G  7.1G  8.9G   45% /
/dev/sdb2       5.0G   17M  4.5G    1% /data
/dev/sda2       2.0G   34M  2.0G    2% /home
/dev/sda1       197M  154M   43M   79% /boot
tmpfs           184M     0  184M    0% /run/user/0
在df命令后加上-a参数,显示所有文件系统磁盘使用情况,这里就不贴输出的内容了,显示内容太长了。
df -ah
The above is all the content of this article, I hope it will be helpful to your work. If you feel the writing is good, take out your one-click triple combo. If you feel that the summary is not in place, I hope you can leave your valuable comments and I will make adjustments and optimizations in the article.
It is not easy to be original. Please indicate the source when reprinting and respect the originality. This article will be uploaded to gitee or github and VX public platform from time to time.
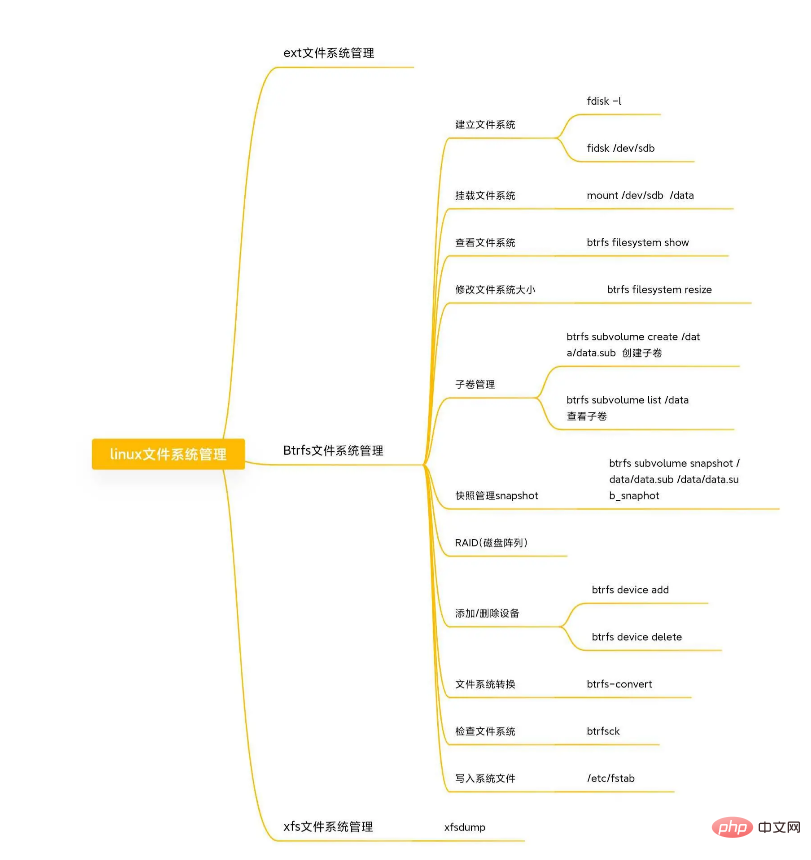
Finally, I give you a mind map, just take a look at it and get an impression!

Related recommendations: "Linux Video Tutorial"
The above is the detailed content of Take you through disk management and mounting hard drives under Linux. For more information, please follow other related articles on the PHP Chinese website!

Hot AI Tools

Undresser.AI Undress
AI-powered app for creating realistic nude photos

AI Clothes Remover
Online AI tool for removing clothes from photos.

Undress AI Tool
Undress images for free

Clothoff.io
AI clothes remover

Video Face Swap
Swap faces in any video effortlessly with our completely free AI face swap tool!

Hot Article

Hot Tools

Notepad++7.3.1
Easy-to-use and free code editor

SublimeText3 Chinese version
Chinese version, very easy to use

Zend Studio 13.0.1
Powerful PHP integrated development environment

Dreamweaver CS6
Visual web development tools

SublimeText3 Mac version
God-level code editing software (SublimeText3)

Hot Topics
 1387
1387
 52
52
 How to use docker desktop
Apr 15, 2025 am 11:45 AM
How to use Docker Desktop? Docker Desktop is a tool for running Docker containers on local machines. The steps to use include: 1. Install Docker Desktop; 2. Start Docker Desktop; 3. Create Docker image (using Dockerfile); 4. Build Docker image (using docker build); 5. Run Docker container (using docker run).
 How to view the docker process
Apr 15, 2025 am 11:48 AM
Docker process viewing method: 1. Docker CLI command: docker ps; 2. Systemd CLI command: systemctl status docker; 3. Docker Compose CLI command: docker-compose ps; 4. Process Explorer (Windows); 5. /proc directory (Linux).
 What to do if the docker image fails
Apr 15, 2025 am 11:21 AM
Troubleshooting steps for failed Docker image build: Check Dockerfile syntax and dependency version. Check if the build context contains the required source code and dependencies. View the build log for error details. Use the --target option to build a hierarchical phase to identify failure points. Make sure to use the latest version of Docker engine. Build the image with --t [image-name]:debug mode to debug the problem. Check disk space and make sure it is sufficient. Disable SELinux to prevent interference with the build process. Ask community platforms for help, provide Dockerfiles and build log descriptions for more specific suggestions.
 What computer configuration is required for vscode
Apr 15, 2025 pm 09:48 PM
VS Code system requirements: Operating system: Windows 10 and above, macOS 10.12 and above, Linux distribution processor: minimum 1.6 GHz, recommended 2.0 GHz and above memory: minimum 512 MB, recommended 4 GB and above storage space: minimum 250 MB, recommended 1 GB and above other requirements: stable network connection, Xorg/Wayland (Linux)
 vscode cannot install extension
Apr 15, 2025 pm 07:18 PM
The reasons for the installation of VS Code extensions may be: network instability, insufficient permissions, system compatibility issues, VS Code version is too old, antivirus software or firewall interference. By checking network connections, permissions, log files, updating VS Code, disabling security software, and restarting VS Code or computers, you can gradually troubleshoot and resolve issues.
 Can vscode be used for mac
Apr 15, 2025 pm 07:36 PM
VS Code is available on Mac. It has powerful extensions, Git integration, terminal and debugger, and also offers a wealth of setup options. However, for particularly large projects or highly professional development, VS Code may have performance or functional limitations.
 What is vscode What is vscode for?
Apr 15, 2025 pm 06:45 PM
VS Code is the full name Visual Studio Code, which is a free and open source cross-platform code editor and development environment developed by Microsoft. It supports a wide range of programming languages and provides syntax highlighting, code automatic completion, code snippets and smart prompts to improve development efficiency. Through a rich extension ecosystem, users can add extensions to specific needs and languages, such as debuggers, code formatting tools, and Git integrations. VS Code also includes an intuitive debugger that helps quickly find and resolve bugs in your code.
 How to back up vscode settings and extensions
Apr 15, 2025 pm 05:18 PM
How to back up VS Code configurations and extensions? Manually backup the settings file: Copy the key JSON files (settings.json, keybindings.json, extensions.json) to a safe location. Take advantage of VS Code synchronization: enable synchronization with your GitHub account to automatically back up all relevant settings and extensions. Use third-party tools: Back up configurations with reliable tools and provide richer features such as version control and incremental backups.


