How to select all in javascript
Javascript method to implement all-select: 1. Create a form through HTML and CSS; 2. Use DOM methods to obtain the "input" elements for all-select and single-select respectively; 3. Set a variable isAllChecked; 4. Assign the value of isAllChecked to the Select All button.

The operating environment of this article: Windows 7 system, javascript version 1.8.5, Dell G3 computer.
javascript How to select all?
Use JS to implement full selection and inverse selection in the form
This is also an exercise, which is to select all in the general e-commerce shopping cart, and add an inverse selection. (It seems that there are not many shopping carts with the inverse selection function, but Windows Explorer has the inverse selection function)

Let’s start with selecting all:
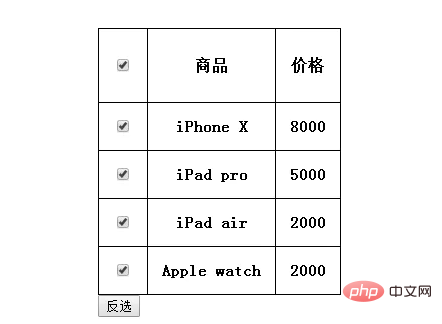
When all 4 rows of products are checked, "Select All" is automatically checked; when any product is not checked, "Select All" is automatically canceled.
When all 4 rows of products are not checked, check "Select All" to make all 4 rows of products checked;
When "Select All" is checked, uncheck "Select All" and all products will be unchecked.
After sorting out the requirements, we first use HTML and CSS to draw this form. The code is as follows:
<html>
<head>
    <meta charset="utf-8">
    <title>全选2</title>
    <style type="text/css">
        .wrap{
            margin-left: 500px;
            margin-top: 200px;
        }
        table{
            border-collapse:collapse;
        }

        th{
            border:1px solid black;
            height: 45px;
        }

        td{
            border:1px solid black;
            text-align: center;
            font-weight: bold;
        }
    </style>
</head>
<body>
    <div class="wrap">
        <table cellspacing="0" cellpadding="14">
            <thead>
                <tr>
                    <th>
                        <input type="checkbox" id="selectAll" onclick="funcAll()">
                    </th>
                    <th>商品</th>
                    <th>价格</th>
                </tr>
            </thead>
            <tbody id="j_tb">
                <tr>
                    <td>
                        <input type="checkbox" class="selectOne" onclick="funcOne()">
                    </td>
                    <td>iPhone X</td>
                    <td>8000</td>
                </tr>
                <tr>
                    <td>
                        <input type="checkbox" class="selectOne" onclick="funcOne()">
                    </td>
                    <td>iPad pro</td>
                    <td>5000</td>
                </tr>
                <tr>
                    <td>
                        <input type="checkbox" class="selectOne" onclick="funcOne()">
                    </td>
                    <td>iPad air</td>
                    <td>2000</td>
                </tr>
                <tr>
                    <td>
                        <input type="checkbox" class="selectOne" onclick="funcOne()">
                    </td>
                    <td>Apple watch</td>
                    <td>2000</td>
                </tr>

            </tbody>
        </table>
        <input type="button" id="backwardOption" value="反选" onclick="funcBackward()">
    </div>
</body>
</html>Here I have put the function of the mouse click event After naming it, call it "funcAll()" for all selection, "funcOne()" for single selection, and "funcBackward()" for reverse selection. The CSS part mainly adds borders to the form, and at the same time blends the borders at the junction, which is basically the simplest look.
Let’s talk about requirements 2 and 3 first. The logic is relatively simple:
Use the DOM method to obtain the "input" elements for full selection and single selection respectively. If there is only one for all selection, use it directly. Just getElementById() is enough (the id has been set in advance), and there are four radio selections. Use getElementByClassName() to get it (the class has been set in advance). Of course, what you get is an array.
Assign the obtained elements to variables, then use a for loop to traverse the array, and assign the checked attribute of the variable that selects all to the checked attribute of each single-selected variable.
At this point, 2 and 3 have been solved at the same time. The code is as follows:
function funcAll(){
            var selectAll = document.getElementById('selectAll');
            var selectOnes = document.getElementsByClassName('selectOne');
            for (var i = 0; i < selectOnes.length; i++) {                 //循环遍历,把全选框的值赋给每个单选框
                selectOnes[i].checked = selectAll.checked;
            }
}Next, let’s talk about item 1: “When all 4 rows of products are checked, “Select All” automatically is checked; when any product is not checked, "Select All" is automatically canceled."
Here, the status of "Select All" is similar to monitoring all other buttons. Once there is a change, it will be automatically changes. So this logic needs to be written into the mouse click event of the radio button of each row of products.
I set up a variable isAllChecked as a bridge. The initial state defines isAllChecked as true, and loops through each radio button. Once it is detected that a radio button is not checked, set isAllChecked to false. Break out of the loop and assign the value of isAllChecked to the Select All button.
In this way, as long as one radio button is not selected, all selections will be turned into an unselected state. , the code is as follows:
function funcOne(){
            var selectAll = document.getElementById('selectAll');            //函数作用域,所以得再定义一遍
            var selectOnes = document.getElementsByClassName('selectOne');
            var isAllChecked = true;                                        //定义一个变量作为桥梁来控制全选按钮
            for (var i = 0; i < selectOnes.length; i++) {
                if (selectOnes[i].checked === false) {
                    isAllChecked = false;
                    break;
                }
            }
            selectAll.checked = isAllChecked;
}Let’s talk about inverse selection
- Click the inverse selection button, and the status of all radio button buttons will be inverted: the selected ones become unselected, and the unselected ones Change the selection to
- and click Inverse Selection. The result will still make the selection consistent with the previous logic.
Item 1 is actually very easy to implement. When you click the invert button, cycle through the 4 radio buttons and invert the checked attribute corresponding to each element.
However, the select-all listener for all single items we implemented earlier is actually implemented in the click event of each radio button. That is to say, if we do not change the single item by clicking the radio button, The state of the selection button, Select All, is actually not monitored globally.
So, we can write the monitoring code into the reverse selection mouse click function. The final code is as follows:
            var selectAll = document.getElementById('selectAll');            //函数作用域,所以得再定义一遍
            var selectOnes = document.getElementsByClassName('selectOne');
            for (var i = 0; i < selectOnes.length; i++) {
                selectOnes[i].isAllChecked = !selectOnes[i].checked;
            }
            function funcOne(){};
            var isAllChecked = true;                                        //定义一个变量作为桥梁来控制全选按钮
            for (var i = 0; i < selectOnes.length; i++) {
                if (selectOnes[i].checked === false) {
                    isAllChecked = false;
                    break;
                }
            }
            selectAll.checked = isAllChecked;
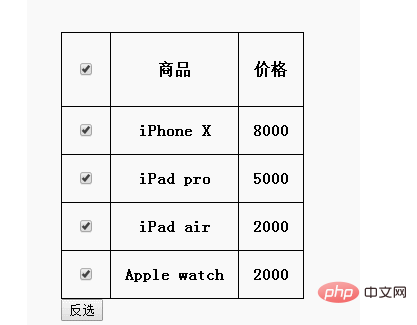
}The final effect is as follows:

Recommended study: "js Basic Tutorial"
The above is the detailed content of How to select all in javascript. For more information, please follow other related articles on the PHP Chinese website!

Hot AI Tools

Undresser.AI Undress
AI-powered app for creating realistic nude photos

AI Clothes Remover
Online AI tool for removing clothes from photos.

Undress AI Tool
Undress images for free

Clothoff.io
AI clothes remover

AI Hentai Generator
Generate AI Hentai for free.

Hot Article

Hot Tools

Notepad++7.3.1
Easy-to-use and free code editor

SublimeText3 Chinese version
Chinese version, very easy to use

Zend Studio 13.0.1
Powerful PHP integrated development environment

Dreamweaver CS6
Visual web development tools

SublimeText3 Mac version
God-level code editing software (SublimeText3)

Hot Topics
 1378
1378
 52
52
 How to implement an online speech recognition system using WebSocket and JavaScript
Dec 17, 2023 pm 02:54 PM
How to use WebSocket and JavaScript to implement an online speech recognition system Introduction: With the continuous development of technology, speech recognition technology has become an important part of the field of artificial intelligence. The online speech recognition system based on WebSocket and JavaScript has the characteristics of low latency, real-time and cross-platform, and has become a widely used solution. This article will introduce how to use WebSocket and JavaScript to implement an online speech recognition system.
 WebSocket and JavaScript: key technologies for implementing real-time monitoring systems
Dec 17, 2023 pm 05:30 PM
WebSocket and JavaScript: Key technologies for realizing real-time monitoring systems Introduction: With the rapid development of Internet technology, real-time monitoring systems have been widely used in various fields. One of the key technologies to achieve real-time monitoring is the combination of WebSocket and JavaScript. This article will introduce the application of WebSocket and JavaScript in real-time monitoring systems, give code examples, and explain their implementation principles in detail. 1. WebSocket technology
 How to use JavaScript and WebSocket to implement a real-time online ordering system
Dec 17, 2023 pm 12:09 PM
Introduction to how to use JavaScript and WebSocket to implement a real-time online ordering system: With the popularity of the Internet and the advancement of technology, more and more restaurants have begun to provide online ordering services. In order to implement a real-time online ordering system, we can use JavaScript and WebSocket technology. WebSocket is a full-duplex communication protocol based on the TCP protocol, which can realize real-time two-way communication between the client and the server. In the real-time online ordering system, when the user selects dishes and places an order
 How to implement an online reservation system using WebSocket and JavaScript
Dec 17, 2023 am 09:39 AM
How to use WebSocket and JavaScript to implement an online reservation system. In today's digital era, more and more businesses and services need to provide online reservation functions. It is crucial to implement an efficient and real-time online reservation system. This article will introduce how to use WebSocket and JavaScript to implement an online reservation system, and provide specific code examples. 1. What is WebSocket? WebSocket is a full-duplex method on a single TCP connection.
 JavaScript and WebSocket: Building an efficient real-time weather forecasting system
Dec 17, 2023 pm 05:13 PM
JavaScript and WebSocket: Building an efficient real-time weather forecast system Introduction: Today, the accuracy of weather forecasts is of great significance to daily life and decision-making. As technology develops, we can provide more accurate and reliable weather forecasts by obtaining weather data in real time. In this article, we will learn how to use JavaScript and WebSocket technology to build an efficient real-time weather forecast system. This article will demonstrate the implementation process through specific code examples. We
 How to use insertBefore in javascript
Nov 24, 2023 am 11:56 AM
Usage: In JavaScript, the insertBefore() method is used to insert a new node in the DOM tree. This method requires two parameters: the new node to be inserted and the reference node (that is, the node where the new node will be inserted).
 Simple JavaScript Tutorial: How to Get HTTP Status Code
Jan 05, 2024 pm 06:08 PM
JavaScript tutorial: How to get HTTP status code, specific code examples are required. Preface: In web development, data interaction with the server is often involved. When communicating with the server, we often need to obtain the returned HTTP status code to determine whether the operation is successful, and perform corresponding processing based on different status codes. This article will teach you how to use JavaScript to obtain HTTP status codes and provide some practical code examples. Using XMLHttpRequest
 How to get HTTP status code in JavaScript the easy way
Jan 05, 2024 pm 01:37 PM
Introduction to the method of obtaining HTTP status code in JavaScript: In front-end development, we often need to deal with the interaction with the back-end interface, and HTTP status code is a very important part of it. Understanding and obtaining HTTP status codes helps us better handle the data returned by the interface. This article will introduce how to use JavaScript to obtain HTTP status codes and provide specific code examples. 1. What is HTTP status code? HTTP status code means that when the browser initiates a request to the server, the service


