

Organize and share Git tool nanny-style tutorials

This article brings you a detailed tutorial on the git tool. Git is a multi-person collaborative version control management system. Git facilitates version management and mutual communication issues when multiple people collaborate to build projects. I hope everyone has to help.

1. Install Git
The installation link for Git is as follows:
https ://git-scm.com/
We just click download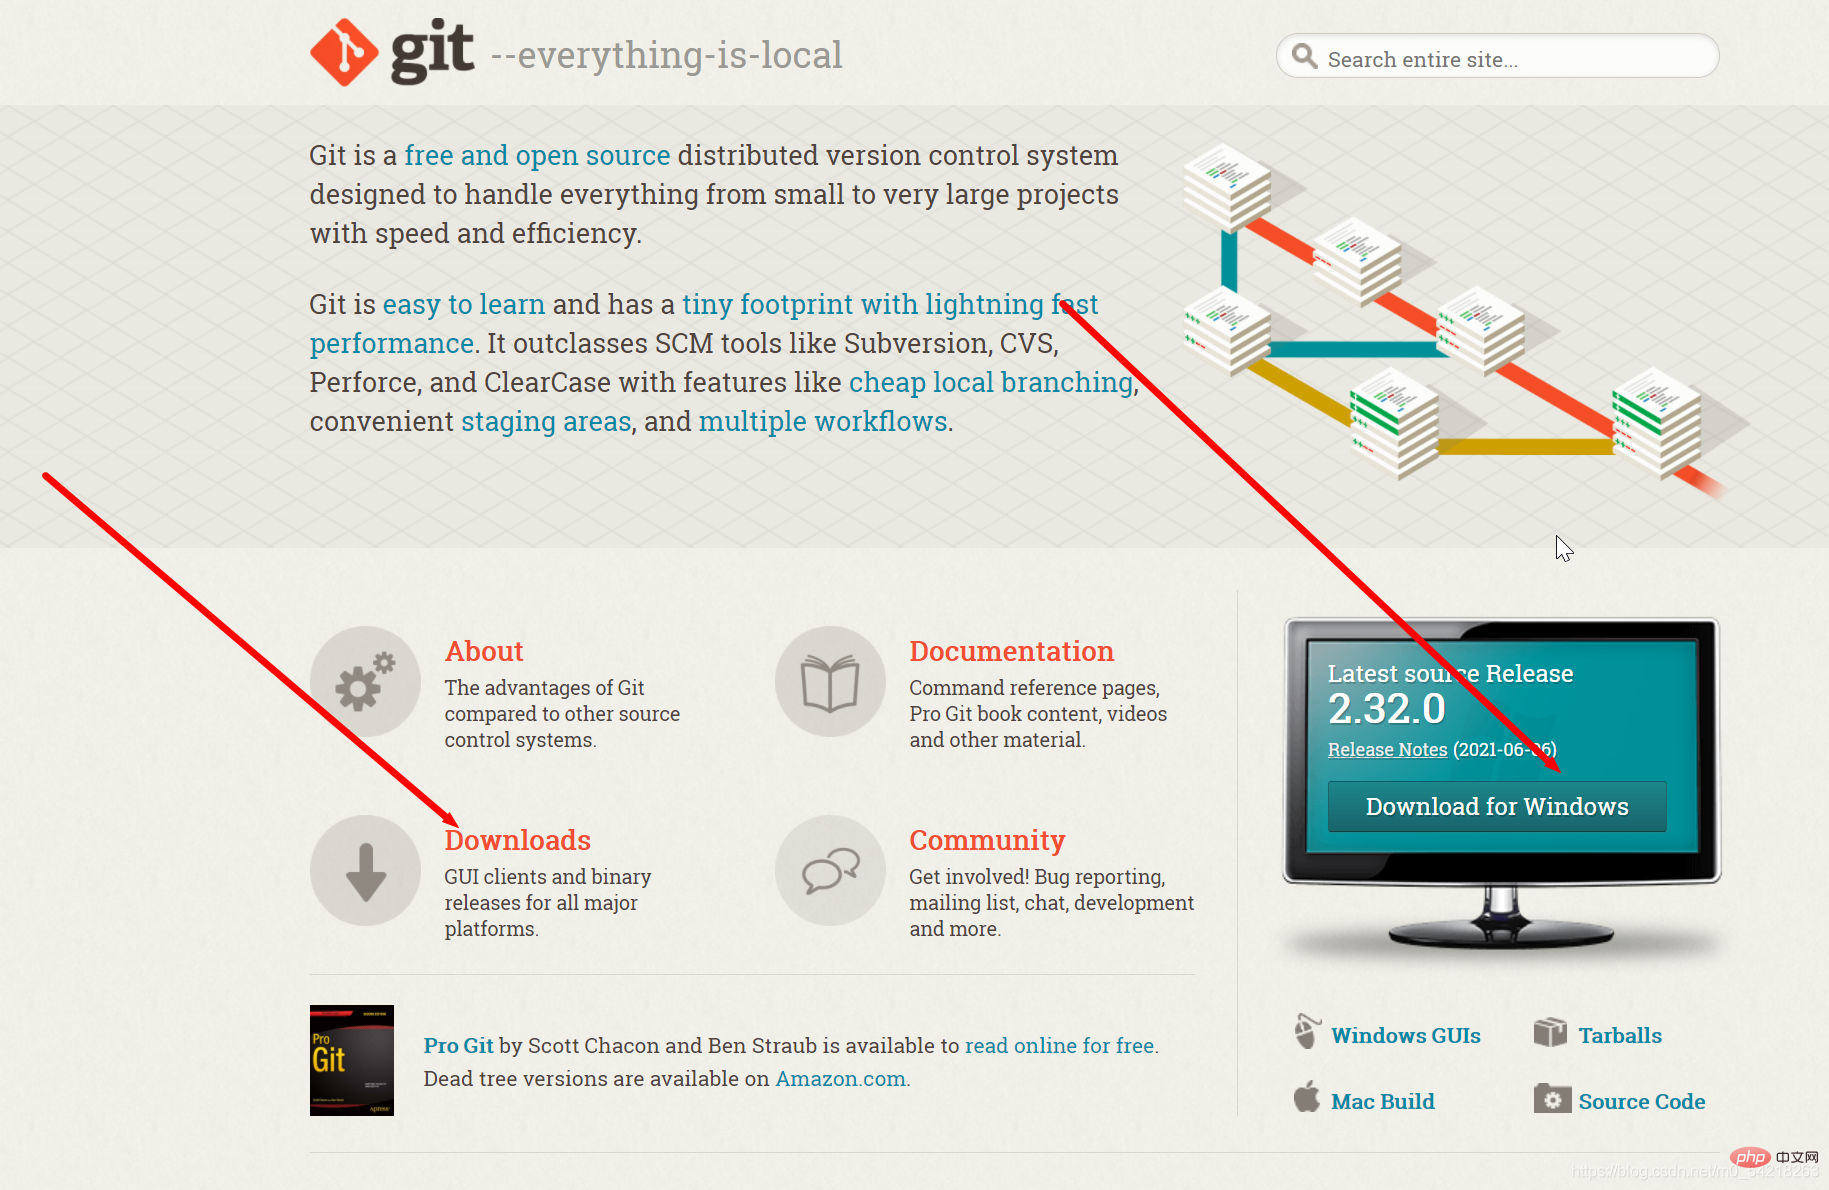
2. Introduction to Git
Git is a Version management system for multi-person collaboration.
Before we start using Git, we still need to first understand how Git works.
First of all, Git has a local warehouse and a remote warehouse
Local warehouse
There will be a local warehouse for each user to manage project files. There are three local warehouses. The three areas are: work area, temporary storage area, and history area
Work area
We write and modify code in the work area.
Temporary storage area
After we complete the task of the workspace, we need to move the contents of the workspace to the temporary storage area first. If we still want to continue working, we can move the contents of the temporary storage area to the temporary storage area. Files are transferred to the workspace.
Historical Area
The historical area stores versions. If our work is over, we need to transfer the files in the temporary storage area to the historical area and form a new version.
The overall process is:
Workspace=> Staging area=> History area
Remote warehouse
Remote The warehouse uploads our projects on the web page, and then the remote server will help us with storage and version control.
The remote warehouse we generally use is the remote warehouse provided by GitHub or Gitee.
In fact, in the end we uploaded the content of the historical area to the remote server, which is the remote warehouse.
For the above description, we can use the following picture to better understand
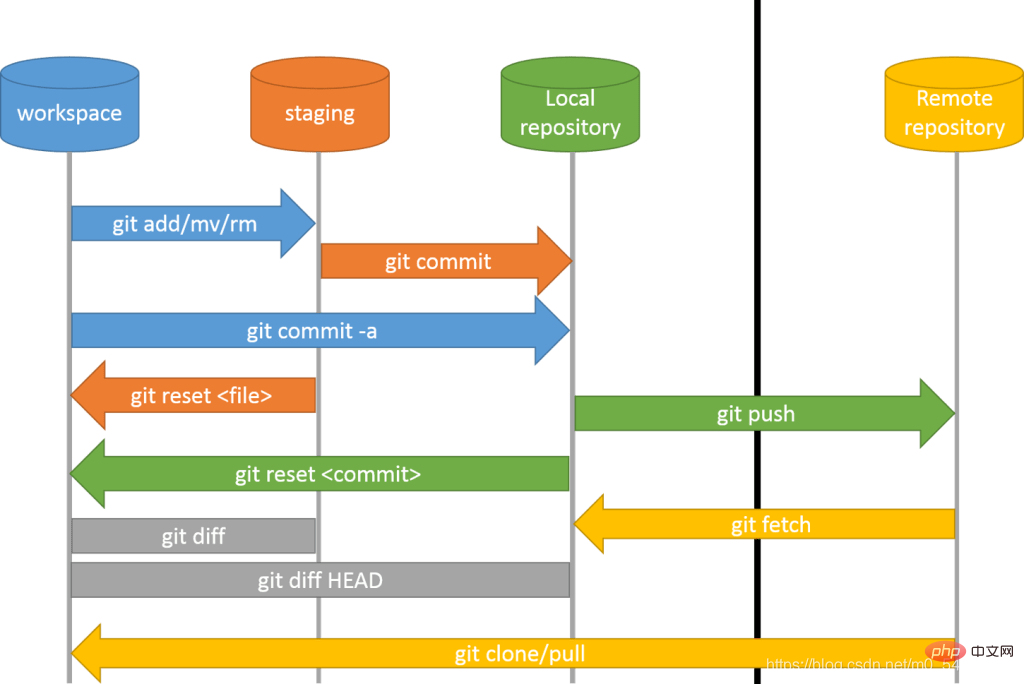
Of course, the above process is reversible:
For example:
We can update the version or return to a past version.
3. Create a local warehouse
1. Let’s create a new folder and name it demo
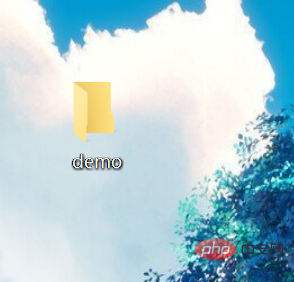
First we need a folder as a local warehouse. Then, we initialize the local warehouse.
Enter the demo folder, right-click and left-click git-bash here

Then the command line pops up 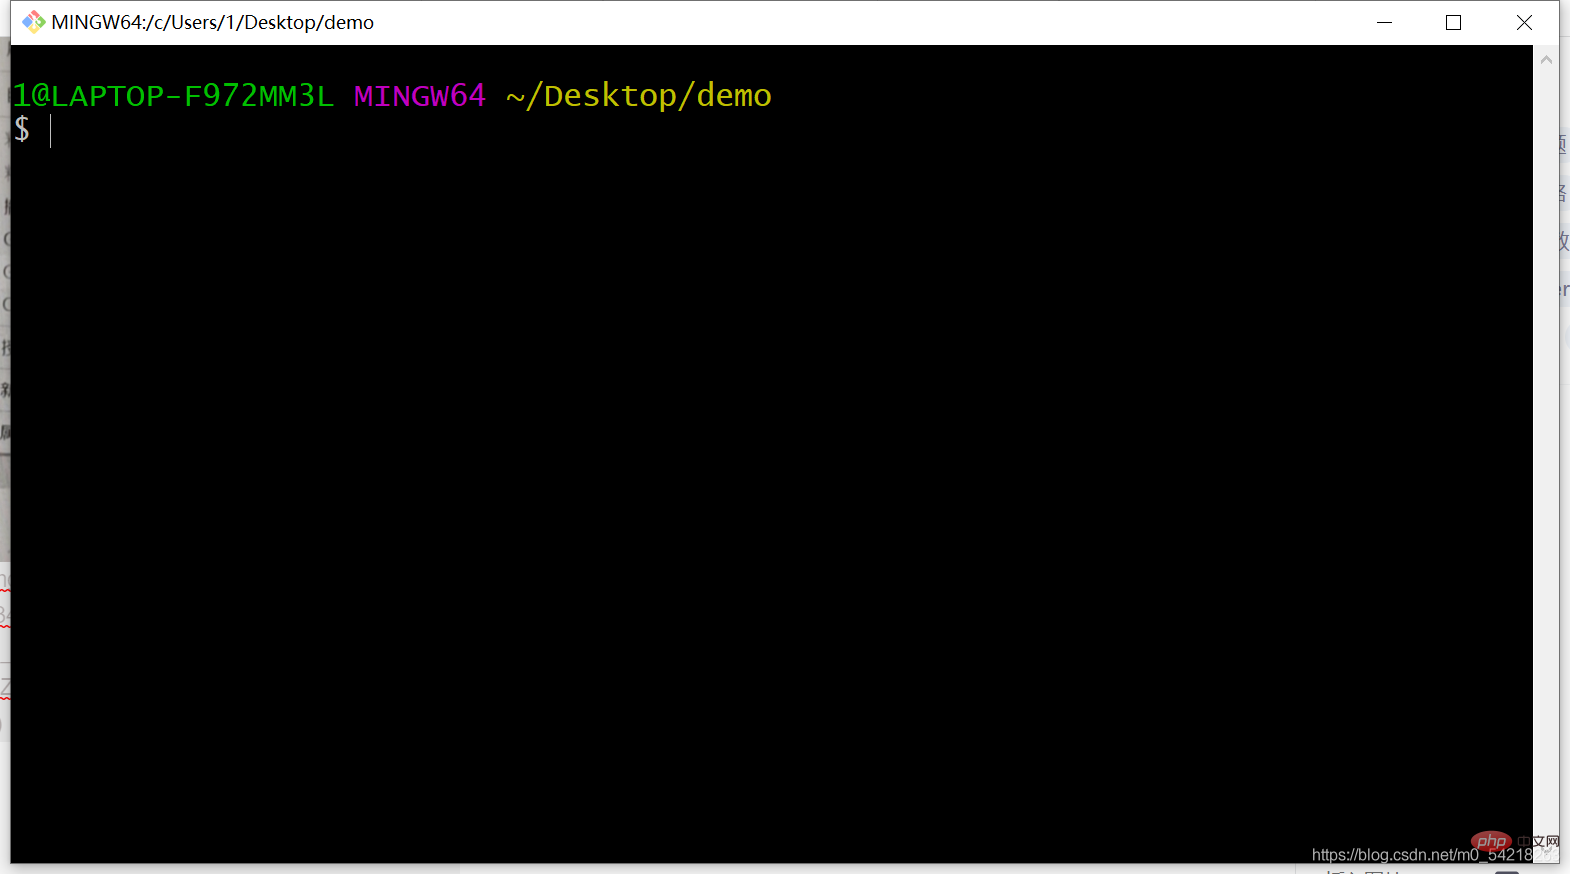
Then enter:
git init
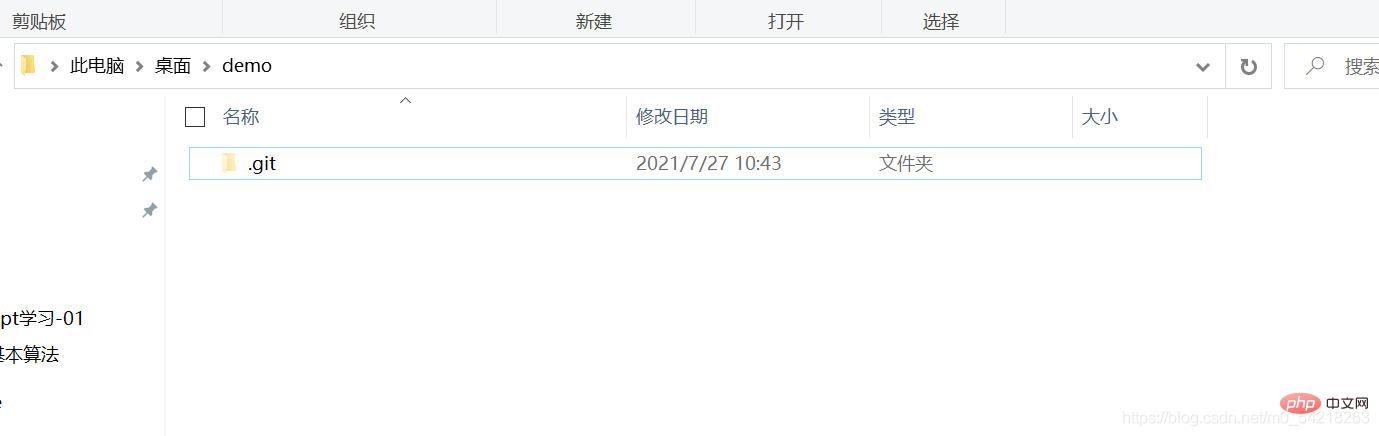
This will initialize a local warehouse: 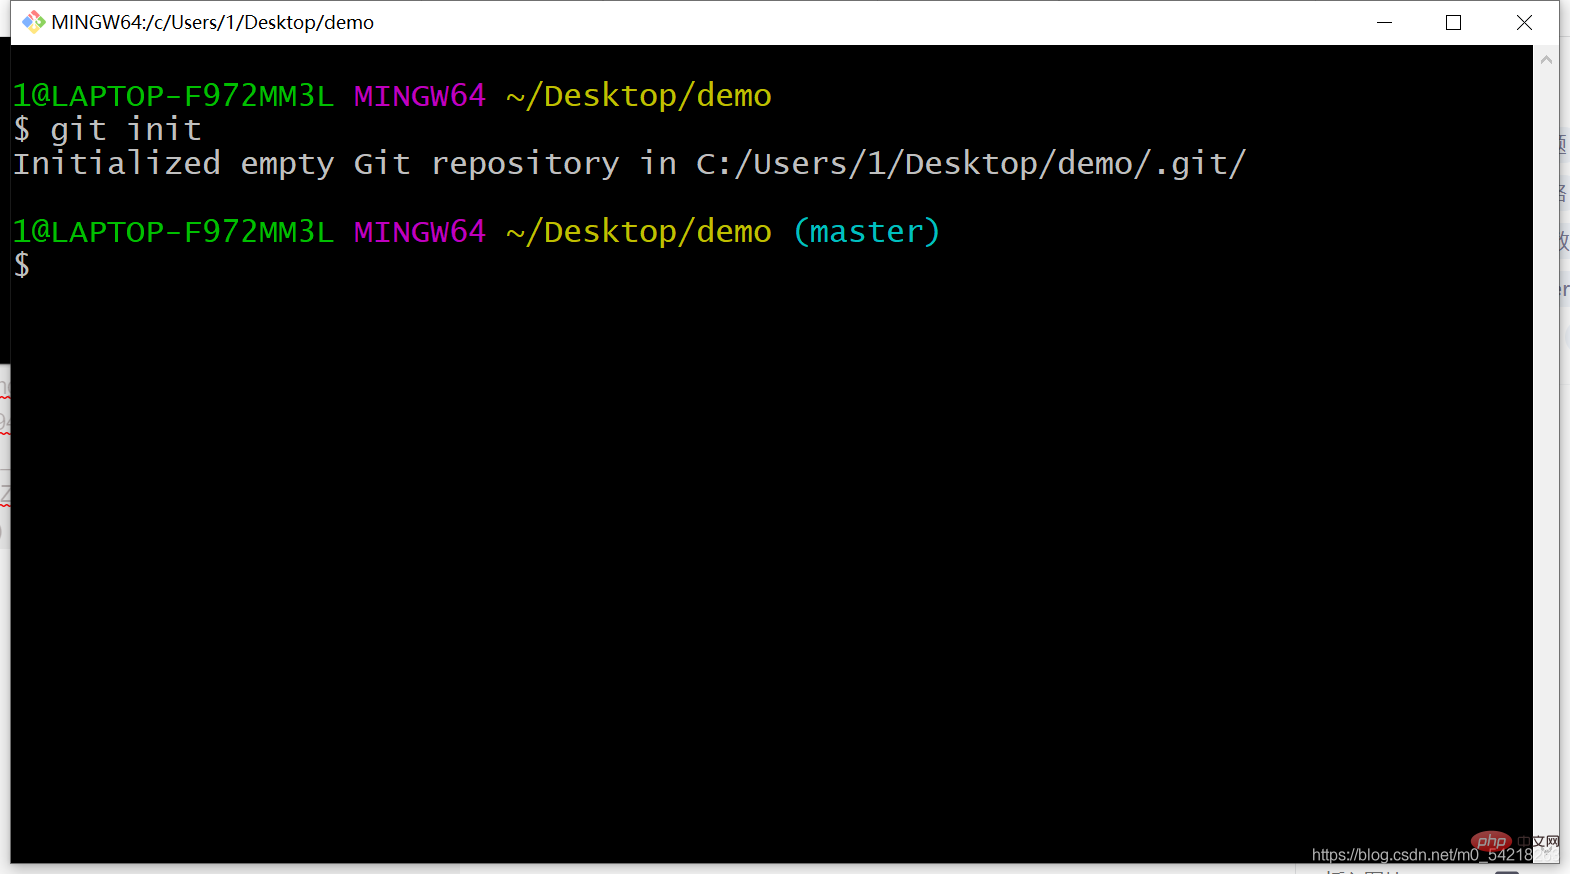
A hidden file will be generated here: .git
Note that this is a hidden file. You need to set the file viewing method to see this hidden file. I believe everyone knows how to view hidden files.
If you are not sure, check the link below:
https://jingyan.baidu.com/article/00a07f381c40ff82d028dcc0.html
Note that the local warehouse is completed Creation
2. Configuration of local warehouse
We have a local warehouse, so who does this local warehouse belong to?
This requires us to configure the user
Enter the codes respectively:
git config users.name "yu xuan"
and
git config users.email "1134111908@qq.com"
That is to say,
same household The name is: yu xuan
The user email is: 1134111908@qq.com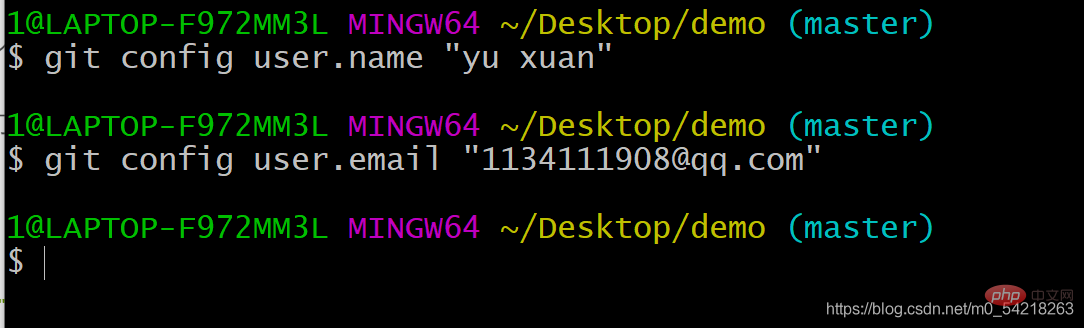
We can also view user information: 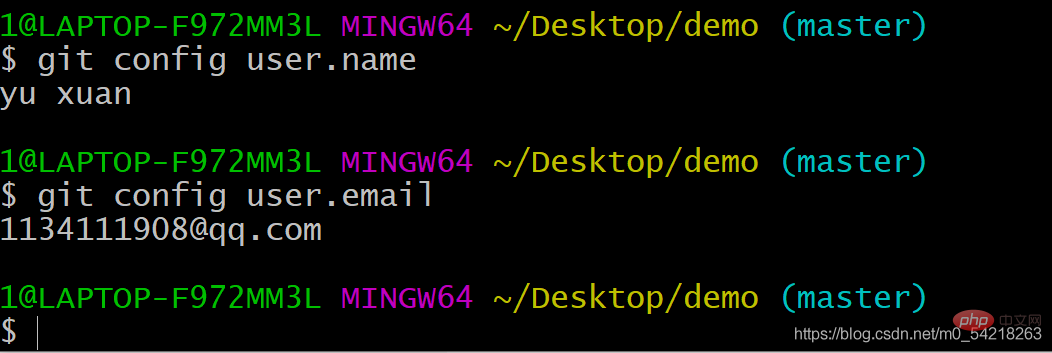
Note that each local warehouse will only There is one user. This is because this is your own local warehouse, so obviously there will only be one user here.
In this way, we have completed the user's configuration information.
3. Edit the file
Now, after completing the above steps, you can edit the file and start working. The file editing method here is based on the Linux system. method.
For example:
Create a file and edit: vi
etc.
If you are not familiar with it, you can refer to the Linux command link:
https:// www.linuxcool.com/
这里我们编辑一个简单的HTML吧,作为实例:
vi demo1.html

回车以后会进入:
按下 i 以后就可以进行编辑了:
nbsp;html>

                <meta>
                <title>
                        hello world                </title>
                <script>
                        window.onload = function()
                        {
                                let oBtn = document.getElementById("btn");
                                let oPra = document.getElementById("p0");
                                let number_0 = parseNumber(oPra.textContent);
                                oBtn.onclick = function()
                                {
                                        oPra.textContent = number_0 + 1;
                                        alert("finished!");
                                }
                        }
                </script>


                <button>click this button to plus 1</button>
                <p>0</p>
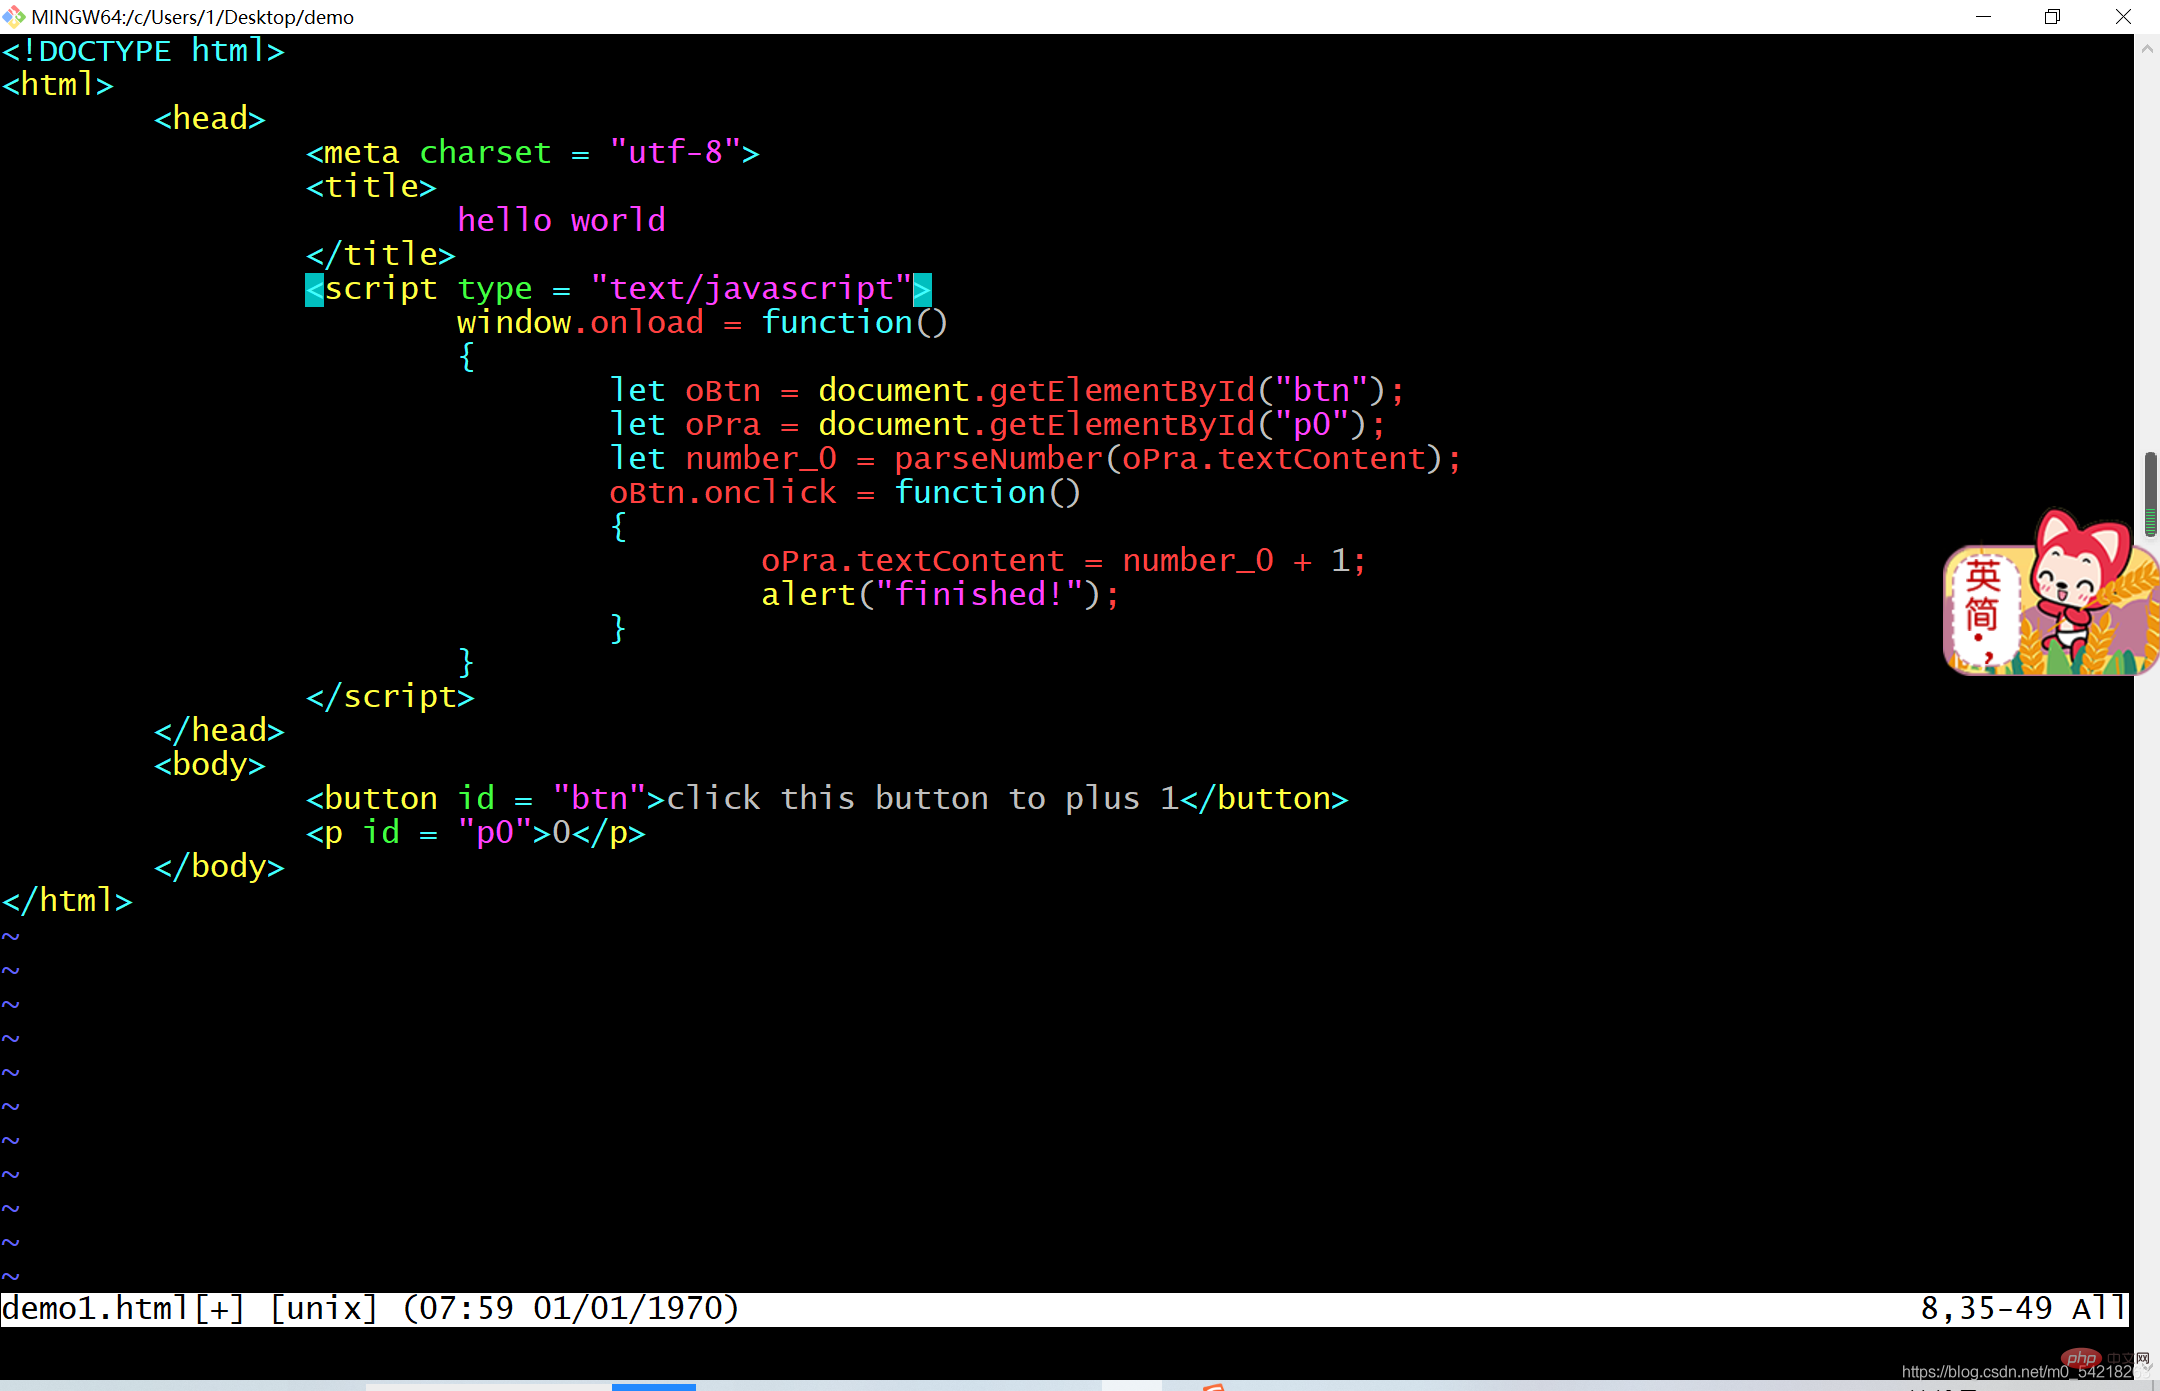
这样就写好了一个简单的HTML文件了
按下 Esc 退出编辑模式,然后输入:
:wq
回车,
进行保存并且退出文件
4、将文件转移到暂存区
如下代码可以查看 g i t 的状态:
git status

或者输入:
git status --short
这样就可以使得显示简介一些了啦。
这里是说刚才编辑的文件在工作区
要想转移到暂存区,需要输入如下代码:
加入一个文件:
git add demo1.html
或者:
加入所有文件
git add --all

这样,就将文件加入到了暂存区
我们在查看一下状态: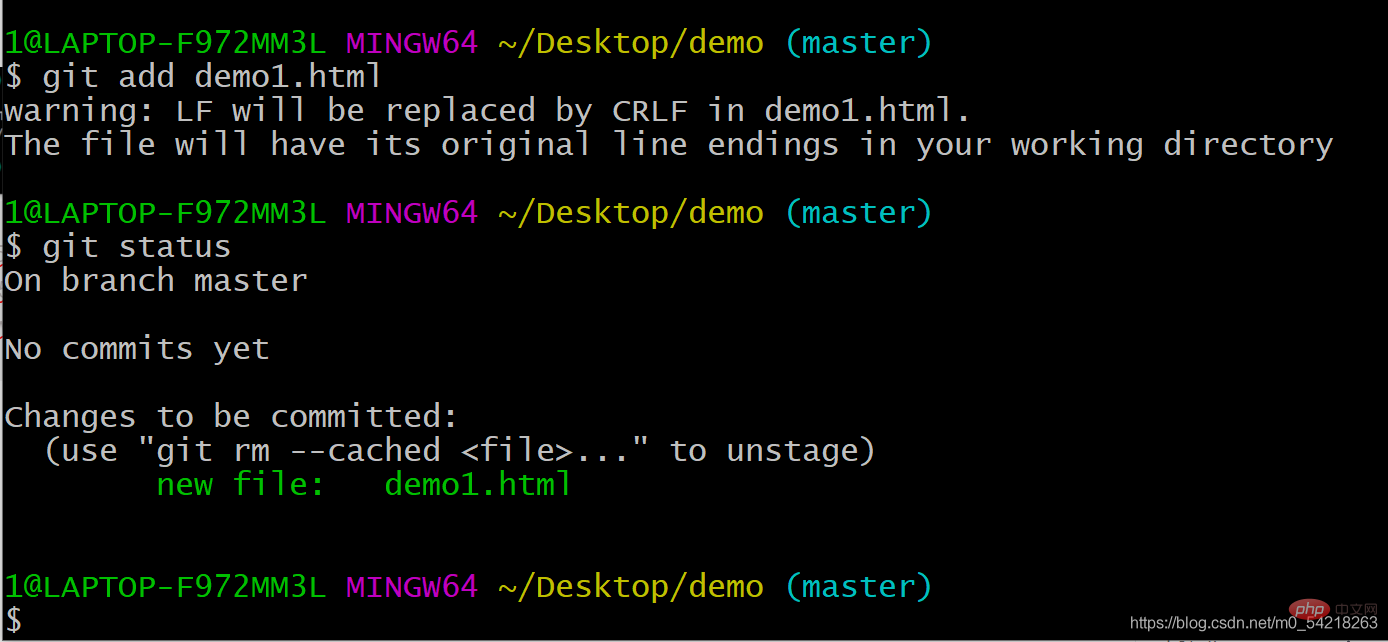
这是说明,文件已经加入到了暂存区,但是没有提交版本
以上是将文件从工作区移动到暂存区
下面将暂存区移动到工作区:
git reset demo1.html
输入:
git reset demo1.html
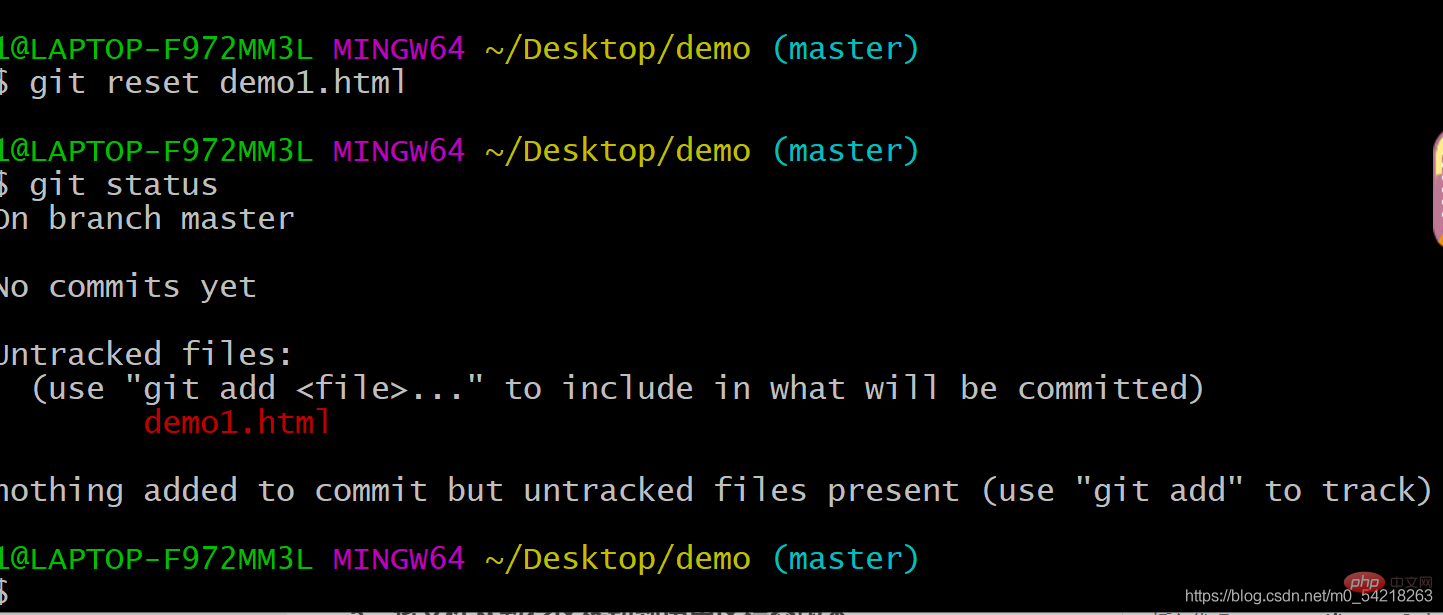
以上介绍完毕了工作区和暂存区的转换。
以上就是工作区,暂存区的处理
5、将文件从暂存区移动到历史区提交版本
下面介绍如何提交版本:
git commit -m git "the first commit"
“the first commit” 是一个提交版本的说明,这个可以自己编辑内容的,内容主要以方便阅读理解做了什么工作为主。
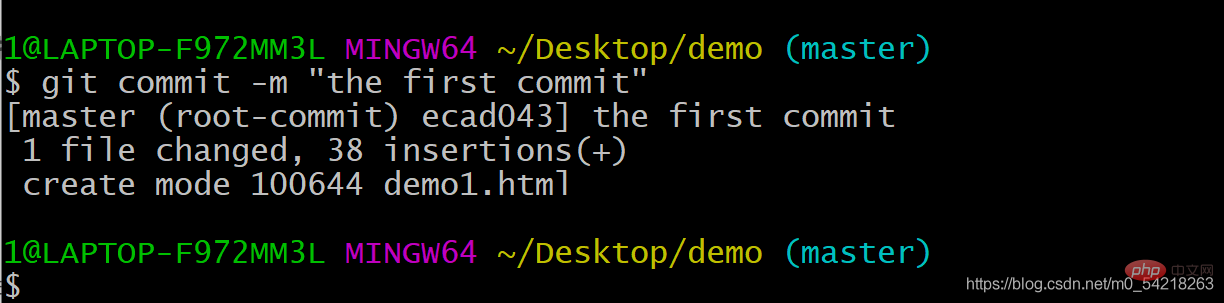
这样就完成了版本的创建和提交。
四、远程仓库
1、远程仓库介绍
我们使用的远程仓库有 GitHub 或者 Gitee。
在这里,我们使用 Gitee 进行介绍,如果是 GitHub 的话,其实都是类似的啦。
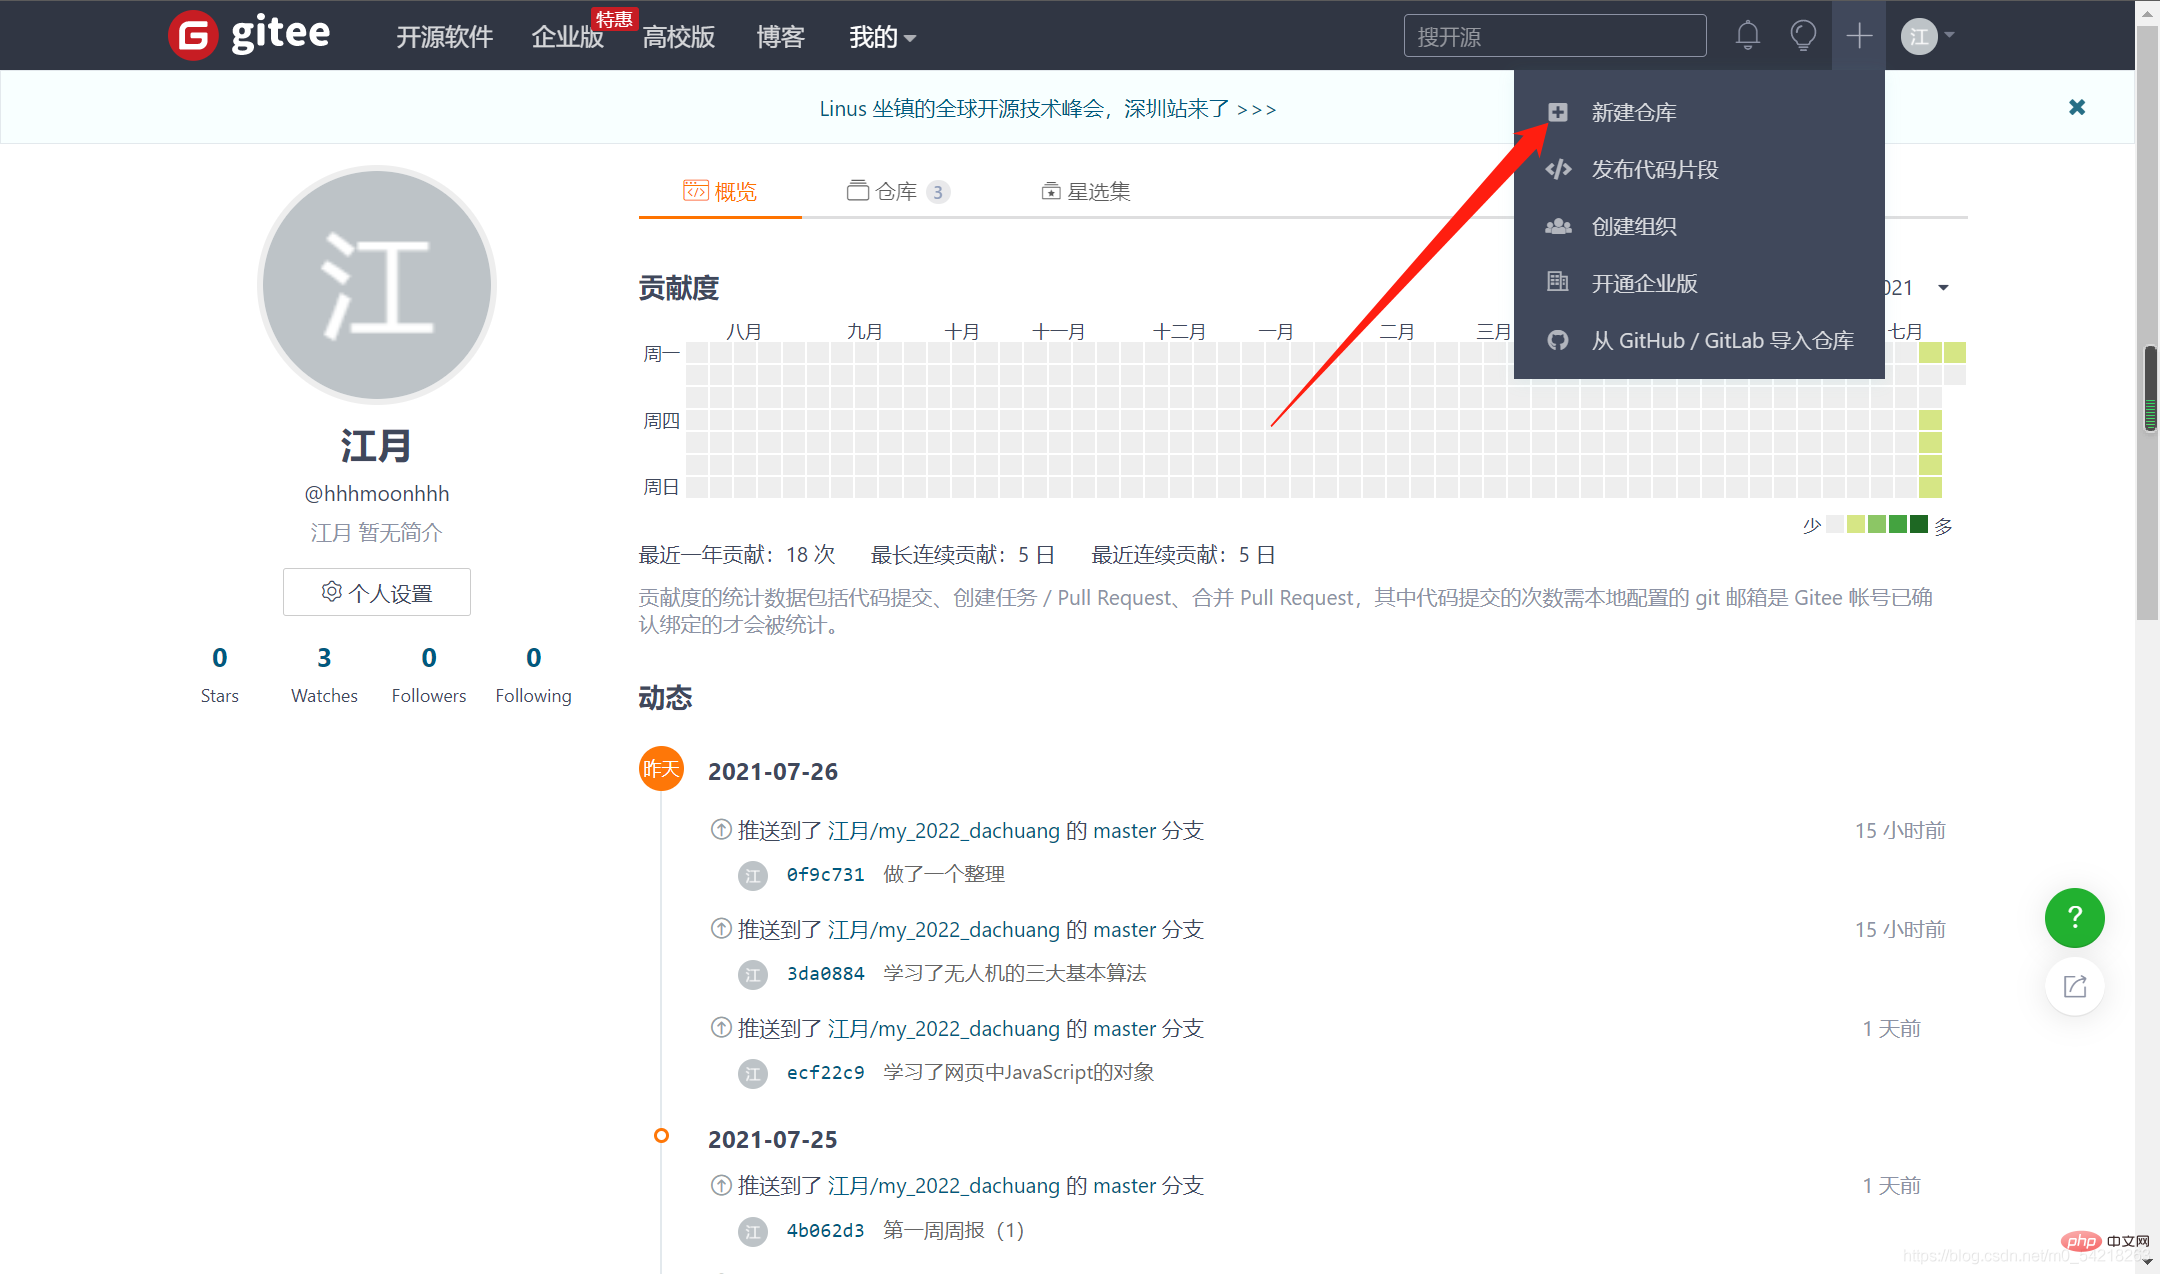
2、创建远程仓库
首先进入 Gitee 官网:
然后自己创建一个账户,创建账户就是注册一下就好了,这个很简单。
然后,创建自己的仓库:
(这里仓库基本是免费的,除非你是想使用最专业的,我们使用免费的就够用了)
1)点击创建仓库
2)仓库的配置
如下图所示,进行一些选择和说明即可: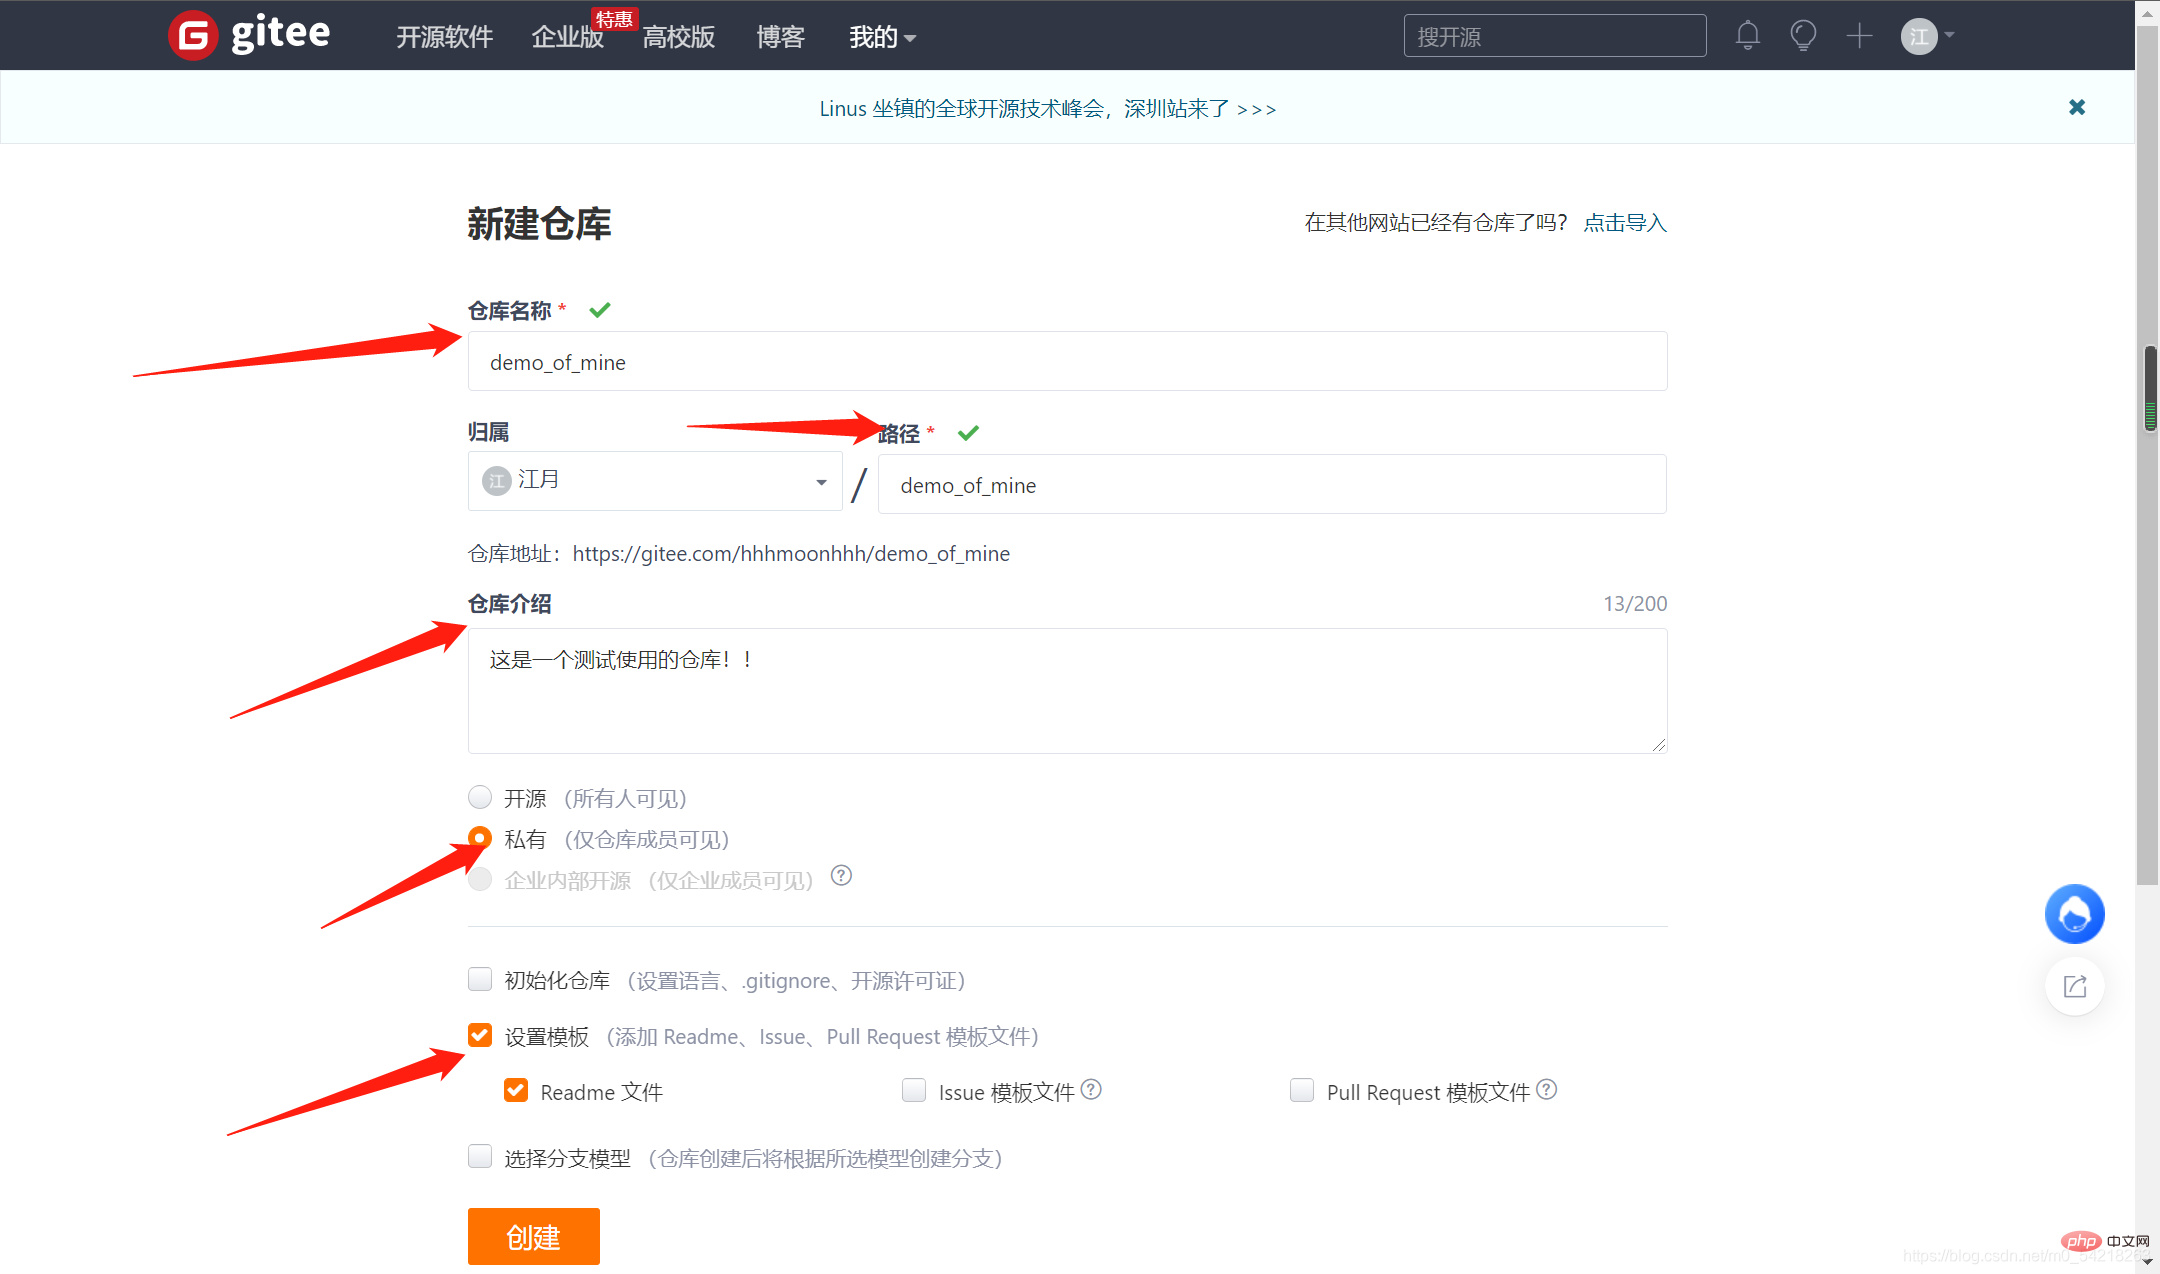
3)创建完成
点击创建即可: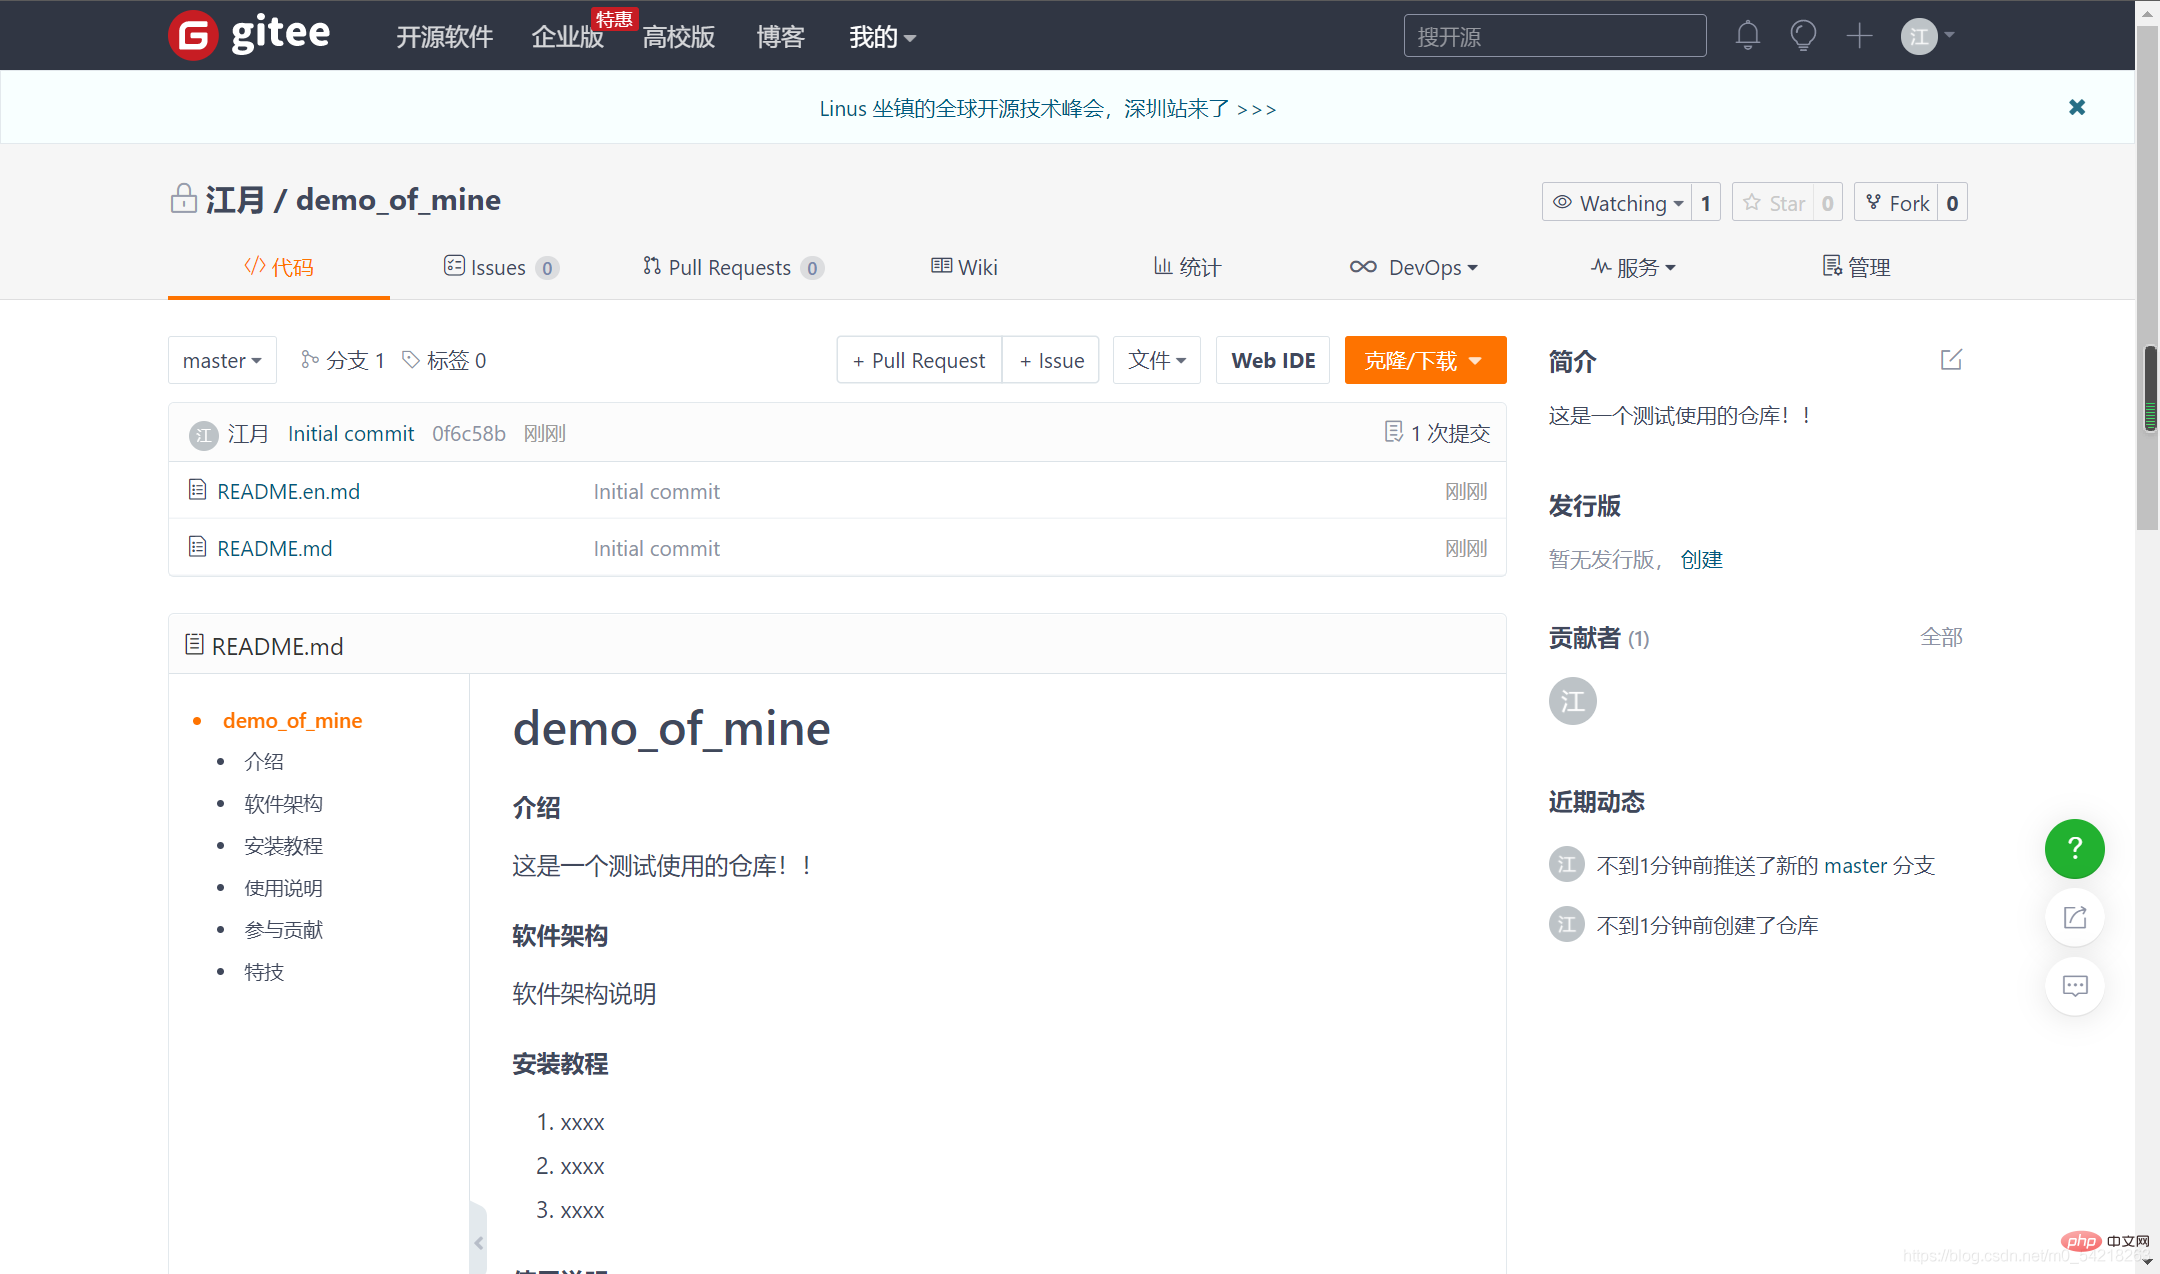
这个就是创建好的一个远程仓库
以上便是创建远程仓库的操作
3、为本地仓库添加远程仓库
现在本地仓库有了,远程仓库也有了,于是需要我们把它们联系起来:
git remote add origin https://gitee.com/hhhmoonhhh/demo_of_mine
git remote add origin
git remote add origin https://gitee.com/hhhmoonhhh/demo_of_mine

这里就是已经添加好了远程仓库,接下来就可以进行后续操作了啦。

4、拉取远程仓库的内容
下面,我们就需要首先拉取远程仓库的内容了:
git pull origin master
git pull origin master 命令输入以后,回车:
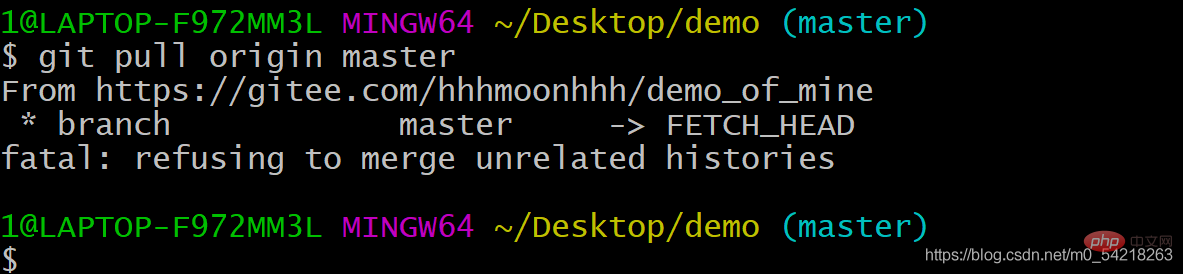
出错了,为什么呢?
fatal: refusing to merge unrelated histories
这是说你的本地仓库和远程仓库的版本问题不对应,为了解决这个问题,我们对命令进行一定的修改,加入一些参数:
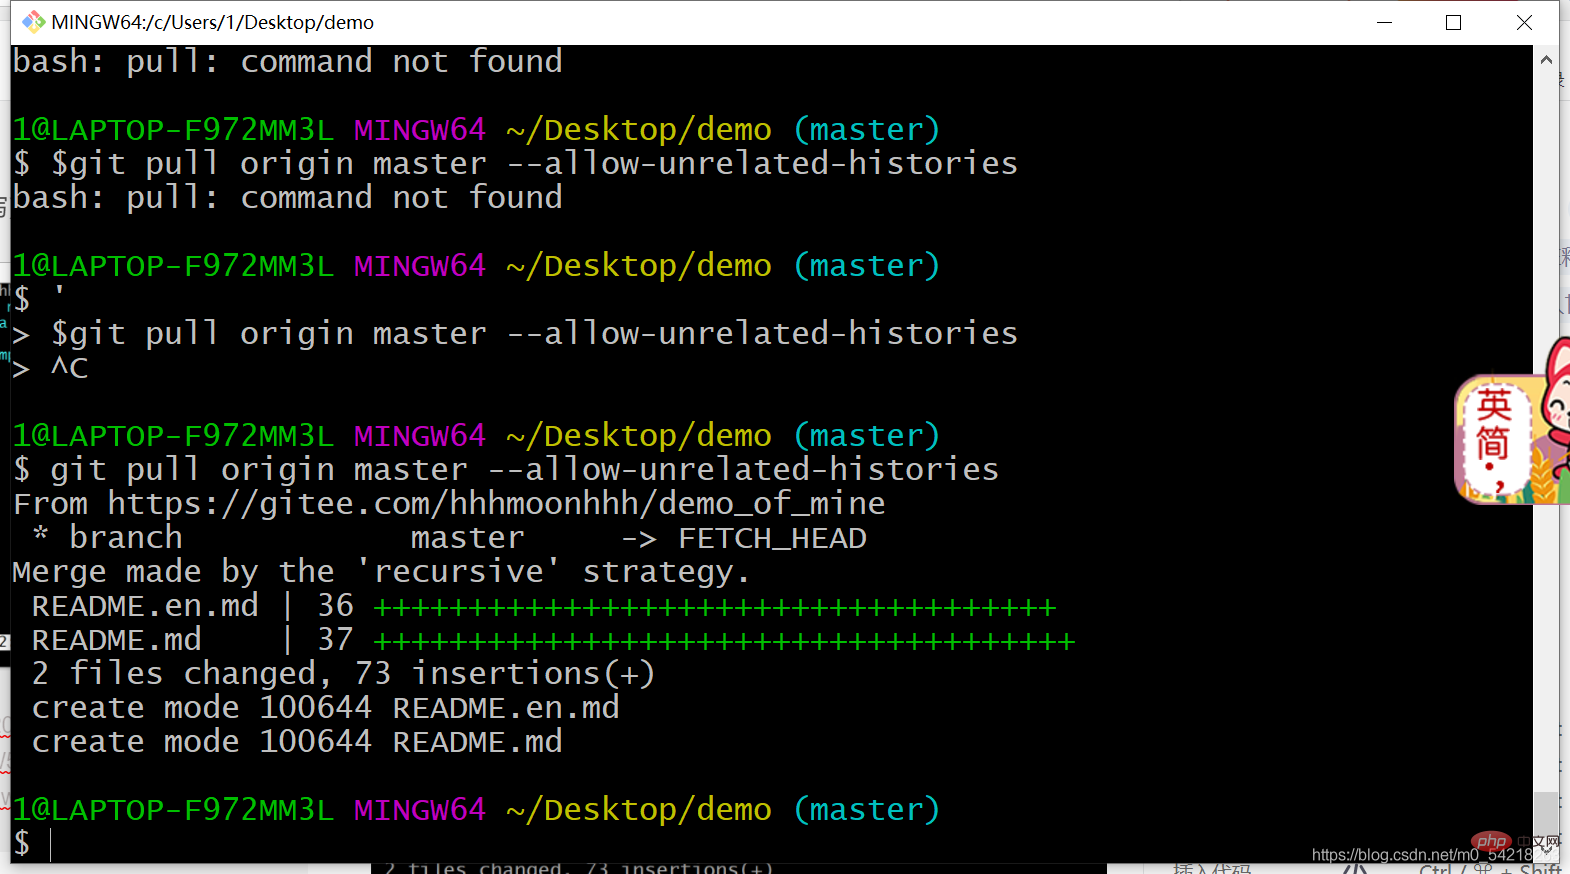
git pull origin master --allow-unrelated-histories
之后会让你对这次提交进行解释:
你输入解释(自己写的,根据自己的需求自己写):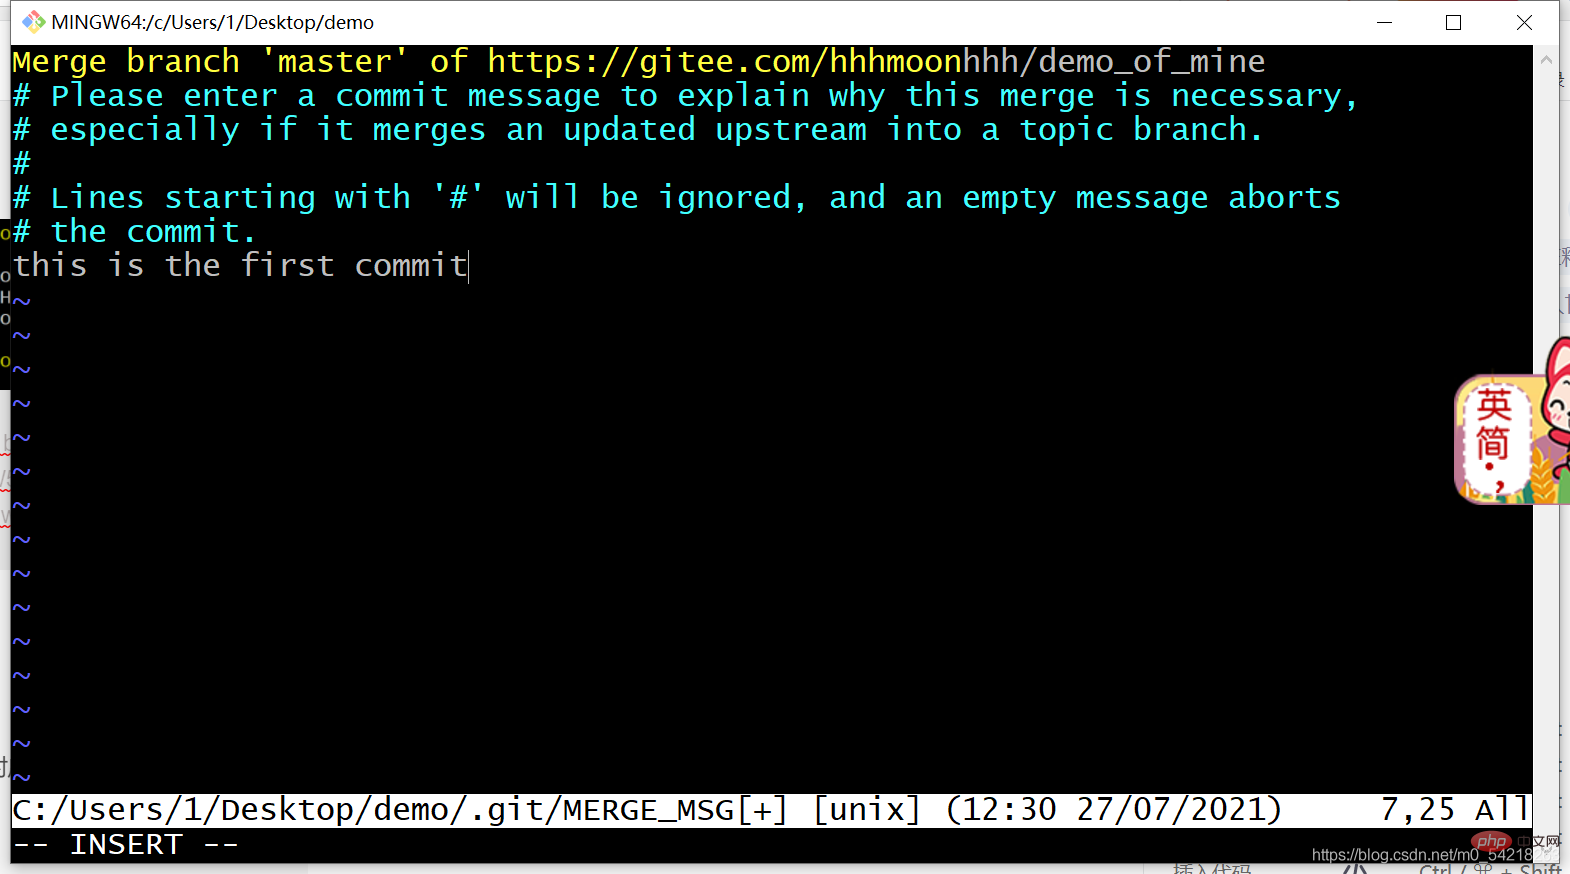
保存,及就完成了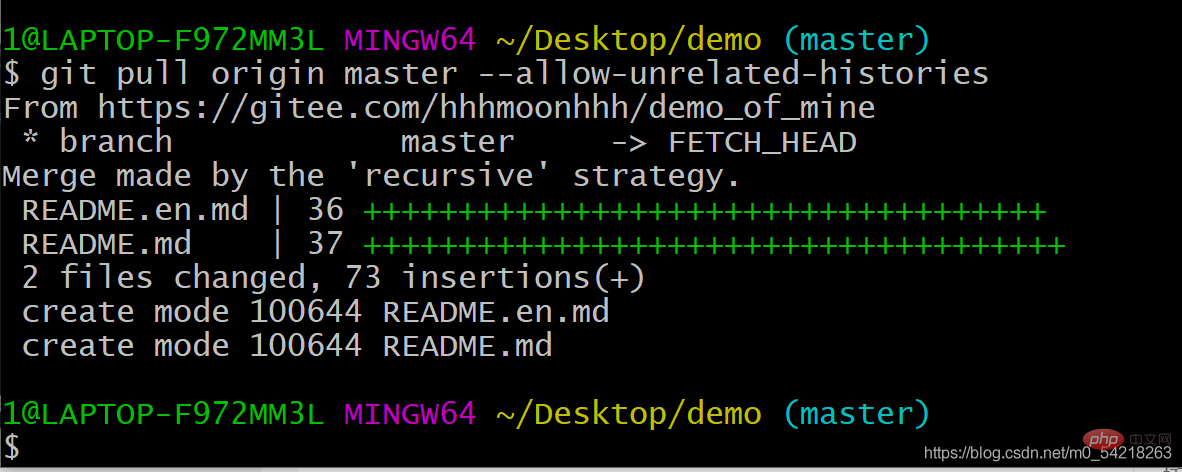
之后,如果还需要拉取那么就是直接
git pull origin master
就好了啦
5、上传自己本地的版本到远程仓库
当我们学会了拉取远程仓库的内容以后,还需要掌握如何进行将本地的仓库的最新的版本上传到远程仓库中去:
git push origin master
git push origin master 这个命令是将本地的版本上传到了远程的仓库中去了啦。
上传成功的实例如下图所示:
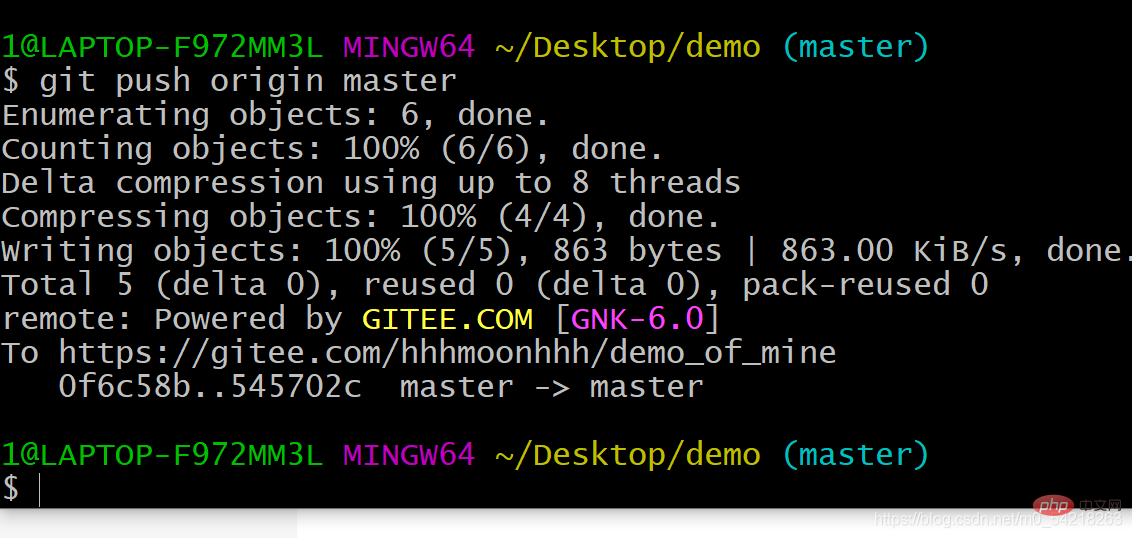
这个便是将本地的仓库中的版本上传到了远程仓库中去了啦。
以上便是拉取以及上传的内容。
五、其他操作
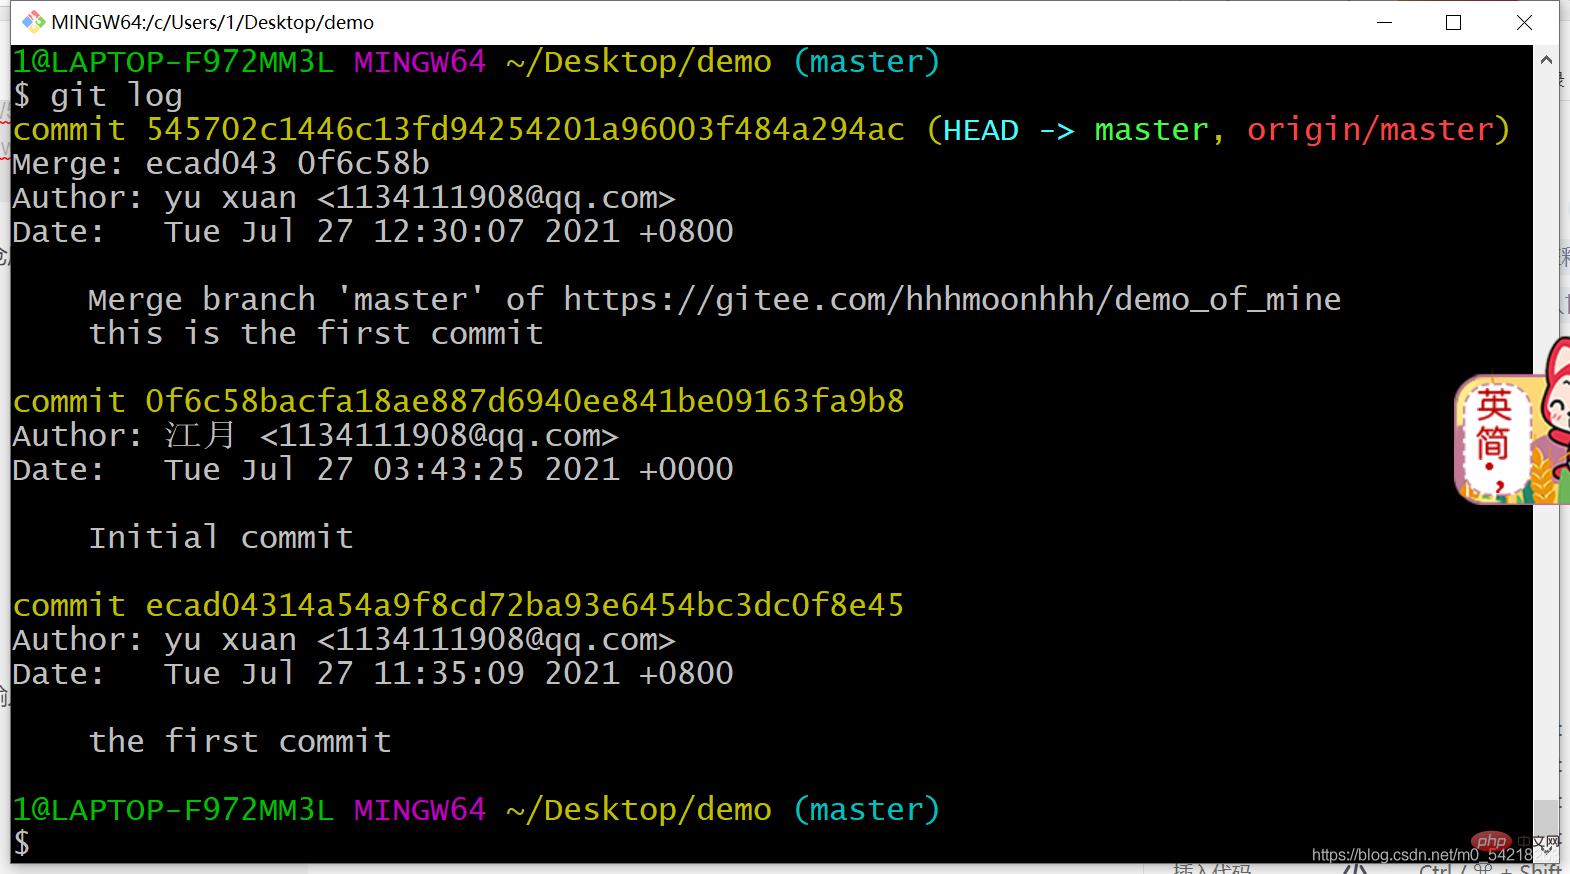
1、查看版本
下面是逆序排列的版本
git log
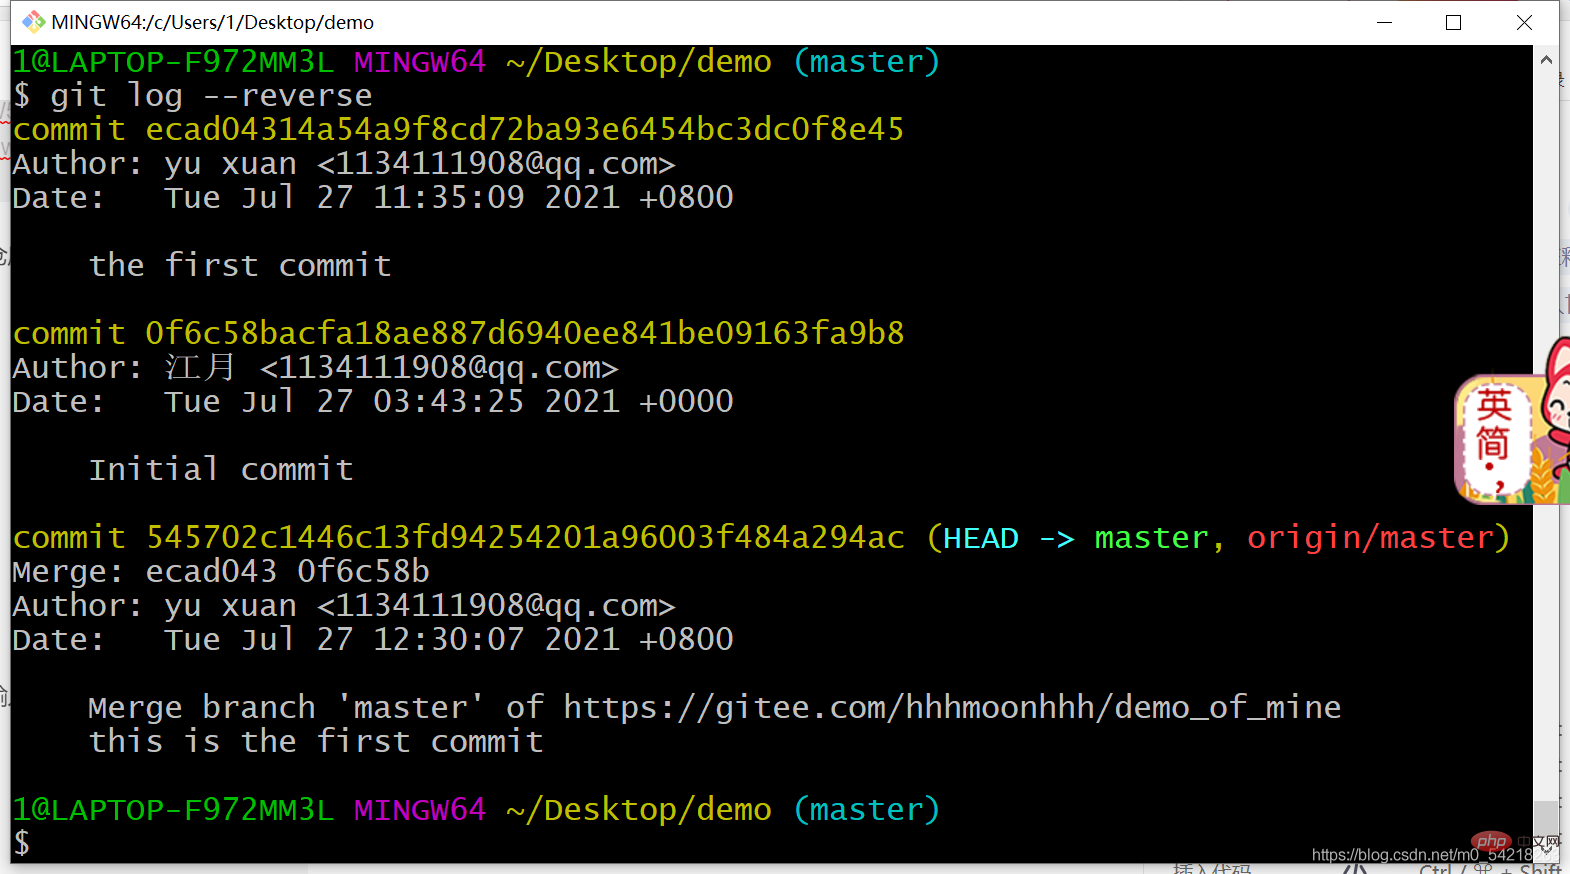
当然如果你希望时间是顺序排列的版本,可以输入 ;
git log --reverse
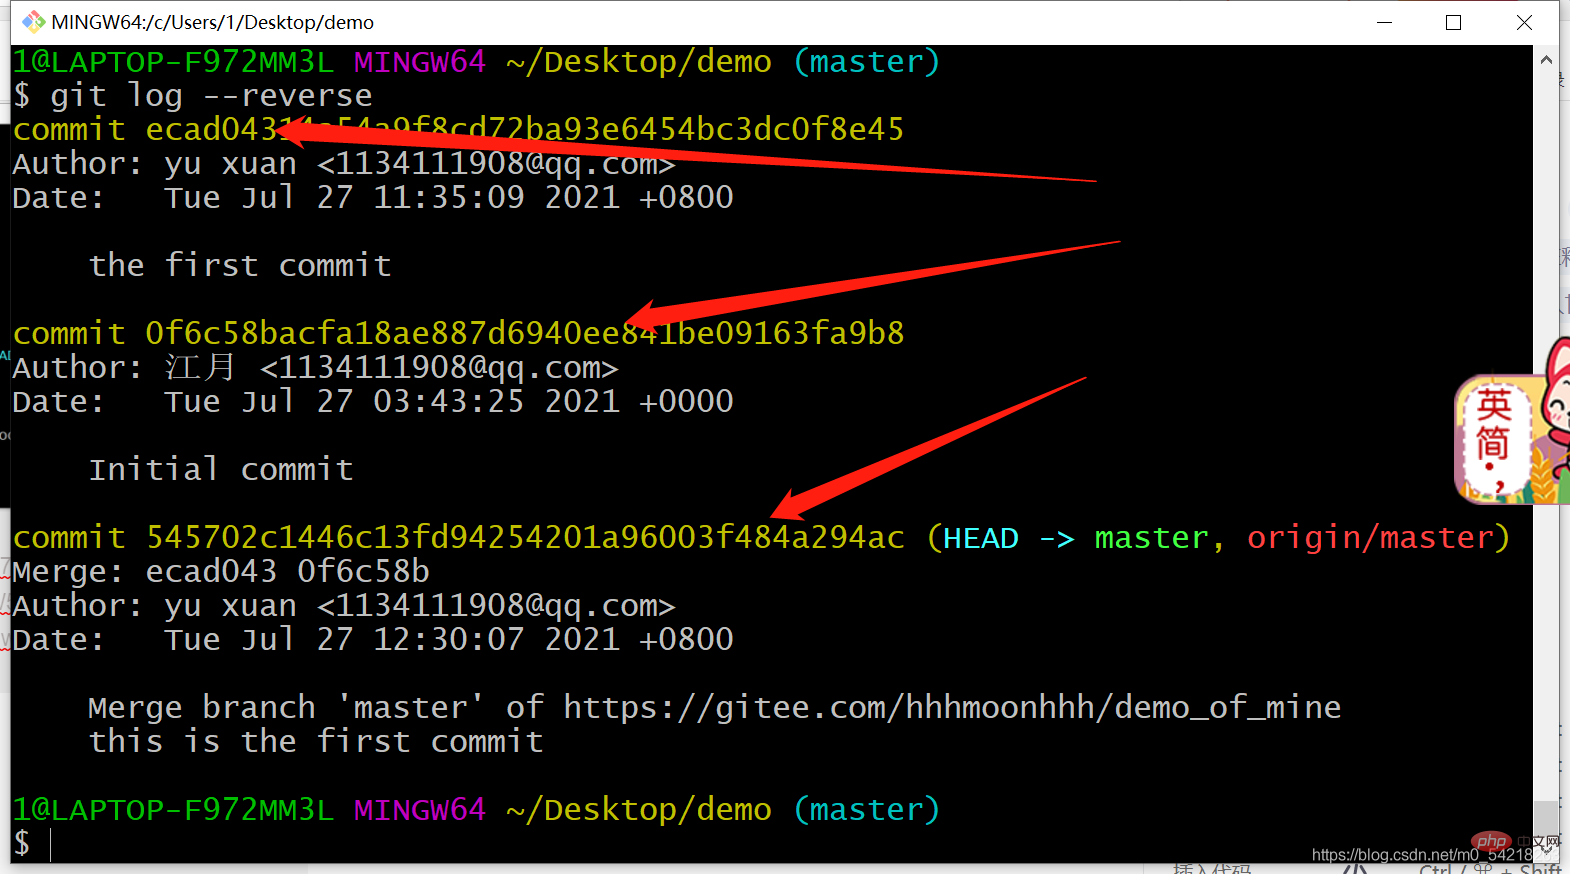
2、 回到某一个版本
这里是回到某一个版本的操作
git reset --hard 版本库地址
git reset --hard 版本库地址
这个指令是回到某一个指令的版本
版本库地址如下图箭头所指的示例:
3、分支的一些问题
1)创建分支
git branch name
git branch name 中 name 是指分支的名称:
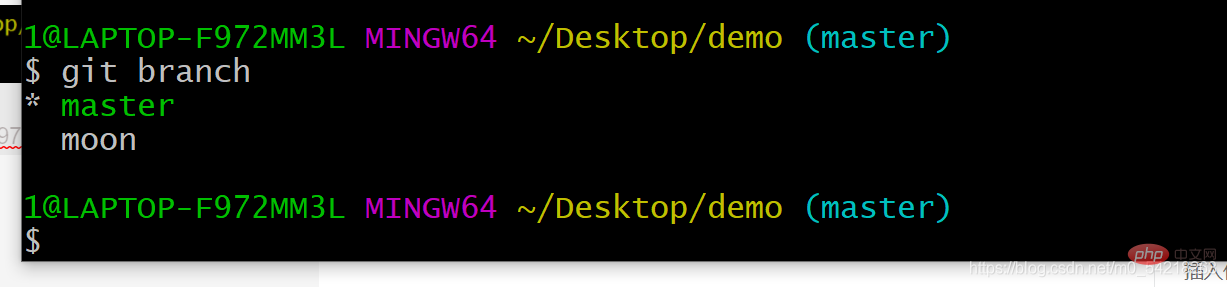
这个是创建了一个 moon 分支
2)查看分支
git branch
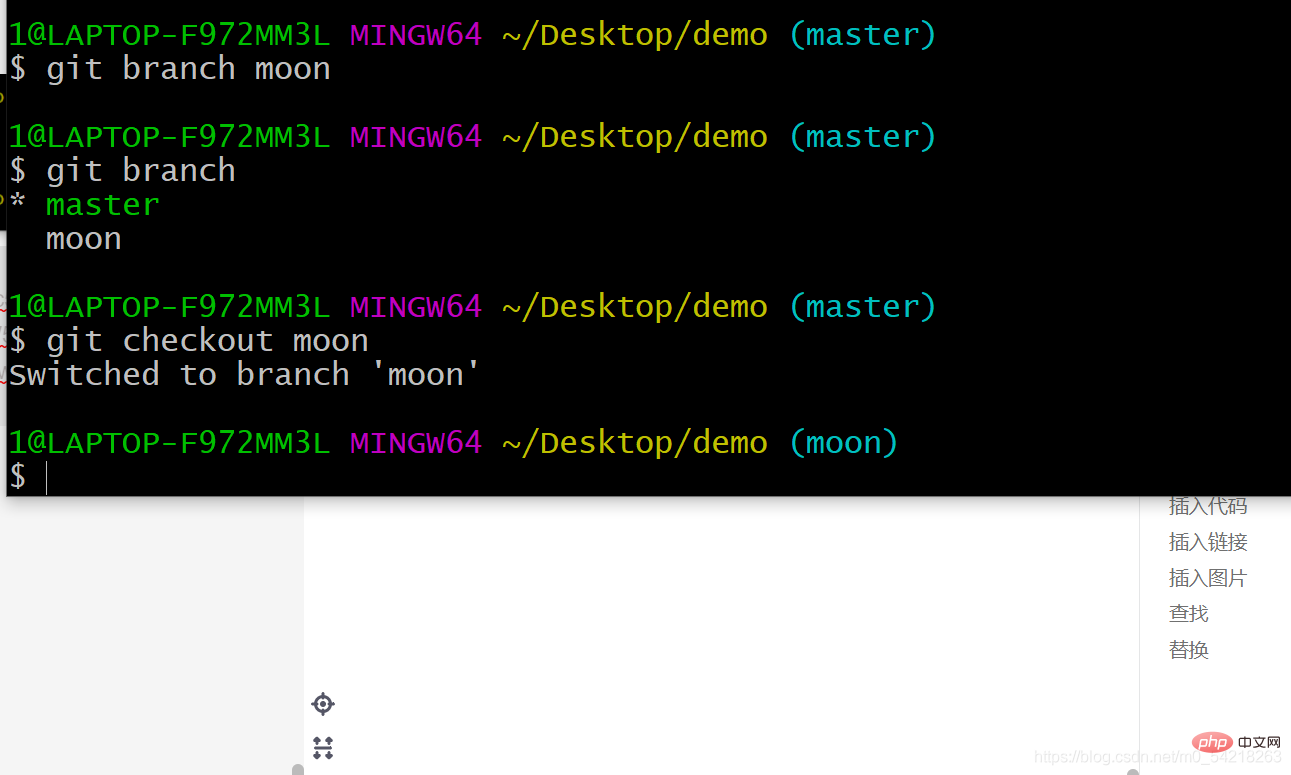
3)切换分支
git checkout name
例如
git checkout moon
4)合并分支
git merge name
git merge name 中的 name 是需要合并的那个目标分支,最终会改变当前分支,不会改变那个合并的目标分支。
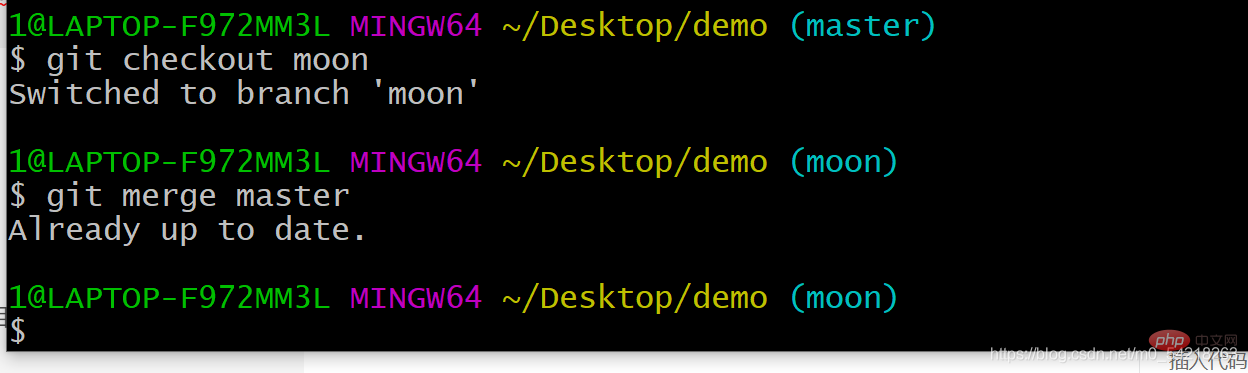
这里面是将master合并给了moon
即就是说把master里面的内容合并到moon里面去了啦。

Already up to date。
就是说明已经完成了更新。
综上所述,这些就是 Git 的一些基本操作流程,包含了本地仓库以及远程仓库的操作,讲解较为详细,希望对大家会有一定的帮助了啦。
希望本文Git的一些讲解可以对大家有一点帮助,也希望大家可以多多支持关照一下啦~~~
Git的基本操作也就是这么多,以后如果工作、学习什么的直接用就好了啦。
谢谢大家的耐心读到这里,既然都到这里了,你就点个赞嘛~~~~
推荐学习:《Git教程》
The above is the detailed content of Organize and share Git tool nanny-style tutorials. For more information, please follow other related articles on the PHP Chinese website!

Hot AI Tools

Undresser.AI Undress
AI-powered app for creating realistic nude photos

AI Clothes Remover
Online AI tool for removing clothes from photos.

Undress AI Tool
Undress images for free

Clothoff.io
AI clothes remover

AI Hentai Generator
Generate AI Hentai for free.

Hot Article
Hot Tools

Notepad++7.3.1
Easy-to-use and free code editor

SublimeText3 Chinese version
Chinese version, very easy to use

Zend Studio 13.0.1
Powerful PHP integrated development environment

Dreamweaver CS6
Visual web development tools

SublimeText3 Mac version
God-level code editing software (SublimeText3)
Hot Topics
 1378
1378
 52
52

 How to run the h5 project
Apr 06, 2025 pm 12:21 PM
How to run the h5 project
Apr 06, 2025 pm 12:21 PM
Running the H5 project requires the following steps: installing necessary tools such as web server, Node.js, development tools, etc. Build a development environment, create project folders, initialize projects, and write code. Start the development server and run the command using the command line. Preview the project in your browser and enter the development server URL. Publish projects, optimize code, deploy projects, and set up web server configuration.
 How to view the results after Bootstrap is modified
Apr 07, 2025 am 10:03 AM
How to view the results after Bootstrap is modified
Apr 07, 2025 am 10:03 AM
Steps to view modified Bootstrap results: Open the HTML file directly in the browser to ensure that the Bootstrap file is referenced correctly. Clear the browser cache (Ctrl Shift R). If you use CDN, you can directly modify CSS in the developer tool to view the effects in real time. If you modify the Bootstrap source code, download and replace the local file, or rerun the build command using a build tool such as Webpack.
 How to use vue pagination
Apr 08, 2025 am 06:45 AM
How to use vue pagination
Apr 08, 2025 am 06:45 AM
Pagination is a technology that splits large data sets into small pages to improve performance and user experience. In Vue, you can use the following built-in method to paging: Calculate the total number of pages: totalPages() traversal page number: v-for directive to set the current page: currentPage Get the current page data: currentPageData()
 Monitor MySQL and MariaDB Droplets with Prometheus MySQL Exporter
Apr 08, 2025 pm 02:42 PM
Monitor MySQL and MariaDB Droplets with Prometheus MySQL Exporter
Apr 08, 2025 pm 02:42 PM
Effective monitoring of MySQL and MariaDB databases is critical to maintaining optimal performance, identifying potential bottlenecks, and ensuring overall system reliability. Prometheus MySQL Exporter is a powerful tool that provides detailed insights into database metrics that are critical for proactive management and troubleshooting.
 HadiDB: A lightweight, horizontally scalable database in Python
Apr 08, 2025 pm 06:12 PM
HadiDB: A lightweight, horizontally scalable database in Python
Apr 08, 2025 pm 06:12 PM
HadiDB: A lightweight, high-level scalable Python database HadiDB (hadidb) is a lightweight database written in Python, with a high level of scalability. Install HadiDB using pip installation: pipinstallhadidb User Management Create user: createuser() method to create a new user. The authentication() method authenticates the user's identity. fromhadidb.operationimportuseruser_obj=user("admin","admin")user_obj.
 How to view the JavaScript behavior of Bootstrap
Apr 07, 2025 am 10:33 AM
How to view the JavaScript behavior of Bootstrap
Apr 07, 2025 am 10:33 AM
The JavaScript section of Bootstrap provides interactive components that give static pages vitality. By looking at the open source code, you can understand how it works: Event binding triggers DOM operations and style changes. Basic usage includes the introduction of JavaScript files and the use of APIs, and advanced usage involves custom events and extension capabilities. Frequently asked questions include version conflicts and CSS style conflicts, which can be resolved by double-checking the code. Performance optimization tips include on-demand loading and code compression. The key to mastering Bootstrap JavaScript is to understand its design concepts, combine practical applications, and use developer tools to debug and explore.
 Is Git the same as GitHub?
Apr 08, 2025 am 12:13 AM
Is Git the same as GitHub?
Apr 08, 2025 am 12:13 AM
Git and GitHub are not the same thing. Git is a version control system, and GitHub is a Git-based code hosting platform. Git is used to manage code versions, and GitHub provides an online collaboration environment.
 How to build a bootstrap framework
Apr 07, 2025 pm 02:54 PM
How to build a bootstrap framework
Apr 07, 2025 pm 02:54 PM
Bootstrap framework building guide: Download Bootstrap and link it to your project. Create an HTML file to add the necessary elements. Create a responsive layout using the Bootstrap mesh system. Add Bootstrap components such as buttons and forms. Decide yourself whether to customize Bootstrap and compile stylesheets if necessary. Use the version control system to track your code.
