 Operation and Maintenance
 Docker
 You must understand the principles of network interconnection between Docker containers
You must understand the principles of network interconnection between Docker containers
This article brings you relevant knowledge about the principles of network interconnection between docker containers. I hope it will be helpful to you.

1. The experiment we want to understand today

As described in red text above: on the same host How do the networks between different containers communicate? ? ?
2. Pre-network knowledge
2.1. Docker defaults to the network we created
After we install docker, the docker daemon will create it for us Automatically create 3 networks, as follows:
Copy~]# docker network ls
NETWORK ID     NAME                DRIVER    SCOPE
e71575e3722a   bridge              bridge    local
ab8e3d45575c   host                host      local
0c9b7c1134ff   none                null      local
In fact, docker has 4 network communication models, namely: bridge, host, none, container
The default network model used is bridge, which is also The network model we will use in production.
The following will share with you the principles of docker container interoperability. The bridge network model will also be used
2.2. How to understand the docker0 bridge
In addition, after we install docker, docker will create a network device called docker0 for us
You can view it through the ifconfig command. It seems that it has the same network status as eth0, like A network card. But no, docker0 is actually a Linux bridge
Copy[root@vip ~]# ip addr
1: lo: <LOOPBACK,UP,LOWER_UP> mtu 65536 qdisc noqueue state UNKNOWN group default qlen 1000
    link/loopback 00:00:00:00:00:00 brd 00:00:00:00:00:00
    inet 127.0.0.1/8 scope host lo
       valid_lft forever preferred_lft forever
    inet6 ::1/128 scope host
       valid_lft forever preferred_lft forever

2: eth0: <BROADCAST,MULTICAST,UP,LOWER_UP> mtu 1500 qdisc pfifo_fast state UP group default qlen 1000
    link/ether 00:0c:29:b4:97:ee brd ff:ff:ff:ff:ff:ff
    inet 10.4.7.99/24 brd 10.4.7.255 scope global noprefixroute eth0
       valid_lft forever preferred_lft forever
    inet6 fe80::20c:29ff:feb4:97ee/64 scope link
       valid_lft forever preferred_lft forever

3: docker0: <BROADCAST,MULTICAST,UP,LOWER_UP> mtu 1500 qdisc noqueue state UP group default
    link/ether 02:42:db:fe:ff:db brd ff:ff:ff:ff:ff:ff
    inet 172.17.0.1/16 brd 172.17.255.255 scope global docker0
       valid_lft forever preferred_lft forever
    inet6 fe80::42:dbff:fefe:ffdb/64 scope link
valid_lft forever preferred_lft foreverHow can you tell? You can view the bridge information on the operating system through the following command
Copy ~]# yum install bridge-utils
 ~]# brctl show
bridge name bridge id       STP enabled interfaces
docker0     8000.0242f0a8c0be   no      veth86e2ef2
vethf0a8bcbSo how do you understand the concept of Linux bridge?
In fact, you can understand docker0 as a virtual switch! Then understand it by analogy like the following, and you will suddenly understand it
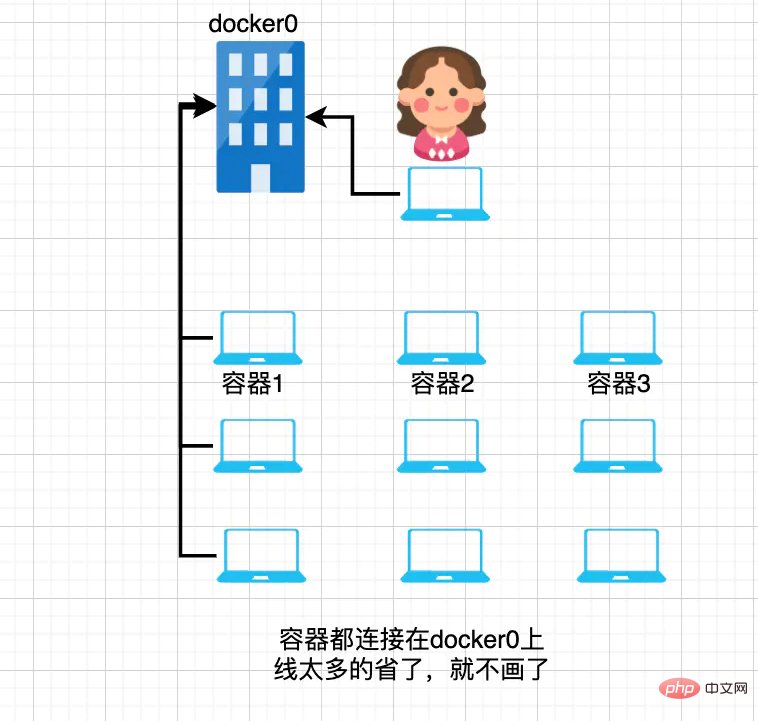
1. It is like the big switch equipment next to the teacher in the computer room of the university.
2. Connect all the computers in the computer room to the switch. It is analogous to the docker container as a device connected to docker0 on the host machine.
3. The IP addresses of the switch and the machine in the computer room are in the same network segment. This is analogous to docker0, and the IP address of the docker container you started also belongs to the same network segment 172.
Copy# docker0 ip是:
 ~]# ifconfig
3: docker0: <BROADCAST,MULTICAST,UP,LOWER_UP> mtu 1500 qdisc noqueue state UP group default
    link/ether 02:42:db:fe:ff:db brd ff:ff:ff:ff:ff:ff
    inet 172.17.0.1/16 brd 172.17.255.255 scope global docker0
       valid_lft forever preferred_lft forever
    inet6 fe80::42:dbff:fefe:ffdb/64 scope link
       valid_lft forever preferred_lft forever

# 进入容器中查看ip是:
/# ifconfig
eth0: flags=4163<UP,BROADCAST,RUNNING,MULTICAST>  mtu 1500
        inet 172.17.0.2  netmask 255.255.0.0  broadcast 172.17.255.255
        ether 02:42:ac:11:00:02  txqueuelen 0  (Ethernet)
        RX packets 13  bytes 1102 (1.0 KiB)
        RX errors 0  dropped 0  overruns 0  frame 0
        TX packets 0  bytes 0 (0.0 B)
TX errors 0 dropped 0 overruns 0 carrier 0 collisions 0The analogy is like this:

2.3. What is veth-pair technology?
When we made an analogy to understand docker0, we said: connect all the computers in the computer room to the switch. It is analogous to the docker container as a device, which is connected to docker0 on the host machine. So what specific technology is used to implement it?
The answer is: veth pair
The full name of veth pair is: virtual ethernet, which is a virtual Ethernet card.
Speaking of Ethernet cards, everyone is familiar with them. Isn’t it our common network device called eth0 or ens?
So how does this veth pair work? What's the use? You can see the picture below

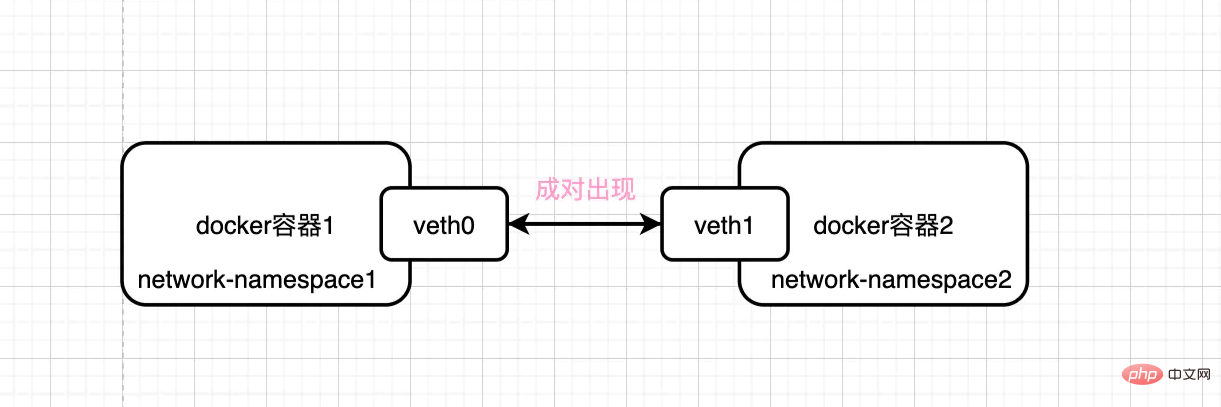
veth-pair devices always appear in pairs and are used to connect two different network-namespaces.
As shown in the above figure, the data sent from veth0 of network-namespace1 will appear in the veth1 device of network-namespace2.
Although this feature is very good, if there are multiple containers, you will find that the organizational structure will become more and more complex and chaotic
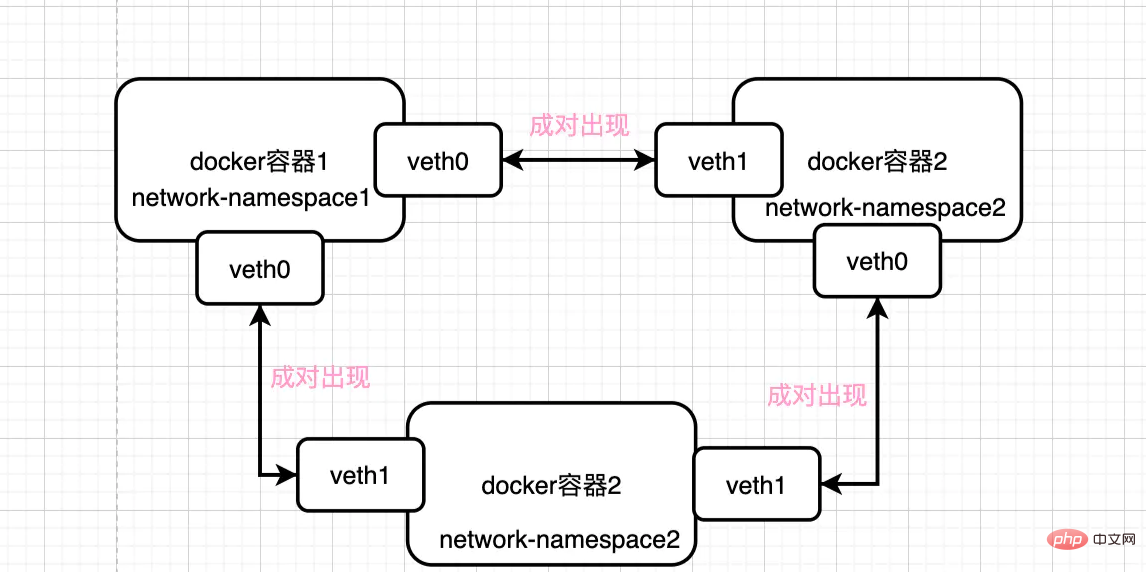
Fortunately, we have gradually understood the Linux bridge (docker0) and the veth-pair device here, so we can redraw the overall architecture diagram as follows
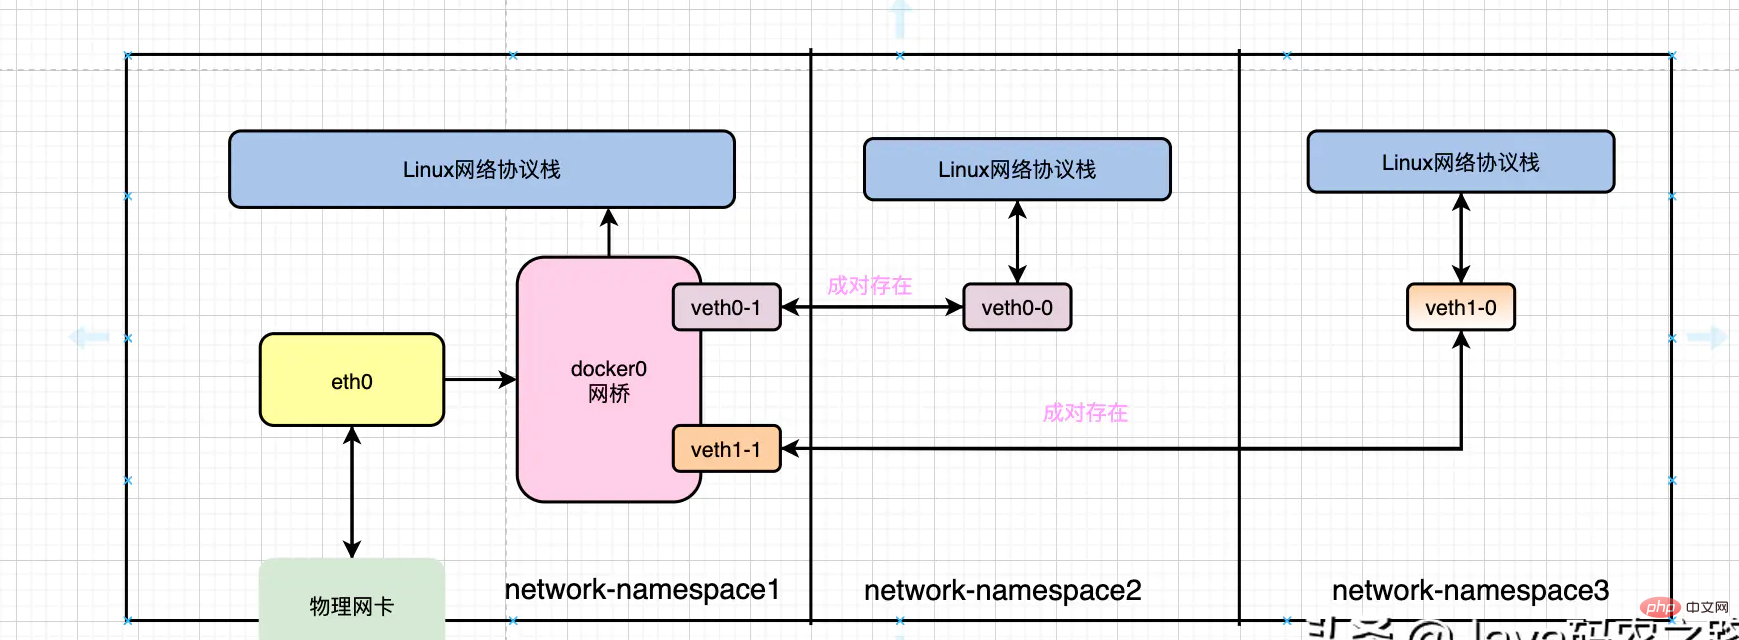
Because different containers have their own isolated network-namespace, they all have their own network protocol stacks
Then can we find out which network card in the container and which card on the physical machine is a network vethpair? What about equipment?
is as follows:
Copy# 进入容器
~]# docker exec -ti 545ed62d3abf /bin/bash

/# apt-get install ethtool
/# ethtool -S eth0
NIC statistics:
peer_ifindex: 55Back to the host machine
Copy~]# ip addr
    ...
55: vethf0a8bcb@if54: <BROADCAST,MULTICAST,UP,LOWER_UP> mtu 1500 qdisc noqueue master docker0 state UP group default
    link/ether ae:eb:5c:2f:7d:c3 brd ff:ff:ff:ff:ff:ff link-netnsid 10
    inet6 fe80::aceb:5cff:fe2f:7dc3/64 scope link
valid_lft forever preferred_lft foreverIt means that the eth0 network card of the container 545ed62d3abf and the network device label 55 viewed by the host through the ip addr command The devices form a pair of vethpair devices and communicate with each other!
3. The principle of interconnection between different hosts in the same LAN
Let’s first look at how different hosts A and B in the same LAN interconnect and exchange data. As shown below
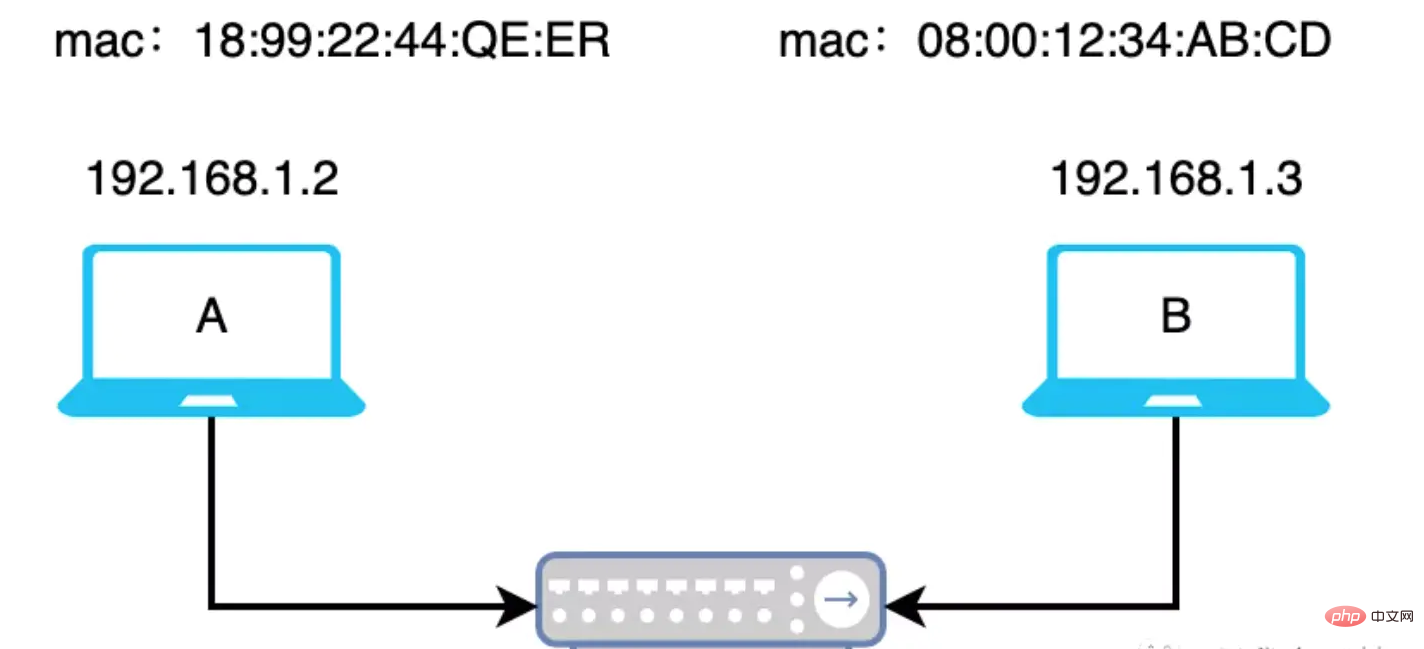
那,既然是同一个局域网中,说明A、B的ip地址在同一个网段,如上图就假设它们都在192.168.1.0网段。
还得再看下面这张OSI 7层网络模型图。
主机A向主机B发送数据,对主机A来说数据会从最上层的应用层一路往下层传递。比如应用层使用的http协议、传输层使用的TCP协议,那数据在往下层传递的过程中,会根据该层的协议添加上不同的协议头等信息。
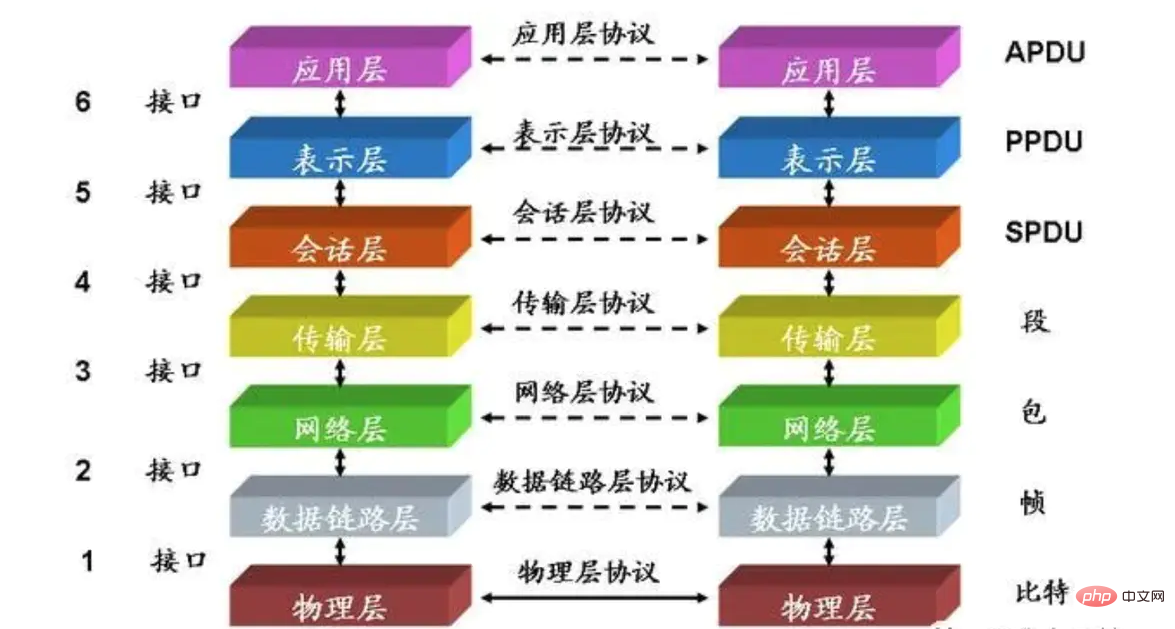
根据OSI7层网络模型的设定,对于接受数据的主机B来说,它会接收到很多数据包!这些数据包会从最下层的物理层依次往上层传递,依次根据每一层的网络协议进行拆包。一直到应用层取出主机A发送给他的数据。
那么问题来了,主机B怎么判断它收到的数据包是否是发送给自己的呢?万一有人发错了呢?
答案是:根据MAC地址,逻辑如下。
Copyif 收到的数据包.MAC地址 == 自己的MAC地址{
  // 接收数据
  // 处理数据包
}else{
 // 丢弃
}那对于主机A来说,它想发送给主机B数据包,还不能让主机B把这个数据包扔掉,它只能中规中矩的按以太网网络协议要求封装将要发送出去的数据包,往下传递到数据链路层(这一层传输的数据要求,必须要有目标mac地址,因为数据链路层是基于mac地址做数据传输的)。
那数据包中都需要哪些字段呢?如下:
Copysrc ip = 192.168.1.2  //源ip地址,交换机
dst ip = 192.168.1.3  //目标ip地址
//本机的mac地址(保证从主机B回来的包正常送达主机A,且主机A能正常处理它)
src mac = 主机A的mac地址
dst mac = 主机B的mac地址//目标mac地址
其中的dst ip好说,我们可以直接固定写,或者通过DNS解析域名得到目标ip。
那dst mac怎么获取呢?
这就不得不说ARP协议了! ARP其实是一种地址解析协议,它的作用就是:以目标ip为线索,找到目的ip所在机器的mac地址。也就是帮我们找到dst mac地址!大概的过程如下几个step
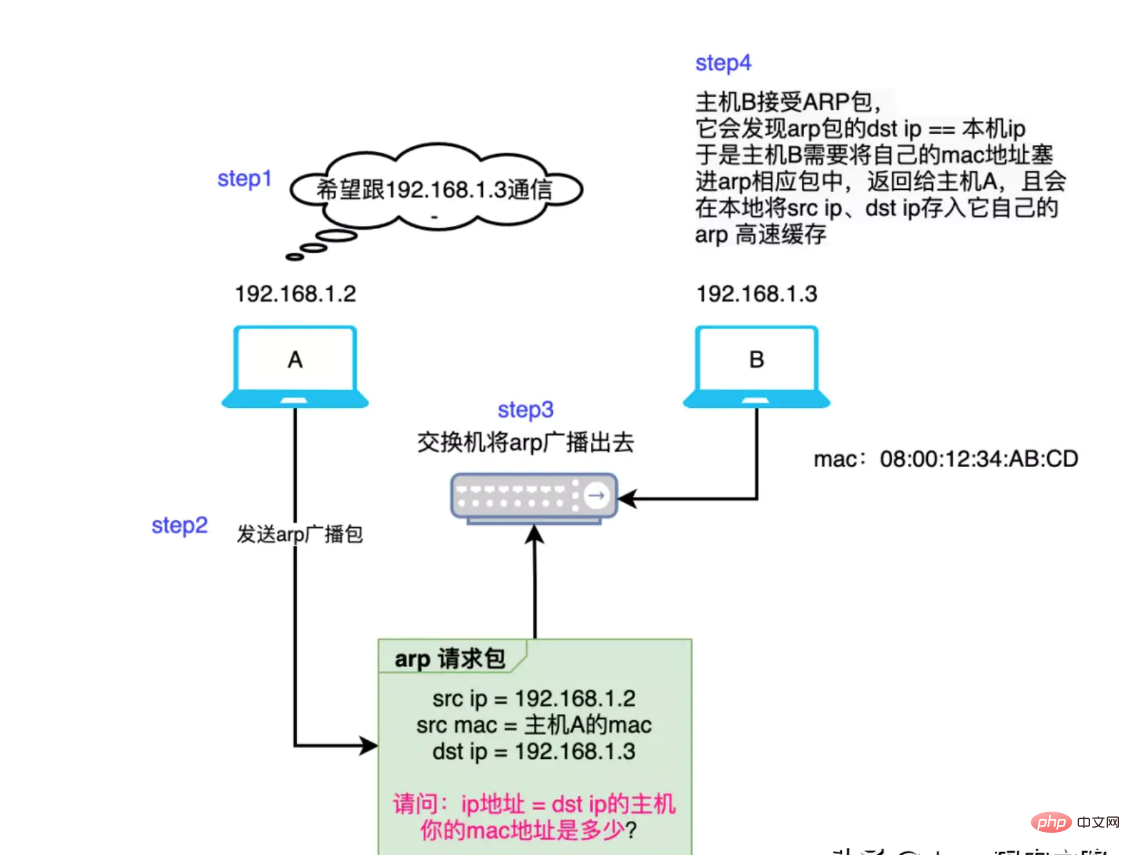
推荐阅读:白日梦的DNS笔记
简述这个过程:主机A想给主机B发包,那需要知道主机B的mac地址。
- 主机A查询本地的arp 高速缓存中是否已经存在dst ip和dst mac地址的映射关系了,如果已存在,那就直接用。
- 本地arp高速缓存中不存在dst ip和dst mac地址的映射关系的话那就只能广播arp请求包,同一网段的所有机器都能收到arp请求包。
- 收到arp请求包的机器会对比arp包中的src ip是否是自己的ip,如果不是则直接丢弃该arp包。如果是的话就将自己的mac地址写到arp响应包中。并且它会把请求包中src ip和src mac的映射关系存储在自己的本地。
补充:
交换机本身也有学习能力,他会记录mac地址和交换机端口的映射关系。比如:mac=a,端口为1。
那当它接收到数据包,并发现mac=a时,它会直接将数据扔向端口1。
嗯,在arp协议的帮助下,主机A顺利拿到了主机B的mac地址。于是数据包从网络层流转到数据链路层时已经被封装成了下面的样子:
Copysrc ip = 192.168.1.2
src mac = 主机A的mac地址
dst ip = 192.168.1.3
dst mac = 主机B的mac地址
网络层基于ip地址做数据做转发
数据链路基于mac地址做数据转发
根据OIS7层网络模型,我们都知道数据包经过物理层发送到机器B,机器B接收到数据包后,再将数据包向上流转,拆包。流转到主机B的数据链路层。
那主机B是如何判断这个在数据链路层的包是否是发给自己的呢?
答案前面说了,根据目的mac地址判断。
Copy// 主机B
if 收到的数据包.MAC地址 == 自己的MAC地址{
  if dst ip == 本机ip{
    // 本地处理数据包
  }else{
    // 查询路由表,根据路由表的规则,将数据包转某个某卡、或者默认网关
  }
}else{
 // 直接丢弃
}这个例子比较简单,dst ip就是主机B的本机ip 所以它自己会处理这个数据包。
那数据包处理完之后是需要给主机A一个响应包,那问题又来了,响应包该封装成什么样子呢?对主机B来说响应包也需要src ip、src mac、dst ip、dst mac
Copysrc ip = 192.168.1.3
src mac = 主机B的mac地址
dst ip = 192.168.1.2
src mac = 主机A的mac地址 (之前通过arp记录在自己的arp高速缓存中了,所以,这次直接用)
同样的道理,响应包也会按照如下的逻辑被主机A接受,处理。
Copy// 主机A
if 收到的数据包.MAC地址 == 自己的MAC地址{
  if dst ip == 本机ip{
    // 本地处理数据包
  }else{
    // 查询路由表,根据路由表的规则,将数据包转某个某卡、或者默认网关
  }
}else{
 // 直接丢弃
}这一次,让我在百度告诉你,当你请求www.baidu.com时都发生了什么?
四、容器网络互通原理
有了上面那些知识储备呢?再看我们今天要探究的问题,就不难了。
如下红字部分:同一个宿主机上的不同容器是如何互通的?
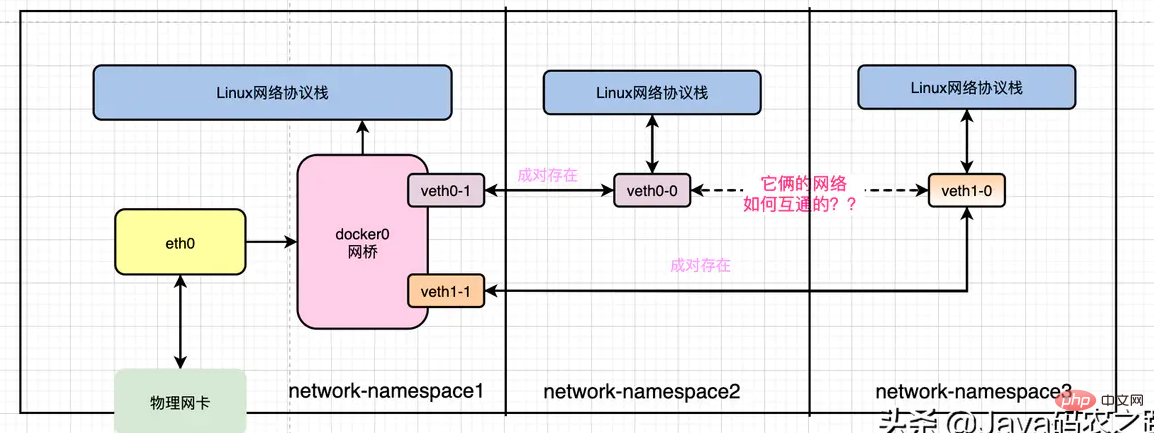
那我们先分别登陆容器记录下他们的ip
Copy9001的ip是:172.17.0.2
9002的ip是:172.17.0.3
先看实验效果:在9001上curl9002
Copy/# curl 172.7.88.3
<!DOCTYPE html>
<html>
<head>
<title>Welcome to nginx!</title>
<style>
html { color-scheme: light dark; }
...实验结果是网络互通!
我们再完善一下上面的图,把docker0、以及两个容器的ip补充上去,如下图:
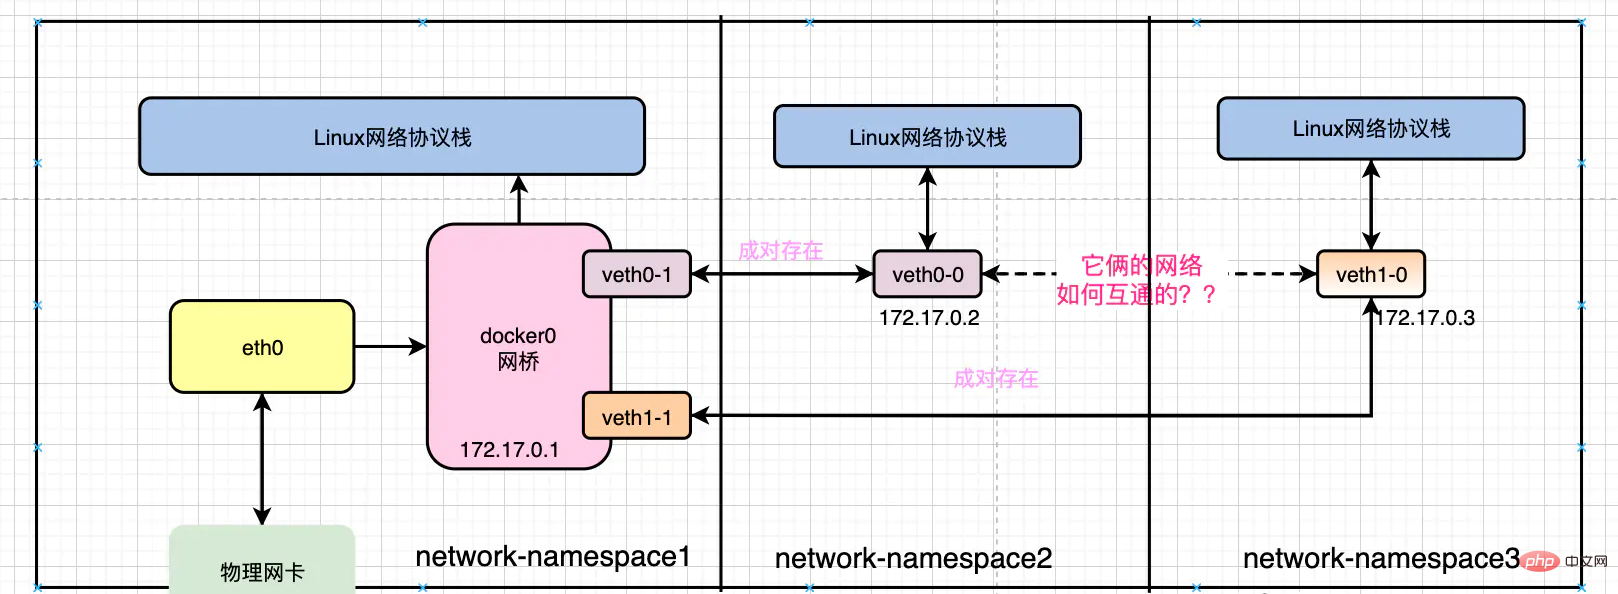
Docker容器间网络互联原理,讲不明白算我输
那两台机器之前要通信是要遵循OSI网络模型、和以太网协议的。
我们管172.17.0.2叫做容器2
我们管172.17.0.3叫做容器3
比如我们现在是从:容器2上curl 容器3,那么容器2也必须按照以太网协议将数据包封装好,如下
Copysrc ip = 172.17.0.2
src mac = 容器2的mac地址
dst ip = 172.17.0.3
dst mac = 容器3的mac地址 ???
那现在的问题是容器3的mac地址是多少?
删掉所有容器,重新启动,方便实验抓包
容器2会先查自己的本地缓存,如果之前没有访问过,那么缓存中也没有任何记录!
Copy:/# arp -n
不过没关系,还有arp机制兜底,于是容器2会发送arp请求包,大概如下
Copy1、这是一个arp请求包
2、我的ip地址是:172.17.0.2
3、我的mac地址是:容器2的mac地址
4、请问:ip地址为:172.17.0.3的机器,你的mac地址是多少?
容器2会查询自己的路由表,将这个arp请求从自己的gateway发送出去
Copy/# route -n
Kernel IP routing table
Destination     Gateway         Genmask         Flags Metric Ref    Use Iface
0.0.0.0         172.7.88.1      0.0.0.0         UG    0      0        0 eth0
172.7.88.0      0.0.0.0         255.255.255.0   U     0      0        0 eth0
我们发现容器2的网关对应的网络设备的ip就是docker0的ip地址,并且经由eth0发送出去!
哎?eth0不就是我们之前说的veth-pair设备吗?
并且我们通过下面的命令可以知道它的另一端对应着宿主机上的哪个网络设备:
Copy/# ethtool -S eth0
NIC statistics:
peer_ifindex: 53而且我们可以下面的小实验,验证上面的观点是否正确
Copy# 在容器中ping百度
~]# ping 220.181.38.148

# 在宿主机上抓包
~]# yum install tcpdump -y
~]# tcpdump -i ${vethpair宿主机侧的接口名} host 220.181.38.148

...所以说从容器2的eth0出去的arp请求报文会同等的出现在宿主机的第53个网络设备上。
通过下面的这张图,你也知道第53个网络设备其实就是下图中的veth0-1
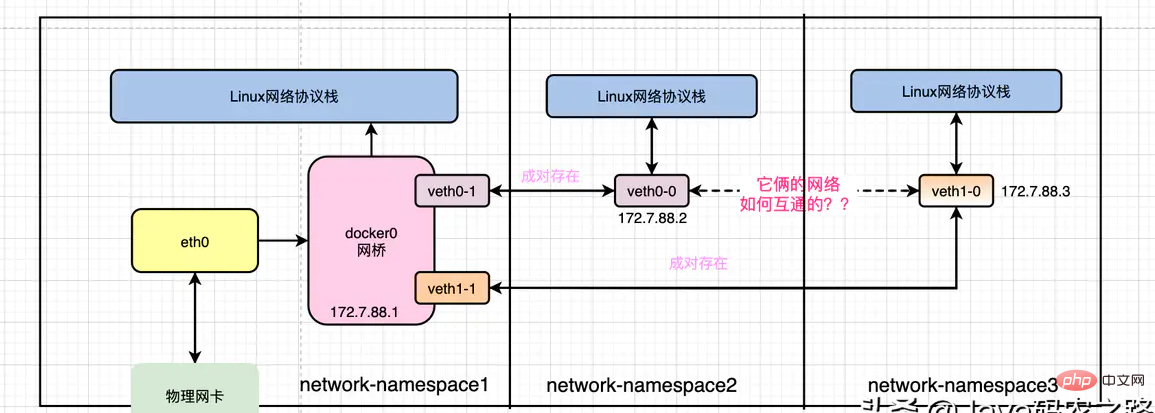
所以这个arp请求包会被发送到docker0上,由docker0拿到这个arp包发现,目标ip是172.17.0.3并不是自己,所以docker0会进一步将这个arp请求报文广播出去,所有在172.17.0.0网段的容器都能收到这个报文!其中就包含了容器3!
那容器3收到这个arp报文后,会判断,哦!目标ip就是自己的ip,于是它将自己的mac地址填充到arp报文中返回给docker0!
同样的我们可以通过抓包验证,在宿主机上
Copy# 在172.17.0.2容器上ping172.17.0.3
/# ping 172.17.0.3

~]# tcpdump -i vethdb0d222
tcpdump: verbose output suppressed, use -v or -vv for full protocol decode
listening on vethdb0d222, link-type EN10MB (Ethernet), capture size 262144 bytes

17:25:30.218640 ARP, Request who-has 172.17.0.3 tell 172.17.0.2, length 28
17:25:30.218683 ARP, Reply 172.17.0.3 is-at 02:42:ac:11:00:03 (oui Unknown), length 28
17:25:30.218686 IP 172.17.0.2.54014 > 172.17.0.3.http: Flags [S], seq 3496600258, win 29200, options [mss 1460,sackOK,TS val 4503202 ecr 0,nop,wscale 7], length 0
于是容器2就拿到了容器3的mac地址,以太网数据包需要的信息也就齐全了!如下:
Copysrc ip = 172.17.0.2
src mac = 容器2的mac地址
dst ip = 172.17.0.3
dst mac = 容器3的mac地址
再之后容器2就可以和容器3正常互联了!
容器3会收到很多数据包,那它怎么知道哪些包是发给自己的,那些不是呢?可以参考如下的判断逻辑
Copyif 响应包.mac == 自己的mac{
 // 说明这是发给自己包,所以不能丢弃
  if 响应包.ip == 自己的ip{
    // 向上转发到osi7层网络模型的上层
  }else{
    // 查自己的route表,找下一跳
  }
}else{
 // 直接丢弃
}五、实验环境
Copy# 下载
 ~]# docker pull registry.cn-hangzhou.aliyuncs.com/changwu/nginx:1.7.9-nettools

# 先启动1个容器
 ~]# docker run --name mynginx1 -i -t -d -p 9001:80 nginx-1.7.9-nettools:latest
eb569b938c07e95ccccbfc654c1fee6364eea55b20f5394382ff42b4ccf96312

~]# docker run --name mynginx2 -i -t -d -p 9002:80 nginx-1.7.9-nettools:latest
545ed62d3abfd63aa9c3ae196e9d7fe6f59bbd2e9ae4e6f2bd378f23587496b7

# 验证
~]# curl 127.0.0.1:9001
推荐学习:《docker视频教程》
The above is the detailed content of You must understand the principles of network interconnection between Docker containers. For more information, please follow other related articles on the PHP Chinese website!

Hot AI Tools

Undresser.AI Undress
AI-powered app for creating realistic nude photos

AI Clothes Remover
Online AI tool for removing clothes from photos.

Undress AI Tool
Undress images for free

Clothoff.io
AI clothes remover

Video Face Swap
Swap faces in any video effortlessly with our completely free AI face swap tool!

Hot Article

Hot Tools

Notepad++7.3.1
Easy-to-use and free code editor

SublimeText3 Chinese version
Chinese version, very easy to use

Zend Studio 13.0.1
Powerful PHP integrated development environment

Dreamweaver CS6
Visual web development tools

SublimeText3 Mac version
God-level code editing software (SublimeText3)

Hot Topics
 1387
1387
 52
52
 How to update the image of docker
Apr 15, 2025 pm 12:03 PM
The steps to update a Docker image are as follows: Pull the latest image tag New image Delete the old image for a specific tag (optional) Restart the container (if needed)
 How to use docker desktop
Apr 15, 2025 am 11:45 AM
How to use Docker Desktop? Docker Desktop is a tool for running Docker containers on local machines. The steps to use include: 1. Install Docker Desktop; 2. Start Docker Desktop; 3. Create Docker image (using Dockerfile); 4. Build Docker image (using docker build); 5. Run Docker container (using docker run).
 How to exit the container by docker
Apr 15, 2025 pm 12:15 PM
Four ways to exit Docker container: Use Ctrl D in the container terminal Enter exit command in the container terminal Use docker stop <container_name> Command Use docker kill <container_name> command in the host terminal (force exit)
 How to copy files in docker to outside
Apr 15, 2025 pm 12:12 PM
Methods for copying files to external hosts in Docker: Use the docker cp command: Execute docker cp [Options] <Container Path> <Host Path>. Using data volumes: Create a directory on the host, and use the -v parameter to mount the directory into the container when creating the container to achieve bidirectional file synchronization.
 How to view the docker process
Apr 15, 2025 am 11:48 AM
Docker process viewing method: 1. Docker CLI command: docker ps; 2. Systemd CLI command: systemctl status docker; 3. Docker Compose CLI command: docker-compose ps; 4. Process Explorer (Windows); 5. /proc directory (Linux).
 How to check the name of the docker container
Apr 15, 2025 pm 12:21 PM
You can query the Docker container name by following the steps: List all containers (docker ps). Filter the container list (using the grep command). Gets the container name (located in the "NAMES" column).
 How to save docker image
Apr 15, 2025 am 11:54 AM
To save the image in Docker, you can use the docker commit command to create a new image, containing the current state of the specified container, syntax: docker commit [Options] Container ID Image name. To save the image to the repository, you can use the docker push command, syntax: docker push image name [: tag]. To import saved images, you can use the docker pull command, syntax: docker pull image name [: tag].
 How to start mysql by docker
Apr 15, 2025 pm 12:09 PM
The process of starting MySQL in Docker consists of the following steps: Pull the MySQL image to create and start the container, set the root user password, and map the port verification connection Create the database and the user grants all permissions to the database


