 Operation and Maintenance
 Linux Operation and Maintenance
 Let's talk about numa architecture on Linux (detailed explanation with pictures and text)
Let's talk about numa architecture on Linux (detailed explanation with pictures and text)
This article brings you relevant knowledge about the numa architecture in Linux. I hope it will be helpful to you.

The following case is based on Ubuntu 16.04 and is also applicable to other Linux systems. The case environment I used is as follows:
Machine configuration: 32 CPU, 64GB memory
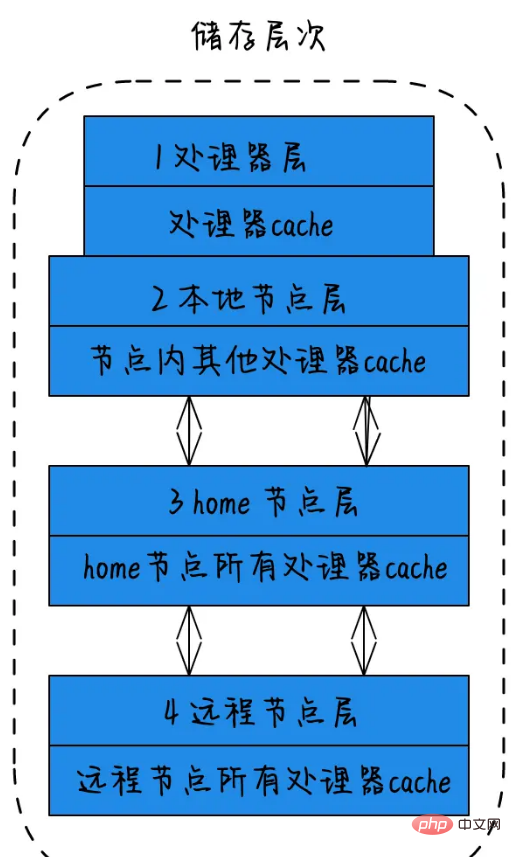
The concept of storage hierarchy in NUMA:

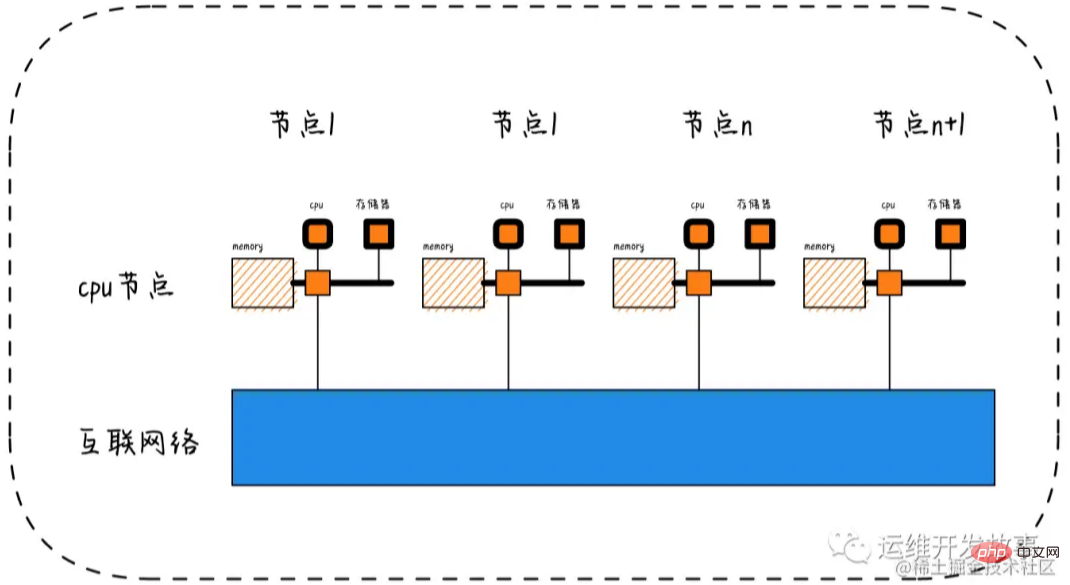
1) Processor layer: A single physical core is called the processor layer. 2) Local node layer: For all processors in a node, this node is called a local node. 3) Home node layer: The node adjacent to the local node is called the home node. 4) Remote node layer: Nodes that are not local nodes or neighbor nodes are called remote nodes. The speed of CPU accessing the memory of different types of nodes is different. The speed of accessing local nodes is the fastest, and the speed of accessing remote nodes is the slowest. That is, the access speed is related to the distance of the node. The farther the distance, the slower the access speed. This distance is called For Node Distance. Applications should try to minimize the interaction between different CPU modules. If the application can be fixed in a CPU module, the performance of the application will be greatly improved.
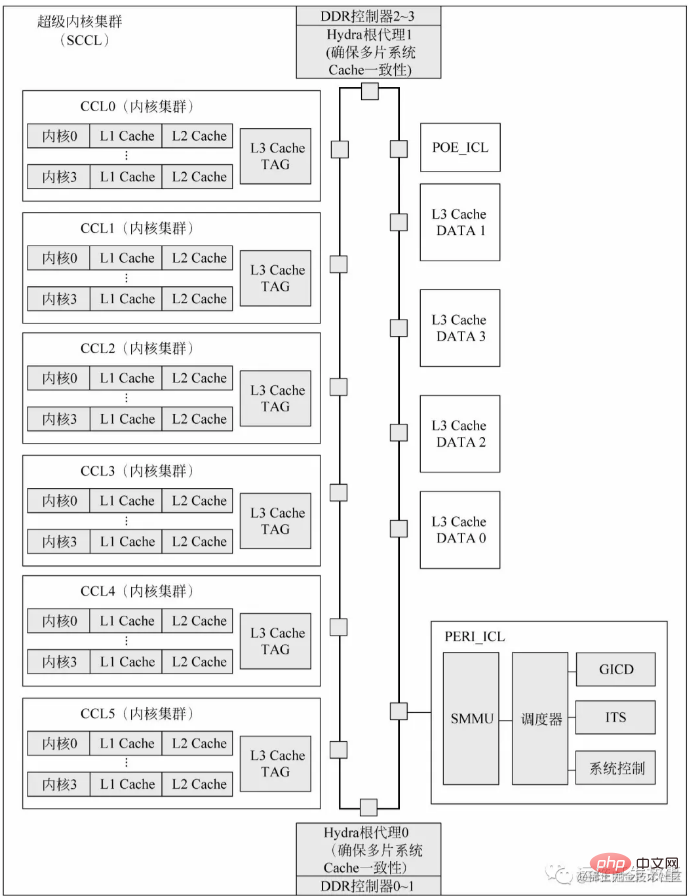
** Let’s talk about the composition of the CPU chip based on the Kunpeng 920 processor: ** Each super core cluster of the Kunpeng 920 processor system-on-chip includes 6 core clusters, 2 I/O clusters and 4 DDR controller. Each super core cluster is packaged into a CPU chip. Each chip integrates four 72-bit (64-bit data plus 8-bit ECC) high-speed DDR4 channels with a data transmission rate of up to 3200MT/s. A single chip can support up to 512GB×4 DDR storage space. L3 Cache is physically divided into two parts: L3 Cache TAG and L3 Cache DATA. L3 Cache TAG is integrated in each core cluster to reduce listening latency. L3 Cache DATA is directly connected to the on-chip bus. Hydra Root Agent (Hydra Home Agent, HHA) is a module that handles the Cache consistency protocol of multi-chip systems. POE_ICL is a system-configured hardware accelerator, which can generally be used as a packet sequencer, message queue, message distribution or to implement specific tasks of a certain processor core. In addition, each super core cluster is physically configured with a Generic Interrupt Controller Distributor (GICD) module, which is compatible with ARM's GICv4 specification. When there are multiple super core clusters in a single-chip or multi-chip system, only one GICD is visible to the system software.

Use of numactl
Linux provides one manual tuning command numactl (not installed by default). The installation command on Ubuntu is as follows:
sudo apt install numactl -y
First of all, you can use man numactl or numactl --h to understand the function of the parameters and the output content. Check the numa status of the system:
numactl --hardware
The following results are obtained by running:
available: 4 nodes (0-3)
node 0 cpus: 0 1 2 3 4 5 6 7
node 0 size: 16047 MB
node 0 free: 3937 MB
node 1 cpus: 8 9 10 11 12 13 14 15
node 1 size: 16126 MB
node 1 free: 4554 MB
node 2 cpus: 16 17 18 19 20 21 22 23
node 2 size: 16126 MB
node 2 free: 8403 MB
node 3 cpus: 24 25 26 27 28 29 30 31
node 3 size: 16126 MB
node 3 free: 7774 MB
node distances:
node   0   1   2   3
  0:  10  20  20  20
  1:  20  10  20  20
  2:  20  20  10  20
  3:  20  20  20  10

According to the results obtained from this picture and the command, you can see that this system There are 4 nodes in total, each with 8 CPUs and 16G memory. What needs to be noted here is that the L3 cache shared by the CPU will also receive the corresponding space by itself. You can check the numa status through the numastat command. The return value content:
numa_hit: It is the intention to allocate memory on this node, and the last number of allocations from this node;
numa_miss: It is the intention to allocate memory on this node. The number of times memory is allocated and finally allocated from other nodes;
numa_foreign: It is the number of times that memory is intended to be allocated on other nodes but is finally allocated from this node;
interleave_hit: The interleave strategy is used and the number of times it is allocated from this node is finally The number of times allocated by this node
local_node: the number of times the process on this node is allocated on this node
other_node: the number of times other node processes are allocated on this node
Note: If the value of numa_miss is found to be relatively high, it means that the allocation strategy needs to be adjusted. For example, the specified process association is bound to the specified CPU, thereby improving the memory hit rate.
root@ubuntu:~# numastat
                           node0           node1           node2           node3
numa_hit             19480355292     11164752760     12401311900     12980472384
numa_miss                5122680       122652623        88449951            7058
numa_foreign           122652643        88449935            7055         5122679
interleave_hit             12619           13942           14010           13924
local_node           19480308881     11164721296     12401264089     12980411641
other_node 5169091 122684087 88497762 67801NUMA memory allocation strategy
--localalloc or -l: Specifies that the process requests memory allocation from the local node. --membind=nodes or -m nodes: Specifies that the process can only request memory allocation from specified nodes. --preferred=node: Specify a recommended node to obtain memory. If the acquisition fails, try another node. --interleave=nodes or -i nodes: Specifies that the process interleavedly requests memory allocation from the specified nodes using the round robin algorithm.
numactl --interleave=all mongod -f /etc/mongod.conf
因为NUMA默认的内存分配策略是优先在进程所在CPU的本地内存中分配,会导致CPU节点之间内存分配不均衡,当开启了swap,某个CPU节点的内存不足时,会导致swap产生,而不是从远程节点分配内存。这就是所谓的swap insanity 现象。或导致性能急剧下降。所以在运维层面,我们也需要关注NUMA架构下的内存使用情况(多个内存节点使用可能不均衡),并合理配置系统参数(内存回收策略/Swap使用倾向),尽量去避免使用到Swap。
Node->Socket->Core->Processor
随着多核技术的发展,将多个CPU封装在一起,这个封装被称为插槽Socket;Core是socket上独立的硬件单元;通过intel的超线程HT技术进一步提升CPU的处理能力,OS看到的逻辑上的核Processor数量。
Socket = Node
Socket是物理概念,指的是主板上CPU插槽;Node是逻辑概念,对应于Socket。
Core = 物理CPU
Core是物理概念,一个独立的硬件执行单元,对应于物理CPU;
Thread = 逻辑CPU = Processor
Thread是逻辑CPU,也就是Processo
lscpu的使用
显示格式:
Architecture:架构
CPU(s):逻辑cpu颗数
Thread(s) per core:每个核心线程,也就是指超线程
Core(s) per socket:每个cpu插槽核数/每颗物理cpu核数
CPU socket(s):cpu插槽数
L1d cache:级缓存(google了下,这具体表示表示cpu的L1数据缓存)
L1i cache:一级缓存(具体为L1指令缓存)
L2 cache:二级缓存
L3 cache:三级缓存
NUMA node0 CPU(s) :CPU上的逻辑核,也就是超线程
执行lscpu,结果部分如下:
root@ubuntu:~# lscpu
Architecture:          x86_64
CPU(s):                32
Thread(s) per core:    1
Core(s) per socket:    8
Socket(s):             4
L1d cache:             32K
L1i cache:             32K
L2 cache:              256K
L3 cache:              20480K
NUMA node0 CPU(s):     0-7
NUMA node1 CPU(s):     8-15
NUMA node2 CPU(s):     16-23
NUMA node3 CPU(s):     24-31
相关推荐:《Linux视频教程》
The above is the detailed content of Let's talk about numa architecture on Linux (detailed explanation with pictures and text). For more information, please follow other related articles on the PHP Chinese website!

Hot AI Tools

Undresser.AI Undress
AI-powered app for creating realistic nude photos

AI Clothes Remover
Online AI tool for removing clothes from photos.

Undress AI Tool
Undress images for free

Clothoff.io
AI clothes remover

AI Hentai Generator
Generate AI Hentai for free.

Hot Article

Hot Tools

Notepad++7.3.1
Easy-to-use and free code editor

SublimeText3 Chinese version
Chinese version, very easy to use

Zend Studio 13.0.1
Powerful PHP integrated development environment

Dreamweaver CS6
Visual web development tools

SublimeText3 Mac version
God-level code editing software (SublimeText3)

Hot Topics
 1378
1378
 52
52
 What is Linux actually good for?
Apr 12, 2025 am 12:20 AM
Linux is suitable for servers, development environments, and embedded systems. 1. As a server operating system, Linux is stable and efficient, and is often used to deploy high-concurrency applications. 2. As a development environment, Linux provides efficient command line tools and package management systems to improve development efficiency. 3. In embedded systems, Linux is lightweight and customizable, suitable for environments with limited resources.
 How to start apache
Apr 13, 2025 pm 01:06 PM
The steps to start Apache are as follows: Install Apache (command: sudo apt-get install apache2 or download it from the official website) Start Apache (Linux: sudo systemctl start apache2; Windows: Right-click the "Apache2.4" service and select "Start") Check whether it has been started (Linux: sudo systemctl status apache2; Windows: Check the status of the "Apache2.4" service in the service manager) Enable boot automatically (optional, Linux: sudo systemctl
 What to do if the apache80 port is occupied
Apr 13, 2025 pm 01:24 PM
When the Apache 80 port is occupied, the solution is as follows: find out the process that occupies the port and close it. Check the firewall settings to make sure Apache is not blocked. If the above method does not work, please reconfigure Apache to use a different port. Restart the Apache service.
 How to monitor Nginx SSL performance on Debian
Apr 12, 2025 pm 10:18 PM
This article describes how to effectively monitor the SSL performance of Nginx servers on Debian systems. We will use NginxExporter to export Nginx status data to Prometheus and then visually display it through Grafana. Step 1: Configuring Nginx First, we need to enable the stub_status module in the Nginx configuration file to obtain the status information of Nginx. Add the following snippet in your Nginx configuration file (usually located in /etc/nginx/nginx.conf or its include file): location/nginx_status{stub_status
 How to start monitoring of oracle
Apr 12, 2025 am 06:00 AM
The steps to start an Oracle listener are as follows: Check the listener status (using the lsnrctl status command) For Windows, start the "TNS Listener" service in Oracle Services Manager For Linux and Unix, use the lsnrctl start command to start the listener run the lsnrctl status command to verify that the listener is started
 How to set up a recycling bin in Debian system
Apr 12, 2025 pm 10:51 PM
This article introduces two methods of configuring a recycling bin in a Debian system: a graphical interface and a command line. Method 1: Use the Nautilus graphical interface to open the file manager: Find and start the Nautilus file manager (usually called "File") in the desktop or application menu. Find the Recycle Bin: Look for the Recycle Bin folder in the left navigation bar. If it is not found, try clicking "Other Location" or "Computer" to search. Configure Recycle Bin properties: Right-click "Recycle Bin" and select "Properties". In the Properties window, you can adjust the following settings: Maximum Size: Limit the disk space available in the Recycle Bin. Retention time: Set the preservation before the file is automatically deleted in the recycling bin
 How to restart the apache server
Apr 13, 2025 pm 01:12 PM
To restart the Apache server, follow these steps: Linux/macOS: Run sudo systemctl restart apache2. Windows: Run net stop Apache2.4 and then net start Apache2.4. Run netstat -a | findstr 80 to check the server status.
 How to optimize the performance of debian readdir
Apr 13, 2025 am 08:48 AM
In Debian systems, readdir system calls are used to read directory contents. If its performance is not good, try the following optimization strategy: Simplify the number of directory files: Split large directories into multiple small directories as much as possible, reducing the number of items processed per readdir call. Enable directory content caching: build a cache mechanism, update the cache regularly or when directory content changes, and reduce frequent calls to readdir. Memory caches (such as Memcached or Redis) or local caches (such as files or databases) can be considered. Adopt efficient data structure: If you implement directory traversal by yourself, select more efficient data structures (such as hash tables instead of linear search) to store and access directory information


