
 Web Front-end
Front-end Q&A
Recommended to collect! Take you step by step and teach you how to get started with express
Web Front-end
Front-end Q&A
Recommended to collect! Take you step by step and teach you how to get started with express
Recommended to collect! Take you step by step and teach you how to get started with express

This article brings you relevant knowledge about express. Express is a fast, open, and minimalist web development framework based on the Node.js platform. I hope it will be helpful to everyone.

express
Introduction
Express is based on the Node.js platform, fast, open, and minimalist Web development framework. Build a web server
The essence of Express: It is a third-party package on npm, which provides a convenient method to quickly create a web server.
Using the Express development framework, you can easily and quickly create a Web website server or API interface server
Official website: https://www.expressjs.com.cn/
Simple use
Download and install:
npm init -ynpm i express -S
Usage steps:
- Import package
- Create server
- Processing Request
- Listening port
const express = require('express')const app = express()app.get(路由,回调) // get是请求方法app.listen(端口号)Routing method
The request method also supports:
get - query request-conditions in the address bar
post - New request - The data is in the request body
put - Modify request - The condition is in the address bar - The data is in the request body
delete - Delete request - The condition is in the address bar
Each verb method is used to handle the corresponding request. Except for one method:
app.all() // 可以用来处理任意请求方式
Although the all method can handle any request, try to use it as little as possible, or even try not to use it.
Use postman for debugging
Routing path
Exact match
// 匹配根路径的请求app.get('/', function (req, res) {
  res.send('root');});// 匹配 /about 路径的请求app.get('/about', function (req, res) {
  res.send('about');});// 匹配 /random.text 路径的请求app.get('/random.text', function (req, res) {
res.send('random.text');});Incomplete match
// 匹配 acd 和 abcdapp.get('/ab?cd', function(req, res) {
  res.send('ab?cd');});// 匹配 abcd、abbcd、abbbcd等app.get('/ab+cd', function(req, res) {
  res.send('ab+cd');});// 匹配 abcd、abxcd、abRABDOMcd、ab123cd等app.get('/ab*cd', function(req, res) {
  res.send('ab*cd');});// 匹配 /abe 和 /abcdeapp.get('/ab(cd)?e', function(req, res) {
res.send('ab(cd)?e');});Characters?, , * and () are subsets of regular expressions, - and . are interpreted literally in string-based paths.
Regular matching:
// 匹配任何路径中含有 a 的路径:app.get(/a/, function(req, res) {
  res.send('/a/');});// 匹配 butterfly、dragonfly,不匹配 butterflyman、dragonfly man等app.get(/.*fly$/, function(req, res) {
res.send('/.*fly$/');});Multiple processing of routing
Use a callback function to process routing:
app.get('/example/a', function (req, res) {
res.send('Hello from A!');});Multiple processing:
app.get('/example/b', function (req, res, next) {
  console.log('这处理完之后会交给下一个函数处理');
  next();}, function (req, res) {
res.send('Hello from B!');});Use callback function array to process routes:
var cb0 = function (req, res, next) {
  console.log('CB0')
  next()}var cb1 = function (req, res, next) {
  console.log('CB1')
  next()}var cb2 = function (req, res) {
res.send('Hello from C!')}app.get('/example/c', [cb0, cb1, cb2])Mix using functions and function arrays to process routes:
var cb0 = function (req, res, next) {
  console.log('CB0')
  next()}var cb1 = function (req, res, next) {
  console.log('CB1')
  next()}app.get('/example/d', [cb0, cb1], function (req, res, next) {
  console.log('response will be sent by the next function ...')
  next()}, function (req, res)
        {
res.send('Hello from D!')})Response method
res.download() // 提示下载文件。
res.end() // 终结响应处理流程。
res.json() // 发送一个 JSON 格式的响应。
res.jsonp() // 发送一个支持 JSONP 的 JSON 格式的响应。
res.redirect() // 重定向请求。
res.render() // 渲染视图模板。
res.send() // 发送各种类型的响应。
res.sendFile() // 以八位字节流的形式发送文件。
res.sendStatus() // 设置响应状态代码,并将其以字符串形式作为响应体的一部分发送。
download example:
// 响应下载 - res.download(被下载的源文件,下载后的文件名称,回调函数)res.download("./test.html",'b.html',err=>{
    if(err){
        console.log("下载失败");
    }else{
        console.log("下载成功");
}})json example:
// 给客户端响应json数据// res.json(json格式的数据)let obj = {
    name:"张三",
    age:12,
    wife:"翠花",
children:['阿大','阿二','小明']}res.json(obj)jsonp example:
// 给客户端发起的jsonp请求做响应,响应的是json数据// res.jsonp(json格式的数据)let obj = {
    name:"张三",
    age:12,
    wife:"翠花",
children:['阿大','阿二','小明']}res.jsonp(obj)redirect example:
// res.redirect() 用来跳转路由的 - /a这个路由,其实/b这个路由就正好可以处理他,就可以在/a这个路由处理中,将这次请求交给/b这个路由去处理res.redirect('/index')app.get('/index',(req,res)=>{
    let data = fs.readFileSync('./test.html')
res.end(data)})send example:
// res.send() - 用于给客户端响应字符串的 - 字符串中如果是标签,可解析成html - 自动设置数据类型和编码let html = `
<h2 id="这是一个h-标签">这是一个h2标签</h2>
`// res.end 不会自动设置数据类型,也不会设置编码// res.end(html)res.send(html)
sendFile example:
// res.sendFile() 用于给客户端响应一个文件res.sendFile(__dirname + '/test.html')
sendStatus example:
// sendStatus是自动设置响应状态码,并将对应的响应状态描述响应给客户端
res.sendStatus(404) // 响应 not found
res.sendStatus(200) // 响应 ok
Attributes of the request object
req.url // 请求的路径 - 如果有?传参,这个路径中也会带有参数
req.method // 请求方法
req.path // 请求路径 - 如果有?传参,这个路径中不包含参数
req.protocol // 协议
req.params // 获取get请求的参数 - 针对动态路由传参 - restful风格的参数 - 最终获取到的是对象,对象的键,就是路径指定的名称
req.query // 获取get请求的参数 - 针对传统形式传参 - 使用?参数 - 最终获取到的是对象
Static resource hosting
express provides a very easy-to-use method called express.static (), through this method, you can easily create a static web resource server:
app.use(express.static('public'))
// app.use()表示使用(中间件)
// 现在可以访问public目录下所有的文件
// 如public/aa.jpg文件,则可以通过 : http://xxxx/images/aa.jpgexpress also supports creating a virtual file prefix for static resource files (actually does not exist in the file system), you can use the express.static function to specify a virtual static directory, as follows:
The meaning of the prefix:
- Can confuse others and prevent others from guessing the directory structure of our server to a certain extent
- Can help us better organize and manage static resources
app.use('/static', express.static('public'))The "/" in front of the prefix must be added, otherwise it will be wrong. 【404】
Now you can use /static as the prefix to load files in the public folder:
http://localhost:3000/static/images/kitten.jpg
http://localhost:3000/static/css/style.css
http://localhost:3000/static/js/app.js
http://localhost:3000/static/images/bg.png
http://localhost:3000/static/hello.html
Use the app.use() method Generally is written before the specific route monitoring.
Each application can have multiple static directories.
app.use(express.static('public'))app.use(express.static('uploads'))app.use(express.static('files'))Routing
Introduction
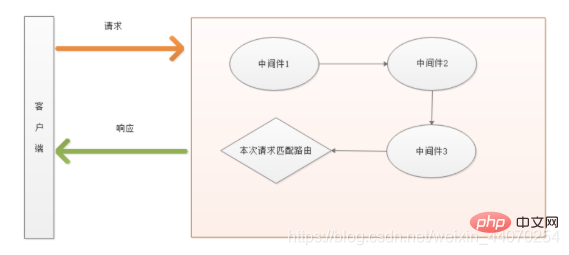
Routing in life, such as when making a service call, what kind of processing can be done by pressing the number? It is similar to the connection between the button and the service The mapping relationship. In Express, routing refers to the mapping relationship between the request (address) initiated by the client and the server-side processing method (function).
The route in express is divided into three parts, namely the request type (method), the request uri (address) and the corresponding processing function .
When a client request reaches the server, it is first matched by routing rules. Only after the match is successful, the corresponding processing function will be called. When matching, will be matched in the order of routing . If the request type and the requested URL are successfully matched at the same time, Express will transfer the request to the corresponding function for processing .
app.<get>(uri,(req,res)=>{})// use方法并不是请求类型方法,但是它放的位置与请求方法一致</get>Routing modularization
Meaning: Split the routing rules that may originally be written in one file into several routing files (js files, one js file is a module).
As the name suggests, routing is modularized,is managed in units of modules (js files), and birds of a feather flock together.
Core idea: Dismantle it if you can (dismantle it until it cannot be dismantled, decoupling, high cohesion, low coupling). When developing a project, if all routing rules are mounted in the entry file, program writing and maintenance will become more difficult. Therefore, express uses the express.Router() method to create a routing modular handler for the modular management function of routing, which can separate different business requirements into different modules, thereby facilitating code maintenance and project expansion. Steps:- Specify the request at the beginning of the path, use app.use (beginning of path, processing module)
app.use('/admin',adminRouter) // /admin开头的请求路径,交给adminRouter模块处理app.use('/front',frontRouter) // /front开头的请求路径,交给frontRouter模块处理Copy after login - This module is not defined, define this module
let {adminRouter} = require('./admin/admin')let {frontRouter} = require('./front/front')Copy after login -
导入的文件还未定义,创建文件
const express = require('express')const adminRouter = express.Router() // 创建路由对象// 通过路由对象处理剩余的请求adminRouter.get('/goods',(req,res)=>{
    res.send('这是admin模块的goods页面')})// 导出模块module.exports = {adminRouter}
Copy after login
此时,我们又两种方案去处理请求:
- app.get/post/use …
- express.Router().get/post …
- app.route(路径).get/post()
同一个请求路径使用不同的请求方法多次请求的简写:
app.route('/book')
  .get(function(req, res) {
    res.send('Get a random book');
  })
  .post(function(req, res) {
    res.send('Add a book');
  })
  .put(function(req, res) {
    res.send('Update the book');
});中间件
中间件(middleware)可以理解为业务流程的中间处理环节,可以理解成中间过滤器。
中间件的分类
中间件可以分类可分如下几类:
-
内置中间件,也就是express本身自带无需npm安装
- express.static()
-
第三方中间件
非 Express 官方内置的,而是由第三方开发出来的中间件,叫做第三方中间件。在项目中可以通过npm进行安装第三方中间件并配置,从而提高项目的开发效率。例如body-parser (解析post数据的)此中间件可以很方便帮助我们获取到post提交过来的数据。
自定义中间件,开发者自己编写的(中间件的本质其实就是一个function)
如果从使用层面去考虑,中间件可以划分为:
- 应用级别中间件(通过app.get/post/use等方法绑定到app实例的中间件)
- 全局使用中间件(所有路由都生效)
- app.use(中间件)
- 局部使用中间件(当前路由生效)
- app.请求方法(地址,[中间件…,]回调函数)
- app.请求方法(地址,中间件1,中间2,中间3…,]回调函数)
- 全局使用中间件(所有路由都生效)
- 路由级别中间件(绑定到express.Router()上的中间件)
- 其用法与应用级别的中间件没有任何区别,只是一个绑在app实例上,一个绑在router上
- router.use(中间件)
- router.请求方法(地址,[中间件…,]回调函数)
- 其用法与应用级别的中间件没有任何区别,只是一个绑在app实例上,一个绑在router上
内置中间件
express提供了好用的内置中间件,如提供一个静态资源管理的中间件,通过此中间件就可以帮助为我们快速搭建一个静态资源服务器:
app.use('前缀',express.static('托管目录地址'))在express中,除了内置的express.static()中间件,还内置了另外2个常用的中间件:
-
express.json()
- 作用:接收json格式提交的数据
- 兼容性问题:express >= 4.16.0
app.use(express.json())- 其在接收完数据后,会将数据的对象形式挂载到
req请求对象的body属性上
使用示例:
// 有了这个中间件以后,我们可以从客户端给服务器端发送json数据,这个json数据会放到请求对象req的body属性上app.use(express.json())app.post('/p1',(req,res)=>{
    // express.json中间件可以让数据挂在req的body属性上
    console.log(req.body);
    res.send('this p1 request is ended')})
Copy after login首先必须是post请求,然后必须有数据,但是数据不能是以前的 x-www-form-urlencoded这样的数据,必须是raw的数据
然后请求头的content-type 必须是 application/json
-
express.urlencoded()
- 作用:处理post表单数据
- 兼容性问题:express >= 4.16.0
app.use(express.urlencoded({extended: false}))- 其在接收完数据后,会将数据的对象形式挂载到
req请求对象的body属性上
注意,
- 后面提及的这2个常用内置中间件存在兼容性问题。
- 上述2个中间件都说把数据处理之后挂到req.body上,但是实际上并不会出现我们想的覆盖的问题。
案例:使用json、urlencoded中间件来接收json数据与表单post数据,发送可以通过postman来进行
自定义中间件
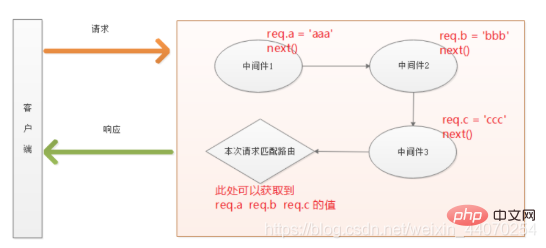
自定义中间件,其本质就是定义一个处理请求的函数,只是此函数中除了有request和response参数外还必须包含一个next参数,此参数作用让中间件能够让流程向下执行下去直到匹配到的路由中发送响应给客户端。也可以通过给request对象添加属性来进行中间件数据的向下传递
function mfn(req,res,next){
    //. 自己需要定义的逻辑流程
	// 中间件最后一定要执行此函数,否则程序无法向下执行下去
next()}注意:在整个请求链路中,所有中间件与最终路由共用一份req和res
案例:依据上述的共用特性,自定义一个中间件来接收post提交的表单数据(意义:内置那中间件是不是存在兼容性问题)
第三方中间件
在express中,其允许我们使用第三方的中间件来进行对数据进行处理。比较典型的例如:可以使用第三方中间件来接收post数据。
以使用body-parser中间件来接收post数据为例,步骤如下:
- 安装三方中间件
body-parsernpm i -S body-parser
- 应用文件中导入
body-parser - 通过中间件调用
app.use(body.urlencoded({extended: false})) - 在匹配的路由中通过
req.body获数post中数据- Express内置的express.urlencoded中间件,就是基于body-parser这个第三方中间件进一步封装出来的。但内置的有版本兼容问题,所以一般项目选择安装使用第三方的中间件
在使用的时候,
body-parser库的语法与前面看的express内置的express.urlencoded中间件的语法非常相似,原因是内置中间件是基于body-parser来实现的。
其他第三方中间件:http-proxy-middleware/cors/cookie-session …
异常处理中间件
**作用:**专门用来捕获整个项目发生的异常错误,从而防止项目异常崩溃的问题产生(友好显示异常)。
**格式:**错误级别中间件的函数参数中,必须有四个形参,分别是(err,req,res,next)
问:多出来的err参数有什么作用呢?
答:里面包含了错误的信息,err.message属性中就包含了错误的文本信息,这个信息可以在中间件中输出给用户看。
app.get('/',(req,res) => {
    throw new Error('服务器内部发生了致命的错误!')
    res.send('Welcome to my homepage')})app.use((err,req,res,next) => {
    console.log('发生了错误:' + err.message)
res.send('Error!' + err.message)})**案例:**要求指定一个路径(可能路由对应的文件不存在),读取文件内容,输出给用户
注意事项:错误级别中间件要想发挥其作用,必须写在所有的路由的后面,是否是app.listen之前无所谓。
404中间件
**作用:**用于处理404的请求响应
// 假设定义这个路由,但是实际请求的时候请求了/12345,这个时候就会404app.post("/1234", (req, res, next) => {
    res.send('你请求成功了')});// 404的输出// 该中间件也需要写在最后(与异常中间件的顺序无所谓,只要确保其在所有的路由方法之后就可)app.use((req,res,next) => {
    // 输出404错误
    res.status(404).send('<h1 id="">404</h1>')
// 先指定404状态码,然后再输出错误信息})404错误中间件也要求在所有的正常请求路由的后面去声明使用,不要放在路由的前面,否则会导致后面的路由都是404错误。
**注意点:**错误级别的中间件,必须在所有路由之后注册,至于404中间件与异常中间件,谁先谁后无所谓。
模板页面:页面:https://404.life/
其他模块
cookie
cookie的原理是在浏览器中开辟了一个用来存储http请求中的数据,第一次保存之后,下次请求只要还是使用的当前浏览器,就能访问到浏览器这个空间中的数据。
cookie会作为键值对,在响应头和请求头之间携带。
cookie的特点:
- 域名限制,当前域名下设置的cookie,只能在当前域名下使用
- 时效性,cookie不会永久存储在浏览器,具有一定的有效期
- 数量限制,正常情况下,每个域名最多不能超过50个cookie
- 空间限制,cookie只能存储4kb
- 数据类型限制,cookie中只能存储字符串
npm i cookie-parser -S
使用:
// 导入
const cookieParser = require('cookie-parser')
// 中间件
app.use(cookieParser());
// 请求头获取
req.headers.cookie // 获取所有cookie
// 响应头设置
res.cookie(键,值,{maxAge: 有效期-毫秒}) // 设置cookiesession
cookie是存储在浏览器的,所以安全性不高,所以一些重要数据就不能存储在cookie中,且cookie的存储空间有限制,所以就有了session。
session是存储服务器端的,session需要依赖cookie,session数据存储会在cookie中存放一个sessionid,这个sessionid会跟服务器端之间产生映射关系,如果sessionid被篡改,他将不会跟服务器端进行隐射,因此安全系数更高。且session的有效期比较短。通常是20分钟左右,如果浏览器在20分钟内没有跟服务器进行交互,服务器就会删除session数据。
npm i cookie-session -S
使用:
// 导入:const session = require('cookie-session')// session配置session({
    name:"sessionId",
    secret:"asdfasdfqwer", // 给sessioinId加密使用的秘钥,随便填写
maxAge:20*60*1000 // 20分钟})// 设置sessionreq.session[键] = 值// 获取sessionreq.session[键]加密
npm i bcryptjs -S
使用:
var bcrypt = require('bcryptjs');
// 加密
密文 = bcryptjs.hashSync(明文[,数字]); // 数字,将使用指定的轮数生成盐并将其使用。推荐 10
// 验证
bcryptjs.compareSync(明文,密文); // 通过返回true,失败返回falsejwt
npm install jsonwebtoken
使用:
// 加密生成tokenvar jwt = require('jsonwebtoken');var token = jwt.sign(被加密的对象, 盐);// 验证jwt.verify(token, 盐, function(err, decoded) {
// decoded是解密后的对象});文件上传
npm i multer -S
使用:
var multer  = require('multer')var upload = multer({ dest: path.join(__dirname,'public','image') }) // 指定上传的文件路径app.post('/profile', upload.single('上传表单name值'), function (req, res, next) {
// req.file 是上传的文件信息 - 可以从中获取到文件名称、路径、后缀 - 拼接路径存入mongodb})mysql
npm i mysql -S
使用:
// 导入const mysql = require("mysql");// 创建连接对象const db = mysql.createConnection({
    host:"localhost",
    user:"root",
    password:"root",
    database:"test"});// 连接db.connect(err=>{
    if(err){
        console.log("连接失败,错误:"+err);
        return;
    }
    console.log("连接成功");});// 执行语句db.query("",(err,result)=>{
    if(err){
        console.log("失败,错误:"+err);
        return;
    }
    console.log("成功");
console.log(result);});验证码
npm i svg-captcha -S
使用:
const svgCaptcha = require('svg-captcha')
// 创建验证码
let captcha = svgCaptcha.create();
// captcha是是一个对象,其中包含data键和text键,text是验证码上的字符,data是一个svg标签直接可以显示为一张图片邮件发送
npm install nodemailer --save
使用:
const nodemailer = require('nodemailer')// 1. 创建发送器const transport = nodemailer.createTransport({
  // 需要你发送放邮箱的 stmp 域名和密码和一些其他信息
  // 需要你去复制一下, 找到下载的 nodemailer 第三方包
  //   nodemailer -> lib -> well-known -> services.json
  "host": "smtp.qq.com",
  "port": 465,
  "secure": true,
  // 证明你的身份
  auth: {
    // 发送方邮箱的用户名
    user: '邮箱号',
    // stmp 允许密码
    pass: '授权码'
  }})// 2. 发送邮件transport.sendMail({
  // 从那个邮箱发送
  from: '发送方邮箱',
  // 发送到哪里, 可以写一个字符串, 书写邮箱, 也可以写一个数组, 写好多邮箱
  to: ['接收方邮箱', '接收方邮箱'],
  // 邮件标题
  subject: '标题',
  // 本次邮件的 超文本 内容
  html: `
    您好: 本次的验证码是
    <h1 id=""> 2345 </h1>
    请在 3 分钟内使用


    <br>
    ------------------------<br>
    前途无限股份有限公司
  `,
  // 本次邮件的 文本 内容
  // text: ''}, function (err, data) {
  if (err) return console.log(err)

  console.log('邮件发送成功')
console.log(data)})模板引擎
介绍
在一个web应用程序中,如果只是使用服务器端代码来编写客户端html代码,前后端不分离,那么会造成很大的工作量,而且写出来的代码会比较难以阅读和维护。如果只是使用客户端的静态的HTML文件,那么后端的逻辑也会比较难以融入到客户端的HTML代码中。为了便于维护,且使后端逻辑能够比较好的融入前端的HTML代码中,同时便于维护,很多第三方开发者就开发出了各种Nodejs模板引擎,其中比较常用的就是Jade/Pug、Ejs和art-template 等模板引擎。
目的:使后端逻辑能够比较好的融入前端的HTML代码中,同时便于维护
网址:
- http://aui.github.io/art-template/zh-cn/
- http://aui.github.io/art-template/express/
art-template 是一个简约、超快的模板引擎。
开发模式:
传统开发模式:
前端代码和后端代码写在了一起
混合在了一起,但是这种文件有要求,文件通常都是后端语言的文件中才能写后端的逻辑 - 这样的话,对于我们前端攻城狮特别不友好,因为我们前端攻城狮负责html页面,但是在html页面中不能写后端的逻辑,如果将html页面放在后端的文件中,我们又需要学习后端语言
此时,模板引擎出现了 - 模板引擎其实就是让我们可以在html页面中书写后端的逻辑 - 循环/判断 …
模板引擎有很多种:jade/ejs/art-tamplate …
模板引擎最终能在html中写逻辑,相当于我们代码前后端混合在一起的一种语法,最终为什么能被浏览器所识别?因为浏览器在识别之前,我们的模板引擎需要进行编译 - html代码
前后端分离开发模式:
html一个人去写;
后端接口另一个人去写;
双方之间对接,使用接口文档
html上所有的数据,都是通过ajax请求回来,并通过dom操作显示在页面中的
模板引擎渲染速度测试:
特性
- 拥有接近 JavaScript 渲染(DOM操作)极限的的性能(快)
- 调试友好:语法、运行时错误日志精确到模板所在行;支持在模板文件上打断点(Webpack Loader)
- 支持 Express、Koa、Webpack
- 支持模板继承(布局)与子模板(引入包含)
- 浏览器版本仅 6KB 大小
使用
下载安装:
# 安装
npm i -S art-template express-art-template
配置:
// 模板引擎配置
// 指定art-template模板,并指定模块后缀为.html
app.engine('html', require('express-art-template'));
// 指定模板视图路径
app.set('views', path.join(__dirname, 'views'));
// 省略指定模块文件后缀后名称(可选,在渲染时可以省略的后缀)
app.set('view engine', 'html') art-template 支持**标准语法与原始语法**。标准语法可以让模板易读写,而原始语法拥有强大的逻辑表达能力。标准语法支持基本模板语法以及基本 JavaScript 表达式;原始语法支持任意 JavaScript 语句,这和 Ejs一样。
-
使用art-template展示一个视图(html文件)
将视图放入views目录下(允许分目录)
-
编写代码,展示视图的方式是`res.redner(文件的路径)
app.get('/', (req, res) => {
    // 输出视图
    res.render('404.html')})
Copy after login
-
控制层返回数据(在js控制层中赋值变量到视图中)
app.get(uri,(req,res)=>{
	res.render(模板,{
		username: '张三',
        age: 25,
        gender: '女',
        hobby: ['篮球','乒乓球','羽毛球']
	})})
Copy after login
模板语法
变量输出:
<!-- 标准语法 -->{{ username }}<!-- 或者 --><!-- 原始语法 -->在默认情况下,上述输出方式不能将带有HTML标记的内容让浏览器解析,只会原样输出。如果需要将HTML标记让浏览器,则请使用下述方式输出数据:
<!-- 标准语法 -->{{@ username}}<!-- 原始语法 -->条件判断:
{{if 条件}} … {{else if 条件}} … {{/if}}
… … 循环:
<!-- 支持 数组和对象的迭代  默认元素变量为$value 下标为$index  可以自定义 {{each target val key}}-->{{each 循环的数据}}
    {{$index}} {{$value}}
{{/each}}

{{each 循环的数据 val key}}
    {{key}} {{val}}
{{/each}}
如果使用默认的键、值的名字(index,value)则其前面的
$一定要写!一定要写!!!如果使用的自定义的键、值的名字,则前面的
$一定不能写!!不能写!!
模板导入:
{{include '被引入文件路径'}}
- 如果是当前路径下的一定要写
./,不写则从磁盘根下开始寻找- 被include的文件后缀名默认为
.art,如果不是请勿省略- 在子模板中最好不要有html、head和body标签(否则容易出现样式错误的问题)
模板继承:
被继承的模板:
    <meta>
    <!-- 类似于vue的插槽 -->
    <title>{{block 'title'}}My Site{{/block}}</title>
	<!-- block占位符 content此占位的名称 -->
{{block 'content'}}{{/block}}需要继承的子模板:
<!--extend 继承 -->{{extend './layout.html'}}
{{block 'title'}}首页{{/block}}
{{block 'content'}} <p>This is just an awesome page.</p>{{/block}}bootcss在线构建器:https://www.bootcss.com/p/layoutit/
更多编程相关知识,请访问:编程入门!!
The above is the detailed content of Recommended to collect! Take you step by step and teach you how to get started with express. For more information, please follow other related articles on the PHP Chinese website!

Hot AI Tools

Undresser.AI Undress
AI-powered app for creating realistic nude photos

AI Clothes Remover
Online AI tool for removing clothes from photos.

Undress AI Tool
Undress images for free

Clothoff.io
AI clothes remover

Video Face Swap
Swap faces in any video effortlessly with our completely free AI face swap tool!

Hot Article
Hot Tools

Notepad++7.3.1
Easy-to-use and free code editor

SublimeText3 Chinese version
Chinese version, very easy to use

Zend Studio 13.0.1
Powerful PHP integrated development environment

Dreamweaver CS6
Visual web development tools

SublimeText3 Mac version
God-level code editing software (SublimeText3)
Hot Topics
 1386
1386
 52
52

 How to use express to handle file upload in node project
Mar 28, 2023 pm 07:28 PM
How to use express to handle file upload in node project
Mar 28, 2023 pm 07:28 PM
How to handle file upload? The following article will introduce to you how to use express to handle file uploads in the node project. I hope it will be helpful to you!
 Comparative analysis of Express and Laravel: Choose the framework that suits you better
Mar 10, 2024 pm 10:15 PM
Comparative analysis of Express and Laravel: Choose the framework that suits you better
Mar 10, 2024 pm 10:15 PM
Express and Laravel are two very popular web frameworks, representing the excellent frameworks of the two major development languages of JavaScript and PHP respectively. This article will conduct a comparative analysis of these two frameworks to help developers choose a framework that is more suitable for their project needs. 1. Framework Introduction Express is a web application framework based on the Node.js platform. It provides a series of powerful functions and tools that enable developers to quickly build high-performance web applications. Express
 In-depth comparison of Express and Laravel: How to choose the best framework?
Mar 09, 2024 pm 01:33 PM
In-depth comparison of Express and Laravel: How to choose the best framework?
Mar 09, 2024 pm 01:33 PM
In-depth comparison of Express and Laravel: How to choose the best framework? When choosing a back-end framework suitable for your project, Express and Laravel are undoubtedly two popular choices among developers. Express is a lightweight framework based on Node.js, while Laravel is a popular framework based on PHP. This article will provide an in-depth comparison of the advantages and disadvantages of these two frameworks and provide specific code examples to help developers choose the framework that best suits their needs. Performance and scalabilityExpr
 Let's talk about how node+express operates cookies
Jun 22, 2022 am 10:01 AM
Let's talk about how node+express operates cookies
Jun 22, 2022 am 10:01 AM
How does node+express operate cookies? The following article will introduce to you how to use node to operate cookies. I hope it will be helpful to you!
 Express vs. Laravel: Comparing the advantages and disadvantages, which one will you choose?
Mar 10, 2024 am 08:39 AM
Express vs. Laravel: Comparing the advantages and disadvantages, which one will you choose?
Mar 10, 2024 am 08:39 AM
Express vs. Laravel: Comparing the advantages and disadvantages, which one will you choose? In the field of web development, Express and Laravel are two frameworks that have attracted much attention. Express is a flexible and lightweight web application framework based on Node.js, while Laravel is an elegant and feature-rich web development framework based on PHP. This article will compare the advantages and disadvantages of Express and Laravel in terms of functionality, ease of use, scalability, and community support, and combine
 How to build a full-stack JavaScript application using React and Express
Sep 26, 2023 pm 01:09 PM
How to build a full-stack JavaScript application using React and Express
Sep 26, 2023 pm 01:09 PM
How to use React and Express to build a full-stack JavaScript application Introduction: React and Express are currently very popular JavaScript frameworks. They are used to build front-end and back-end applications respectively. This article will introduce how to use React and Express to build a full-stack JavaScript application. We will explain step by step how to build a simple TodoList application and provide specific code examples. 1. Preparation before starting
 How to build a simple blog system using Node.js
Nov 08, 2023 pm 06:45 PM
How to build a simple blog system using Node.js
Nov 08, 2023 pm 06:45 PM
How to use Node.js to build a simple blog system Node.js is a JavaScript runtime environment based on the ChromeV8 engine, which can make JavaScript run more efficiently. With the help of Node.js, we can build powerful server-side applications using JavaScript, including blogging systems. This article will introduce you to how to use Node.js to build a simple blog system and provide you with specific code examples. Press
 Express or Laravel? Choose the backend framework that works best for you
Mar 10, 2024 pm 06:06 PM
Express or Laravel? Choose the backend framework that works best for you
Mar 10, 2024 pm 06:06 PM
When it comes to choosing a backend framework, both Express and Laravel are very popular choices. Express is a web application development framework based on Node.js, while Laravel is a web application development framework based on PHP. Both have their own advantages, and choosing the framework that best suits you requires considering many factors. The strengths of the Express framework are its flexibility and easy learning curve. The core idea of Express is "small enough and flexible enough", and it provides a large number of middleware
