

What to do if xshell fails to connect to centos

xshell连接centos失败的解决办法:1、打开虚拟机,设置子网IP;2、设置网关IP;3、修改网卡文件内容;4、通过“systemctl restart network”重启网络即可。

本文操作环境:CentOS 7系统、DELL G3电脑
xshell连接centos失败怎么办?
Xshell连接CentOS失败,记录一次CentOS7.6网络连接的步骤(笔记)
问题:本来在公司可以正常连接网络,回到学校换了学校的无线网络之后连接不上网络,Xshell连接Linux失败,CentOSping外网不通,这里记录一下解决办法(通过设置Linux静态Ip)。
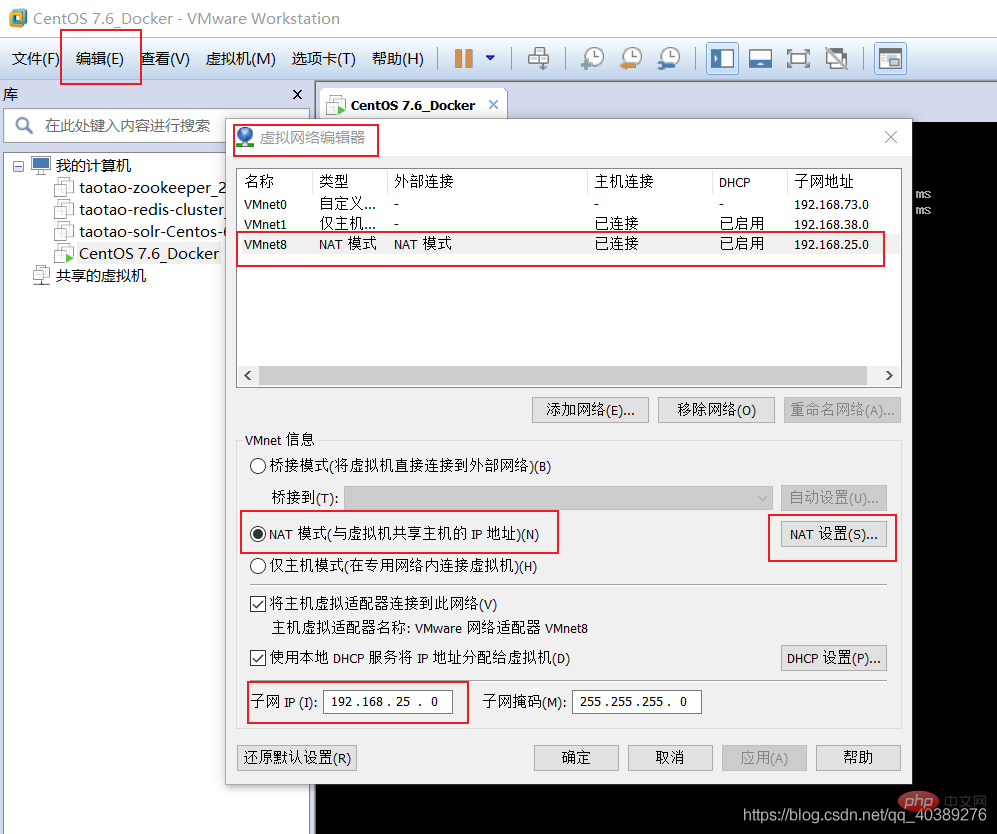
打开虚拟机-编辑-虚拟网络编辑器-设置子网IP

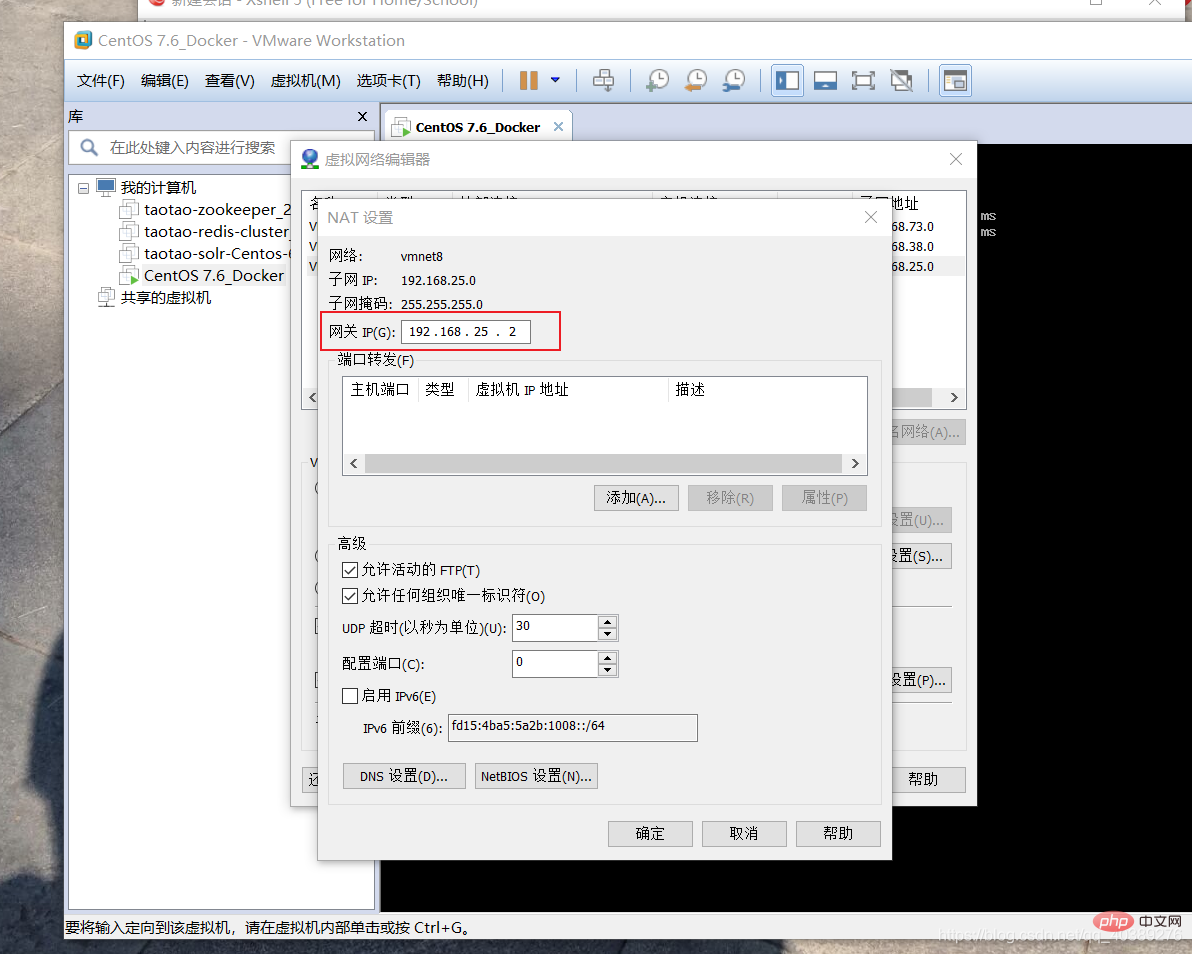
上图打开NAT设置之后,设置网关IP(要和子网IP在一个网段)
-
修改网卡文件内容,使用vim模式打开网卡文件
打开网卡文件命令:
vi /etc/sysconfig/network-scripts/ifcfg-ens33
如果不知道网卡文件名,可以使用以下命令查看:ll /etc/sysconfig/network-scripts/ | grep ifcfg-en
打开之后修改和添加如下:
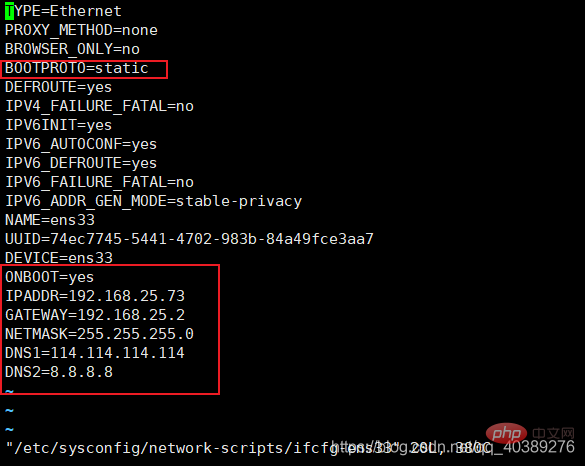
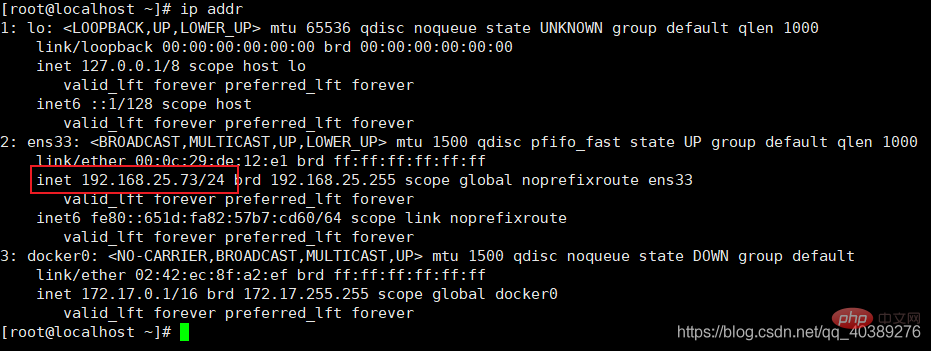
BOOTPROTO=static
ONBOOT=yes
IPADDR=192.168.25.73
GATEWAY=192.168.25.2
NETMASK=255.255.255.0
DNS1=114.114.114.114
DNS2=8.8.8.8
- IPADDR:为设置的IP,更改为和子网IP在同一网段的自定义IP
- GATEWAY:为虚拟网络编辑器设置的网关IP,这个要与自己的网关IP一致(注意)
- NETMASK:子网掩码
- 其它都一致即可
查看网关IP: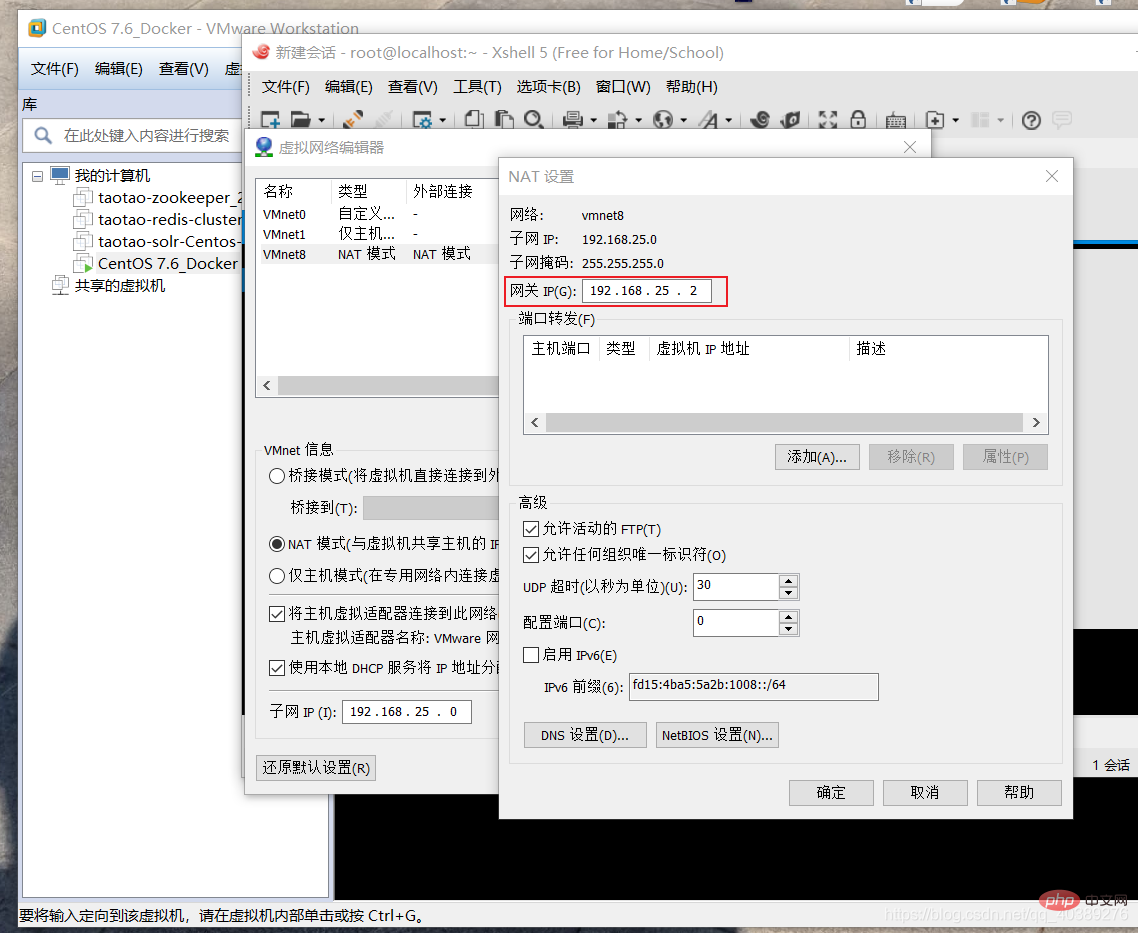
- 设置完成之后,保存退出,重启网络
systemctl restart network - 查看CentOS中的IP,通过
ip addr命令查看
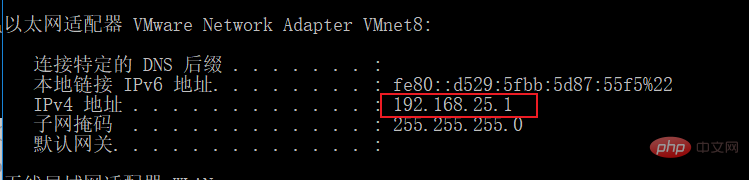
- 打开WIndows下的命令行,输入cmd进入命令行,然后输入
ipconfig命令查看IP,确保和CentOS下的IP在同一个网段即为设置成功
设置成功之后,本机pingCentOS,CentOSping本机,CentOSping外网都可以成功!!!
推荐:《centos使用教程》
The above is the detailed content of What to do if xshell fails to connect to centos. For more information, please follow other related articles on the PHP Chinese website!

Hot AI Tools

Undresser.AI Undress
AI-powered app for creating realistic nude photos

AI Clothes Remover
Online AI tool for removing clothes from photos.

Undress AI Tool
Undress images for free

Clothoff.io
AI clothes remover

AI Hentai Generator
Generate AI Hentai for free.

Hot Article
Hot Tools

Notepad++7.3.1
Easy-to-use and free code editor

SublimeText3 Chinese version
Chinese version, very easy to use

Zend Studio 13.0.1
Powerful PHP integrated development environment

Dreamweaver CS6
Visual web development tools

SublimeText3 Mac version
God-level code editing software (SublimeText3)
Hot Topics


 CentOS7 various version image download addresses and version descriptions (including Everything version)
Feb 29, 2024 am 09:20 AM
CentOS7 various version image download addresses and version descriptions (including Everything version)
Feb 29, 2024 am 09:20 AM
When loading CentOS-7.0-1406, there are many optional versions. For ordinary users, they don’t know which one to choose. Here is a brief introduction: (1) CentOS-xxxx-LiveCD.ios and CentOS-xxxx- What is the difference between bin-DVD.iso? The former only has 700M, and the latter has 3.8G. The difference is not only in size, but the more essential difference is that CentOS-xxxx-LiveCD.ios can only be loaded into the memory and run, and cannot be installed. Only CentOS-xxx-bin-DVD1.iso can be installed on the hard disk. (2) CentOS-xxx-bin-DVD1.iso, Ce
 How to set the background color in Xshell - How to set the background color in Xshell
Mar 04, 2024 pm 10:22 PM
How to set the background color in Xshell - How to set the background color in Xshell
Mar 04, 2024 pm 10:22 PM
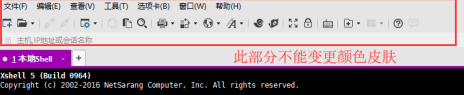
Speaking of Xshell software, I believe that all the users here are familiar with it, but do you know how to set the background color of Xshell? The following article brings the method of setting the background color of Xshell. Interested users, please come and take a look below. How to set the background color of xshell. Open the xshell tool, click the menu bar---tab. Click the tab, you can choose to set the color, such as yellow, purple, red. For example, if you choose red, the tab background will become red. Change the toolbar color. It was just a demonstration change of the tab. The toolbar color cannot be adjusted. It can be changed to transparent and the default simple mode as shown in the picture. Check the transparent mode on the left and right. Tool background modification If you want to modify the remote window background, you can select Tools-Color Scheme Root
 Steps to enter CentOS 7 emergency repair mode
Jan 13, 2024 am 09:36 AM
Steps to enter CentOS 7 emergency repair mode
Jan 13, 2024 am 09:36 AM
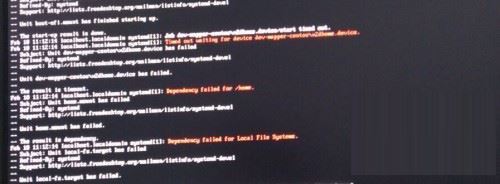
Open the centos7 page and appear: welcome to emergency mode! afterloggingin, type "journalctl -xb" to viewsystemlogs, "systemctlreboot" toreboot, "systemctldefault" to tryagaintobootintodefaultmode. giverootpasswordformaintenance(??Control-D???): Solution: execute r
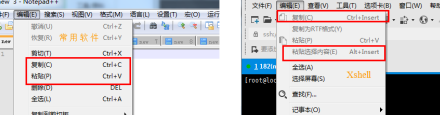 How to quickly copy and paste in Xshell-How to quickly copy and paste in Xshell
Mar 04, 2024 pm 02:30 PM
How to quickly copy and paste in Xshell-How to quickly copy and paste in Xshell
Mar 04, 2024 pm 02:30 PM
Many users have just come into contact with the Xshell software and are not familiar with how to quickly copy and paste in Xshell? The following article brings you how to quickly copy and paste in Xshell. Let us take a look below. Use commonly used copy and paste commands. Ctrl+C and Ctrl+V do not work in Xshell. After checking, it is found that the default copy and paste commands in Xshell are different. As follows, using the default copy and paste command of Xshell, you can copy and paste information, but it is not as good as The speed and convenience of commonly used copy and paste commands are set to quickly copy information: Tools-Options-Keyboard and Mouse, check [Automatically copy selected text to the pasteboard], and confirm the setting to quickly paste information: Tools-Options-Keyboard and Mouse- press right
 How to install mbstring extension under CENTOS7?
Jan 06, 2024 pm 09:59 PM
How to install mbstring extension under CENTOS7?
Jan 06, 2024 pm 09:59 PM
1.UncaughtError:Calltoundefinedfunctionmb_strlen(); When the above error occurs, it means that we have not installed the mbstring extension; 2. Enter the PHP installation directory cd/temp001/php-7.1.0/ext/mbstring 3. Start phpize(/usr/local/bin /phpize or /usr/local/php7-abel001/bin/phpize) command to install php extension 4../configure--with-php-config=/usr/local/php7-abel
 How to install Mysql in CentOS7 and set it to start automatically at boot
Jun 02, 2023 pm 08:36 PM
How to install Mysql in CentOS7 and set it to start automatically at boot
Jun 02, 2023 pm 08:36 PM
Centos7 does not have a mysql database. The default database is mariadb (a branch of mysql). You can install the mysql database manually by following the steps below. 1. Download the rpm installation file wgethttp://repo.mysql.com/mysql-community-release-el7.rpm 2. Execute rpm to install rpm-ivhmysql-community-release-el7.rpm. After the dependency resolution is completed, the following options appear: dependenciesresolved =================================
 How to set password rules in centos7? How to set password rules in centos7
Jan 07, 2024 pm 01:17 PM
How to set password rules in centos7? How to set password rules in centos7
Jan 07, 2024 pm 01:17 PM
Set password rules for security reasons Set the number of days after which passwords expire. User must change password within days. This setting only affects created users, not existing users. If setting to an existing user, run the command "chage -M (days) (user)". PASS_MAX_DAYS60#Password expiration time PASS_MIN_DAYS3#Initial password change time PASS_MIN_LEN8#Minimum password length PASS_WARN_AGE7#Password expiration prompt time Repeat password restriction use [root@linuxprobe~]#vi/etc/pam.d/system-auth#nearline15:
 How to access and clean junk files in /tmp directory in CentOS 7?
Dec 27, 2023 pm 09:10 PM
How to access and clean junk files in /tmp directory in CentOS 7?
Dec 27, 2023 pm 09:10 PM
There is a lot of garbage in the tmp directory in the centos7 system. If you want to clear the garbage, how should you do it? Let’s take a look at the detailed tutorial below. To view the list of files in the tmp file directory, execute the command cdtmp/ to switch to the current file directory of tmp, and execute the ll command to view the list of files in the current directory. As shown below. Use the rm command to delete files. It should be noted that the rm command deletes files from the system forever. Therefore, it is recommended that when using the rm command, it is best to give a prompt before deleting the file. Use the command rm-i file name, wait for the user to confirm deletion (y) or skip deletion (n), and the system will perform corresponding operations. As shown below.
