
 Web Front-end
JS Tutorial
Simple common techniques for communication between React components (organized and shared)
Web Front-end
JS Tutorial
Simple common techniques for communication between React components (organized and shared)
Simple common techniques for communication between React components (organized and shared)

This article brings you common ways of communicating between React components that are simple and easy to use. One of the main contents of React knowledge is the communication between components. Here are several common ways of component communication, combined with examples, popular It's easy to understand. It is recommended to collect it. I hope it will be helpful to everyone.

1. Parent-child component communication
Principle: The parent component communicates with the child component through props (different from props in vue), and the child component Components communicate with parent components through callback events.
First, create a parent component Parent.js and a child component Children.js. The relationship between the two is a direct parent-child relationship.
Parent.js parent component is as follows. Give the parent component a default state, introduce the child component, and add toChildren={this.state.msg} to the child component, where props are passed to the child component. .
import React from 'react';
import { Button } from 'element-react';
import Children from './Children';
class Parent extends React.Component {
constructor(props) {
super(props);
this.state = {
msg:'父组件传递给子组件'
};
this.changeMsg = this.changeMsg.bind(this)
}
changeMsg(){
this.setState({
msg:'父组件传递给子组件(改变之后的内容)'
})
}
render(){
return (
<p style={{backgroundColor:'#f7ba2a',padding:'20px',width:'500px',margin:'auto',textAlign:'center'}}>
<p>父子组件通信实例</p>
<Button onClick={this.changeMsg}>父传子</Button>
<Children toChildren={this.state.msg}></Children>
</p>
)
}
}
export default ParentChildren.js sub-component is as follows. The initial state gets the value passed by the parent component through props.
import React from 'react';
class Children extends React.Component {
constructor(props) {
super(props);
this.state = {
msg:this.props.toChildren //通过props拿到父组件传过来的值
};
}
render(){
return (
<p style={{backgroundColor:'#13ce66',padding:'10px',width:'200px',margin:'auto',marginTop:'20px'}}>
<p>从父组件传过来:</p>
<span style={{color:'blue'}}>{this.state.msg}</span>
</p>
)
}
}
export default Children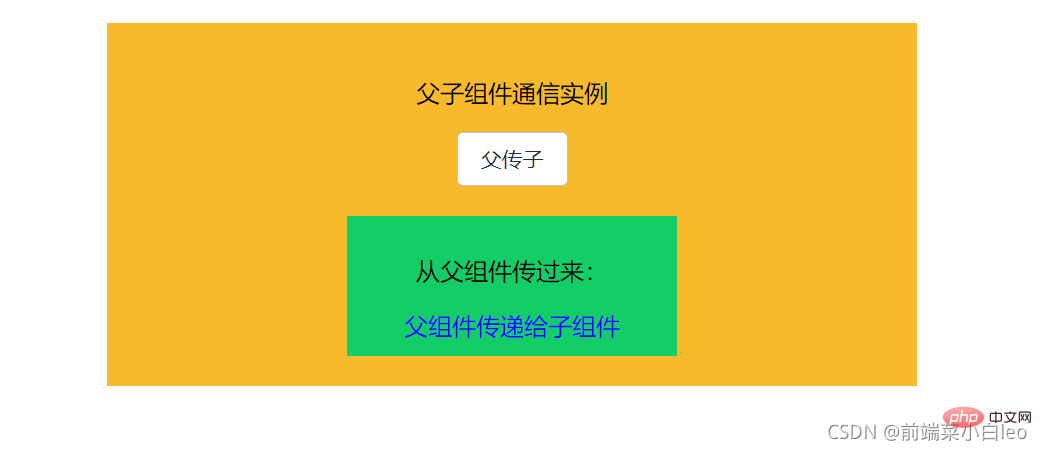
Note: The value of the subcomponent should be consistent with the field props placed by the parent component in the subcomponent, that is, in this example toChildren, as follows


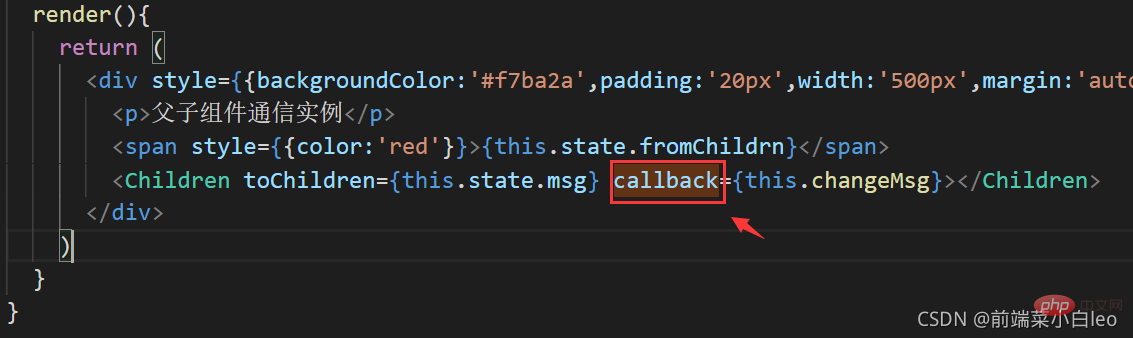
If the child component wants to pass the value to the parent component (upload the value), it can call the parent component The passed callback function
Add the callback function callback to Children.js in Parent.js, bind the changeMsg method
import React from 'react';
import Children from './Children';
class Parent extends React.Component {
constructor(props) {
super(props);
this.state = {
msg:'父组件传递给子组件',
fromChildrn:''
};
this.changeMsg = this.changeMsg.bind(this)
}
changeMsg(val){
this.setState({
fromChildrn: val
})
}
render(){
return (
<p style={{backgroundColor:'#f7ba2a',padding:'20px',width:'500px',margin:'auto',textAlign:'center'}}>
<p>父子组件通信实例</p>
<span style={{color:'red'}}>{this.state.fromChildrn}</span>
<Children toChildren={this.state.msg} callback={this.changeMsg}></Children>
</p>
)
}
}
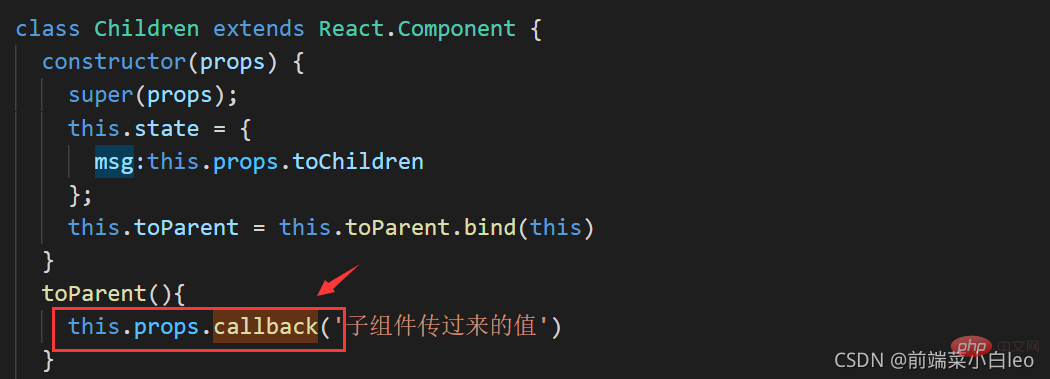
export default ParentIn the child component, use this.props.callback() Execute the callback function of the parent component to execute the binding method changeMsg and display the value passed by the child component
import React from 'react';
import { Button } from 'element-react';
class Children extends React.Component {
constructor(props) {
super(props);
this.state = {
msg:this.props.toChildren
};
this.toParent = this.toParent.bind(this)
}
toParent(){
this.props.callback('子组件传过来的值') //子组件通过此触发父组件的回调方法
}
render(){
return (
<p style={{backgroundColor:'#13ce66',padding:'10px',width:'200px',margin:'auto',marginTop:'20px'}}>
<p>从父组件传过来:</p>
<span style={{color:'blue'}}>{this.state.msg}</span>
<Button onClick={this.toParent}>子传父</Button>
</p>
)
}
}
export default ChildrenNote: The callback function names in props must be consistent, that is, in this example callback, as follows
##Summary: The above is Direct father and sonOne of the ways of component communication is from parent to child, through props; from child to parent, callbacks are executed.
2. Cross-level component communication Assume that there is a child component in a parent component, and there is a child component in this child component, which is temporarily called a "grandchild component". When the parent component needs When communicating with "grandchild components", there are two commonly used methods, layer-by-layer value passing and cross-layer value passing. 1. Passing values layer by layerThis method is based on the direct parent-child communication above and adds an intermediate layer. For example, if the parent and "grandson" components communicate, you can first communicate with the father and son, and then communicate with the child and "grandson". The transmission level becomes parent-->child-->"grandson". In the same way, props are passed down. Upload through callback. If you are interested, you can implement it yourself.2. Cross-level value transfer
As the name suggests, the parent communicates with the "grandson" without going through the child (middle layer) component. This leads toContext.
React official documentation explains Context:In a typical React application, data is passed from top to bottom (from parent to child) through the props attribute Yes, but this approach is extremely cumbersome for certain types of properties (e.g. locale preferences, UI themes) that are required by many components in the application. Context provides a way to share such values between components without having to explicitly pass props through each level of the component tree.
One sentence summary is:Cross-level value transfer, state sharing.
Look at a simple example and explain the usage directly. First, I create a context.js file (in the same directory as the parent and descendants), with the default value being an object.import React from "react";
const MyContext = React.createContext({text:'luck'});
export default MyContextimport React from 'react';
import Children from './Children';
import MyContext from './context';
class Parent extends React.Component {
constructor(props) {
super(props);
}
// 使用一个 Provider 来将当前的 value 传递给以下的组件树。
// 无论多深,任何组件都能读取这个值。
render(){
return (
<p style={{backgroundColor:'#f7ba2a',padding:'20px',width:'500px',margin:'auto',textAlign:'center'}}>
<p>context通信实例</p>
<MyContext.Provider value={{text:'good luck'}}>
<Children></Children>
</MyContext.Provider>
</p>
)
}
}
export default Parentimport React from 'react';
import Grandson from './Grandson';
class Children extends React.Component {
render(){
return (
<p>
<Grandson></Grandson>
</p>
)
}
}
export default Childrenstatic contextType = MyContext inside the component. At this time, you will be able to directly obtain the closest upper layer through this.context. The value passed by Provider, at this time this.context = {text:good luck}, that is, the parent component passes value.
import React from 'react';
import MyContext from './context';
class Grandson extends React.Component {
static contextType = MyContext
render(){
return (
<p style={{backgroundColor:'#13ce66',padding:'10px',width:'200px',margin:'auto',marginTop:'20px'}}>
<p>通过context传过来:</p>
<span style={{color:'blue'}}>{this.context.text}</span>
</p>
)
}
}
export default Grandson ## The above is a parent-->grandson process, that is, a downward process. If you want to upload a value from the grandson-->parent to the parent, you can use the callback Way
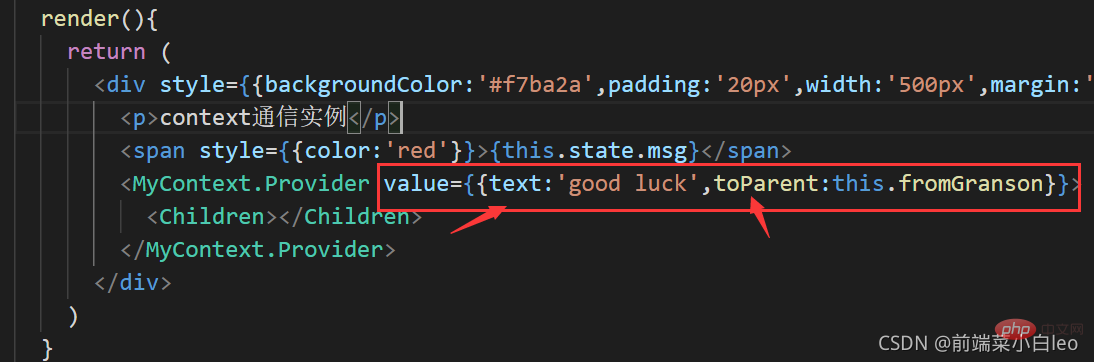
对父组件进行传值修改,在传过来的对象中添加一个属性,里面绑定父组件的方法value={{text:'good luck',toParent:this.fromGranson}}
import React from 'react';
import Children from './Children';
import MyContext from './context';
class Parent extends React.Component {
constructor(props) {
super(props);
this.state = {
msg:''
};
this.fromGranson = this.fromGranson.bind(this)
}
fromGranson(val){
this.setState({
msg:val
})
}
// 使用一个 Provider 来将当前的 theme 传递给以下的组件树。
// 无论多深,任何组件都能读取这个值。
render(){
return (
<p style={{backgroundColor:'#f7ba2a',padding:'20px',width:'500px',margin:'auto',textAlign:'center'}}>
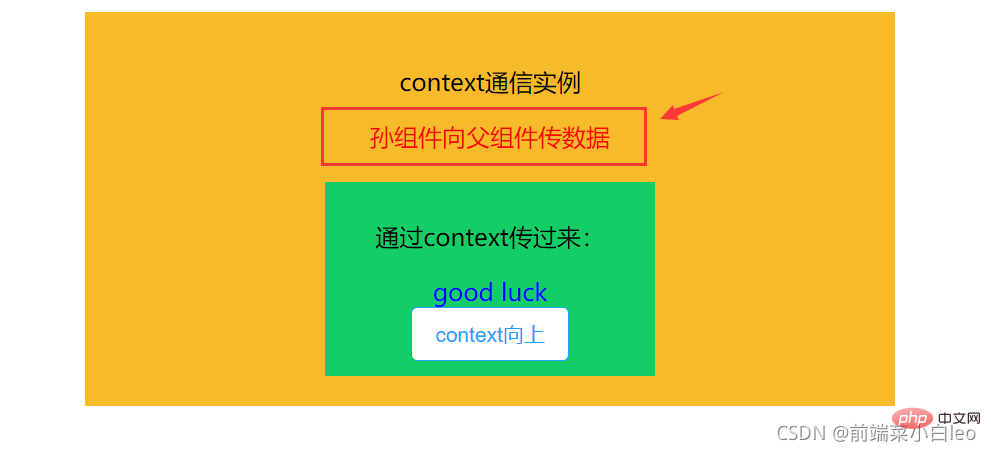
<p>context通信实例</p>
<span style={{color:'red'}}>{this.state.msg}</span>
<MyContext.Provider value={{text:'good luck',toParent:this.fromGranson}}>
<Children></Children>
</MyContext.Provider>
</p>
)
}
}
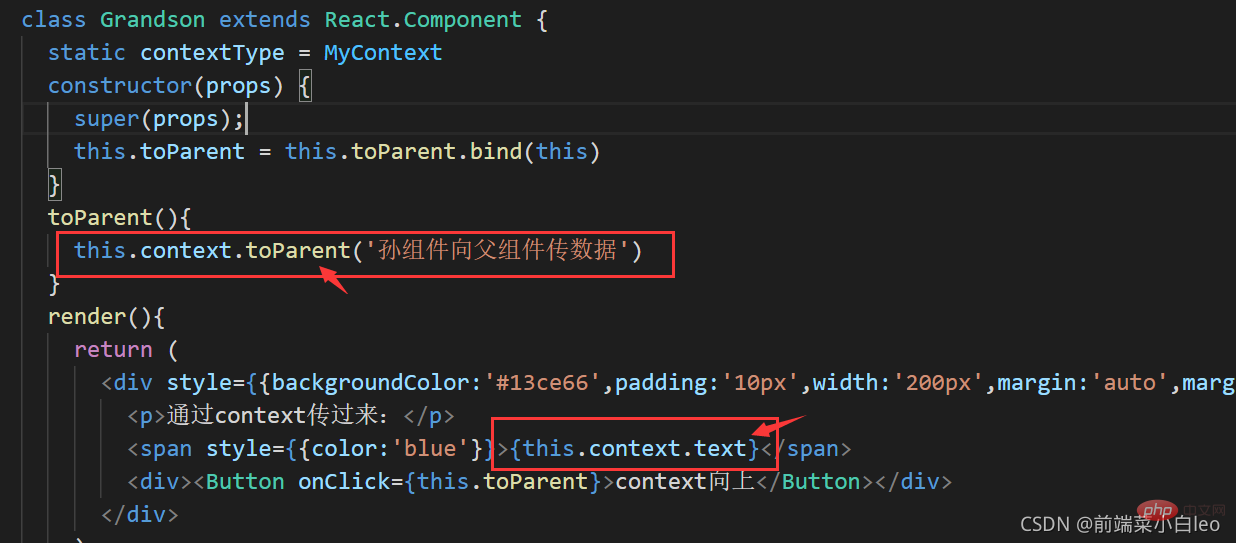
export default Parent然后在孙组件中添加一个按钮,绑定方法,执行函数回调
toParent(){
this.context.toParent('孙组件向父组件传数据')
}
import React from 'react';
import MyContext from './context';
import { Button } from 'element-react'
class Grandson extends React.Component {
static contextType = MyContext
constructor(props) {
super(props);
this.toParent = this.toParent.bind(this)
}
toParent(){
this.context.toParent('孙组件向父组件传数据')
}
render(){
return (
<p style={{backgroundColor:'#13ce66',padding:'10px',width:'200px',margin:'auto',marginTop:'20px'}}>
<p>通过context传过来:</p>
<span style={{color:'blue'}}>{this.context.text}</span>
<p><Button onClick={this.toParent}>context向上</Button></p>
</p>
)
}
}
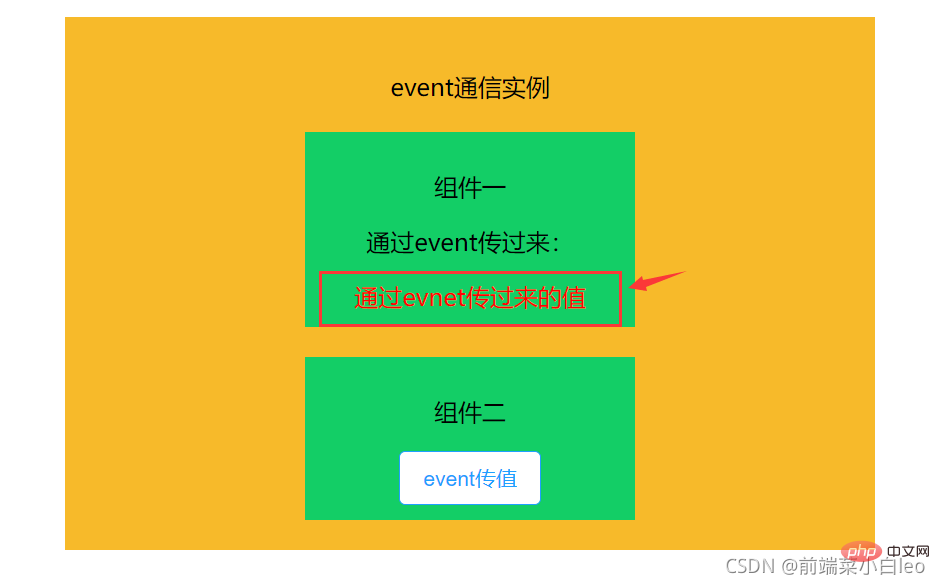
export default Grandson默认的页面为:

点击按钮之后,执行context中的回调,向上传值。
不管层级有多深,都可以使用context进行向下或向上传值。
注意:在下层组件中取的context中的字段需与value中传递字段保持一致。text与toParent
以上就是Context的大致使用,更多细节请往React官方文档:
Context – React=https://react.docschina.org/docs/context.html
三、兄弟(无嵌套)组件通信
当两个组件互不嵌套,处在同个层级或者不同层级上,他们之间要进行通信,有以下几种常用方法
1、某个组件先将值传到同一个父组件,然后在通过父组件传给另外一个组件,用到父子组件传值
2、使用缓存sessionStorage、localStorage等
3、如果两个组件之间存在跳转,可以使用路由跳转传值,附上详细用法
React学习笔记 -- 组件通信之路由传参(react-router-dom)_前端菜小白leo的博客-CSDN博客
4、event(发布--订阅)
首先,安装event
npm install event -save
新建一个event.js
import { EventEmitter } from 'events';
export default new EventEmitter();然后另两个组件处于同层级(不同个父组件或者不同层级都可以)
import React from 'react';
import Grandson from './Grandson';
import GrandsonOther from './GrandsonOther';

class Children extends React.Component {
  render(){
    return (
      <p>
        <Grandson></Grandson>
        <GrandsonOther></GrandsonOther>
      </p>
    )
  }
}

export default Children组件一,导入event,在componentDidMount阶段添加监听addListener(订阅),在componentWillUnmount移除监听removeListener,事件名称与组件二中emit一致。
import React from 'react';
import event from '../event';
class Grandson extends React.Component {
constructor(props) {
super(props);
this.state = {
msg:''
}
}
componentDidMount(){
event.addListener('eventMsg',val => {
this.setState({
msg:val
})
})
}
componentWillUnmount(){
event.removeListener('eventMsg')
}
render(){
return (
<p style={{backgroundColor:'#13ce66',padding:'10px',width:'200px',margin:'auto',marginTop:'20px'}}>
<p>组件一</p>
<p>通过event传过来:</p>
<span style={{color:'red'}}>{this.state.msg}</span>
</p>
)
}
}
export default Grandson组件二,导入event,按钮绑定方法,使用event.emit触发(发布)事件。
import React from 'react';
import event from '../event';
import { Button } from 'element-react'
class Grandson extends React.Component {
constructor(props) {
super(props);
this.state = {
msg:''
}
this.toOther = this.toOther.bind(this)
}
toOther(){
event.emit('eventMsg','通过evnet传过来的值')
}
render(){
return (
<p style={{backgroundColor:'#13ce66',padding:'10px',width:'200px',margin:'auto',marginTop:'20px'}}>
<p>组件二</p>
<span style={{color:'blue'}}>{this.state.msg}</span>
<p><Button onClick={this.toOther}>event传值</Button></p>
</p>
)
}
}
export default Grandson点击按钮,组件二发布事件,组件一监听(订阅)事件,更新内容。(如果交换发布者订阅者身份,写法一致)

注意:如果两个组件使用event进行通信,确保发布订阅的事件名称一致,如上例中 eventMsg
小结: event的方式比较灵活,不管是父子、跨级、还是同级,甚至毫无关联的组件,都可以使用此方式进行通信。
四、路由传值
React学习笔记 -- 组件通信之路由传参(react-router-dom)_前端菜小白leo的博客-CSDN博客
五、Redux
Redux基本用法(在react中使用,链路打通)_前端菜小白leo的博客-CSDN博客
总结:主要讲了react中常用的组件通信方式,在平时工作中,根据不同的应用场景,选择不同的通信方式,会让通信流程更加简单、清晰。
对比Vue中的组件通信方式,你会发现很多相似之处:
Vue组件间的通信方式(多种场景,通俗易懂,建议收藏)_前端菜小白leo的博客-CSDN博客
推荐学习:《react视频教程》
The above is the detailed content of Simple common techniques for communication between React components (organized and shared). For more information, please follow other related articles on the PHP Chinese website!

Hot AI Tools

Undresser.AI Undress
AI-powered app for creating realistic nude photos

AI Clothes Remover
Online AI tool for removing clothes from photos.

Undress AI Tool
Undress images for free

Clothoff.io
AI clothes remover

AI Hentai Generator
Generate AI Hentai for free.

Hot Article
Hot Tools

Notepad++7.3.1
Easy-to-use and free code editor

SublimeText3 Chinese version
Chinese version, very easy to use

Zend Studio 13.0.1
Powerful PHP integrated development environment

Dreamweaver CS6
Visual web development tools

SublimeText3 Mac version
God-level code editing software (SublimeText3)
Hot Topics
 1382
1382
 52
52

 How to build a real-time chat app with React and WebSocket
Sep 26, 2023 pm 07:46 PM
How to build a real-time chat app with React and WebSocket
Sep 26, 2023 pm 07:46 PM
How to build a real-time chat application using React and WebSocket Introduction: With the rapid development of the Internet, real-time communication has attracted more and more attention. Live chat apps have become an integral part of modern social and work life. This article will introduce how to build a simple real-time chat application using React and WebSocket, and provide specific code examples. 1. Technical preparation Before starting to build a real-time chat application, we need to prepare the following technologies and tools: React: one for building
 Guide to React front-end and back-end separation: How to achieve decoupling and independent deployment of front-end and back-end
Sep 28, 2023 am 10:48 AM
Guide to React front-end and back-end separation: How to achieve decoupling and independent deployment of front-end and back-end
Sep 28, 2023 am 10:48 AM
React front-end and back-end separation guide: How to achieve front-end and back-end decoupling and independent deployment, specific code examples are required In today's web development environment, front-end and back-end separation has become a trend. By separating front-end and back-end code, development work can be made more flexible, efficient, and facilitate team collaboration. This article will introduce how to use React to achieve front-end and back-end separation, thereby achieving the goals of decoupling and independent deployment. First, we need to understand what front-end and back-end separation is. In the traditional web development model, the front-end and back-end are coupled
 How to build simple and easy-to-use web applications with React and Flask
Sep 27, 2023 am 11:09 AM
How to build simple and easy-to-use web applications with React and Flask
Sep 27, 2023 am 11:09 AM
How to use React and Flask to build simple and easy-to-use web applications Introduction: With the development of the Internet, the needs of web applications are becoming more and more diverse and complex. In order to meet user requirements for ease of use and performance, it is becoming increasingly important to use modern technology stacks to build network applications. React and Flask are two very popular frameworks for front-end and back-end development, and they work well together to build simple and easy-to-use web applications. This article will detail how to leverage React and Flask
 How to build a reliable messaging app with React and RabbitMQ
Sep 28, 2023 pm 08:24 PM
How to build a reliable messaging app with React and RabbitMQ
Sep 28, 2023 pm 08:24 PM
How to build a reliable messaging application with React and RabbitMQ Introduction: Modern applications need to support reliable messaging to achieve features such as real-time updates and data synchronization. React is a popular JavaScript library for building user interfaces, while RabbitMQ is a reliable messaging middleware. This article will introduce how to combine React and RabbitMQ to build a reliable messaging application, and provide specific code examples. RabbitMQ overview:
 React responsive design guide: How to achieve adaptive front-end layout effects
Sep 26, 2023 am 11:34 AM
React responsive design guide: How to achieve adaptive front-end layout effects
Sep 26, 2023 am 11:34 AM
React Responsive Design Guide: How to Achieve Adaptive Front-end Layout Effects With the popularity of mobile devices and the increasing user demand for multi-screen experiences, responsive design has become one of the important considerations in modern front-end development. React, as one of the most popular front-end frameworks at present, provides a wealth of tools and components to help developers achieve adaptive layout effects. This article will share some guidelines and tips on implementing responsive design using React, and provide specific code examples for reference. Fle using React
 React code debugging guide: How to quickly locate and solve front-end bugs
Sep 26, 2023 pm 02:25 PM
React code debugging guide: How to quickly locate and solve front-end bugs
Sep 26, 2023 pm 02:25 PM
React code debugging guide: How to quickly locate and resolve front-end bugs Introduction: When developing React applications, you often encounter a variety of bugs that may crash the application or cause incorrect behavior. Therefore, mastering debugging skills is an essential ability for every React developer. This article will introduce some practical techniques for locating and solving front-end bugs, and provide specific code examples to help readers quickly locate and solve bugs in React applications. 1. Selection of debugging tools: In Re
 React Router User Guide: How to implement front-end routing control
Sep 29, 2023 pm 05:45 PM
React Router User Guide: How to implement front-end routing control
Sep 29, 2023 pm 05:45 PM
ReactRouter User Guide: How to Implement Front-End Routing Control With the popularity of single-page applications, front-end routing has become an important part that cannot be ignored. As the most popular routing library in the React ecosystem, ReactRouter provides rich functions and easy-to-use APIs, making the implementation of front-end routing very simple and flexible. This article will introduce how to use ReactRouter and provide some specific code examples. To install ReactRouter first, we need
 How to build a fast data analysis application using React and Google BigQuery
Sep 26, 2023 pm 06:12 PM
How to build a fast data analysis application using React and Google BigQuery
Sep 26, 2023 pm 06:12 PM
How to use React and Google BigQuery to build fast data analysis applications Introduction: In today's era of information explosion, data analysis has become an indispensable link in various industries. Among them, building fast and efficient data analysis applications has become the goal pursued by many companies and individuals. This article will introduce how to use React and Google BigQuery to build a fast data analysis application, and provide detailed code examples. 1. Overview React is a tool for building
