This article will take you to understand Bitmaps in Redis, and introduce the concept, operation and common applications of Bitmaps in detail. I hope it will be helpful to everyone!

Redis version: 6.2.6
Bitmap is not The actual data type, but a set of bit-oriented operations defined on the String type. Since strings are binary-safe blobs and their maximum length is 512 MB, they are suitable for setting up to 2^32 different bits. [Related recommendations: Redis video tutorial]
The above is the introduction to Bitmaps on the Redis official website. A simple understanding of Bitmaps is a series of instructions provided by Redis to directly operate the bits of String, such as We now have a string: "a"
127.0.0.1:6379> set k1 a
OK
127.0.0.1:6379> get k1
"a"
The binary of a is: 0110 0001. We can use the [GETBIT key offset] command to get the value of the corresponding bit of this string:
127.0.0.1:6379> getbit k1 0
(integer) 0
127.0.0.1:6379> getbit k1 1
(integer) 1
127.0.0.1:6379> getbit k1 2
(integer) 1
127.0.0.1:6379> getbit k1 3
(integer) 0
127.0.0.1:6379> getbit k1 4
(integer) 0
127.0.0.1:6379> getbit k1 5
(integer) 0
127.0.0.1:6379> getbit k1 6
(integer) 0
127.0.0.1:6379> getbit k1 7
(integer) 1
The offset in this instruction represents the offset. As shown above, the value of offset 1, 2, and 7 is 1, and the other bits are 0. The corresponding binary is: 0110 0001, which is the character a ASCII value.
Next we can use the [SETBIT key offset value] command to change the value of a certain bit, for example:
127.0.0.1:6379> setbit k1 6 1 //偏移6位,置为1
(integer) 0
127.0.0.1:6379> get k1
"c"
As above, we set the position value of offset 6 to 1 , so this binary object becomes: 0110 0011, which corresponds to the character "c". We change the value of the string by directly manipulating the bits of the string.
Bitmaps is a tool for bitwise manipulation of strings in redis. According to this tool, we can use strings as a set of binary arrays. Let’s give a simple example:
How to record the online status of one billion users?
Here we use a string of binary to record the login status of these billion users. Each bit of the binary represents a user, 0 represents not logged in, 1 represents logged in, each time you log in or log in Chudu uses Bitmaps to update the value of the corresponding bit, and the final result looks like this:

We use the above string of binary to record the information of these billion users Logged in status, why do you do this? The main thing is to save space and read or update quickly
Let’s calculate the storage space required for this storage method:
十亿用户,每一个用户占 1 bit
所需空间 = 1000000000 bit = 1000000000 / 8 / 1024 / 1024 = 119 MB
Take MySQL as an example, the space required for storage:
假设仅有两个字段:用户id,在线状态
用户id为BIGINT类型,大小为:8 Bytes
在线状态使用TINYINT类型,大小为:1 Bytes
所需空间 = 1000000000 * (8 + 1) Bytes = 9000000000 Bytes = 8583 MB
The gap is obvious and easy to understand. When using MySQL or Redis Hash storage, the smallest unit is bytes, which is naturally incomparable with direct operation bits.
The above is a brief introduction to Bitmaps of Redis. Next, we will introduce the basic commands and applications of Bitmaps.
SETBIT
Time complexity: O(1)
SETBIT key offset value
Update the value at the offset position of the specified key, the value can only be 0 or 1
Note:
1, offset represents the offset, the maximum is 2 32-1 ((Because the maximum is 512MB, the symbol occupies 1 bit).
2. Allocate memory. After one allocation, there will be no allocation overhead for subsequent identical keys, as described on the official website : On the 2010 MacBook Pro, setting the number of bits to 2 32-1 (512MB allocation) takes about 300 milliseconds.
3. Return value, return the value before the corresponding offset operation.
GETBIT
Time complexity: O(1)
GETBIT key offset
Return stored in ## The bit value at offset in the string value of #key.
Note: When key does not exist, or offset is out of range, an integer is returned 0BITCOUNT
Time complexity: O(n)
BITCOUNT key [start end [BYTE|BIT]]
示例:
127.0.0.1:6379> set k1 a
OK
127.0.0.1:6379> BITCOUNT k1
(integer) 3
127.0.0.1:6379> set k1 aa
OK
127.0.0.1:6379> BITCOUNT k1
(integer) 6
127.0.0.1:6379> BITCOUNT k1 0 0
(integer) 3
127.0.0.1:6379> BITCOUNT k1 0 1
(integer) 6
127.0.0.1:6379> BITCOUNT k1 0 -1
(integer) 6
2. If the key does not exist, the statistics are 03. The time complexity is O(n). This n refers to the amount of data between the start and end parameters, so the amount of data is too large. Make good use of start and end, or create more keys.
BITOP
Time complexity: O (n)
BITOP operation destkey key [key ...]
AND, OR, XOR and NOT
destkey refers to the target key. After performing bitwise operations on the following keys, store them in destkey// AND,按位与 127.0.0.1:6379> set k1 a OK 127.0.0.1:6379> set k2 aa OK 127.0.0.1:6379> set k3 aaa OK 127.0.0.1:6379> bitop and dk1 k1 k2 k3 (integer) 3 127.0.0.1:6379> get dk1 "a\x00\x00"
如上面示例,将 k1 ,k2,k3,进行按位与之后结果储存在 dk1 中,dk1 后面的 \x00 是十六进制, a\x00\x00 转换成二进制就是: 0110 0001 0000 0000 0000 0000。
// OR,按位或
127.0.0.1:6379> bitop or dk2 k1 k2 k3
(integer) 3
127.0.0.1:6379> get dk2
"aaa"
---------------------
//XOR ,按位异或
127.0.0.1:6379> bitop xor dk3 k1 k2 k3
(integer) 3
127.0.0.1:6379> get dk3
"a\x00a"
---------------------
//NOT,取反 0110 0001 取反 ->  1001 1110  -> 十六进制 \x9e
127.0.0.1:6379> bitop not dk4 k1
(integer) 1
127.0.0.1:6379> get dk4
"\x9e"
BITPOS
时间复杂度: O(N)
BITPOS key bit [start [end [BYTE|BIT]]]
返回字符串中设置为 1 或 0 的第一位的位置。
示例
127.0.0.1:6379> setbit k1 4 1
(integer) 0
127.0.0.1:6379> setbit k1 13  1
(integer) 0
127.0.0.1:6379> bitpos k1 1
(integer) 4
127.0.0.1:6379> bitpos k1 1 0 0
(integer) 4
127.0.0.1:6379> bitpos k1 1 1 1
(integer) 13
需要注意:
1、这里的 start 、end 参数指的是 Byte,在7.0版本后可以指定 Byte或bit。
2、bitpos 、 setbit 、 getbit 遵循相同的位位置约定。
3、查询 1 时,不存在的 key 或者 对应范围的字符串全是 0 ,返回 -1。
4、查询 0 时,有三种特殊情况:
k2 = 1111 1111  , k3 不存在
---------------------------
// 不指定范围或仅指定 start,且值全是1,这时候会查出来最右侧的1的位置 + 1,可以视为右侧填充了0
127.0.0.1:6379> BITPOS k2 0
(integer) 8
---------------------------
// 不指定范围或仅指定 start,且key不存在,返回0
127.0.0.1:6379> BITPOS k3 0
(integer) 0
---------------------------
// 指定范围,且范围内没有0,返回 -1
127.0.0.1:6379> BITPOS k2 1 1
(integer) -1
BITFIFLD
BITFIELD key [GET encoding offset] [SET encoding offset value] [INCRBY encoding offset increment] [OVERFLOW WRAP|SAT|FAIL]
该命令将 Redis 字符串视为位数组,并且能够处理不同位宽和任意非(必要)对齐偏移量的特定整数字段,该命令有get、set、incrby操作
就是说可以利用这个命令,按位分段的处理字符串,举个例子:
127.0.0.1:6379> set k1 aaa
OK
| a | a | a |
|---|---|---|
| 0110 0001 | 0110 0001 | 0110 0001 |
k1的二进制如上表格所示,接下来我们使用BITFIFLD命令来操作 k1
GET:
// u8 = 无符号 + 8 位   ;  0 = 从第0位开始
// 获取到的结果就是 : 0110 0001 ,无符号转换成十进制就是 97
127.0.0.1:6379> BITFIELD k1 get u8 0
1) (integer) 97
// i8 = 有符号 + 8 位   ; 1 = 从第一位开始
// 结果 = 1100 0010 ,带符号转换成十进制就是 -62 (不理解为啥是-62可以看一下补码)
127.0.0.1:6379> BITFIELD k1 get i8 1
1) (integer) -62
SET:
// 将0-7位,变成98,也就是: 0110 0010 ,这对应的就是b,所以第一个字符变成了 b
127.0.0.1:6379> BITFIELD k1 set u8 0 98
1) (integer) 97
127.0.0.1:6379> get k1
"baa"
------------------------------------------
127.0.0.1:6379> BITFIELD k1 set u8 #1 98   // #1的意思是 从第二个 8 位开始
1) (integer) 97
127.0.0.1:6379> get k1
"bba"
INCRBY:递增或者递减
// -1 表示递增或递减的数值,k1 的0-7位 减1,结果是97,k1就变成了 "aba"
127.0.0.1:6379> get k1
"bba"
127.0.0.1:6379> BITFIELD k1 incrby u8 0 -1
1) (integer) 97
127.0.0.1:6379> get k1
"aba"
127.0.0.1:6379> BITFIELD k1 incrby u8 #1 -1
1) (integer) 97
127.0.0.1:6379> get k1
"aaa"
在使用 INCRBY 进行递增或递减操作时,有 溢出控制 ,而且 Redis 提供了三种行为来控制溢出:
WRAP :环绕,在无符号整数的情况下,换行就像对整数可以包含的最大值进行模运算
// 以 u8 为例,无符号,8位,那么最大值是 256
127.0.0.1:6379> BITFIELD k1 get u8 0
1) (integer) 97
127.0.0.1:6379> BITFIELD k1 overflow WRAP incrby u8 0 256
1) (integer) 97
127.0.0.1:6379> BITFIELD k1 overflow WRAP incrby u8 0 257  // 97 + 257 = 97+257-256 = 98
1) (integer) 98
127.0.0.1:6379> BITFIELD k1 overflow WRAP incrby u8 0 200 // 98 + 200 = 298 - 256 = 42
1) (integer) 42
在有符号的情况下,向上溢出到负值,向下溢出到正值,以 i8 为例 127 + 1 到 -128
127.0.0.1:6379> set k1 aaa
OK
127.0.0.1:6379> BITFIELD k1 get u8 0
1) (integer) 97
127.0.0.1:6379> BITFIELD k1 incrby i8 0 30
1) (integer) 127
127.0.0.1:6379> BITFIELD k1 incrby i8 0 1
1) (integer) -128
127.0.0.1:6379> BITFIELD k1 incrby i8 0 -1
1) (integer) 127
SAT: 使用饱和算法,即下溢时设置为最小整数值,溢出时设置为最大整数值。
// u8时,最大255 最小 0
127.0.0.1:6379> set k1 aaa
OK
127.0.0.1:6379> BITFIELD k1 get u8 0
1) (integer) 97
127.0.0.1:6379> BITFIELD k1 overflow SAT incrby u8 0 20000
1) (integer) 255
127.0.0.1:6379> BITFIELD k1 overflow SAT incrby u8 0 -213123
1) (integer) 0
FAIL:在此模式下,不会对检测到的上溢或下溢执行任何操作。相应的返回值设置为 NULL 以向调用者发出条件信号。就是说,溢出就返回 NUll。
127.0.0.1:6379> set k1 aaa
OK
127.0.0.1:6379> BITFIELD k1 get u8 0
1) (integer) 97
127.0.0.1:6379> BITFIELD k1 overflow FAIL incrby u8 0 200
1) (nil)
127.0.0.1:6379> BITFIELD k1 overflow FAIL incrby u8 0 -98
1) (nil)
另外,以上的 BITFIELD 命令可以多个一起使用:
127.0.0.1:6379> BITFIELD k1 overflow FAIL incrby u8 0 -98  get u8 0
1) (nil)
2) (integer) 97
BITFIELD_RO
BITFIELD命令的只读变体。它就像原始的BITFIELD一样,但只接受GET子命令并且可以安全地用于只读副本。
在上面的描述中,介绍了 Bitmaps 可以记录用户的在线状态,除此之外还可以用他做那些功能呢?
首先我们来总结一下Bitmaps的特点:
基于这些特点,我们可以用 Bitmaps 来判断数据是否存在于某个集合中、也可以用于记录用户的一些行为比如登录或者某个页面的查看,关闭,签到等等,接下来我们举几个比较常见的例子。
日活统计
如何统计当前系统每天登录的用户数量?
使用Redis的Bitmaps,将 系统名+日期设置为key 如 zcy20211215,value中使用用户的Id做offset,用 0 和 1 记录用户在当天是否登录过,登录将对应的位设置为1。
这样做之后,每天可以得到一个Bitmaps,如果想获取某天登录过的用户数量,直接使用 BITCOUNT 操作即可。
如果想统计过去 30 天都登录过的用户,可以使用 BITOP AND 操作,将那 30 天的Bitmaps进行 按位与 操作。
布隆过滤器
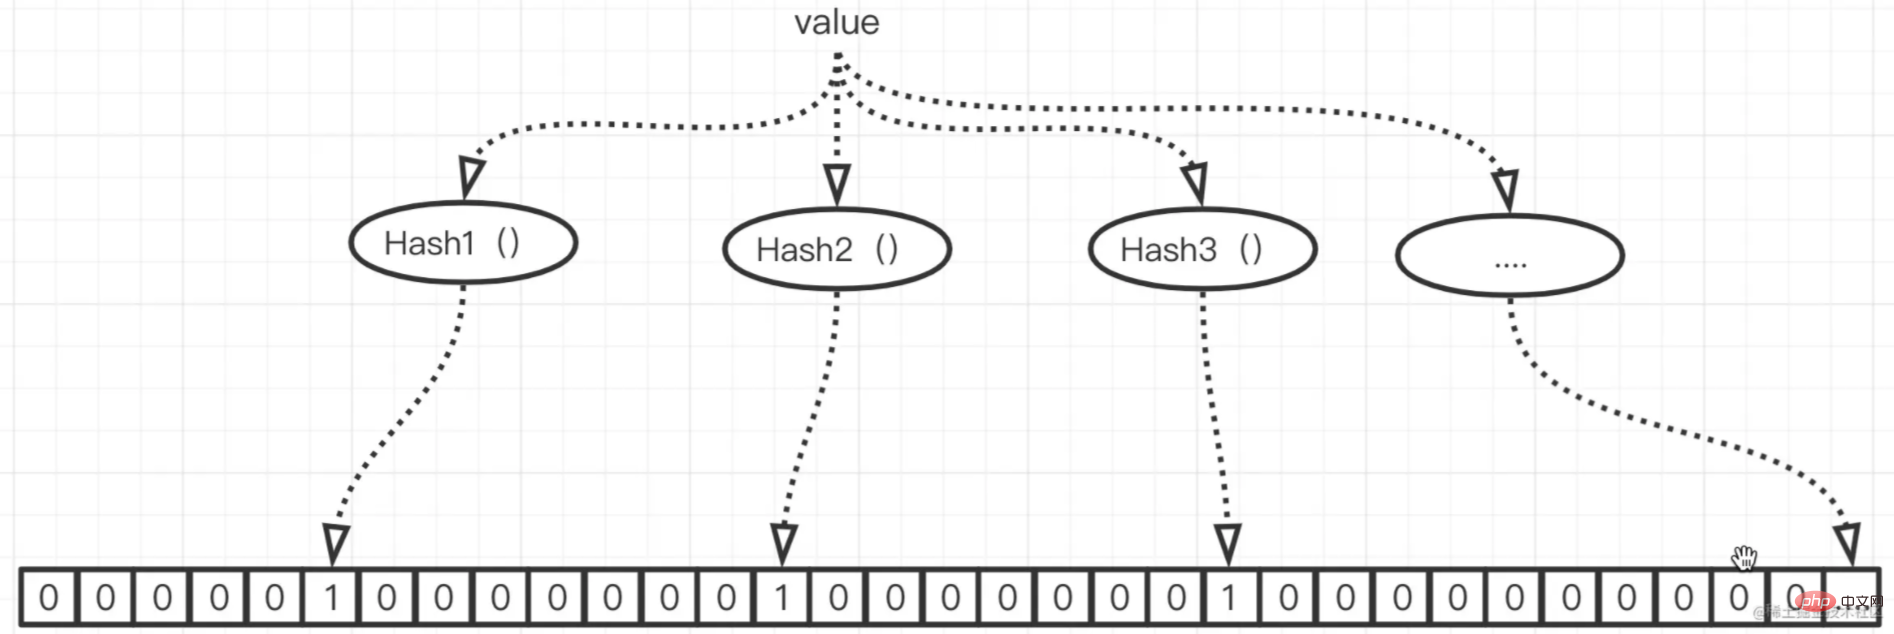
布隆过滤器的本质是 Hash映射算法 + Bitmaps。

如图,一个 value 进入布隆过滤器,经过多个Hash算法,获取其映射在Bitmap上的位置,当所有的位置都为1时,则认为这个 value 在过滤器中,否则就认为不存在。
营销数据统计
Bitmaps 在营销系统中可以用到的场景很多:
用户画像信息的使用,一个用户有很多中标签并且无限扩展,比如 性别,是否是程序员,单身,租房,是否养宠物,我们都可以考虑用Bitmap储存和使用。
用户的行为,是否点击了广告,是否浏览到底部,是否领取优惠券等行为分别用一个Bitmap存储,用法和上面的用户画像类似。
这里举一个小例子,看一下Bitmaps在营销系统中的使用:
假设我们有一个一亿用户的电商应用,产品提了这样一个需求:
所有的男性用户在进入应用首页时,弹出一个 防脱发保健品 的广告弹窗
需求很简单,一个接口搞定,用户进入时调用 获取广告 的接口,接口中查询数据库判断是否为男性,是返回广告内容,否返回空。
这时候产品觉得这种推送不够精准,也未必男性都会掉头发,所以增加了条件: 程序员,我们的需求就变成了:
所有的 男性 且职业为 程序员 的用户在进入应用首页时,弹出一个 防脱发保健品 的广告弹窗
加了一个条件之后依然很简单,用户的 性别 和 职业 信息极有可能存在一张表,也是一次查询即可。
然而,男性程序员脱发的概率很高,但是未必都买得起防脱发保健品,这时候需要推送的更精准一点,所以再新增一个条件:在平台上月均消费超过五百 ,这个条件和上述的 男性、程序员 这两个条件大概率不在同一个表中,如果用上面的方案,那就是再增加一次DB查询,速度慢且对数据库开销大,这个时候 Bitmaps 的效果就很明显了。
现有的条件是:男性、程序员、在平台上月均消费超过五百
在这个场景中,如果要使用 Bitmaps,首先要把数据加载到Redis里,可以用一种简单粗暴的方法,直接遍历数据库,把需要用的标签信息加载到Redis中:
    // 用户标签加载伪代码
    public Boolean loadUserLabel() {
    		// 用户性别 bitmap 数据加载
        String key = "user_label_sex_male";
        List<User> users = userDao.queryUser();
        users.forEach(
                t->{
                    if (Objects.equals(t.getSex(),"male")) {
                        jedis.setbit(key,t.getId(),"1");
                    }
                }
        );
        return true;
}经过上述代码,将用户的性别加载到了 redis 的 bitmap中,其他的标签如 职业、消费大于五百,与此类似。
在Redis中有了我们所需的用户标签信息后,就可以开始使用了,像我们上述的需求,可以用 BITOP 命令的 AND操作,将男性、程序员、月均消费大于五百这三个Bitmap 生成一个 同时满足这三个条件的 Bitmap,标签过多的时候可以这样做。在这里我们就三个条件,可以简单一点直接在代码里查三次:
    // 用户首页广告获取伪代码
    public Response getHomepageAds(User user) {
        // 这里写死,实际使用中是动态配置
        String maleKey = "user_label_sex_male";
        String programmerKey = "user_label_occupation_programmer";
        String spendMonth500Key = "user_label_spend_month_500";
        //去bitmap判断,该位为1,则满足条件
        if (jedis.getbit(maleKey,user.getId()) && jedis.getbit(programmerKey,user.getId())
                && jedis.getbit(spendMonth500Key,user.getId())) {
            return "内容";
        }
        return  "没有广告";
}上面就是一个Bitmap在营销系统中应用的小例子,可以在这基础上进行很多扩展,比如每个标签的实时的增量加载,每个广告和标签的绑定关系的动态配置,标签的自动生成等等等等。。。。
我们接下来可以看一下 Bitmaps 在用户行为记录中的应用,现在产品提了一个新的需求:
我想知道有多少用户点进了我们的弹窗广告
点击弹窗广告之后,前端发送请求,后端记录用户的点击状态:
    // 用户点击广告行为记录伪代码
    public Response getHomepageAds(User user) {
        String adActionKey = "homepage_ad_action_open";
        jedis.setbit(adActionKey,user.getId(),"1");

}后面如果想统计数量,可以直接用 BITCOUNT 命令。其他行为的记录和这个相似,如是否拖动到底部,停留时间是否大于n秒等等,这里就不做赘述啦。
协同制图
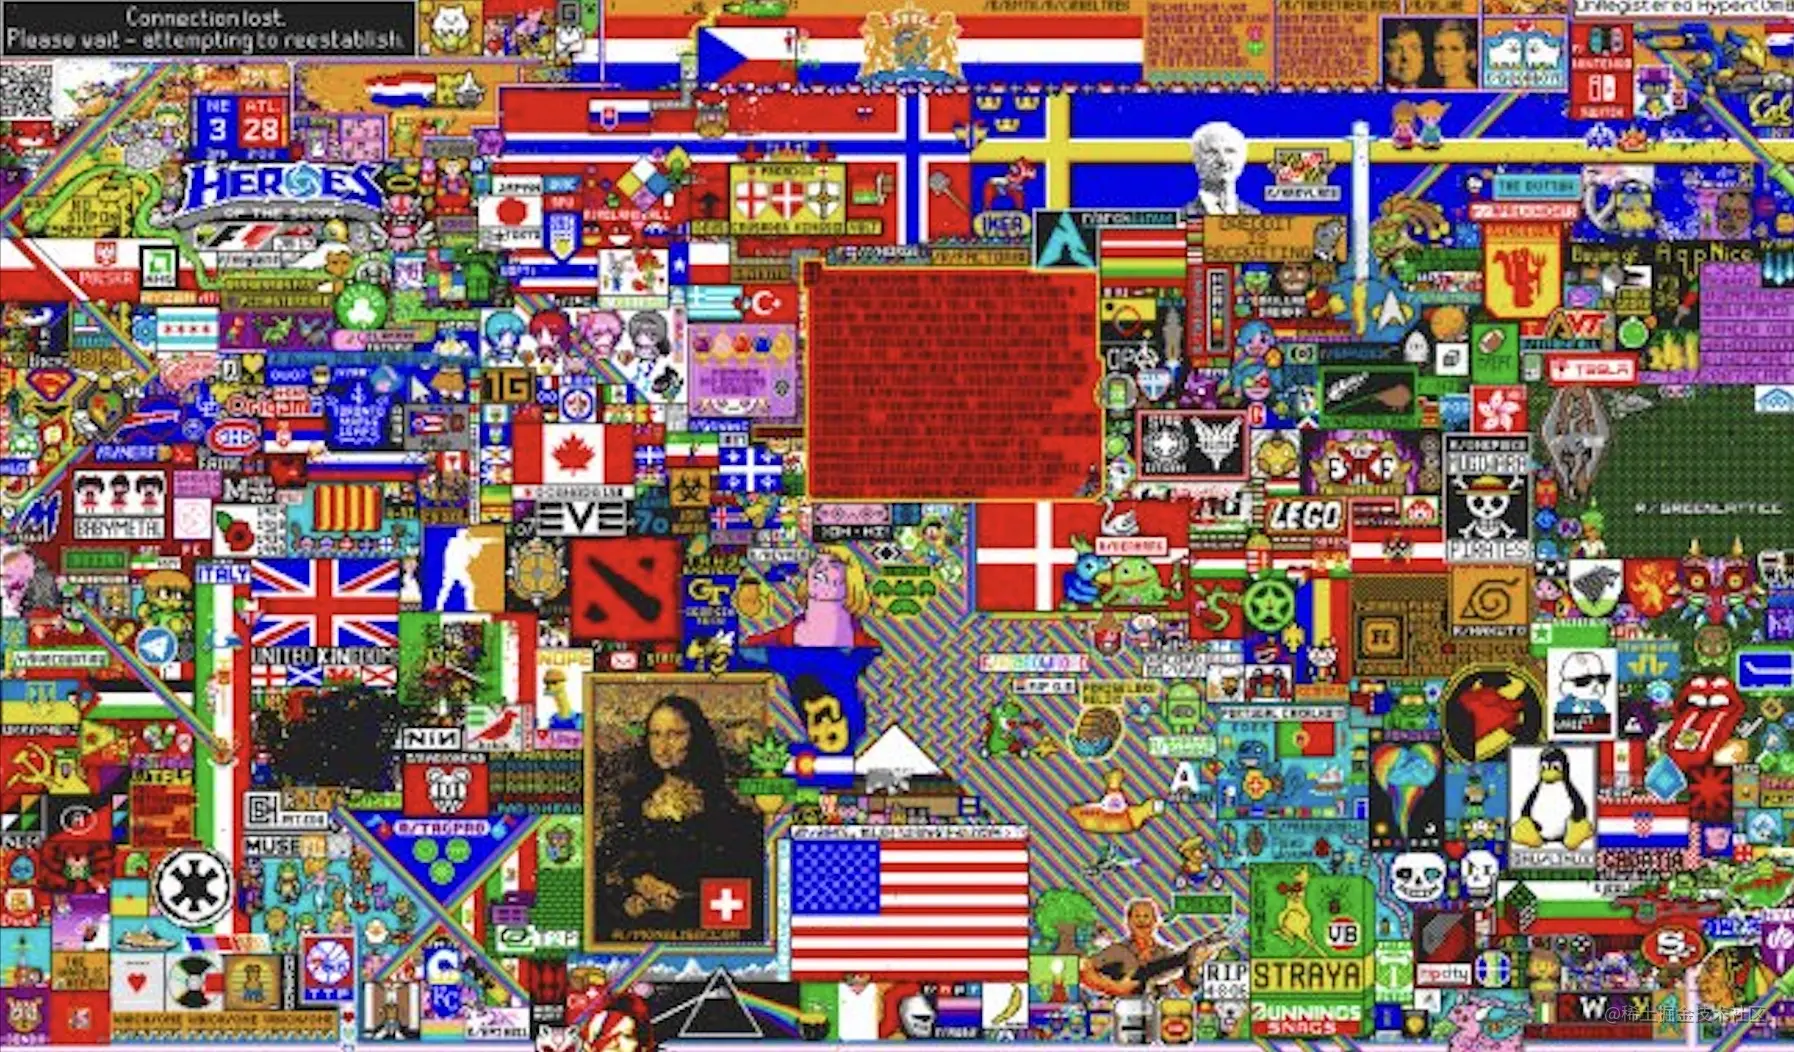
这个例子来源于Redis官网,是 Reddit 在 2017 年愚人节的一个游戏 r/place,这是一个非常有趣的 Bitmaps 的应用。
游戏介绍:
一个画板,上面有1000 * 1000 个像素点,每个玩家每五分钟可以编辑一个像素点(有十六种颜色提供选择),参与的玩家数量不限,72 小时后截止。
游戏很简单,每个人只要编辑像素点的颜色即可,17 年的活动最终形成了这个画(这里是一部分):

这里面有一百万个像素点,据统计至少十万人参与了这个游戏,并发量很高,如何保证可用性呢?Reddit 在这里就使用了 Redis 的 Bitmap:
先定义画板中的像素的位置,用 x 表示横坐标,y 表示纵坐标,每一个像素点的位置都对应 Bitmap 的一个offset。
用户编辑像素点时,将 位置信息(x,y) 和 颜色信息 用 Bitmap 储存,读取画板数据也是直接利用 Bitmap。
思路很简单,主要是解决下面两个问题:
1、坐标和Bitmap之间的映射关系? 坐标如何转换成 Bitmap的 offset,offset如何转换成画板中的 x,y 坐标。
2、如何直接利用 Bitmaps 储存一个坐标点的信息? 这里就存颜色。
这个项目是这么做的:
1、由于总计像素点是 100 万个,所以设计了公式: x + 1000y = offset
储存时,将 (x,y) 转换成 offset ,比如 (1,2) 位置,那么 offset = 1 + 2000 = 2001
读取时,将 offset 转换成(x,y),比如 offset = 9008,那么 x = 9008 % 1000 = 8,y = 9008 / 1000 = 9
2、利用 Bitmaps 的 BITFIELD 命令,进行分段操作:
玩家可选择的颜色共 16 种,那么每个点至少需要 4 位,所以使用 BITFIELD 时,操作的位数字段应该是 u4
看起来就是这样的:
上面是这个游戏对于 Bitmaps 应用的简单介绍,具体实现及源码见文末Reddit 团队的博客。
利用 BITFIELD 命令,还可以判断数据是否重复,比如有 10 亿个整数,如何找出其中重复的数据? 每个数可以给 2 位,01表示出现一次,10表示有重复。
How to use Bitmaps when the user ID is not an auto-incremented ID?
In actual development, the user's ID may not be auto-incremented, such as using the snowflake algorithm or the ID generated by the UUID tool. In this case, it is not possible to use Bitmaps directly. The shift amount is too large. At this time, you can refer to Bloom Filter and design an Id mapping algorithm to map the user ID within a certain range.
Bitmaps How to save space when performing persistent storage?
Use compression algorithm, such as RLE algorithm
When using Bitmaps, there will be a large number of continuous position data repetitions, and these repetitions will be compressed space, for example, the first 1000 digits are all 0, then you only need to store 1000 0s, instead of 00000... This way, you can store a thousand 0s.
For more programming-related knowledge, please visit: Introduction to Programming! !
The above is the detailed content of Redis Learning: Deep Understanding of Bitmaps. For more information, please follow other related articles on the PHP Chinese website!
 Commonly used database software
 What are the in-memory databases?
 Which one has faster reading speed, mongodb or redis?
 How to use redis as a cache server
 How redis solves data consistency
 How do mysql and redis ensure double-write consistency?
 What data does redis cache generally store?
 What are the 8 data types of redis