
 Operation and Maintenance
Linux Operation and Maintenance
An in-depth analysis of the system task settings of Linux study notes
Operation and Maintenance
Linux Operation and Maintenance
An in-depth analysis of the system task settings of Linux study notes
An in-depth analysis of the system task settings of Linux study notes

This article brings you relevant knowledge about system task settings in Linux, including issues related to the system startup process, system services, self-starting services and scheduled tasks. I hope it will be helpful to everyone.

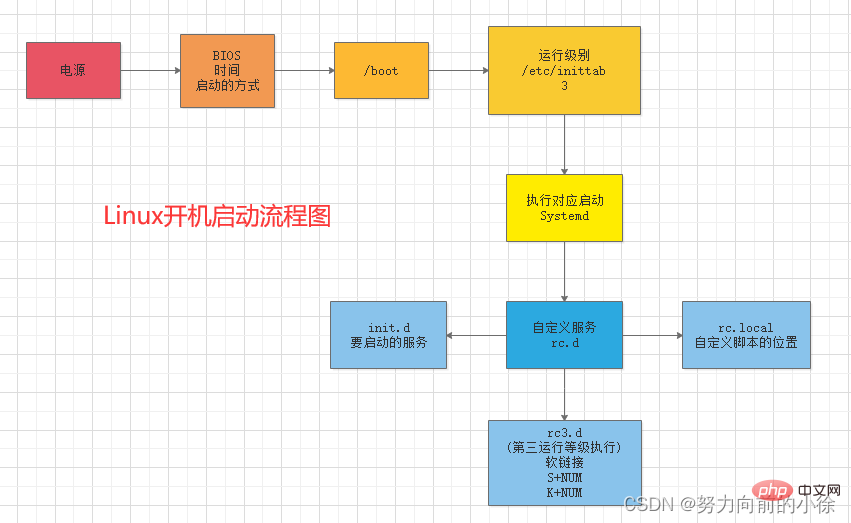
System startup process
- Start the computer's hardware (BIOS)
- Read time
- Select Corresponding startup mode (USB HDD EFI)
- If it is a Linux system, go back to the /boot directory and boot the system to start
- The computer system starts to start and reads the initialization Configuration file
- vi /etc/inittab
- Controls the running level of the computer when starting runlevel
- ##3Full multiuser mode (multi-user full version mode) 4unused (reserved mode) 5X11 (User Interface Mode) 6reboot (restart mode)
- id:3initdefault: The default runlevel is 3
- Start starting the corresponding services and components with runlevel=3
- Start to boot the public components by default or Service
- vi /etc/rc.d/rc.sysinit
- Start loading the service corresponding to runlevel
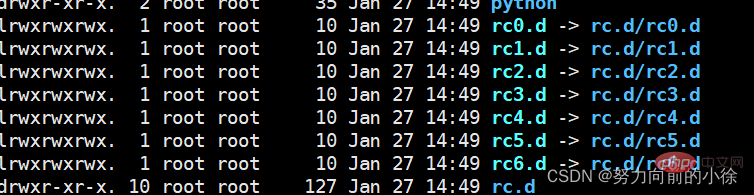
- vi /etc/rc3.d
- K: Services that need to be turned off when shutting down
- S: Services that need to be turned on when starting up
- The numbers represent the order of turning on or off
All The files are all soft links (shortcuts), and the link address is /etc/init.
- vi /etc/rc3.d
- ##When the startup is completed, all services
- By viewing, you can know that different levels correspond to each service and confirm that it will start automatically during this boot.
- After the boot is completed, you need Use the service (CentOS6) Systemctl (CentOS7) command to control the opening or closing of the service
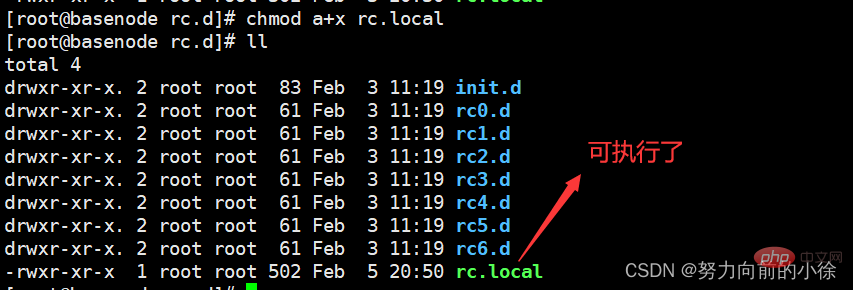
- (When this file has execution permission, it will be executed automatically after booting) First create the folder where the script is stored
- mkdir -p /usr/local/scripts
- vi hello.sh
- Give execution permission

- Give rc.local execution permissions
- mkdir -p /usr/local/scripts
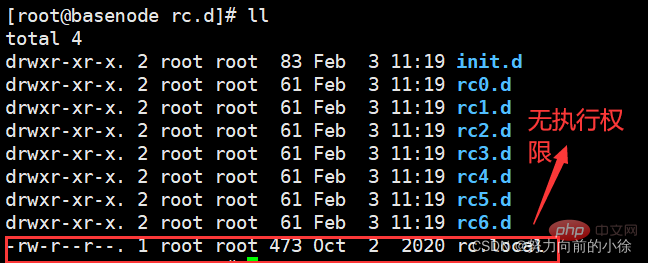
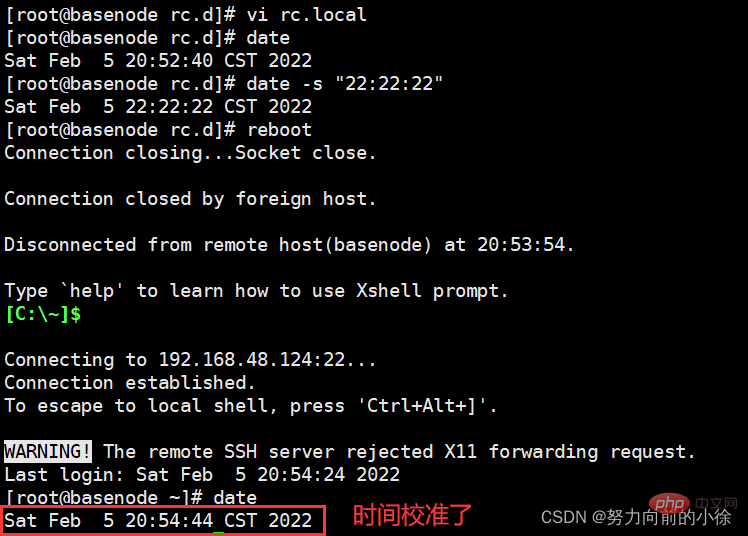
- First cancel the execution permission of rc.local, and then start testing
1
chmoda-x rc.localCopy after login-
-
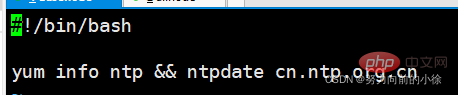
Create automatic startup at boot Script file
1
vi schoolntpdate.shCopy after login 1
2
3
4
5
6
#!/bin/bash#chkconfig:2345 88 99#description:schoolntpdate.sh## 开机自启动同步时间yum info ntp && ntpdate cn.ntp.org.cnCopy after login- Set execution permissions
1
chmoda+x schoolnptdate.shCopy after login-
- Copy the script to /etc/init.d directory
1
cp schoolntpdate.sh /etc/init.d/Copy after login -
- Add to service
1
chkconfig --add /etc/init.d/schoolntpdate.shCopy after login -
- Restart Server
-
-
- Add tasks and edit the current user’s task list
1
crontab -eCopy after login -
- Edit task
1
2
3
4
5
6
7
8
9
10
11
12
13
星 星 星 星 星 command分 时 日 月 周 命令第一列表示分钟1~59 每分钟用*或者*/1表示第二列表示小时1~23(0表示0点)第三列表示日期1~31第四列表示月份1~12第五列标识号星期0~6(0表示星期天)第六列表示要运行的命令*: 表示任何时间都,实际上就是“每”的意思。可以代表00-23小时或者00-12每月或者00-59分-: 表示区间,是一个范围,00 17-19 * * * cmd,就是每天17,18,19的整点执行命令,: 是分割时段,30 3,19,21 * * * cmd,就是每天凌晨3和晚上19,21的半点时刻执行命令/n: 表示分割,可以看成除法,*/5 * * * * cmd,每隔五分钟执行一次Copy after login -
- Restart crontab to make the configuration take effect
1
systemctl restart crond.serviceCopy after login - View the current scheduled task through crontab -l
-
- View the history of the task
1
vi /var/spool/mail/rootCopy after login -
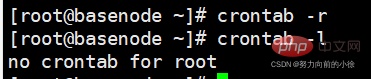
- Clear task
1
crontab -rCopy after login - Test
- Create a script that creates a folder
-
-
- Add a scheduled task and create a folder every minute
1
crontab -e #编辑定时任务Copy after login
-
- #
1
systemctl restart crond.service #重启生效Copy after login-
1
crontab -l #查看当前的定时任务Copy after login- Check if created
-
- Clear tasks
Related recommendations: "Linux Video Tutorial"
- #
##System services
You can use the chkconfig command to view the services of the current virtual machine.- rc.local
##chkconfig
In the system service center, crond is responsible for periodic tasks1
systemctl status crond.serviceCopy after login1
2
3
4
5
6
7
8
9
10
11
12
13
14
15
16
17
18
19
20
21
22
23
24
25
26
27
28
29
30 21 * * * /usr/local/rc.d/Lighttpd restart#上面的例子表示每晚21:30重启apache45 4 1,10,22 * * /usr/local/rc.d/Lighttpd restart#上面的例子表示每月1,10,22日的4:45重启apache10 1 * * 6,0 /usr/local/rc.d/Lighttpd restart#上面的例子表示周六、周日的1:10重启apache0,30 18-23 * * * /usr/local/rc.d/Lighttpd restart#上面的例子表示每天的18:00至23:0每隔30分钟重启apache0 23 * * 6 /usr/local/rc.d/Lighttpd restart#上面的例子表示每星期六的11:00重启apache* */2 * * * /usr/local/rc.d/Lighttpd restart#上面的例子表示每两小时重启apache* 23-7/1 * * * /usr/local/rc.d/Lighttpd restart#上面的例子表示晚上的11点到早上的7点之间,每隔一小时重启apache0 21 4 * mon-wed /usr/local/rc.d/Lighttpd restart#上面的例子表示每月的4号与每周一到周三的11点重启apache0 4 1 jan * /usr/local/rc.d/Lighttpd restart#上面的例子表示一月一号的4:00重启apache--(功能描述:显示年月日时分秒)date"+%Y %m %d %H %M %S"Copy after login1
2
3
4
#!/bin/bashdname=`date"+%Y%m%d%H%M%S"`mkdir-p ~/$dnameCopy after login0 ##halt (shut down) 1 Single user mode 2 Multiuser, without NFS (multi-user mode, but no network status) FS-->FileSystem


 ##chkconfig
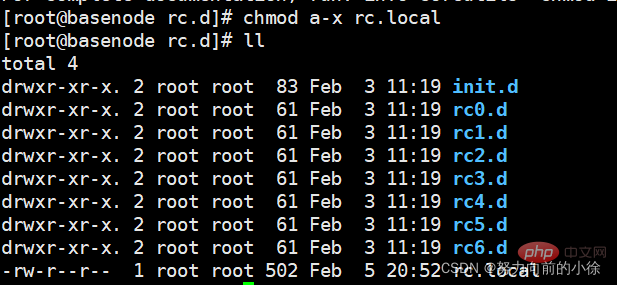 Create automatic startup at boot Script file
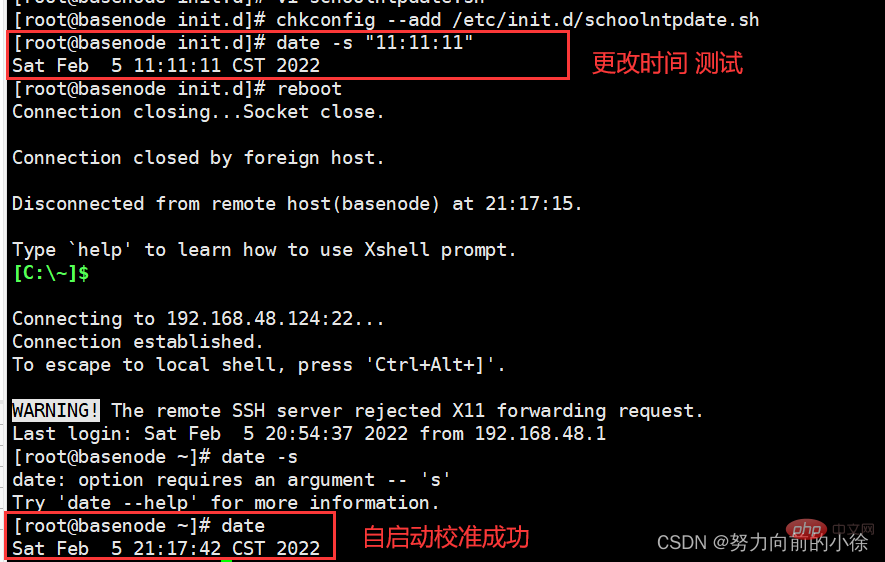


The above is the detailed content of An in-depth analysis of the system task settings of Linux study notes. For more information, please follow other related articles on the PHP Chinese website!
Hot AI Tools

Undresser.AI Undress
AI-powered app for creating realistic nude photos

AI Clothes Remover
Online AI tool for removing clothes from photos.

Undress AI Tool
Undress images for free

Clothoff.io
AI clothes remover

Video Face Swap
Swap faces in any video effortlessly with our completely free AI face swap tool!
Hot Article
Hot Tools

Notepad++7.3.1
Easy-to-use and free code editor

SublimeText3 Chinese version
Chinese version, very easy to use

Zend Studio 13.0.1
Powerful PHP integrated development environment

Dreamweaver CS6
Visual web development tools

SublimeText3 Mac version
God-level code editing software (SublimeText3)
Hot Topics
 1389
1389
 52
52

 How to use docker desktop
Apr 15, 2025 am 11:45 AM
How to use docker desktop
Apr 15, 2025 am 11:45 AM
How to use Docker Desktop? Docker Desktop is a tool for running Docker containers on local machines. The steps to use include: 1. Install Docker Desktop; 2. Start Docker Desktop; 3. Create Docker image (using Dockerfile); 4. Build Docker image (using docker build); 5. Run Docker container (using docker run).
 How to view the docker process
Apr 15, 2025 am 11:48 AM
How to view the docker process
Apr 15, 2025 am 11:48 AM
Docker process viewing method: 1. Docker CLI command: docker ps; 2. Systemd CLI command: systemctl status docker; 3. Docker Compose CLI command: docker-compose ps; 4. Process Explorer (Windows); 5. /proc directory (Linux).
 What to do if the docker image fails
Apr 15, 2025 am 11:21 AM
What to do if the docker image fails
Apr 15, 2025 am 11:21 AM
Troubleshooting steps for failed Docker image build: Check Dockerfile syntax and dependency version. Check if the build context contains the required source code and dependencies. View the build log for error details. Use the --target option to build a hierarchical phase to identify failure points. Make sure to use the latest version of Docker engine. Build the image with --t [image-name]:debug mode to debug the problem. Check disk space and make sure it is sufficient. Disable SELinux to prevent interference with the build process. Ask community platforms for help, provide Dockerfiles and build log descriptions for more specific suggestions.
 What computer configuration is required for vscode
Apr 15, 2025 pm 09:48 PM
What computer configuration is required for vscode
Apr 15, 2025 pm 09:48 PM
VS Code system requirements: Operating system: Windows 10 and above, macOS 10.12 and above, Linux distribution processor: minimum 1.6 GHz, recommended 2.0 GHz and above memory: minimum 512 MB, recommended 4 GB and above storage space: minimum 250 MB, recommended 1 GB and above other requirements: stable network connection, Xorg/Wayland (Linux)
 vscode cannot install extension
Apr 15, 2025 pm 07:18 PM
vscode cannot install extension
Apr 15, 2025 pm 07:18 PM
The reasons for the installation of VS Code extensions may be: network instability, insufficient permissions, system compatibility issues, VS Code version is too old, antivirus software or firewall interference. By checking network connections, permissions, log files, updating VS Code, disabling security software, and restarting VS Code or computers, you can gradually troubleshoot and resolve issues.
 Can vscode be used for mac
Apr 15, 2025 pm 07:36 PM
Can vscode be used for mac
Apr 15, 2025 pm 07:36 PM
VS Code is available on Mac. It has powerful extensions, Git integration, terminal and debugger, and also offers a wealth of setup options. However, for particularly large projects or highly professional development, VS Code may have performance or functional limitations.
 What is vscode What is vscode for?
Apr 15, 2025 pm 06:45 PM
What is vscode What is vscode for?
Apr 15, 2025 pm 06:45 PM
VS Code is the full name Visual Studio Code, which is a free and open source cross-platform code editor and development environment developed by Microsoft. It supports a wide range of programming languages and provides syntax highlighting, code automatic completion, code snippets and smart prompts to improve development efficiency. Through a rich extension ecosystem, users can add extensions to specific needs and languages, such as debuggers, code formatting tools, and Git integrations. VS Code also includes an intuitive debugger that helps quickly find and resolve bugs in your code.
 What is the main purpose of Linux?
Apr 16, 2025 am 12:19 AM
What is the main purpose of Linux?
Apr 16, 2025 am 12:19 AM
The main uses of Linux include: 1. Server operating system, 2. Embedded system, 3. Desktop operating system, 4. Development and testing environment. Linux excels in these areas, providing stability, security and efficient development tools.
