
 Operation and Maintenance
Linux Operation and Maintenance
Linux study notes file system (organized and shared)
Operation and Maintenance
Linux Operation and Maintenance
Linux study notes file system (organized and shared)
Linux study notes file system (organized and shared)

This article brings you relevant knowledge about the file system in Linux, including some directory descriptions and related issues about file operations. I hope it will be helpful to you.

Memory usage
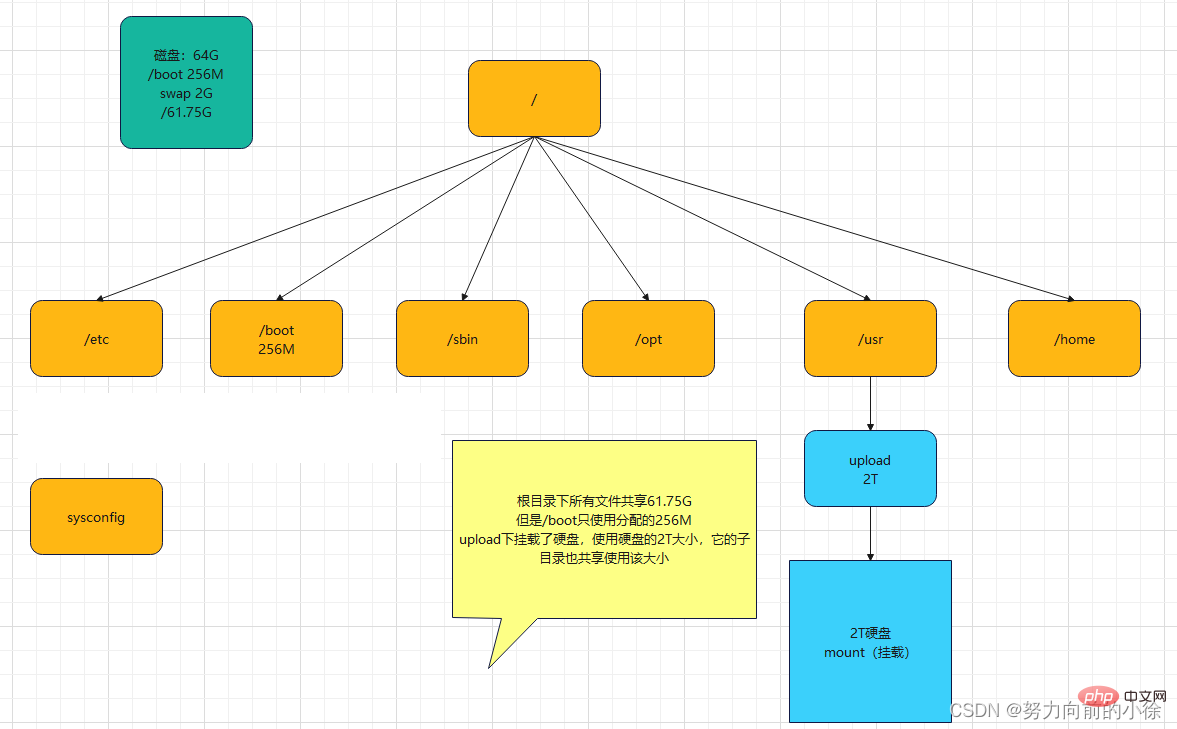
Partial directory description
-
/bin
- bin is the abbreviation of Binary. This directory stores the most commonly used commands
-
/boot
- Stores some core files used when starting Linux, including some connection files and image files
-
/etc
- is used to store All configuration files and subdirectories required by the system administrator
-
/lib
- store the most basic dynamic link shared libraries of the system. The function is similar to the DLL file in Windows. Almost all applications require these shared libraries.
-
/lost found
- Normally it is empty. When the system is shut down illegally, some files are stored here
-
/media
- The Linux system will automatically recognize some devices, such as U disks, CD-ROM drives, etc. After recognition, Linux will mount the recognized devices. Go to this directory
-
/mnt
- The system provides this directory to allow users to temporarily mount other file systems. You can put the optical drive Mount it to /mnt/, and then enter the directory to view the contents of the optical drive
-
/opt
- This is for the host The directory where additional installed software is placed. For example, if you install an ORACLE database, you can put it in this directory. It is empty by default.
- ##/proc
- This directory is a virtual directory. It is a mapping of system memory. You can obtain the system memory by directly accessing this directory. information.
- The contents of this directory are not on the hard disk but in the memory. Some files in it can be modified directly.
- For example, you can use the following command to block the ping command of the host so that others cannot ping your machine
echo 1 > /proc/sys/net/ipv4/icmp_echo_ignore_all
- /root
- This directory is the user home directory of the system administrator, also known as the super privileged person
- /sbin
- s means Super user. The system management program used by the system administrator is stored here.
- /srv
- This directory stores Some data that need to be extracted after starting some services
##/sys -
This is a big change in the linux2.6 kernel. In this directory Installed sysfs, a new file system in the 2.6 kernel.
- The sysfs file system integrates the information of the following three file systems, the proc file system for process information, the devfs file system for devices, and the devpts file system for pseudo terminals. The file system is a visual reflection of the kernel device tree.
- When a kernel object is created, the corresponding files and directories are also created in the kernel object subsystem
/tmp -
This directory is used to store some temporary files
-
This is a very important directory for users Many applications and files are placed in this directory, similar to the program files directory under Windows
-
System Applications used by users
-
Relatively advanced management programs and system daemons used by super users
-
Default placement directory for kernel source code
-
This directory stores ever-expanding things. It is customary to place directories that are frequently modified in this directory, including various log files
-
is a temporary file system that stores information other than system startup. When the system restarts, the files in this directory should be deleted or cleared.
- ll
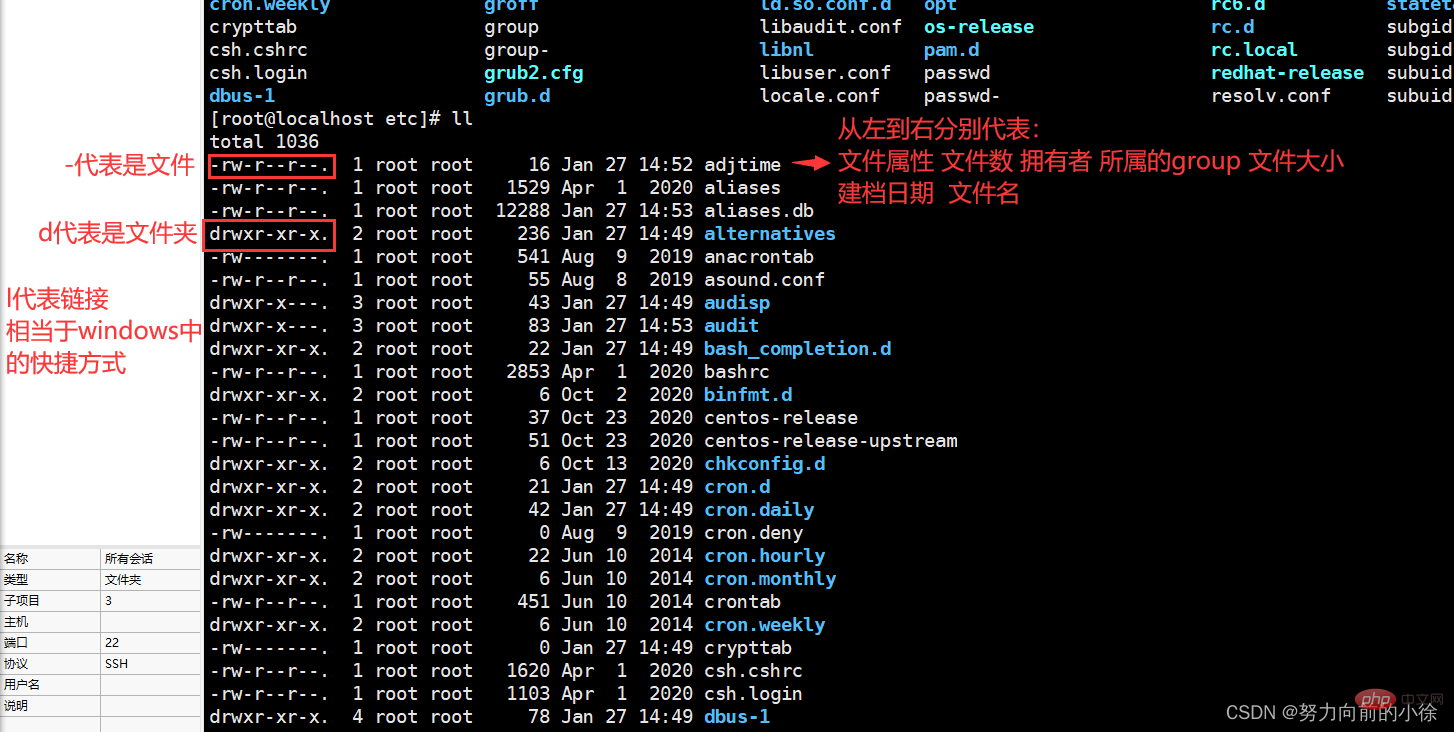

Linux files are basically divided into 3 attributes: readable (r), writable (w), executable (x) . The sorting order of permission positions is (taking -rw-r--r-- as an example): -rw (user)-r (user group in the same group)--r (other users)--
User can read and write, users in the same group can read, and other users can read
Number of files:If it is a file, the number of files is 1; if it is a directory , the number of files is the number of files in the directory
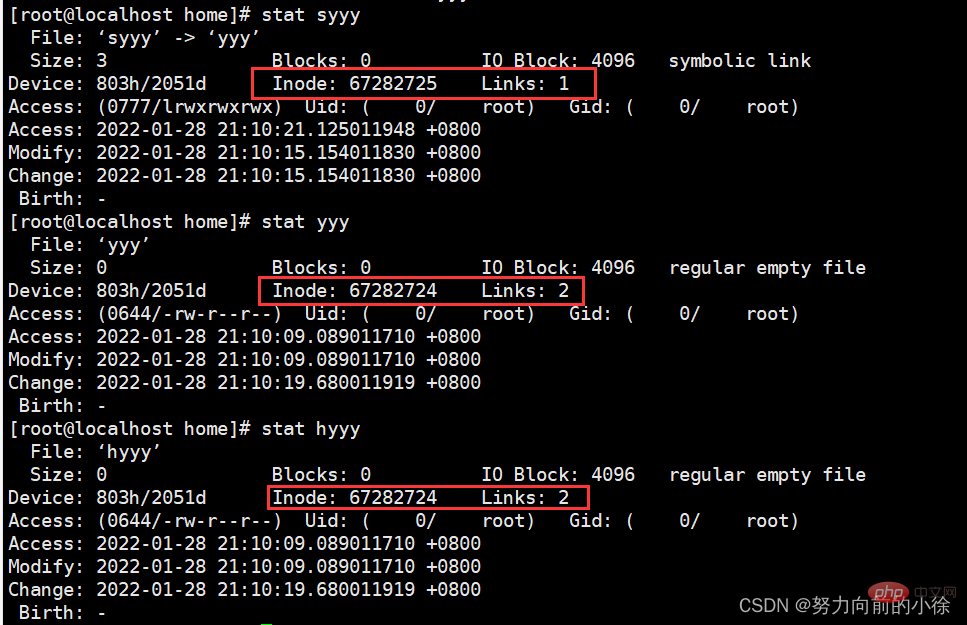
The group it belongs to:Each owner can have more than one group, but most users should only belong to the same group group, only when the system administrator wants to give the user special permissions, he may give him another group File size:File size is expressed in bytes. Empty directories are generally 1024byte Creation date:In the format of "month, day and time" Links: Link to Inode Access: The last time the file contents were viewed Modify: The time when the file content was last modified Change: The time when the file permissions or other file attributes were last modified Use stat to make the above three times consistent again 移除yyy后 因为还有一个hyyy指向和yyy一样的Inode,所以 移除hyyy后 再次创建yyy后,并向yyy中追加“hello” 再次向yyy中追加数据 在etc目录及子目录查找a开头a结尾的文件 相关推荐:《Linux视频教程》cd
##cd
Change directory command
cd /
Return to the root directory
cd /home
Switch to the home directory
cd ..
Return to the upper level directory '.' indicates the current directory
cd /var/ftp/pub
Switch to the pub directory at one time
cd /root
Switch to the root user directory (Note: the root user directory is displayed as "~")
Directory operations are available Use absolute paths (starting from the root directory) or relative paths (starting from the current directory). In order to change directories quickly and accurately, directory operations should be good at using the TAB key to automatically complete directory names
cp
Copy command
cp 123 /var/ftp/pub
Copy the file named 123 to the pub directory
cp 123 /var/ftp/pub/456
Copy the file named 123 to the pub directory and rename it to 456
cp -r /var/ftp/pub /home
Copy the pub directory to the home directory
##mv
Move command
mv 123 /var/ftp/pub
Move the file named 123 to pub Under the directory
mv 123 /var/ftp/pub/456
Move the file named 123 to pub directory and rename it to 456
mv /var/ftp/pub /home ##mv 123 456Move the pub directory Go to the home directory
Rename file 123 in the current directory to 456 rm
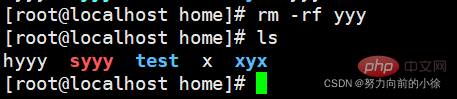
##rm
Delete Command
rm 123
Delete the file named 123 in the directory (the file exists), you need to press y to confirm
rm -f 123
Delete the file, force deletion, no confirmation required
rm -r abc
Delete the directory named abc under the directory (the directory exists), you need to press y to confirm
rm -fr abc
Forcibly delete the directory without confirmation
rm -f a*
#Forcibly delete all files starting with a in the directory, no confirmation is required
##touch
Create file
touch 123 Create a file named 123
touch a b c
Create multiple files
stat
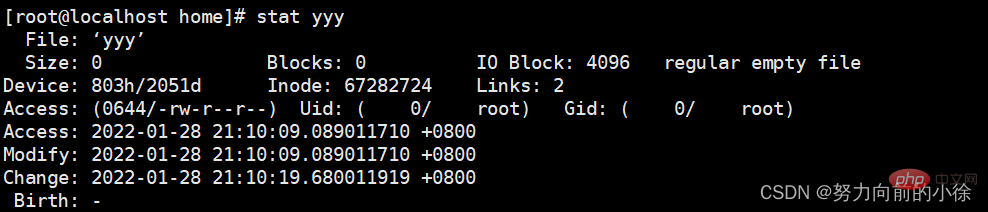 Inode: File identifier
##ln
Link (shortcut)
##ln -s yyy syyy
Create a link to yyy ( Soft link) syyy, and then use cat syyy to view the content in yyy
ln yyy hyyy
Create The link (hard link) of yyy is hyyy, and then use cat hyyy to view the content in yyy
 cat/tac/less
##cat/less
View text content command
cat /etc/passwd
View the text file passwd Content, you can only view the last page, only suitable for viewing small text files within one screen
less /etc/passwd
You can use the up and down cursor keys and page up and down to scroll through the entire contents of the text file passwd. After viewing, press q to exit
tac
is similar to the cat command, except that the content is displayed from back to front
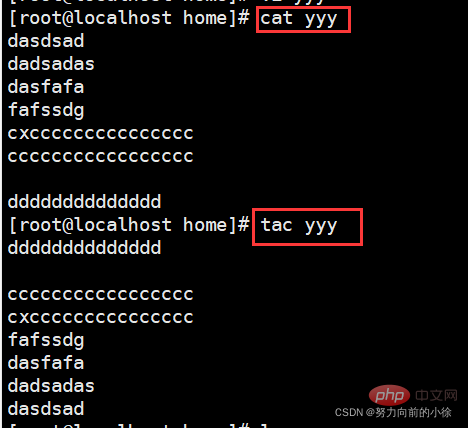
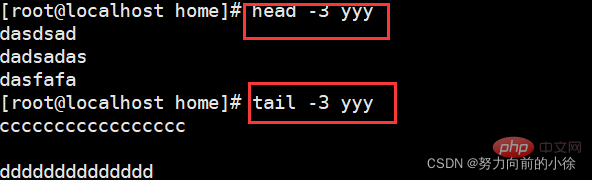
head/tail
head -3 yyy
显示yyy文件的前三行内容
tail -3 yyy
显示yyy文件的后三行内容
head -3 yyy | tail -1
显示yyy文件第三行的内容
tail -f yyy
监控yyy的内容(监控Inode,当文件删除后,监控就停止,再次创建同名文件时,不会继续监控)
tail -F yyy
监控yyy文件的内容(监控文件名,当文件删除后,监控会暂停,再次创建同名文件时,监控会继续)

tail -F yyy停止
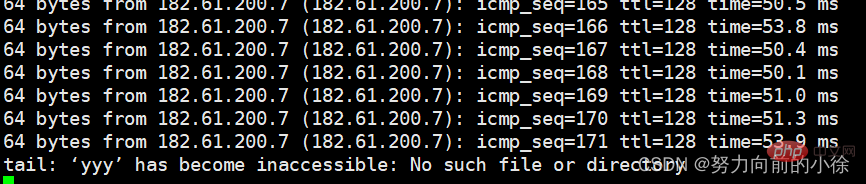
tail -f yyy还在继续监控

tail -f yyy停止监控


tail -F yyy追加hello

tail -f yyy没有反应
ping www.baidu.com >> yyy//将ping的内容追加到yyy文件中
tail -F yyy继续追加新的信息
find
find / -name yyy
全局搜索yyy文件的位置
find /ect -name yyy
在etc目录及子目录查找yyy文件
find /etc -name a*a
The above is the detailed content of Linux study notes file system (organized and shared). For more information, please follow other related articles on the PHP Chinese website!

Hot AI Tools

Undresser.AI Undress
AI-powered app for creating realistic nude photos

AI Clothes Remover
Online AI tool for removing clothes from photos.

Undress AI Tool
Undress images for free

Clothoff.io
AI clothes remover

Video Face Swap
Swap faces in any video effortlessly with our completely free AI face swap tool!

Hot Article
Hot Tools

Notepad++7.3.1
Easy-to-use and free code editor

SublimeText3 Chinese version
Chinese version, very easy to use

Zend Studio 13.0.1
Powerful PHP integrated development environment

Dreamweaver CS6
Visual web development tools

SublimeText3 Mac version
God-level code editing software (SublimeText3)
Hot Topics
 1387
1387
 52
52

 How to use docker desktop
Apr 15, 2025 am 11:45 AM
How to use docker desktop
Apr 15, 2025 am 11:45 AM
How to use Docker Desktop? Docker Desktop is a tool for running Docker containers on local machines. The steps to use include: 1. Install Docker Desktop; 2. Start Docker Desktop; 3. Create Docker image (using Dockerfile); 4. Build Docker image (using docker build); 5. Run Docker container (using docker run).
 How to view the docker process
Apr 15, 2025 am 11:48 AM
How to view the docker process
Apr 15, 2025 am 11:48 AM
Docker process viewing method: 1. Docker CLI command: docker ps; 2. Systemd CLI command: systemctl status docker; 3. Docker Compose CLI command: docker-compose ps; 4. Process Explorer (Windows); 5. /proc directory (Linux).
 What to do if the docker image fails
Apr 15, 2025 am 11:21 AM
What to do if the docker image fails
Apr 15, 2025 am 11:21 AM
Troubleshooting steps for failed Docker image build: Check Dockerfile syntax and dependency version. Check if the build context contains the required source code and dependencies. View the build log for error details. Use the --target option to build a hierarchical phase to identify failure points. Make sure to use the latest version of Docker engine. Build the image with --t [image-name]:debug mode to debug the problem. Check disk space and make sure it is sufficient. Disable SELinux to prevent interference with the build process. Ask community platforms for help, provide Dockerfiles and build log descriptions for more specific suggestions.
 What computer configuration is required for vscode
Apr 15, 2025 pm 09:48 PM
What computer configuration is required for vscode
Apr 15, 2025 pm 09:48 PM
VS Code system requirements: Operating system: Windows 10 and above, macOS 10.12 and above, Linux distribution processor: minimum 1.6 GHz, recommended 2.0 GHz and above memory: minimum 512 MB, recommended 4 GB and above storage space: minimum 250 MB, recommended 1 GB and above other requirements: stable network connection, Xorg/Wayland (Linux)
 vscode cannot install extension
Apr 15, 2025 pm 07:18 PM
vscode cannot install extension
Apr 15, 2025 pm 07:18 PM
The reasons for the installation of VS Code extensions may be: network instability, insufficient permissions, system compatibility issues, VS Code version is too old, antivirus software or firewall interference. By checking network connections, permissions, log files, updating VS Code, disabling security software, and restarting VS Code or computers, you can gradually troubleshoot and resolve issues.
 Can vscode be used for mac
Apr 15, 2025 pm 07:36 PM
Can vscode be used for mac
Apr 15, 2025 pm 07:36 PM
VS Code is available on Mac. It has powerful extensions, Git integration, terminal and debugger, and also offers a wealth of setup options. However, for particularly large projects or highly professional development, VS Code may have performance or functional limitations.
 What is vscode What is vscode for?
Apr 15, 2025 pm 06:45 PM
What is vscode What is vscode for?
Apr 15, 2025 pm 06:45 PM
VS Code is the full name Visual Studio Code, which is a free and open source cross-platform code editor and development environment developed by Microsoft. It supports a wide range of programming languages and provides syntax highlighting, code automatic completion, code snippets and smart prompts to improve development efficiency. Through a rich extension ecosystem, users can add extensions to specific needs and languages, such as debuggers, code formatting tools, and Git integrations. VS Code also includes an intuitive debugger that helps quickly find and resolve bugs in your code.
 How to back up vscode settings and extensions
Apr 15, 2025 pm 05:18 PM
How to back up vscode settings and extensions
Apr 15, 2025 pm 05:18 PM
How to back up VS Code configurations and extensions? Manually backup the settings file: Copy the key JSON files (settings.json, keybindings.json, extensions.json) to a safe location. Take advantage of VS Code synchronization: enable synchronization with your GitHub account to automatically back up all relevant settings and extensions. Use third-party tools: Back up configurations with reliable tools and provide richer features such as version control and incremental backups.
