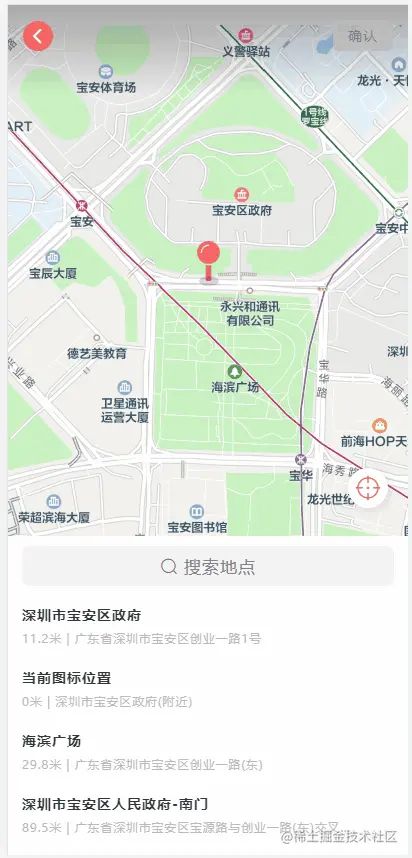
How does the uni-app mobile terminal imitate WeChat to implement map interaction for sending locations? The following article will introduce to you how to implement map interaction. I hope it will be helpful to you!

The company's new project must have a built-in map, or the old map must be revised and a new map must be aligned with WeChat in terms of UI and interaction, and functionally fit the business need.
Actually, these are quite simple. The main trouble lies in the animation interaction below.
But first, let me regret my original point. I built it into the project according to the Tencent map tutorial, and the preview in the browser was normal. However, when debugging on the real machine, I found that it could not be done, and I planned to change it again. , write an html in the project, and then introduce it into the project through webview.
Okay, I hope readers can take this as a warning.

Let’s talk about the development of this interaction.
The first version is to use uni-app to obtain the width and height of the device. The map width fills the screen, and the content and list are different. Account for 50% of the height. When the expanded list is triggered, adjust the height proportion and add a transition effect through the transition attribute.
But the result of this is that when the height ratio is automatically adjusted, the height adjustment value itself is excessive, and the animation looks stuck.
To put it bluntly, it’s just one word, ugly.
ps: The following code is just a core concept, not a real executable code. It can be understood as a pseudo-code;
<template>
<view>
<view :style="{height: mapHeight + 'px'}"> </view>
<view :style="{height: windowHeight - mapHeight + 'px'}"></view>
</view>
</teamplate>
export default {
data(){
return {
windowWidth: uni.getSystemInfoSync().windowWidth,
windowHeight: uni.getSystemInfoSync().windowHeight,
searchStatus: false,
}
},
computed{
mapHeight(){
return searchStatus ? this.windowHeight * 0.7 : this.windowHeight * 0.5;
}
}
}
<style scoped>
.map-box,
.result-list{
transition: height .3s;
}
</style>In fact, after reading the ideas in the second version, you will feel that I really lost my mind and wanted to do that in the first version.
The idea of the second version is generally the same as that of the first version, both are adjusting the height, but the difference is in the overall movement of you advancing and I retreating.
1. The height of the list container accounts for 70%, and the height of the content accounts for 50% of the total height. 70% is the unfolded height.
2. When the list is expanded, the map moves upward by 10% and the list moves upward by 20%;
Compared with the previous version where adjusting the height caused the final animation to freeze, this The first version is to adjust the top value.
The map height is always 50%, and 20% is hidden after the list is expanded.
The height of the list is always 70%. After expansion, moving up 20% will cover an additional part of the map. At this time, the center store of the map remains unchanged. There is no need to reacquire the map center point.
<template>
<view>
<view :style="{height: windowHeight*0.5+'px', top: searchStatus ? '-10%' : 0 }"> </view>
<view :style="{height: windowHeight*0.7+'px', top: searchStatus ? '50%' : '30%'}">
<view :style="{height: searchStatus ? windowHeight*0.5+'px' :windowHeight*0.7+'px'}"></view>
</view>
</view>
</teamplate>
export default {
data(){
return {
windowWidth: uni.getSystemInfoSync().windowWidth,
windowHeight: uni.getSystemInfoSync().windowHeight,
searchStatus: false,
}
}
}
<style scoped>
.map-box,
.result-list{
transition: height .3s;
}
</style>The company’s project code is not easy to post the project address. This part of the complete code is quite a lot. If you really don’t have the idea to implement it, you can leave a message in the comment area or add your contact information. Friendly communication, no advertising, no fees.
Original address: https://juejin.cn/post/7054700579590766628
Recommended: "uniapp tutorial"
The above is the detailed content of How to implement map interaction for sending location in mobile uni-app project. For more information, please follow other related articles on the PHP Chinese website!