What are the ways of docker storage?
Docker has four storage methods: 1. "Default storage", the data is saved in the running container. After the container is deleted, the data is also deleted; 2. "Volumes data volume"; 3. "bind mounts mount", directly mount any directory or file in the host file system; 4. "tmpfs mount".

The operating environment of this tutorial: linux5.9.8 system, docker-1.13.1 version, Dell G3 computer.
Several storage methods of docker containers
The storage of containers can be divided into two categories:
One is related to mirroring, which is the container layer Copy-On-Write feature we mentioned in the article "Basic of Docker Container Technology: Joint File System OverlayFS". By default, all files created within the container are stored on the writable container layer. This method of directly storing files on the container layer makes data difficult to persist and share due to the reliance on storage drivers and the use of direct writing to the host file system. This additional abstraction reduces performance compared to the data volume.
The other is host storage, which is used by binding or hanging the host directory into the container. The data can be persisted even after the container is stopped. Mainly introduce the latter.
Several storage mounting methods
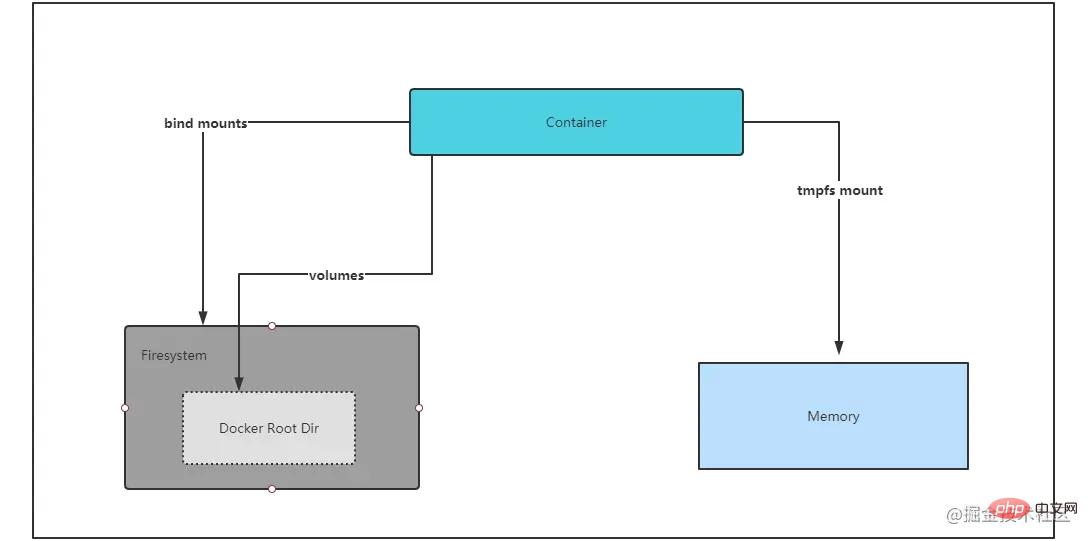
Here we draw the following diagram based on the different locations where the data is stored on the Docker host:

Docker has four storage methods: default, volumes data volumes, bind mounts, and tmpfs mount (only available in Linux environment). Two of them, volumes and bind mounts, implement persistent container data.
1. Default storage
The data is saved in the running container. After the container is deleted, the data will also be deleted
2. bind mounts
Bind mounts have limited functionality compared to volumes. When using bind mount, a file or directory on the host is mounted into the container. The file or directory is referenced by its full path on the host. The directory does not need to already exist on the Docker host. If it does not exist, Docker will create it for us. Note that only directories can be created automatically.
We bind and mount a directory /nginx/html through the -v option and check it in the container
docker run -dt -v /nginx/html:/usr/share/nginx/html --name nginx nginx
View the container Mounts field through docker inspect nginx
"Mounts": [
    {
        "Type": "bind",
        "Source": "/nginx/html",
        "Destination": "/usr/share/nginx/html",
        "Mode": "",
        "RW": true,
        "Propagation": "rprivate"
    }
],Then we Create an index.html on the docker host and write hello nginx, and then access the container IP. Obviously our mounting has taken effect.
[root@localhost ~]# echo "hello nginx" >  /nginx/html/index.html
[root@localhost ~]# curl 172.17.0.4
hello nginx
There is a problem here. We can modify the files through the docker host to make the files in the container effective. The same is true in reverse. The container can modify, create and delete the contents on the host file system. To deal with this problem, we can configure the permissions of the mounting directory when creating the container, such as the following read-only permissions:
docker run -dt -v /nginx/html:/usr/share/nginx/html:ro --name nginx nginx
So when we use bind mount, you are operating the host file system, You must know the following:
What contents are contained in the directory you mount to avoid affecting other applications.
Whether your container should have permission to operate these directories.
3.volumes data volume
Volume storage volumes are created and managed by Docker. We can use the docker volume create command to explicitly create volumes, or create them in the container volume is created.
[root@localhost ~]# docker volume create nginx_volume
nginx_volume
[root@localhost volumes]# docker inspect  nginx_volume
[
    {
        "CreatedAt": "2021-08-12T01:58:04-04:00",
        "Driver": "local",
        "Labels": {},
        "Mountpoint": "/var/lib/docker/volumes/nginx_volume/_data",
        "Name": "nginx_volume",
        "Options": {},
        "Scope": "local"
    }
]You can see that the mount point is under docker’s root directory /var/lib/docker/volumes
Use docker volume rm/prune to clear a single or all unused volumes. Managing volumes through docker commands is an advantage over bind mounts.
[root@localhost ~]# docker volume ls
DRIVER    VOLUME NAME
local     owncloud-docker-server_files
local     owncloud-docker-server_mysql
local     owncloud-docker-server_redis
[root@localhost ~]# docker volume prune
WARNING! This will remove all local volumes not used by at least one container.
Are you sure you want to continue? [y/N] y
Deleted Volumes:
owncloud-docker-server_files
owncloud-docker-server_mysql
owncloud-docker-server_redis

Total reclaimed space: 199.4MB
When creating a container, if the source of the container mounting is not specified, docker will automatically create an anonymous volume for us, also located in the docker root directory.
[root@localhost volumes]# docker run -dt -v /usr/share/nginx/html --name nginx_with_volume nginx
d25bdfce9c7ac7bde5ae35067f6d9cf9f0cd2c9cbea6d1bbd7127b3949ef5ac6
[root@localhost volumes]# docker volume ls
DRIVER    VOLUME NAME
local     d8e943f57d17a255f8a4ac3ecbd6471a735aa64cc7a606c52f61319a6c754980
local     nginx_volume
[root@localhost volumes]# ls /var/lib/docker/volumes/
backingFsBlockDev  d8e943f57d17a255f8a4ac3ecbd6471a735aa64cc7a606c52f61319a6c754980  metadata.db  nginx_volume
After we create a mount volume, the storage at this time is consistent with bind mounts. However, when the docker host cannot guarantee a given directory or file structure, the volume can help us configure the docker host. Decoupled from the container runtime. In this way, when we need to back up, restore or migrate data from one Docker host to another, the volume is very convenient and can be separated from the restrictions of the host path.
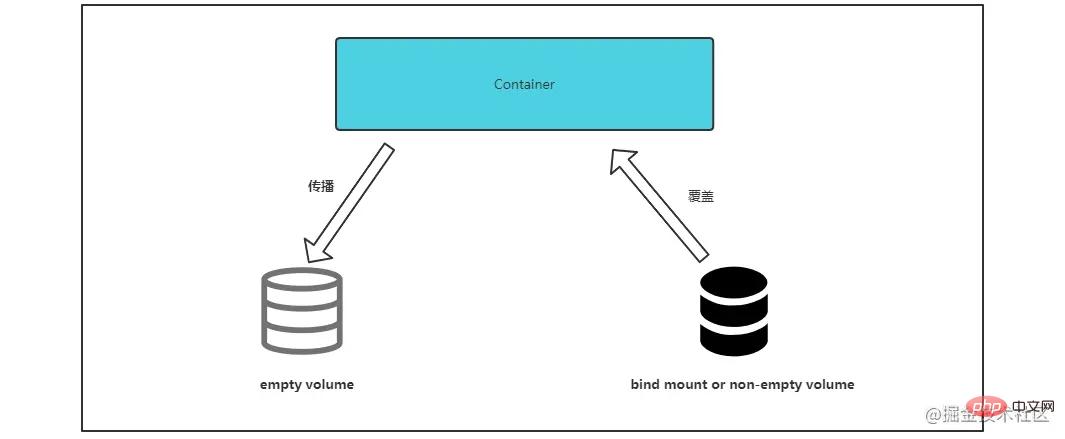
When using bind mounts and volumes we should pay attention to the following propagation coverage principles:

When mounting an empty volume: the contents of the directory in the container is propagated (copied) to the volume.
When binding a mounted or non-empty volume: the contents of the directory in the container will be overwritten by the volume or bound host directory.
4.tmpfs mount
tmpfs mount is only applicable to linux hosts. When we use tmpfs mount to create a container, the container can be in the writable layer of the container. Create files externally. Keep the data in memory and when the container is stopped, the written data will be removed. Mainly used for temporary storage of sensitive files that you do not want to remain in the host or container writable layer.
Mount a memory block through the --tmpfs option.
docker run -dt --name busybox_tmpfs --tmpfs /etc/running busybox
Put parameters in the --mount method to specify the temporary storage size.
docker run -dt --name busybox_tmpfs2 --mount type=tmpfs,tmpfs-size=2048,destination=/etc/running busybox
Storage data sharing
在容器之间共享数据主要有两种方法,第一种比较简单,只需要将目录或者volume挂载到多个容器中即可。这里不做赘述,我们来看一下通过中间容器实现共享的方式。
我们创建一个中间容器,包含绑定挂载目录和一个卷。
docker create -v /share:/volume1 -v /volume2 --name volume_share busybox
在我们需要共享的容器中通过选项--volumes-from拿过来用即可
docker run -d -t --volumes-from volume_share --name container1 busybox
我们inspect检查一下Mounts字段,此时container1已经挂载到了一个bind目录和一个volume
"Mounts": [
    {
        "Type": "bind",
        "Source": "/share",
        "Destination": "/volume1",
        "Mode": "",
        "RW": true,
        "Propagation": "rprivate"
    },
    {
        "Type": "volume",
        "Name": "21605e49a0ba90a1b952a32c1b3f0d42735da8bfe718f0dc76c37e91f1e51c0e",
        "Source": "/var/lib/docker/volumes/21605e49a0ba90a1b952a32c1b3f0d42735da8bfe718f0dc76c37e91f1e51c0e/_data",
        "Destination": "/volume2",
        "Driver": "local",
        "Mode": "",
        "RW": true,
        "Propagation": ""
    }
],推荐学习:《docker视频教程》
The above is the detailed content of What are the ways of docker storage?. For more information, please follow other related articles on the PHP Chinese website!

Hot AI Tools

Undresser.AI Undress
AI-powered app for creating realistic nude photos

AI Clothes Remover
Online AI tool for removing clothes from photos.

Undress AI Tool
Undress images for free

Clothoff.io
AI clothes remover

Video Face Swap
Swap faces in any video effortlessly with our completely free AI face swap tool!

Hot Article

Hot Tools

Notepad++7.3.1
Easy-to-use and free code editor

SublimeText3 Chinese version
Chinese version, very easy to use

Zend Studio 13.0.1
Powerful PHP integrated development environment

Dreamweaver CS6
Visual web development tools

SublimeText3 Mac version
God-level code editing software (SublimeText3)

Hot Topics
 1387
1387
 52
52
 How to update the image of docker
Apr 15, 2025 pm 12:03 PM
The steps to update a Docker image are as follows: Pull the latest image tag New image Delete the old image for a specific tag (optional) Restart the container (if needed)
 How to use docker desktop
Apr 15, 2025 am 11:45 AM
How to use Docker Desktop? Docker Desktop is a tool for running Docker containers on local machines. The steps to use include: 1. Install Docker Desktop; 2. Start Docker Desktop; 3. Create Docker image (using Dockerfile); 4. Build Docker image (using docker build); 5. Run Docker container (using docker run).
 How to exit the container by docker
Apr 15, 2025 pm 12:15 PM
Four ways to exit Docker container: Use Ctrl D in the container terminal Enter exit command in the container terminal Use docker stop <container_name> Command Use docker kill <container_name> command in the host terminal (force exit)
 How to copy files in docker to outside
Apr 15, 2025 pm 12:12 PM
Methods for copying files to external hosts in Docker: Use the docker cp command: Execute docker cp [Options] <Container Path> <Host Path>. Using data volumes: Create a directory on the host, and use the -v parameter to mount the directory into the container when creating the container to achieve bidirectional file synchronization.
 How to view the docker process
Apr 15, 2025 am 11:48 AM
Docker process viewing method: 1. Docker CLI command: docker ps; 2. Systemd CLI command: systemctl status docker; 3. Docker Compose CLI command: docker-compose ps; 4. Process Explorer (Windows); 5. /proc directory (Linux).
 How to check the name of the docker container
Apr 15, 2025 pm 12:21 PM
You can query the Docker container name by following the steps: List all containers (docker ps). Filter the container list (using the grep command). Gets the container name (located in the "NAMES" column).
 How to save docker image
Apr 15, 2025 am 11:54 AM
To save the image in Docker, you can use the docker commit command to create a new image, containing the current state of the specified container, syntax: docker commit [Options] Container ID Image name. To save the image to the repository, you can use the docker push command, syntax: docker push image name [: tag]. To import saved images, you can use the docker pull command, syntax: docker pull image name [: tag].
 How to start mysql by docker
Apr 15, 2025 pm 12:09 PM
The process of starting MySQL in Docker consists of the following steps: Pull the MySQL image to create and start the container, set the root user password, and map the port verification connection Create the database and the user grants all permissions to the database


