This article brings you relevant knowledge about front-end upload files, including traditional development mode upload, front-end and back-end separate upload, ajax upload and other related issues. I hope it will be helpful to everyone.

There will be many file upload requirements in the project, such as: avatar upload, table files, word documents, etc...
Upload required form elements:
<input>
When uploading files,
1. The form must be a post request
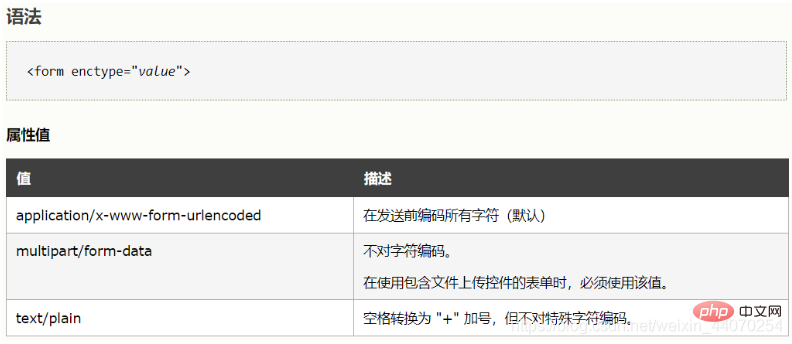
2. The form must declare not to encode the data - enctype=multipart/form- data
The format of transmitted data is in the form of key-value pairs, and the data are all js data types, but when files are transmitted, there are only two forms for transmission:
Mix the front and back ends Development
To upload in the traditional development model, you need to transfer the files selected in the form to the backend and let the backend do the uploading:
At this time, the form must have the enctype attribute. , the description of this attribute is as follows:

After clicking the upload button, the backend will upload the file, taking PHP as an example:
echo "上传文件名: " . $_FILES["avatar"]["name"] . "<br>";  上传文件的名称
echo "文件类型: " . $_FILES["avatar"]["type"] . "<br>";  上传文件的类型
echo "文件大小: " . ($_FILES["avatar"]["size"] / 1024) . " kB<br>";  上传文件的大小,以字节计
echo "文件临时存储的位置: " . $_FILES["avatar"]["tmp_name"];  存储在服务器的文件的临时副本的名称
echo $_FILES["file"]["error"]  由文件上传导致的错误代码
The file Save to the server:
move_uploaded_file($_FILES["avatar"]["tmp_name"], "upload/" . $_FILES["avatar"]["name"]);
echo "文件存储在: " . "upload/" . $_FILES["avatar"]["name"];
In actual development, in order to improve efficiency, separate development of front-end and back-end is usually used.
The front end is used as the front end, and the back end is used as the back end. Finally, interface documents are used for docking - the core technology is ajax
Separate development of front and rear ends, the main application The technology is ajax. Uploading can also be done using ajax.
FormData is a constructor built into js, and the constructed object can identify file information.
Usage:
Construct the FormData object, add the file information to the FormData object, and then upload.
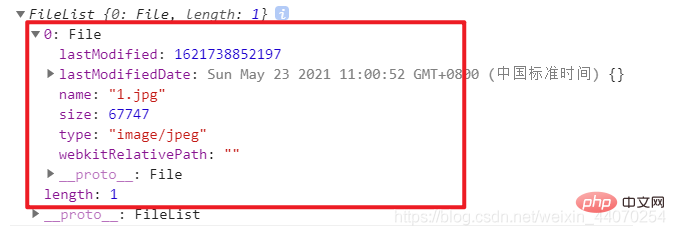
File information in the file selection control: form.files
Example:
<input>
<input><script>document.querySelector('[type="button"]').onclick = function(){
console.log(document.querySelector('[type="file"]').files)}</script>
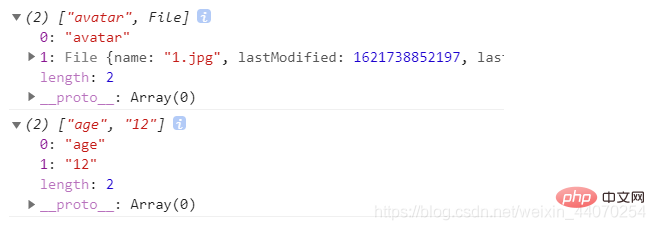
The FormData object has a feature, which is to store the file information After adding it, you cannot see the file information by printing directly. You need to use for of traversal to see it:
var formdata = new FormData();var fileinfo = document.querySelector('[type="file"]').files[0];formdata.append('avatar',fileinfo) / 将文件信息添加到FormData对象中
console.log(formdata)for(var v of formdata){
    console.log(v)}
Other data can also be added to the FormData object and submitted together. :
formdata.append('avatar',fileinfo)formdata.append('age',12)for(var v of formdata){
    console.log(v)}
To delete a piece of data from the FormData object, use:
formdata.delete(键)
Sometimes, we need to upload multiple files in a form. At this time , there is no need to append a file information to FormData. When constructing the FormData object, the entire form object can be passed in, and it will automatically identify all the data:

When used When FormData is uploaded, the FormData object is passed in as data. There is no need to modify the request header, the browser will automatically modify it.
At this time, the front-end and back-end uploads have been separated, but normal projects will have a function to preview images.
We can let the backend transmit the uploaded file name to the frontend after uploading, and let the frontend render the returned image path.
But this is for previewing after uploading. Suppose that after we select the file, we want to see if the file needs to be uploaded. That is, if we want to preview before uploading, there is still no way to achieve it.
We can use the FileReader provided by H5 to read the file and preview it, and then decide whether to upload it.
After ajax uploads
 var xhr = new XMLHttpRequest;
    xhr.onreadystatechange = function(){
        if(xhr.readyState === 4){
if(xhr.status>=200 && xhr.status<p>Put the file data in send for transmission<br> You need to use the constructor provided by H5 FormData - used to identify file information</p><pre class="brush:php;toolbar:false">var fd = new FormData()Put the file information in the fd object-use the append method of fd
Where is the file information?
var file = document.querySelector('[type="file"]')
    // console.dir(file);
var fileinfo = file.files[0] / 文件信息The append method is to put the file into this object. The object requires key-value pairs. Parameter 1 is the key and parameter 2 is the file information.
fd.append('avatar',fileinfo)fd has a feature, that is, directly Print it, but you cannot see the content and need to traverse to see the data - you must use for of
for(var value of fd){
         console.log(value);
}fd. In addition to adding file information, you can also add data
fd.append('username',document.querySelector('[name="username"]').value)上传文件的时候,利用FormData,里面就有了数据和文件信息,其实最终文件和数据以二进制数据流进行传送的,不需要设置请求头,因为ajax会自动调整
文件数据其实就是fd
php:
现在能打印出数据,文件存到了临时目录中
上传就是将临时文件移动到服务器中
header("content-type:text/html;charset=utf8");echo "<pre class="brush:php;toolbar:false">";print_r($_FILES);move_uploaded_file($_FILES['avatar']['tmp_name'],'./upload/'.$_FILES['avatar']['name']);// echo '上传成功';echo './upload/'.$_FILES['avatar']['name'];
echo "<script>
alert('上传成功')
location.assign('./1-上传表单.html')</script>ajax 上传前:
当文件选择器中的数据发生了变化就要读取并预览
读取并预览 - 借助H5提供的FileReader - 读取文件是异步读取
构造函数需要new
document.querySelector('[type="file"]').onchange = function(){var fr = new FileReader();readAsArrayBuffer - 将数据读取成一个Buffer数组
var fileinfo = this.files[0]
参数要一个文件对象 - 结果是一个buffer
fr.readAsArrayBuffer(fileinfo)
参数要一个文件对象 - 结果是一个二进制数据 - 适用于多媒体文件
fr.readAsBinaryString(fileinfo)
结果是一个可以当做路径使用的数据 - base64字符串 - 适用于图片
fr.readAsDataURL(fileinfo)
在load事件中,读取完成后获取读取出来的数据
load事件在读取完成的时候触发
fr.onload = function(){
        / result属性是读取出来的内容        / console.log(fr.result);
        / 创建img标签        var img = document.createElement('img')
        img.src = fr.result;
document.body.appendChild(img)FileReader也是js内置的一个构造函数,主要功能是用来读取文件,读取文件为异步读取。
var fr = new FileReader()  创建读取对象// 该对象的读取方法:fr.readAsDataUrl(文件信息)  将文件读取为base64字符串 - 通常用于图片文件,读取结果可以作为图片的src使用
fr.readAsArrayBuffer(文件信息)  将文件读取为二进制数据流 - 通常用于多媒体文件
fr.readAsText(文件信息)  将文件读取为字符串 - 通常用于文档文件
对象监听的事件:
abort事件:在读取被中断的时候触发
error事件:读取发生错误的时候触发
load事件:在读取完成的时候触发 - 常用语读取完成后获取数据
loadstart事件:在读取开始的时候触发
loadend事件:在读取结束的时候触发
progress事件:在读取过程中触发
例:
fr.onload = function(){
  读取结果为:对象.result 或 事件对象.target.result
console.log(fr.result) 此时这个数据就可以作为img的src进行图片预览}base64是指:小写字母+大写字母+数字+加号+等于号 共64个字符
data位置就直接写formData就好了
设置一个content-type为false表示jquery不要设置请求头
设置一个processData为false,表示query不要修改数据格式
我们可以在new的时候,将表单元素放在构造函数中 - 默认能将表单中的数据,添加到这个对象中
$('[type="button"]').click(function()
    var fd = new FormData($('form')[0])

    $.ajax({
        url:"2-upload.php",
        method:"post",
         jquery上传用 FormData
        data:fd,
        contentType:false,  不让jQuery的ajax修改请求头
        processData:false,  不让jquery的ajax编码数据        success:res=>{
            console.log(res);
        }

})})大量运算的代码,可以作为一个异步线程执行
需要将这段代码单独放在一个文件中
需要new一个worker对象 - 这个构造函数需要在服务器环境中运行
woker需要一个事件,当文件完成以后获取里面的数据
可以在事件中,接收到文件中导出的数据
woker.onmessage = function(e){
    数据就在事件对象的data属性中
console.log(e.data);}当业务逻辑需要的计算量比较大的时候,同步代码会阻塞下面的代码继续执行,此时需要将这个大计算量的代码另外开辟一个新的线程进行执行,这个线程也是异步执行的,但需要将在新线程中执行的代码单独放在一个js文件中,使用方式:
var w = new Worker(需要异步执行的js文件)
如果在主线程中需要这个线程中返回的数据,在这个线程中使用postMessage来返回:
postMessage(数据)
主线程中接收返回出来的数据:
w.onmessage = function(e){
e.data // 是异步线程中返回出来的数据}离线缓存的作用:在马上断网之后,依旧可以访问到缓存下来的文件。比较鸡肋。该技术在2020年8月已经被弃用了。
使用方式:
使用规则        1. 需要你自定义一个 .manifest 文件        2. 再你书写 html 文件的时候
          => 如果这个 html 文件需要缓存规则
          => 再 html 标签上添加一个 manifest 属性
          => 值就写你的缓存规则文件        3. 第一次打开页面的时候
          => 就会按照你书写的缓存规则去缓存文件
例:
第一行必须要写上
CACHE MANIFEST
以注释的形式书写一个版本号
app version 1.0
表示你要缓存的文件
CACHE:
./index.html
./css/index.css
表示必须需要网络环境才可以请求的文件
一般我们会书写 星号(*), 表示除了 CACHE 里面书写的文件, 其他的去过没有网络环境就报错
NETWORK:
*
当你再一个离线环境下访问一些没有的页面的时候
使用一个什么内容替代
FALLBACK:
事件循环面试题:
<script>console.log(1)setTimeout(()=>{ console.log(2) },0) new Promise(resolve=>{
    console.log(3)
    resolve()}).then(()=>{
    console.log(4)})setTimeout(()=>{
    console.log(5)
    new Promise(resolve=>{
        console.log(6)
        setTimeout(()=>{
            console.log(7)
        })
        resolve()
    }).then(()=>{
        console.log(8)
    })},500)new Promise(resolve=>{
    console.log(9)
    resolve()}).then(()=>{
    console.log(10)
    setTimeout(()=>{
        console.log(11)
},0)})console.log(12)</script>答案:1 3 9 12 4 10 2 11 5 6 8 7
更多编程相关知识,请访问:编程视频!!
The above is the detailed content of In one hour, I will take you to summarize the method of uploading files on the front end (organized and shared). For more information, please follow other related articles on the PHP Chinese website!
 Is python front-end or back-end?
 How to implement instant messaging on the front end
 The difference between front-end and back-end
 Introduction to the relationship between php and front-end
 net use command usage
 How to run code with vscode
 How to open html files on mobile phone
 How to configure phpstudy