

This article brings you relevant knowledge about the basic knowledge of git, including an introduction to git and github, remote warehouses and other related issues. I hope it will be helpful to everyone.
In actual work, we will encounter many unpredictable problems:
Problem 1: Frequent changes in requirements. Example:
Develop function A - V1
Add function B - V2
Add function C on function B - rewrite function B, and then add function C - V3
Add function D to function B - rewrite function B, and then add function D
项目开发好以后,形成版本v1.0
需求改变:
在v1.0的基础上添加功能A,形成版本v1.1 - 在上个版本的基础上添加功能A
在v1.0的基础上添加功能B,形成版本v1.2 - 在上个版本的基础上删除功能A,添加功能B
在v1.1的基础上添加功能C,形成版本v1.3 - 在上个版本的基础上删除功能B,添加功能A,再添加功能C
在v1.2的基础上添加功能D,形成版本v1.4 - 上个版本的基础上删除功能A,删除功能C,添加功能B,添加功能D
git can perfectly solve this deletion and addition process. Because git can save each version, you can easily switch the current version to a previous version.
Question 2: The file was accidentally deleted and needs to be rewritten.
I wrote a bit of code at the company, then returned home and continued development. The code I wrote during the day was not copied back.
Using git, if a certain file is deleted, a new version will be formed. , you can also easily switch to the previous version and retrieve deleted files.
Question 3: After developing content on the current computer, I found that the code still needs to be rewritten after changing to another computer
If you use git, upload the code written each time to github The website can be downloaded as long as there is an Internet connection, which is equivalent to a backup
Question 4: The files written by everyone at work need to be merged into one large file, which requires tedious copying and pasting
Multiple people develop by division of labor, and ultimately the code needs to be merged
Using git can easily merge files
git: Distributed version control tool. In fact, it is a software used to manage folders. Need to operate through commands.
github: A world-class open source website for storing files. The users are all developers. You can choose to encrypt your files so that only you can use them, or you can choose to open source them so that everyone can use them. You can also communicate with the author. Only git tool uploads are accepted. There are many code files in various languages written by others on this website. If there are any plug-ins that you need to download, you can search on this website.
Git can manage local files and gitgub files.
Local warehouse: a folder managed by git on your own computer
Remote warehouse: a folder managed online
Push: Upload local content to the remote
Synchronization: Keep online content consistent with local content
Use git bash here - use command operation
Warehouse: It is a folder used to store code. This folder is managed by the git tool.
Local warehouse: A folder managed by git on the local computer.
Remote warehouse : A folder managed by git on the remote server
Push: Upload the contents of the local warehouse to the remote warehouse - push
Pull (synchronization): Download the contents of the remote warehouse to the local One copy - Make the local warehouse and remote warehouse consistent
Like Baidu Netdisk-But it can only store code files
Like Baidu Tieba-You can make friends, exchange fans, and like...
github.com - The world's largest same-sex dating website - foreign
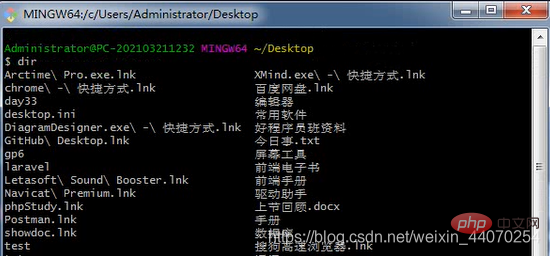
locally to download and install, check whether the installation is successful:
git --version
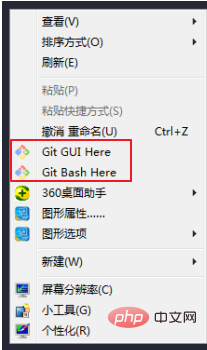
Or you can click the right button of the mouse and the following picture will appear
| Sign of successful git installation |
|---|
 |
dir
 ## First, you must initialize the managed folder before you can use the git command to manage it:
git init
执行结束后,在文件夹中会生成一个 隐藏文件夹 .git;标志着这个文件夹成为了git仓库
 After initialization, a hidden folder will appear
, this means that the current folder and its following contents are all managed by git. When git manages folders, the management process is divided into 3 areas:
 |
 将源文件添加到暂存区: git add 文件 # 将单独一个文件添加到暂存区 git add 文件夹/ # 将整个文件夹添加到暂存区(git不管理空文件夹) git add --all # 将当前文件夹中所有文件和文件夹都添加到暂存区 - 简写:git add . Copy after login
查看git管理的文件的状态: git status Copy after login
将暂存区的文件拉回到源文件: git reset HEAD -- 文件 # 将某个文件从暂存区变为源文件 git reset HEAD -- 文件夹/ # 将整个文件夹从暂存区变为源文件 git reset HEAD -- . # 将所有文件从暂存区变为源文件 Copy after login
将暂存区的内容生成历史版本: git commit -m "版本说明" Copy after login
初次需要设置自己的邮箱和姓名   输入以下指令
所以解决方法是当出现这个上述提示后 接着补充
你在命令行中执行
git config --global user.email "你的邮箱"
git config --global user.name "你的名字"
(注意 “ 前面是有空格的)
输入完后再接着执行git commit 即可成功!
查看所有版本信息:
Copy after login
git log Copy after login 查看版本信息:
回到指定版本: git reset --hard HEAD^ # 有几个上档键就回退几个版本git reset --hard 历史版本号 Copy after login 删除历史版本: git rebase -i 指定的历史版本 Copy after login 删除历史版本的坑:
两个特殊文件git在进行管理文件夹的时候,不能管理空文件夹,为了避免误会产生,让空文件夹被管理,git提供了一个专业的管理空文件夹的文件 - 名字是固定的:.gitkeep - 将这个文件放到被管理的空文件夹 - 此时的空文件夹被管理了 如果某些文件或文件夹不希望被git管理,就可以设置一个黑名单,让这个文件或文件夹被忽略掉,此时git提供了一个文件叫 .gitignore 这个文件就可以设置黑名单 将需要被忽略掉的文件的路径写在这个文件中 让git能管理一个空文件夹: 在空文件夹中新建文件: 让某些文件或者文件夹被忽略管理: 在和 直接写文件名,代表要忽略的是哪个文件 写文件夹路径,表示要忽略的是哪个文件夹 *.后缀,表示要忽略的是所有后缀为指定后缀的文件 Copy after login 远程操作创建仓库的时候,可以选择初始化,也可以选择不初始化 不初始化在本地创建仓库,放到暂存区,形成历史区 让本地仓库和远程仓库之间建立连接 git remote add origin https://gitee.com/web_wang_wu/good-man.git origin是一个变量,可以自定义 将本地仓库的内容上传到远程仓库: git push -u origin master 需要输入账号密码:注册使用的邮箱以及密码 当下次再次上传的时候,就不需要输入账号密码了,因为windows已经将这次输入的账号密码保存起来了 账号密码存储在计算机的 “凭据管理器” 中 ,可以删除 并且我们下次上传的时候,只需要执行命令: git push 选择初始化相当于远程仓库中已经有内容了 我已经有过上传的代码了,我想修改代码,但是本地仓库不见了 项目经理做好一个项目的仓库,我需要根据这个仓库中已知的文件进行二次开发
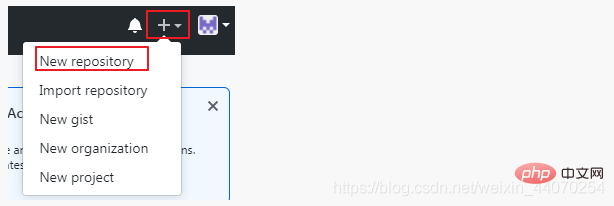
远程仓库上传到远程仓库: 在github上新建仓库:
使用https上传: 添加上传地址: git remote add origin https://github.com/weberWangjie/test.git # 其中的origin是变量名表示上传地址,可以自定义 Copy after login 开始上传: git push -u origin master # 其中的origin是表示地址的那个变量名 Copy after login 首次推送远程需要输入用户名和密码。 第二次上传的时候只需要: 将远程代码拉取到本地:(要先新建一个文件夹作为git管理的文件夹) git clone 远程仓库地址 Copy after login 将本地代码和远程代码同步:(在本地仓库使用命令) git pull Copy after login Copy after login 分支一个大项目,会分很多人开发,每个人一个功能,这时候,每个功能作为一个分支,主分支只有目录结构。当所有人将自己负责的功能开发完成的时候,再将所有分支合并到主分支上,形成一个完整的项目。 每次初始化一个git的时候,默认创建一个主要分支: 创建分支: git branch 分支名 Copy after login 查看当前分支: git branch Copy after login 切换分支: git checkout 分支名 Copy after login 创建并切换到这个分支: git checkout -b 新分支名 Copy after login 合并分支:(将别的分支合并到自己分支) git merge 要合并的分支 Copy after login 删除分支:(不能自己删自己) git branch -D 要删除的分支 Copy after login 冲突在项目开发阶段,有两个人同时操作一个仓库,最终总会有一个人先上传, 一个人后上传,先上传的能成功,后上传的不能成功 因为,git远程仓库中,任何一个版本的形成,都需要从上一个版本 作为基础 再形成新的版本 同步/拉取git pull // 让本地先跟远程保持一致,然后再次推送新版本 同步: 在本地新建一个跟远程分支同名的分支名,本地切换过去,git pull 失败,提示命令: git branch --set-upstream-to=origin/远程的分支名 本地的分支名 继续git pull 提交: 在本地新建了分支,希望推送到远程仓库,失败,提示命令: git push --set-upstream origin 远程的分支名 git add . git commit -m “版本描述” # 为了避免代码丢失,一定要写完以后 commit一下 git push git pull git clone 远程仓库地址 远程分支操作 - 给别人提交
两个人同时操作同一个分支,提交的时候会有先后顺序,先提交的人正常提交了,后一个人提交的时候会产生冲突。因为git规定,每次提交必须是在原来的版本基础上,但是第二个人在提交的时候,在远程已经有了第二个版本,所以第二个人相当于从第一个版本向第三个版本提交。如下图:
冲突解决:
历史版本回滚的冲突本地先形成版本1 本地再形成版本2 上传到远程 本地回滚到版本1 再次形成版本1·2 再次上传 报错 因为远程仓库只有一条时间线,但本地有两条,解决: 先拉取,解决冲突问题 再次上传 分支远程操作默认不能提交其他分支,因为,远程默认提交为master分支。 如果非要提交其他分支: git --set-upstream push origin 分支名 # 将以前记录的-u默认的master改为新的分支名 git push origin 分支名 # 临时提交,不改默认的master Copy after login 本地跟远程仓库进行除了master分支之外的分支,进行推送、同步,多执行一个命令,报错提示的命令。 删除远程分支: git push origin --delete 将要删除的分支名 Copy after login github服务器分支github上一个特殊的分支:gh-pages 只要有这个分支,就可以将这个分支中的代码作为一个服务器打开其中的文件。默认打开index.html文件,其他名称的文件需要手动输入。 有了这个分支之后,就可以在这个仓库的setting中,找到打开这个分支中文件的服务器链接。
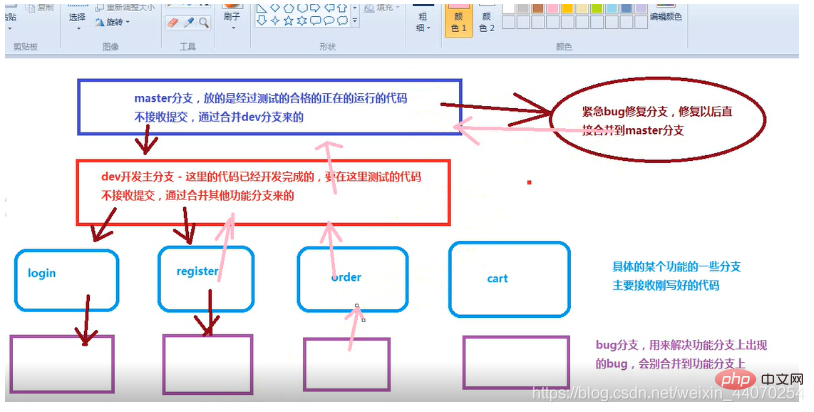
分支命名规范master是主分支,创建仓库的时候默认生成。不接收任何上传,只接收dev分支合并的内容,这个分支只存储每一次开发过程中经过测试合格的代码。 dev是开发主分支,也可以说development/deve,初始化项目后,从master分支上开辟的新分支。这个分支也不接受任何代码提交,只接收主功能分支合并的内容。当dev分支上的代码测试通过以后,会被合并到主分支上。 feature-XXX是主功能分支,是从dev分支上开辟出的分支,进行各个功能的开发,开发完成后合并到dev分支上进行测试,这些分支接收开发的代码提交。 feature-XXX-fix-XXX是功能bug解决分支,在项目运行过程中,出现的bug进行修复,是从功能分支上开辟出来的,修改完毕后合并到功能分支上,再由功能分支合并到dev分支上。 hot-fix-XXX是紧急bug修复分支,直接从master上开辟,修复紧急bug后,直接合并到master分支上。 SSH提交配置秘钥github上传除了使用https协议上传,也可以使用ssh协议来上传。ssh上传需要配置公钥和秘钥,公钥和秘钥是配置在自己计算机上的,所以使用了ssh之后,只能在当前计算机使用了,不像https上传,在任何电脑上都能上传。 但是ssh上传需要配合秘钥。 秘钥配置: ssh-keygen -t rsa -C "git全局邮箱"# 敲3次回车 Copy after login 查看git全局配置: git config --list Copy after login 秘钥所在文件夹:
上面的秘钥,下面后缀为pub的是公钥,需要将公钥配置在github账号中。
打开之后,title项中自定义,key中将公钥文件中的所有内容复制过来。 点击添加按钮后,需要输入密码验证。 此时就将ssh配置好了,后面就可以使用ssh协议进行操作了。
以后就可以使用这个地址进行克隆和上传了。 推荐学习:《Git教程》 |
The above is the detailed content of Explosive summary of git nanny-level teaching notes. For more information, please follow other related articles on the PHP Chinese website!
 Build your own git server
 The difference between git and svn
 git undo submitted commit
 How to undo git commit error
 How to compare the file contents of two versions in git
 How about Ouyi Exchange?
 How to switch between full-width and half-width
 what does facebook mean
 The difference between JD.com's self-operated and official flagship stores


![| [外链图片转存失败,源站可能有防盗链机制,建议将图片保存下来直接上传(img-pyFfquEl-1622645729955)(media/1568646397296.png)] |](https://img-blog.csdnimg.cn/20210602230131213.png)](https://img.php.cn/upload/article/000/000/067/3b3b8587bd907fe8f86bf9512120f6ac-14.png)


![[Web front-end] Node.js quick start](https://img.php.cn/upload/course/000/000/067/662b5d34ba7c0227.png)


