A brief analysis of how to submit a form in uni-app? (code analysis)
How to submit form in uni-app? The following article will share with you two ways to submit form forms in uni-app. I hope it will be helpful to you!

Two ways for uni-app to submit the form
Method 1: The form form elements are smaller Less
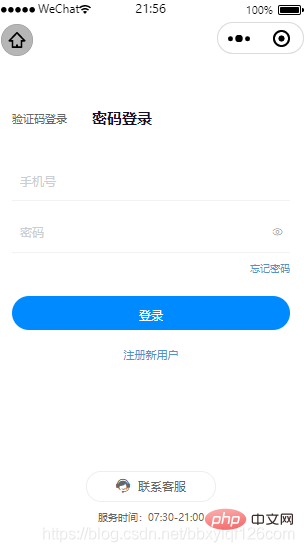
For example, user login, as shown below

Example of front-end code
This Some redundant code has been omitted
<template>
<view style="padding:50rpx;">
<view style="margin-top:60rpx;">
<form @submit="submit">
<view class="gui-border-b gui-form-item" style="margin-top:80rpx;">
<view class="gui-form-body">
<input type="number" class="gui-form-input" v-model="driverTel" name="driverTel" placeholder="手机号" placeholder-style="color:#CACED0"/>
</view>
</view>
<view class="gui-border-b gui-form-item" style="margin-top:30rpx;">
<view class="gui-form-body">
<input type="password" class="gui-form-input" v-if="isPwd"
v-model="password" name="password" placeholder="密码" placeholder-style="color:#CACED0"/>
<input type="text" class="gui-form-input" v-if="!isPwd" :disabled="true"
v-model="password" name="password" placeholder="密码" placeholder-style="color:#CACED0"/>
</view>
<text class="gui-form-icon gui-icons gui-text-center"
@click="changePwdType" :style="{color:isPwd?'#999999':'#008AFF'}"></text>
</view>
<view style="margin-top:50rpx;">
<button type="default" class="gui-button gui-bg-blue msgBtn" formType="submit" style="border-radius:50rpx;">
<text class="gui-color-white gui-button-text-max">登录</text>
</button>
</view>
</form>
</view>
</view>
</template>
<script>
uni.request({
url: _self.server_host + "/app/driver/login/password",
method:'POST',
header:{'content-type' : "application/x-www-form-urlencoded"},
data:{
// 对于上面的form表单提交,我们可以直接在uni.request的data属性中直接提交就行了
driverTel: _self.driverTel,
password: _self.password
},
success: (res) => {
// 服务器返回结果
}
})
</script>Back-end code example
/**
* 这里可以以一个实体类来接收,实体类必须包含前端传参参数的对应字段
*/
@PostMapping("/password")
public Result loginByPassword(LoginUserVO loginUserVO) {
	// 处理业务逻辑
}

/**
* 也可以按照字段名来接收
*/
@PostMapping("/password")
public Result loginByPassword(String username, String passsword) {
	// 处理业务逻辑
}Method 1: There are many form elements
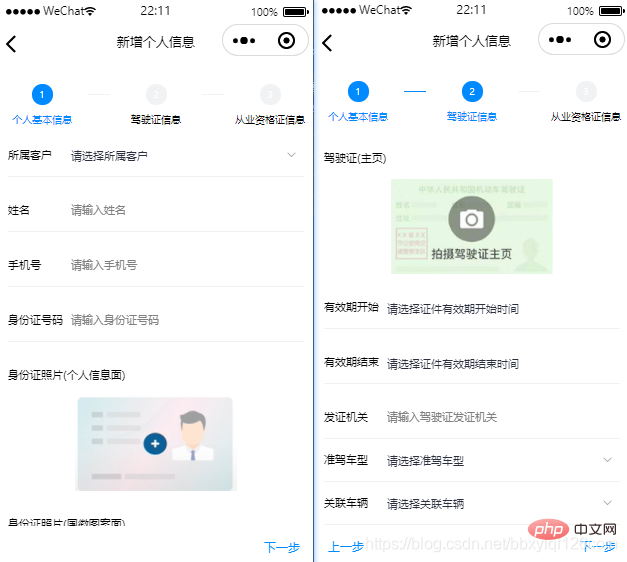
The above method is more troublesome to process when there are many form elements. Generally, form forms such as adding new users and products can range from a dozen to dozens. indivual. As shown below: 
If you follow the above writing method, not only the front-end is troublesome and unsightly to write, but the background reception also requires field-by-field reception. At this time, we can define an objectformData, save the data in it and submit the JSON string directly to the backend when submitting. The backend receives the JSON string and converts it into a JSON object, and then performs its own business logic processing
Front-end code example:
<!-- 表单元素核心区域 -->
<scroll-view :scroll-y="true" :show-scrollbar="false" :style="{height:mainHeight+'px'}">
<!-- 第1步 -->
<view class="gui-padding" v-if="step == 1">
<view class="gui-form-item gui-border-b">
<text class="gui-form-label">所属客户</text>
<view class="gui-form-body">
<picker mode="selector" :range="tenantList" :value="tenantIndex" @change="tenantChange($event,tenantList)" :range-key="'tenantName'">
<view class="gui-flex gui-rows gui-nowrap gui-space-between gui-align-items-center">
<text class="gui-text">{{tenantList[tenantIndex].tenantName}}</text>
<text class="gui-form-icon gui-icons gui-text-center gui-color-gray"></text>
</view>
</picker>
</view>
</view>
<view class="gui-form-item gui-margin-top gui-border-b">
<text class="gui-form-label">姓名</text>
<view class="gui-form-body">
<input type="text" class="gui-form-input" v-model="formData.driverName" placeholder="请输入姓名" />
</view>
</view>
<view class="gui-form-item gui-margin-top gui-border-b">
<text class="gui-form-label">手机号</text>
<view class="gui-form-body">
<input type="text" class="gui-form-input" v-model="formData.driverTel" placeholder="请输入手机号" />
</view>
</view>
<view class="gui-form-item gui-margin-top gui-border-b">
<text class="gui-form-label">身份证号码</text>
<view class="gui-form-body">
<input type="text" class="gui-form-input" v-model="formData.idNumber" placeholder="请输入身份证号码" />
</view>
</view>
<view class="gui-margin-top">
<text class="gui-form-label" style="width: 100%;">身份证照片(个人信息面)</text>
</view>
<view class="gui-idcard-items gui-img-in gui-flex gui-rows gui-justify-content-center">
<view class="gui-idcard-items-image" @tap="selectIdPhotoPositive">
<gui-image :src="formData.idPhotoPositive" :width="380"></gui-image>
</view>
</view>
<view class="gui-margin-top">
<text class="gui-form-label" style="width: 100%;">身份证照片(国徽图案面)</text>
</view>
<view class="gui-idcard-items gui-img-in gui-flex gui-rows gui-justify-content-center">
<view class="gui-idcard-items-image" @tap="selectIdPhotoReverse">
<gui-image :src="formData.idPhotoReverse" :width="380"></gui-image>
</view>
</view>
<view class="gui-form-item gui-margin-top gui-border-b">
<text class="gui-form-label">证件有效期</text>
<view class="gui-form-body">
<picker class="gui-form-picker" mode="date" @change="idNumberValidUntilChange">
<text class="gui-text">{{formData.idNumberValidUntil}}</text>
<text class="gui-icons icon-arrow-down" style="margin-left:5px;"></text>
</picker>
</view>
</view>
<view class="gui-form-item gui-border-b">
<text class="gui-form-label">收款人</text>
<view class="gui-form-body">
<picker mode="selector" :range="payeeList" :value="payeeIndex" @change="payeeChange($event,payeeList)" :range-key="'payeeName'">
<view class="gui-flex gui-rows gui-nowrap gui-space-between gui-align-items-center">
<text class="gui-text">{{payeeList[payeeIndex].payeeName}}</text>
<text class="gui-form-icon gui-icons gui-text-center gui-color-gray"></text>
</view>
</picker>
</view>
</view>
</view>
<!-- 第2步 -->
<view class="gui-padding" v-if="step == 2">
<view class="gui-form-item gui-margin-top gui-border-b">
<text class="gui-form-label">驾驶证编号</text>
<view class="gui-form-body">
<input type="text" class="gui-form-input" v-model="formData.drivingLicenseNumber" placeholder="请输入驾驶证编号" />
</view>
</view>
<view class="gui-margin-top">
<text class="gui-form-label" style="width: 100%;">驾驶证(主页)</text>
</view>
<view class="gui-idcard-items gui-img-in gui-flex gui-rows gui-justify-content-center">
<view class="gui-idcard-items-image" @tap="selectDrivingLicensePhoto">
<gui-image :src="formData.drivingLicensePhoto" :width="380"></gui-image>
</view>
</view>
<view class="gui-form-item gui-margin-top gui-border-b">
<text class="gui-form-label">有效期开始</text>
<view class="gui-form-body">
<picker class="gui-form-picker" mode="date" @change="drivingLicenseValidityStartChange">
<text class="gui-text">{{formData.drivingLicenseValidityStart}}</text>
<text class="gui-icons icon-arrow-down" style="margin-left:5px;"></text>
</picker>
</view>
</view>
<view class="gui-form-item gui-margin-top gui-border-b">
<text class="gui-form-label">有效期结束</text>
<view class="gui-form-body">
<picker class="gui-form-picker" mode="date" @change="drivingLicenseValidityEndChange">
<text class="gui-text">{{formData.drivingLicenseValidityEnd}}</text>
<text class="gui-icons icon-arrow-down" style="margin-left:5px;"></text>
</picker>
</view>
</view>
<view class="gui-form-item gui-margin-top gui-border-b">
<text class="gui-form-label">发证机关</text>
<view class="gui-form-body">
<input type="text" class="gui-form-input" v-model="formData.drivingLicenseIssuingOrg" placeholder="请输入驾驶证发证机关" />
</view>
</view>
<view class="gui-form-item gui-border-b">
<text class="gui-form-label">准驾车型</text>
<view class="gui-form-body">
<picker mode="selector" :range="vehicleTypeList" :value="vehicleTypeIndex" @change="vehicleTypeChange($event,vehicleTypeList)" :range-key="'codeSetName'">
<view class="gui-flex gui-rows gui-nowrap gui-space-between gui-align-items-center">
<text class="gui-text">{{vehicleTypeList[vehicleTypeIndex].codeSetName}}</text>
<text class="gui-form-icon gui-icons gui-text-center gui-color-gray"></text>
</view>
</picker>
</view>
</view>
<view class="gui-form-item gui-border-b">
<text class="gui-form-label">关联车辆</text>
<view class="gui-form-body">
<picker mode="selector" :range="vehicleList" :value="vehicleIndex" @change="vehicleChange($event,vehicleList)" :range-key="'carNumber'">
<view class="gui-flex gui-rows gui-nowrap gui-space-between gui-align-items-center">
<text class="gui-text">{{vehicleList[vehicleIndex].carNumber}}</text>
<text class="gui-form-icon gui-icons gui-text-center gui-color-gray"></text>
</view>
</picker>
</view>
</view>
</view>
<!-- 第3步 -->
<view class="gui-padding" v-if="step == 3">
<view class="gui-form-item gui-margin-top gui-border-b">
<text class="gui-form-label">资格证号码</text>
<view class="gui-form-body">
<input type="text" class="gui-form-input" v-model="formData.roadTransportQualificationCertificateNumber" placeholder="请输入从业资格证编号" />
</view>
</view>
<view class="gui-margin-top">
<text class="gui-form-label" style="width: 100%;">从业资格证</text>
</view>
<view class="gui-idcard-items gui-img-in gui-flex gui-rows gui-justify-content-center">
<view class="gui-idcard-items-image" @tap="selectRoadTransportQualificationCertificatePhoto">
<gui-image :src="formData.roadTransportQualificationCertificatePhoto" :width="380"></gui-image>
</view>
</view>
<view class="gui-form-item gui-margin-top gui-border-b">
<text class="gui-form-label">证件有效期</text>
<view class="gui-form-body">
<picker class="gui-form-picker" mode="date" @change="roadTransportQualificationCertificateValidUntilChange">
<text class="gui-text">{{formData.roadTransportQualificationCertificateValidUntil}}</text>
<text class="gui-icons icon-arrow-down" style="margin-left:5px;"></text>
</picker>
</view>
</view>
</view>
</scroll-view>
<script>
export default {
data() {
return {
// 表单数据记录
formData: {
// 第一步
tenantId: '', // 所属客户
payeeId: '', // 收款人
driverName: '', // 司机姓名
driverTel: '', // 司机电话
idNumber: '', // 身份证号码
idNumberValidUntil:'请选择证件有效期', // 身份证有效期
idPhotoPositive: 'https://www.zzwlnet.com/files/images/upload_identity_card_front.png', // 身份证正面(个人信息面)
idPhotoReverse: 'https://www.zzwlnet.com/files/images/upload_identity_card_contrary.png', // 身份证反面(国徽面)
// 第二步
drivingLicenseNumber: '', // 驾驶证编号
drivingLicensePhoto: 'https://www.zzwlnet.com/files/images/upload_driving_license.png', // 驾驶证图片
drivingLicenseValidityStart: '请选择证件有效期开始时间', // 驾驶证有效期开始
drivingLicenseValidityEnd: '请选择证件有效期结束时间', // 驾驶证有效期结束
drivingLicenseIssuingOrg: '', // 驾驶证发证机关
quasiDrivingType: '', // 准驾车型
vehicleId: '', // 关联车辆
// 第三步
roadTransportQualificationCertificateNumber: '', // 从业资格证号
roadTransportQualificationCertificatePhoto: 'https://www.zzwlnet.com/files/images/upload_road_transport_qualification_certificate.png', // 从业资格证图片
roadTransportQualificationCertificateValidUntil: '请选择证件有效期', // 从业资格证有效期
},
}
},
methods: {
submit: function() {
uni.request({
url: _self.server_host + '/api',
method: 'POST',
header: {'content-type' : "application/x-www-form-urlencoded"},
data: {
// 传参方式一:以JSON字符串的形式提交form表单数据
formData: JSON.stringify(_self.formData),
// 传参方式二:将form表单数据以对象形式传递
// formData: _self.formData,
},
success: res => {
// 服务器返回数据,后续业务逻辑处理
},
fail: () => {
uni.showToast({ title: "服务器响应失败,请稍后再试!", icon : "none"});
},
complete: () => {}
});
}
}
}
</script>Back-end java code example
// 针对传参方式一:后台以String的方式接收
public Result add(String formData){
	// 将JSON字符串转换成JSONObject
	JSONObject jsonObject= JSONObject.parseObject(formData);
	// 继续后续业务逻辑处理
	return Results.success();
}

// 针对传参方式二:后台以Object的方式接收
public Result add(Object driverObj){
	// 继续后续业务逻辑处理
	return Results.success();
}Recommended: "uniapp tutorial"
The above is the detailed content of A brief analysis of how to submit a form in uni-app? (code analysis). For more information, please follow other related articles on the PHP Chinese website!

Hot AI Tools

Undresser.AI Undress
AI-powered app for creating realistic nude photos

AI Clothes Remover
Online AI tool for removing clothes from photos.

Undress AI Tool
Undress images for free

Clothoff.io
AI clothes remover

AI Hentai Generator
Generate AI Hentai for free.

Hot Article

Hot Tools

Notepad++7.3.1
Easy-to-use and free code editor

SublimeText3 Chinese version
Chinese version, very easy to use

Zend Studio 13.0.1
Powerful PHP integrated development environment

Dreamweaver CS6
Visual web development tools

SublimeText3 Mac version
God-level code editing software (SublimeText3)

Hot Topics
 How to start preview of uniapp project developed by webstorm
Apr 08, 2024 pm 06:42 PM
Steps to launch UniApp project preview in WebStorm: Install UniApp Development Tools plugin Connect to device settings WebSocket launch preview
 How to get form data in layui
Apr 04, 2024 am 03:39 AM
layui provides a variety of methods for obtaining form data, including directly obtaining all field data of the form, obtaining the value of a single form element, using the formAPI.getVal() method to obtain the specified field value, serializing the form data and using it as an AJAX request parameter, and listening Form submission event gets data.
 How to implement front-end and back-end interaction in layui
Apr 01, 2024 pm 11:33 PM
There are the following methods for front-end and back-end interaction using layui: $.ajax method: Simplify asynchronous HTTP requests. Custom request object: allows sending custom requests. Form control: handles form submission and data validation. Upload control: easily implement file upload.
 Which one is better, uniapp or mui?
Apr 06, 2024 am 05:18 AM
Generally speaking, uni-app is better when complex native functions are needed; MUI is better when simple or highly customized interfaces are needed. In addition, uni-app has: 1. Vue.js/JavaScript support; 2. Rich native components/API; 3. Good ecosystem. The disadvantages are: 1. Performance issues; 2. Difficulty in customizing the interface. MUI has: 1. Material Design support; 2. High flexibility; 3. Extensive component/theme library. The disadvantages are: 1. CSS dependency; 2. Does not provide native components; 3. Small ecosystem.
 How to set up jump on layui login page
Apr 04, 2024 am 03:12 AM
Layui login page jump setting steps: Add jump code: Add judgment in the login form submit button click event, and jump to the specified page through window.location.href after successful login. Modify the form configuration: add a hidden input field to the form element of lay-filter="login", with the name "redirect" and the value being the target page address.
 What basics are needed to learn uniapp?
Apr 06, 2024 am 04:45 AM
uniapp development requires the following foundations: front-end technology (HTML, CSS, JavaScript) mobile development knowledge (iOS and Android platforms) Node.js other foundations (version control tools, IDE, mobile development simulator or real machine debugging experience)
 What are the disadvantages of uniapp
Apr 06, 2024 am 04:06 AM
UniApp has many conveniences as a cross-platform development framework, but its shortcomings are also obvious: performance is limited by the hybrid development mode, resulting in poor opening speed, page rendering, and interactive response. The ecosystem is imperfect and there are few components and libraries in specific fields, which limits creativity and the realization of complex functions. Compatibility issues on different platforms are prone to style differences and inconsistent API support. The security mechanism of WebView is different from native applications, which may reduce application security. Application releases and updates that support multiple platforms at the same time require multiple compilations and packages, increasing development and maintenance costs.


