
 Web Front-end
JS Tutorial
Use the images+imageinfo library to add watermarks to images in batches in the Node project
Web Front-end
JS Tutorial
Use the images+imageinfo library to add watermarks to images in batches in the Node project
Use the images+imageinfo library to add watermarks to images in batches in the Node project

How to add watermarks to images in batches in Nodejs? The following article will introduce to you how to use the images imageinfo library to add watermarks to pictures in batches in the Node project. I hope it will be helpful to you!

NodejsAdd watermarks to images in batches
Environment preparation
Install images library
npm install images
Install imageinfo library
npm install imageinfo
Implementation
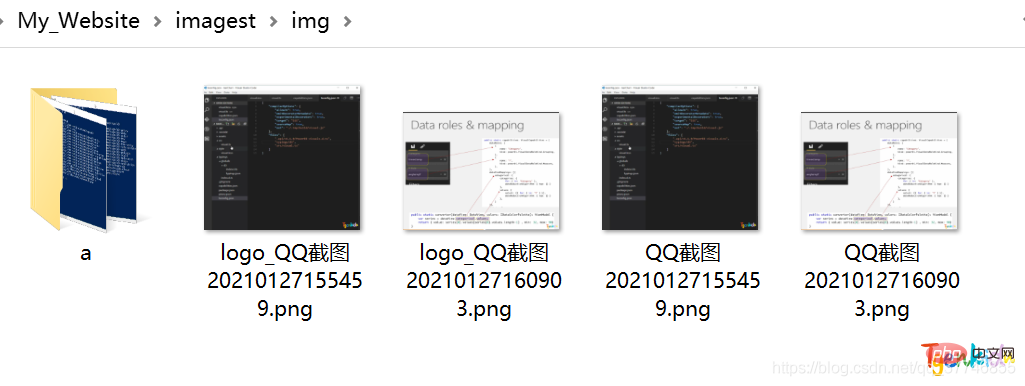
In this example, addimageinfo.js is in the same directory as marklogo.png, imagest folder, and node_modules folder.
Sub-files can also be implemented
JS code
If you use it directly, you need to modify the information
var logomarkimg = images('./marklogo.png');//水印位置
var rmimgpath = "./imagest/img/";//添加图片文件加位置
var mark = "logo_";//另存图片前缀,若为""则替换原图片
Full code addimageinfo. js
//引用文件系统模块
var fs = require("fs");
//引用imageinfo模块
var imageInfo = require("imageinfo");
//引用images模块
var images = require('images');

var logomarkimg = images('./marklogo.png');//水印位置
var rmimgpath = "./imagest/img/";//添加图片文件加位置
var mark = "logo_";//另存图片前缀,若为""则替换原图片

function readFileList(path, filesList) {
    var files = fs.readdirSync(path);
    files.forEach(function (itm, index) {
        var stat = fs.statSync(path + itm);
        if (stat.isDirectory()) {
            //递归读取文件
            readFileList(path + itm + "/", filesList)
        } else {
            var obj = {};//定义一个对象存放文件的路径和名字
            obj.path = path;//路径
            obj.filename = itm//名字
            filesList.push(obj);
        }
    })
}
var getFiles = {

    //获取文件夹下的所有文件
    getFileList: function (path) {
        var filesList = [];
        readFileList(path, filesList);
        return filesList;
    },
    //获取文件夹下的所有图片
    getImageFiles: function (path) {
        var imageList = [];
        this.getFileList(path).forEach((item) => {
            var ms = imageInfo(fs.readFileSync(item.path + item.filename));
            ms.mimeType && (imageList.push(item))
        });
        return imageList;
    }
};
//获取文件夹下的所有图片
var photos = getFiles.getImageFiles(rmimgpath);
for (var i = 0; i < photos.length; i++) {
    var sourceImgpath = photos[i].path;
    var sourceImgname = photos[i].filename;
    var sourceImg = images(sourceImgpath + sourceImgname);
    var sWidth = sourceImg.width();
    var sHeight = sourceImg.height();
    var wmWidth = logomarkimg.width();
    var wmHeight = logomarkimg.height();

    images(sourceImg)
        // 设置绘制的坐标位置,右下角距离 10px
        .draw(logomarkimg, sWidth - wmWidth - 10, sHeight - wmHeight - 10)
        // 保存格式会自动识别
        .save(sourceImgpath + mark + sourceImgname + '');
}Run
In the directory, run the node command
node ./addimageinfo.js
View the effect


nodejs tutorial!
The above is the detailed content of Use the images+imageinfo library to add watermarks to images in batches in the Node project. For more information, please follow other related articles on the PHP Chinese website!

Hot AI Tools

Undresser.AI Undress
AI-powered app for creating realistic nude photos

AI Clothes Remover
Online AI tool for removing clothes from photos.

Undress AI Tool
Undress images for free

Clothoff.io
AI clothes remover

Video Face Swap
Swap faces in any video effortlessly with our completely free AI face swap tool!

Hot Article
Hot Tools

Notepad++7.3.1
Easy-to-use and free code editor

SublimeText3 Chinese version
Chinese version, very easy to use

Zend Studio 13.0.1
Powerful PHP integrated development environment

Dreamweaver CS6
Visual web development tools

SublimeText3 Mac version
God-level code editing software (SublimeText3)
Hot Topics
 1386
1386
 52
52

 The difference between nodejs and vuejs
Apr 21, 2024 am 04:17 AM
The difference between nodejs and vuejs
Apr 21, 2024 am 04:17 AM
Node.js is a server-side JavaScript runtime, while Vue.js is a client-side JavaScript framework for creating interactive user interfaces. Node.js is used for server-side development, such as back-end service API development and data processing, while Vue.js is used for client-side development, such as single-page applications and responsive user interfaces.
 Is nodejs a backend framework?
Apr 21, 2024 am 05:09 AM
Is nodejs a backend framework?
Apr 21, 2024 am 05:09 AM
Node.js can be used as a backend framework as it offers features such as high performance, scalability, cross-platform support, rich ecosystem, and ease of development.
 How to connect nodejs to mysql database
Apr 21, 2024 am 06:13 AM
How to connect nodejs to mysql database
Apr 21, 2024 am 06:13 AM
To connect to a MySQL database, you need to follow these steps: Install the mysql2 driver. Use mysql2.createConnection() to create a connection object that contains the host address, port, username, password, and database name. Use connection.query() to perform queries. Finally use connection.end() to end the connection.
 What is the difference between npm and npm.cmd files in the nodejs installation directory?
Apr 21, 2024 am 05:18 AM
What is the difference between npm and npm.cmd files in the nodejs installation directory?
Apr 21, 2024 am 05:18 AM
There are two npm-related files in the Node.js installation directory: npm and npm.cmd. The differences are as follows: different extensions: npm is an executable file, and npm.cmd is a command window shortcut. Windows users: npm.cmd can be used from the command prompt, npm can only be run from the command line. Compatibility: npm.cmd is specific to Windows systems, npm is available cross-platform. Usage recommendations: Windows users use npm.cmd, other operating systems use npm.
 What are the global variables in nodejs
Apr 21, 2024 am 04:54 AM
What are the global variables in nodejs
Apr 21, 2024 am 04:54 AM
The following global variables exist in Node.js: Global object: global Core module: process, console, require Runtime environment variables: __dirname, __filename, __line, __column Constants: undefined, null, NaN, Infinity, -Infinity
 Is there a big difference between nodejs and java?
Apr 21, 2024 am 06:12 AM
Is there a big difference between nodejs and java?
Apr 21, 2024 am 06:12 AM
The main differences between Node.js and Java are design and features: Event-driven vs. thread-driven: Node.js is event-driven and Java is thread-driven. Single-threaded vs. multi-threaded: Node.js uses a single-threaded event loop, and Java uses a multi-threaded architecture. Runtime environment: Node.js runs on the V8 JavaScript engine, while Java runs on the JVM. Syntax: Node.js uses JavaScript syntax, while Java uses Java syntax. Purpose: Node.js is suitable for I/O-intensive tasks, while Java is suitable for large enterprise applications.
 Is nodejs a back-end development language?
Apr 21, 2024 am 05:09 AM
Is nodejs a back-end development language?
Apr 21, 2024 am 05:09 AM
Yes, Node.js is a backend development language. It is used for back-end development, including handling server-side business logic, managing database connections, and providing APIs.
 How to deploy nodejs project to server
Apr 21, 2024 am 04:40 AM
How to deploy nodejs project to server
Apr 21, 2024 am 04:40 AM
Server deployment steps for a Node.js project: Prepare the deployment environment: obtain server access, install Node.js, set up a Git repository. Build the application: Use npm run build to generate deployable code and dependencies. Upload code to the server: via Git or File Transfer Protocol. Install dependencies: SSH into the server and use npm install to install application dependencies. Start the application: Use a command such as node index.js to start the application, or use a process manager such as pm2. Configure a reverse proxy (optional): Use a reverse proxy such as Nginx or Apache to route traffic to your application
