

Thirty minutes will teach you how to manage Redis

This article brings you relevant knowledge about Redis, which mainly introduces the related issues of Redis management tools and how to manage Redis database. Let’s take a look at it below. I hope it will be helpful to everyone. helpful.

Recommended learning: Redis tutorial

This article will familiarize you with Redis management. Knowledge, including security and communication protocols, etc.
At the same time, third-party management tools that are closely related to it will also be introduced.
1. Safety
When it comes to safety, what do we think of?
For example, a trustworthy environment will bring us a sense of security, while an unfamiliar environment will make you feel unknown fear and loneliness.
Another example is the localization replacement of the Xinchuang project (Anke Substitution), here I refer to it as the Guochuang project, which is to achieve the goals of trust, safety, reliability, and independence and controllability.
I have talked so much above (a lot of nonsense, I am exhausted), just to enhance our safety awareness.
Redis is beautiful in simplicity, as the founder once described it. But also not much work has been done on the security level.
I would like to add one thing here, last time I didn’t talk about how to gracefully shut down the Redis service. Although you can kill the process to control it, it is recommended to use the following method to shut down:
$ /opt/redis-6.0.8/src/redis-cli shutdown
1. Trusted environment
The security design of Redis is based on the premise that "Redis runs in a trusted environment" Made. When running in the production environment (official release environment), external direct connections to the Redis server are not allowed. At this time, the connection should be made through the application. Running in a trustworthy environment is a crucial method to ensure the security of Redis.
1.1. bind parameter
In the default configuration file redis.conf of Redis, only local network requests will be accepted. However, this setting can be changed by modifying the bind parameter in the configuration file. The default bind setting is:

bind:127.0.0.1
bind parameter Multiple IP addresses can also be bound, and the IP addresses are separated by spaces, as shown in the following example:

# Examples:# bind 192.168.1.100 10.0.0.1# bind 127.0.0.1 ::1
1.2, protected-mode parameter
in Redis3. In version 2, a special mode is introduced: protected mode to better ensure that Redis runs in a trusted environment. It is worth noting that protected mode is turned on by default.
Parameter settings:
#开启保护模式protected-mode yes#禁止保护模式protected-mode no

Function:
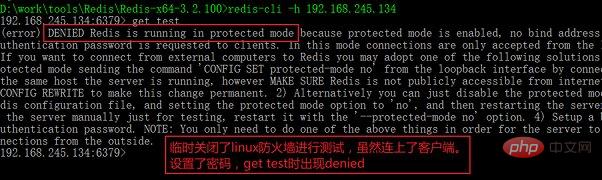
- Enable protection mode: receive from absent When the bind-bound network client sends a command, if the client does not set a password, Redis will return an error rejection (DENIED) to execute the command.
- Disable protected mode: You can use
protected-mode noto disable it in the configuration. - Security: For the production environment, you need to ensure that the shield (firewall) is turned on to ensure that trusted clients can connect to the server.
When testing, for example, I connect to my Redis service on Linux under Windows. In order to facilitate testing, temporarily close the firewalld firewall at this time, or use the firewall-cmd command to add the 6379 default port and the Redis service. For knowledge about firewalls, please refer to my previous article "firewalld and iptables firewall tools":
#临时关闭防火墙systemctl stop firewalld.service
Note: Versions before Redis 3.2 will bind all network interfaces by default, and any computer on the network (including the public network) can connect to the Redis server. Those who use the old version need to pay attention. It is best to modify this parameter or upgrade to the new version.
2. Database password
Redis provides the database password function. At first, I foolishly thought that I could connect directly, but there was no password, so it was really unsafe. It wasn't until later in practice that I discovered that this thing can be used to set passwords, but I didn't know it before. It is worth noting: And in the 6.0 version, the multi-user permission control function is supported.
2.1. Redis password setting
was also mentioned in my previous article. The Redis database password is controlled through the parameter requirepass. The default 6.0.8 version is disabled and needs to be turned on manually.

#默认禁用掉了#requirepass foobared#启用密码requirepass 123456
The client needs to send a password every time it connects to Redis, otherwise Redis will refuse to execute the command sent by the client. For example, I use Windows client to connect:
turned on protected mode and started to prompt DENIED. Use bind to bind a trusted IP or disable protected mode, and finally you will be prompted for a password for verification.
示例:设置键sky,set “sky” “hello redis”
#设置skyset "sky" "hello redis"
重启redis服务(需要读取到redis.conf文件),会提示验证密码,如下图所示。
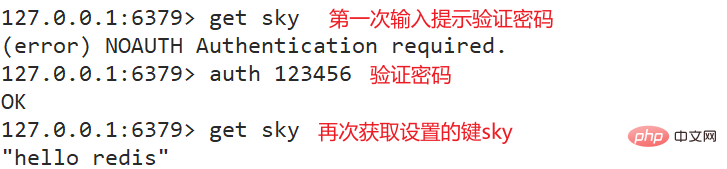
#获取skyget sky(error) NOAUTH Authentication required.
#提示需要密码认证
#认证auth 123456
#再次获取skyget sky"hello redis"
虽然数据库设置密码很方便,但是在复杂的场景中经常需要使用更加细粒度的访问权限控制。比如:
- 生产环境中的应用程序下不应该具有执行CONFIG、FLUSHALL涉及到管理或者数据安全的命令权限
- 多个程序因不同用途共用一个Redis服务时,建议限制某个程序访问其它程序产生的键。
tips:为此,Redis6.0推出了访问控制列表(ACL)功能,可以支持多用户,并且设置每个用户可以使用的命令和访问的键名规则等。可以通过配置文件设置,如下:
- 将ACL配置直接写在Redis配置文件中
- 将ACL配置写在单独的文件中,然后在Redis配置文件通过
aclfile指令引入,例如:
aclifile /opt/person/conf.acl
2.1、Redis主从复制注意事项
在配置Redis复制的时候,如果主库设置了密码,需要在从库的配置文件中通过masterauth <master-password>参数设置主库的密码,使从库连接主库时自动使用auth命令验证,配置如下。

masterauth <master-password>
3、命名命令
Redis支持在配置文件中将命令重命名,例如将FLUSHALL命令重命名为一个比较复杂的名字,达到保证只有自己的应用可以使用该命令。当然,这个功能可以看做在6.0版本之前没有ACL,作为对命令安全性的一个补充。如下配置:
rename-command FLUSHALL redisabcdsky1r2d3is
如果希望直接一点,直接禁用,通过重命名为空字符
rename-command FLUSHALL ""
再次强调:安全起见,无论设置密码还是重命名命令,都应遵循保证配置文件的安全性,否则就无意义了。
二、通信协议
之前有了解到Redis的主从复制以及持久化AOF文件的格式,通过了解Redis通信协议能更好的理解Redis。
当然Redis支持两种通信协议。如下:
- 一种是二进制安全的统一请求协议(unified request protocol)
- 第二种是比较直观的便于在telnet程序中输入的简单协议
1、简单协议
简单协议适合在telnet程序中和Redis通信。如下是通过telnet测试与Redis通信:
linux下Redhat系列安装telnet通过yum命令:
yum -y install telnet
Windows在启用或关闭Windows功能中启用telnet
[root@dywangk redis-6.0.8]# telnet 127.0.0.1 6379Trying 127.0.0.1...
Connected to 127.0.0.1.
Escape character is '^]'.auth 123456 #同样需要验证密码,之前设置了密码+OKset foo bar
+OK
get foo$3bar#输入quit退出telnet
1.1、错误回复
错误回复(error reply)以 - 开头并在后面跟着错误信息:
-ERR unknown command ``, with args beginning with:
1.2、状态回复
状态回复(status reply)以+开头
+OK
1.3、整数回复
整数回复(integer reply)以:开头
:3
1.4、字符串回复
字符串(bulk reply)回复以$开头
$3
2、统一请求协议
统一请求协议是从Redis1.2开始加入的,其命令格式与多行字符串回复格式类似。也以telnet为例演示:
[root@dywangk redis-6.0.8]# telnet 127.0.0.1 6379Trying 127.0.0.1...
Connected to 127.0.0.1.
Escape character is '^]'.auth 123456 #同样需要验证密码,之前设置了密码+OK
*3$3set$3foo$3bar
+OK#输入quit退出telnet
同样,在发送命令的时候指定了后面字符串的长度,所以每个命令的每个参数都可以包含二进制的字符。
Redis的AOF文件和主从复制时数据库发送的内容使用了统一请求协议。如果简单的使用telnet与Redis进行通信,使用简单协议即可。
三、管理工具
1、redis-cli
看到redis-cli大家肯定不陌生,是的我们学习测试快速融入都是使用的redis-cli命令进行的,Redis自带的客户端。Redis可以执行大部分的Redis命令,包括查看数据库信息的info命令、更改数据库设置的config命令和强制进行RDB快照的save命令。简单介绍几个管理Redis常用的命令。
1.1、耗时命令日志
当一条命令执行时间超过限制时,Redis会将该命令的执行时间等信息加入耗时命令日志(slow log)以供开发者查看。通过配置文件的slowlog-log-slower-than 10000参数设置限制,注意单位是微秒,可以看到默认为10000。通过slowlog-max-len 128限制记录的条数。
获取当前耗时命令日志
slowlog get
每条日志由以下4个部分组成
- 唯一日志ID
- 执行的Unix时间
- 耗时时间,单位为微秒
- 命令及其参数
测试时,将slowlog-log-slower-than 0 参数设置为0
slowlog-log-slower-than 0
1.2、命令监控
Redis提供了monitor来监控Redis执行的所有命令,redis-cli也支持。例如:
monitor
注意:一般用于调试和纠错使用。
2、Medis
获取地址:https://getmedis.com/
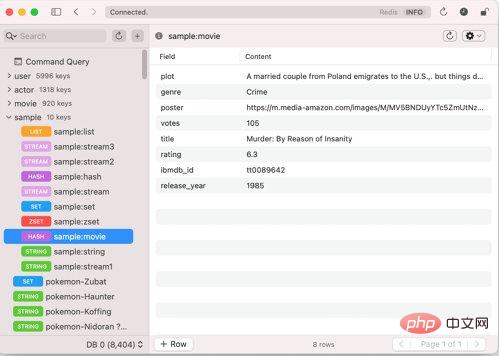
当Redis中的键比较多时,此时使用redis-cli管理略显不足。Medis是一款macOS下的可视化Redis管理工具。通过界面即可实现管理Redis。
3、phpRedisAdmin
看到phpRedisAdmin,大家也许会联想到以网页形式管理MySQL的phpMyAdmin管理工具。
下载地址:https://github.com/erikdubbelboer/phpRedisAdmin
关于工具的使用,可以参考github说明,这里不做过多介绍。
建议:github那访问速度大家都懂的,建议导入到gitee作为镜像仓库使用,每隔一段时间同步。
4、Rdbtools
一款采用Python语言开发的Redis的快照文件解析器,它可以根据快照文件导出json数据文件、分析Redis中每个键的占用空间情况。
下载地址:https://github.com/sripathikrishnan/redis-rdb-tools
关于工具的使用,可以参考github说明,这里不做过多介绍。
5、命令参考
最后介绍一个Redis命令大全参考网站,源自于Redis官网,链接如下:
https://redis.io/commands
推荐学习:Redis学习教程
The above is the detailed content of Thirty minutes will teach you how to manage Redis. For more information, please follow other related articles on the PHP Chinese website!

Hot AI Tools

Undresser.AI Undress
AI-powered app for creating realistic nude photos

AI Clothes Remover
Online AI tool for removing clothes from photos.

Undress AI Tool
Undress images for free

Clothoff.io
AI clothes remover

Video Face Swap
Swap faces in any video effortlessly with our completely free AI face swap tool!

Hot Article
Hot Tools

Notepad++7.3.1
Easy-to-use and free code editor

SublimeText3 Chinese version
Chinese version, very easy to use

Zend Studio 13.0.1
Powerful PHP integrated development environment

Dreamweaver CS6
Visual web development tools

SublimeText3 Mac version
God-level code editing software (SublimeText3)
Hot Topics


 How to build the redis cluster mode
Apr 10, 2025 pm 10:15 PM
How to build the redis cluster mode
Apr 10, 2025 pm 10:15 PM
Redis cluster mode deploys Redis instances to multiple servers through sharding, improving scalability and availability. The construction steps are as follows: Create odd Redis instances with different ports; Create 3 sentinel instances, monitor Redis instances and failover; configure sentinel configuration files, add monitoring Redis instance information and failover settings; configure Redis instance configuration files, enable cluster mode and specify the cluster information file path; create nodes.conf file, containing information of each Redis instance; start the cluster, execute the create command to create a cluster and specify the number of replicas; log in to the cluster to execute the CLUSTER INFO command to verify the cluster status; make
 How to clear redis data
Apr 10, 2025 pm 10:06 PM
How to clear redis data
Apr 10, 2025 pm 10:06 PM
How to clear Redis data: Use the FLUSHALL command to clear all key values. Use the FLUSHDB command to clear the key value of the currently selected database. Use SELECT to switch databases, and then use FLUSHDB to clear multiple databases. Use the DEL command to delete a specific key. Use the redis-cli tool to clear the data.
 How to read redis queue
Apr 10, 2025 pm 10:12 PM
How to read redis queue
Apr 10, 2025 pm 10:12 PM
To read a queue from Redis, you need to get the queue name, read the elements using the LPOP command, and process the empty queue. The specific steps are as follows: Get the queue name: name it with the prefix of "queue:" such as "queue:my-queue". Use the LPOP command: Eject the element from the head of the queue and return its value, such as LPOP queue:my-queue. Processing empty queues: If the queue is empty, LPOP returns nil, and you can check whether the queue exists before reading the element.
 How to use the redis command
Apr 10, 2025 pm 08:45 PM
How to use the redis command
Apr 10, 2025 pm 08:45 PM
Using the Redis directive requires the following steps: Open the Redis client. Enter the command (verb key value). Provides the required parameters (varies from instruction to instruction). Press Enter to execute the command. Redis returns a response indicating the result of the operation (usually OK or -ERR).
 How to use redis lock
Apr 10, 2025 pm 08:39 PM
How to use redis lock
Apr 10, 2025 pm 08:39 PM
Using Redis to lock operations requires obtaining the lock through the SETNX command, and then using the EXPIRE command to set the expiration time. The specific steps are: (1) Use the SETNX command to try to set a key-value pair; (2) Use the EXPIRE command to set the expiration time for the lock; (3) Use the DEL command to delete the lock when the lock is no longer needed.
 How to read the source code of redis
Apr 10, 2025 pm 08:27 PM
How to read the source code of redis
Apr 10, 2025 pm 08:27 PM
The best way to understand Redis source code is to go step by step: get familiar with the basics of Redis. Select a specific module or function as the starting point. Start with the entry point of the module or function and view the code line by line. View the code through the function call chain. Be familiar with the underlying data structures used by Redis. Identify the algorithm used by Redis.
 How to configure Lua script execution time in centos redis
Apr 14, 2025 pm 02:12 PM
How to configure Lua script execution time in centos redis
Apr 14, 2025 pm 02:12 PM
On CentOS systems, you can limit the execution time of Lua scripts by modifying Redis configuration files or using Redis commands to prevent malicious scripts from consuming too much resources. Method 1: Modify the Redis configuration file and locate the Redis configuration file: The Redis configuration file is usually located in /etc/redis/redis.conf. Edit configuration file: Open the configuration file using a text editor (such as vi or nano): sudovi/etc/redis/redis.conf Set the Lua script execution time limit: Add or modify the following lines in the configuration file to set the maximum execution time of the Lua script (unit: milliseconds)
 How to use the redis command line
Apr 10, 2025 pm 10:18 PM
How to use the redis command line
Apr 10, 2025 pm 10:18 PM
Use the Redis command line tool (redis-cli) to manage and operate Redis through the following steps: Connect to the server, specify the address and port. Send commands to the server using the command name and parameters. Use the HELP command to view help information for a specific command. Use the QUIT command to exit the command line tool.
