

What does docker image import and export mean?

In docker, image import uses the "load [options]" command to copy the current image into a new image; image export uses the "save [options] images" command to save the history including the mirror all the information.

The operating environment of this tutorial: linux7.3 system, docker-1.13.1 version, Dell G3 computer.
What does docker image import and export mean
With the development of container technology, many application systems now choose to use docker containers for deployment, but sometimes docker containers are used We will encounter problems when deploying. For example, our application needs to rely on other third-party images. If the server cannot connect to the external network from the internal network at this time, it will not be deployed. Based on this situation, Docker officially supports the import and export of Docker images and containers. We can compile the image on a machine with Internet access, then export the image or container, and finally upload the exported image or container to the intranet server, and then Import the image or container, and that's it.
The import and export operations of images and containers mainly involve the following commands: save, load, export, and import.
During the demonstration, we generated the image or container locally, then exported the image or container, and finally uploaded it to the Alibaba Cloud server to demonstrate the import function.
We use VS 2019 to create an ASP.NET Core MVC project, add the Dockerfile file:
# 使用运行时镜像
FROM mcr.microsoft.com/dotnet/core/aspnet:3.1-buster-slim
# 设置工作目录
WORKDIR /app
# 把目录下的内容都复制到当前目录下
COPY . .
# 暴露80端口
EXPOSE 80
# 运行镜像入口命令和可执行文件名称
ENTRYPOINT ["dotnet", "DockerDemo.dll"]
and then publish the project. We look at the existing docker images

and we can see that there are only two .net core images. We generate the image:
docker build -t dockerdemo .
As shown below:
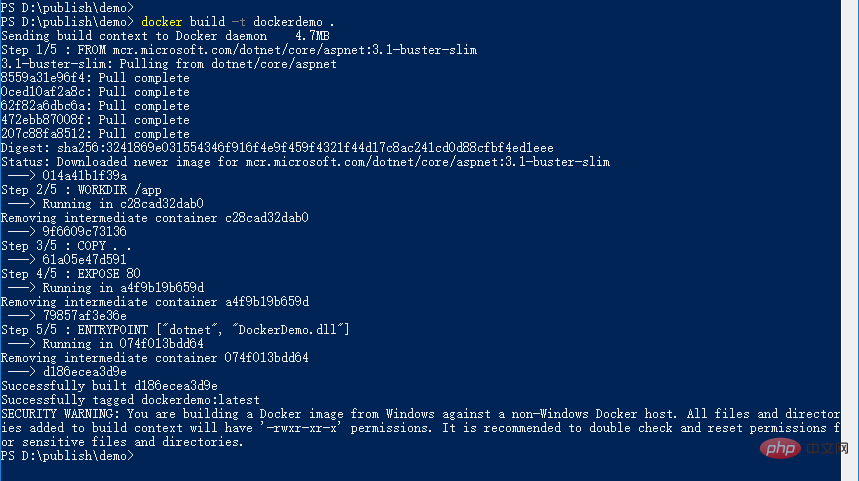
View the generated image

Then we run the container based on the generated image. First check the existing containers:

You can see that there are no containers at this time. We run the container:

#You can see that the container has run successfully.
2. Import and export of docker image
1. Export of docker image
Involved commands:
docker save [options] images [images...]
We use the above image to Export of the demo image:
docker save -o dockerdemo.tar dockerdemo
As shown in the figure below:

The path to the exported file is specified when exporting. If the path is not specified, the default is the current folder.
Or you can use the following command to export:
docker save > dockerdemo.tar dockerdemo
where -o and > indicate output to a file, dockerdemo.tar is the exported target file, and dockerdemo is the source image name.
We check whether there is an exported file locally:
 You can see that there is already the file just exported under the directory.
2. Import of docker image
We first use XFtp to upload the image file exported above to the Alibaba Cloud server

and then enter The directory where the file is located

Let’s check what images are on the Alibaba Cloud server:

As can be seen from the picture above : There are currently no images on the Alibaba Cloud server.
Involved import command load
docker load [options]
Next we import the image just uploaded.
docker load -i dockerdemo.tar
As shown below:
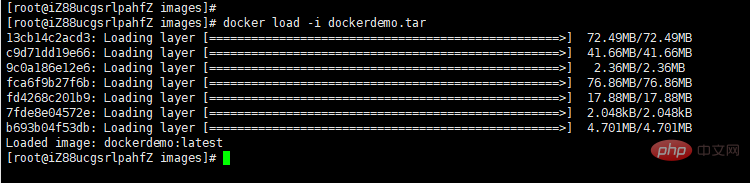
#Or you can also use the following command
docker load < dockerdemo.tar
where -i (i means import) and < means input from file. The above two commands will successfully import the image and related metadata, including tag information.
View the image after importing:

You can see that we have the image we just imported. After importing the image, you can run the container based on the image and finally run the application.
3. Import and export of docker containers
Next we demonstrate the import and export of containers.
1. Export of docker container
Involves the command export.
docker export [options] container
We export the container generated above:
docker export -o D:\containers\dockerdemocontainer.tar dockerdemo
As shown below:

其中,-o表示输出的文件,这里指定了输出的路径,如果没有指定路径,则默认生成到当前文件夹。dockerdemocontainer.tar为目标文件,dockerdemo为源容器名。
我们查看目录下面是否生成了导出的容器:

2、docker容器的导入
我们首先把导出的容器使用XFTP上传到阿里云服务器。

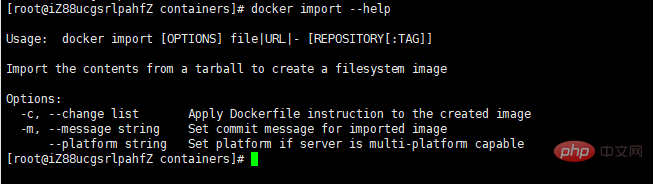
涉及到的导入命令import。
docker import [options] file|URL|- [REPOSITORY[:TAG]]
如下图所示
 我们导入刚才上传的容器
docker import dockerdemocontainer.tar dockerdemo:imp
dockerdemocontainer.tar表示要导入的容器,dockerdemo:imp表示导入后的镜像名称,imp表示给导入的镜像打tag。
如下图所示

然后我们查看镜像:

可以看到这时有我们刚才导入的镜像了,导入的镜像tag为imp。
四、总结
下面我们来总结一下镜像和容器导入导出的区别:
- 镜像导入是一个复制的过程,容器导入是将当前容器变成一个新的镜像。
- docker save命令保存的是镜像(image),docker export命令保存的是容器(container)。
- export命令导出的tar文件略小于save命令导出的。
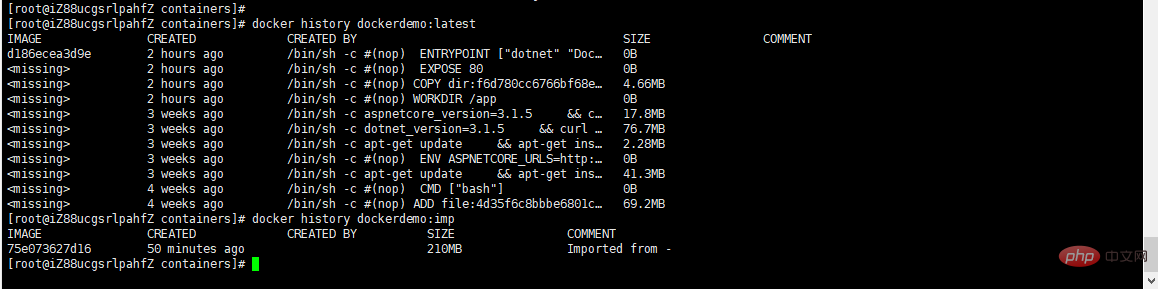
- 因为export导出的是容器,export导出的文件在import导入时,无法保留镜像所有的历史(即每一层layer信息),不能进行回滚操作。而save是根据镜像来的,所以导入时可以完整保留下每一层layer信息。如下图所示:dockerdemo:latest是save导出load导入的,dockerdemo:imp是export导出import导入的。

docker load不能对导入的镜像重命名,而docker import导入可以为镜像指定新名称。例如,上面导入的时候指定dockerdeom:imp。
对于是使用镜像导入导出还是使用容器导入导出该如何选择呢?有下面两点建议:
- 若是只想备份image,使用save和load。
- 若是在启动容器后,容器内容有变化,需要备份,则使用export和import。
推荐学习:《docker视频教程》
The above is the detailed content of What does docker image import and export mean?. For more information, please follow other related articles on the PHP Chinese website!

Hot AI Tools

Undresser.AI Undress
AI-powered app for creating realistic nude photos

AI Clothes Remover
Online AI tool for removing clothes from photos.

Undress AI Tool
Undress images for free

Clothoff.io
AI clothes remover

Video Face Swap
Swap faces in any video effortlessly with our completely free AI face swap tool!

Hot Article
Hot Tools

Notepad++7.3.1
Easy-to-use and free code editor

SublimeText3 Chinese version
Chinese version, very easy to use

Zend Studio 13.0.1
Powerful PHP integrated development environment

Dreamweaver CS6
Visual web development tools

SublimeText3 Mac version
God-level code editing software (SublimeText3)
Hot Topics
 1386
1386
 52
52

 How to update the image of docker
Apr 15, 2025 pm 12:03 PM
How to update the image of docker
Apr 15, 2025 pm 12:03 PM
The steps to update a Docker image are as follows: Pull the latest image tag New image Delete the old image for a specific tag (optional) Restart the container (if needed)
 How to use docker desktop
Apr 15, 2025 am 11:45 AM
How to use docker desktop
Apr 15, 2025 am 11:45 AM
How to use Docker Desktop? Docker Desktop is a tool for running Docker containers on local machines. The steps to use include: 1. Install Docker Desktop; 2. Start Docker Desktop; 3. Create Docker image (using Dockerfile); 4. Build Docker image (using docker build); 5. Run Docker container (using docker run).
 How to create a mirror in docker
Apr 15, 2025 am 11:27 AM
How to create a mirror in docker
Apr 15, 2025 am 11:27 AM
Steps to create a Docker image: Write a Dockerfile that contains the build instructions. Build the image in the terminal, using the docker build command. Tag the image and assign names and tags using the docker tag command.
 What to do if the docker image fails
Apr 15, 2025 am 11:21 AM
What to do if the docker image fails
Apr 15, 2025 am 11:21 AM
Troubleshooting steps for failed Docker image build: Check Dockerfile syntax and dependency version. Check if the build context contains the required source code and dependencies. View the build log for error details. Use the --target option to build a hierarchical phase to identify failure points. Make sure to use the latest version of Docker engine. Build the image with --t [image-name]:debug mode to debug the problem. Check disk space and make sure it is sufficient. Disable SELinux to prevent interference with the build process. Ask community platforms for help, provide Dockerfiles and build log descriptions for more specific suggestions.
 How to save docker image
Apr 15, 2025 am 11:54 AM
How to save docker image
Apr 15, 2025 am 11:54 AM
To save the image in Docker, you can use the docker commit command to create a new image, containing the current state of the specified container, syntax: docker commit [Options] Container ID Image name. To save the image to the repository, you can use the docker push command, syntax: docker push image name [: tag]. To import saved images, you can use the docker pull command, syntax: docker pull image name [: tag].
 How to exit the container by docker
Apr 15, 2025 pm 12:15 PM
How to exit the container by docker
Apr 15, 2025 pm 12:15 PM
Four ways to exit Docker container: Use Ctrl D in the container terminal Enter exit command in the container terminal Use docker stop <container_name> Command Use docker kill <container_name> command in the host terminal (force exit)
 How to copy files in docker to outside
Apr 15, 2025 pm 12:12 PM
How to copy files in docker to outside
Apr 15, 2025 pm 12:12 PM
Methods for copying files to external hosts in Docker: Use the docker cp command: Execute docker cp [Options] <Container Path> <Host Path>. Using data volumes: Create a directory on the host, and use the -v parameter to mount the directory into the container when creating the container to achieve bidirectional file synchronization.
 How to check the name of the docker container
Apr 15, 2025 pm 12:21 PM
How to check the name of the docker container
Apr 15, 2025 pm 12:21 PM
You can query the Docker container name by following the steps: List all containers (docker ps). Filter the container list (using the grep command). Gets the container name (located in the "NAMES" column).
