

What is the difference between docker volume and mount

The difference between "docker volume" and mount is: "docker volume" is declarative, "Docker Engine" itself will occupy a certain directory in the system, and Docker will allocate the volume under the occupied path by default. A path; mounting will not occupy a path as a mount point.

The operating environment of this tutorial: linux7.3 system, docker-1.13.1 version, Dell G3 computer.
What is the difference between docker volume and mount
For a long time, when multiple containers need to share access to the same data directory, or when data in the container needs to be persisted (such as a database), we They all use the form of mounting directories (bind mounts) to mount a directory on the host to a specified directory in the container. This method can solve the problem, but this method always has some shortcomings:
- Containers deployed on different servers need to modify the path according to the actual disk mounting directory
- The file and directory permissions of different operating systems will make you confused and angry?
These problems can be solved using Volume. Let's first compare bind mounts and docker volume, and then see how volume solves the problem of bind mounts. Let’s look at a picture first:
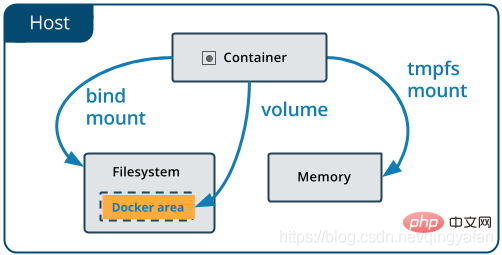
This picture shows that bind mount and volume actually use the host’s file system , the difference is that volume is a subdirectory in the directory managed by docker itself, so there is no mounting problem caused by permissions, and the directory path is managed by docker itself, so there is no need to specify different paths on different servers. , you don’t need to care about the path (actually not all of them, we will care about it below?). Next, let’s take a look at the different uses of bind mount and volume.
1. When deploying containers on different servers, you need to modify the path according to the actual disk mounting directory
For example:
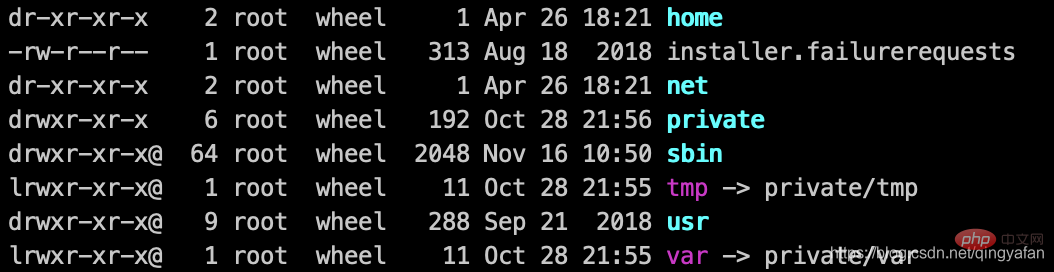
In Linux systems, we often Use "/var/someDir" as the mounting directory;
However, on Mac, /var/ is not a real directory. Mac users will tell you that we are more advanced than Linux and we do not use /var/ , users don’t need it;
In Windows systems, Windows users will ask you: What is /var/? C drive and D drive are the most reasonable divisions~~

2. The file and directory permissions of different operating systems will make you confused and angry?
Originally, the test in the Linux system was quite good, but as a result, various problems with the mounting path on Windows were encountered. I will not go into details here. If you have not encountered these problems, you can try it and experience it. But it's better in Mac, after all, it's the same as Linux.
In addition to the mounting method, there is also a Volume that can persist data in Docker. It’s a bit embarrassing to mention this. After using Docker for so long, I have always regarded mounting as a Volume. But don’t blame me. In the Docker-compose file There is no problem in writing the mapping relationship between the container and the host mount path in the volume section, but this has always been a misunderstanding. . (Fancy blame?)
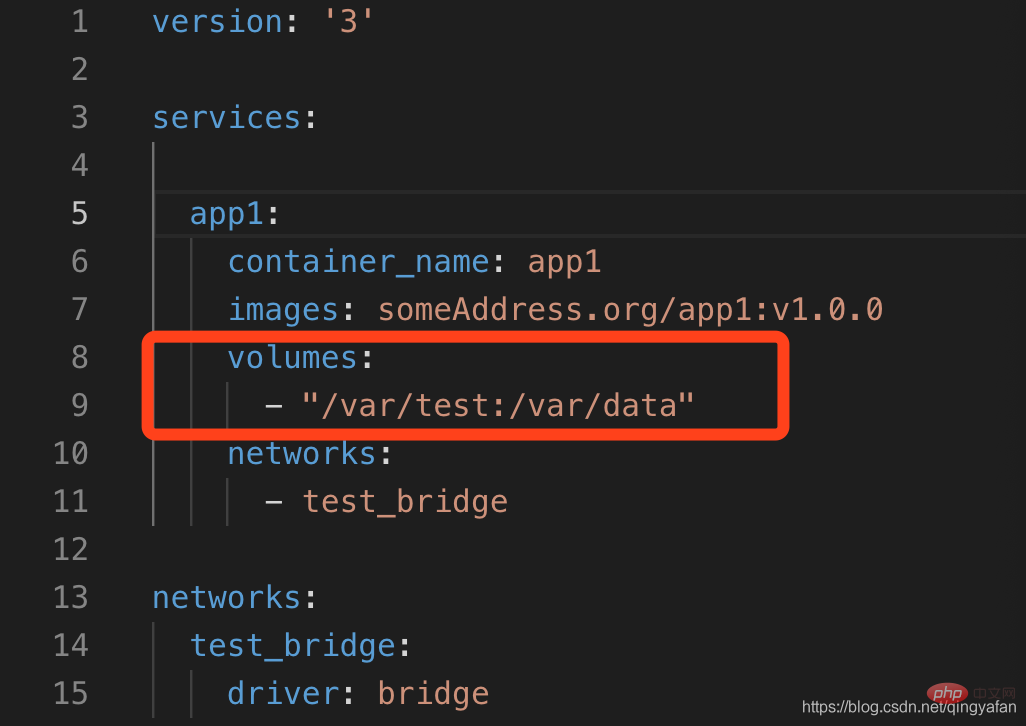
In fact, "mounting" and "Docker Volume" are not the same thing. There is a certain difference. Docker Volume is declarative. Docker Engine itself will occupy a certain directory in the system, generally "/var/lib/docker" in Linux, and can be adjusted in both Mac and Windows. When we declare a volume, Docker will assign a path to the volume under the occupied path by default, for example:

relative to the mount, volume It is Docker Engine that allocates a path as a mount point in its own "site", and the permissions of its own site must be clearly arranged. Therefore, the above problems of mounting the host path are solved. ?
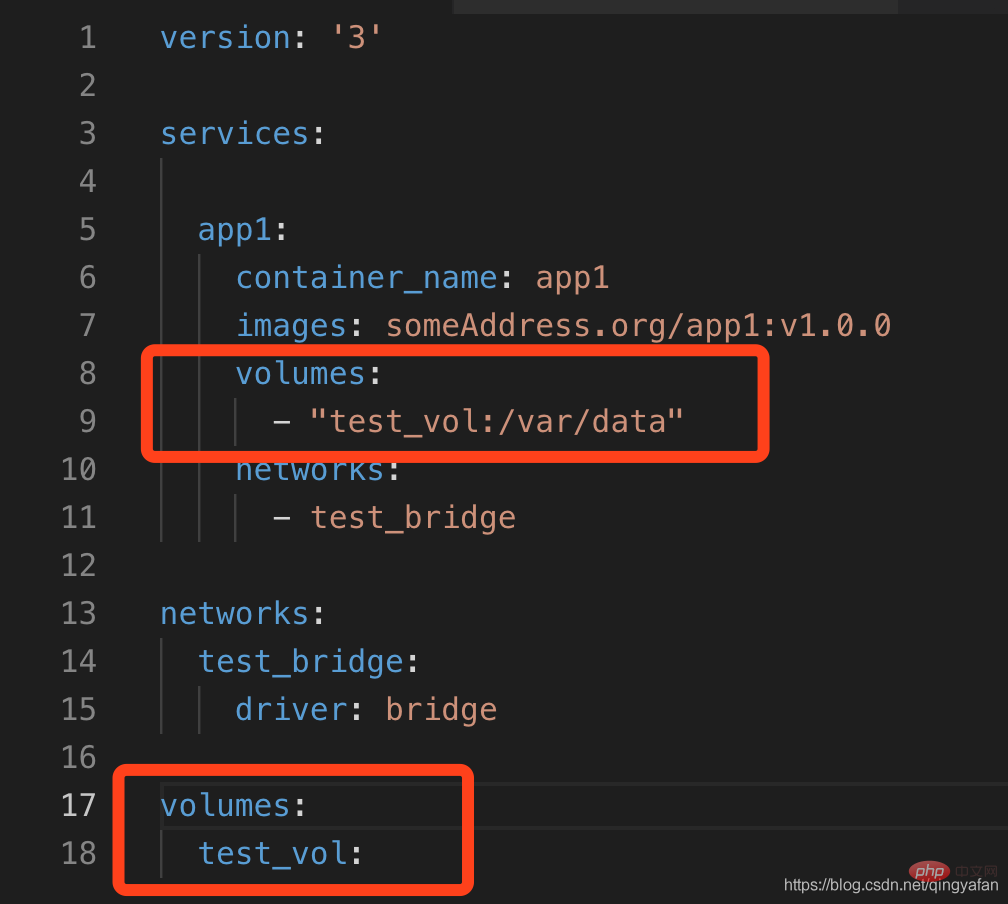
When using it, just use the volume name instead of the host path name. Assume that we created a volume named "test_vol" above:
- docker run -d -v "test_vol:/var/data" some_image, this will mount the /var/data directory in the container to the mount point of "test_vol";
- It’s similar in docker-compose, but the volume must be declared in the docker-compose.yaml file. Let’s modify the above example:
##Attention !!
- It should be noted that the volume will cause the docker directory to expand, because both the image and the volume need to be stored. It is best not to put it on the system disk. Configure the docker installation directory to another Larger mount disk.
- The two have a different behavior: when the corresponding directory outside the container is empty, volume will first copy the contents in the container to the directory outside the container, while mount will overwrite the external directory in the container's internal directory! !
- volume Another disadvantage of bind mount is that it cannot directly mount files, such as mounting the configuration file of the nginx container: nginx.conf.
docker video tutorial"
The above is the detailed content of What is the difference between docker volume and mount. For more information, please follow other related articles on the PHP Chinese website!

Hot AI Tools

Undresser.AI Undress
AI-powered app for creating realistic nude photos

AI Clothes Remover
Online AI tool for removing clothes from photos.

Undress AI Tool
Undress images for free

Clothoff.io
AI clothes remover

AI Hentai Generator
Generate AI Hentai for free.

Hot Article
Hot Tools

Notepad++7.3.1
Easy-to-use and free code editor

SublimeText3 Chinese version
Chinese version, very easy to use

Zend Studio 13.0.1
Powerful PHP integrated development environment

Dreamweaver CS6
Visual web development tools

SublimeText3 Mac version
God-level code editing software (SublimeText3)
Hot Topics
 1382
1382
 52
52

 How to use docker desktop
Apr 15, 2025 am 11:45 AM
How to use docker desktop
Apr 15, 2025 am 11:45 AM
How to use Docker Desktop? Docker Desktop is a tool for running Docker containers on local machines. The steps to use include: 1. Install Docker Desktop; 2. Start Docker Desktop; 3. Create Docker image (using Dockerfile); 4. Build Docker image (using docker build); 5. Run Docker container (using docker run).
 How to read the docker version
Apr 15, 2025 am 11:51 AM
How to read the docker version
Apr 15, 2025 am 11:51 AM
To get the Docker version, you can perform the following steps: Run the Docker command "docker --version" to view the client and server versions. For Mac or Windows, you can also view version information through the Version tab of the Docker Desktop GUI or the About Docker Desktop menu.
 How to create a mirror in docker
Apr 15, 2025 am 11:27 AM
How to create a mirror in docker
Apr 15, 2025 am 11:27 AM
Steps to create a Docker image: Write a Dockerfile that contains the build instructions. Build the image in the terminal, using the docker build command. Tag the image and assign names and tags using the docker tag command.
 How to view logs from docker
Apr 15, 2025 pm 12:24 PM
How to view logs from docker
Apr 15, 2025 pm 12:24 PM
The methods to view Docker logs include: using the docker logs command, for example: docker logs CONTAINER_NAME Use the docker exec command to run /bin/sh and view the log file, for example: docker exec -it CONTAINER_NAME /bin/sh ; cat /var/log/CONTAINER_NAME.log Use the docker-compose logs command of Docker Compose, for example: docker-compose -f docker-com
 How to check the name of the docker container
Apr 15, 2025 pm 12:21 PM
How to check the name of the docker container
Apr 15, 2025 pm 12:21 PM
You can query the Docker container name by following the steps: List all containers (docker ps). Filter the container list (using the grep command). Gets the container name (located in the "NAMES" column).
 How to change the docker image source in China
Apr 15, 2025 am 11:30 AM
How to change the docker image source in China
Apr 15, 2025 am 11:30 AM
You can switch to the domestic mirror source. The steps are as follows: 1. Edit the configuration file /etc/docker/daemon.json and add the mirror source address; 2. After saving and exiting, restart the Docker service sudo systemctl restart docker to improve the image download speed and stability.
 How to update the image of docker
Apr 15, 2025 pm 12:03 PM
How to update the image of docker
Apr 15, 2025 pm 12:03 PM
The steps to update a Docker image are as follows: Pull the latest image tag New image Delete the old image for a specific tag (optional) Restart the container (if needed)
 How to start containers by docker
Apr 15, 2025 pm 12:27 PM
How to start containers by docker
Apr 15, 2025 pm 12:27 PM
Docker container startup steps: Pull the container image: Run "docker pull [mirror name]". Create a container: Use "docker create [options] [mirror name] [commands and parameters]". Start the container: Execute "docker start [Container name or ID]". Check container status: Verify that the container is running with "docker ps".
