How to install vnc on linux
How to install vnc on Linux: 1. Use the "yum install vnc vnc-server" command to install vnc; 2. Use the "yum install tightvnc-server" command to install "tigervnc-server".

#The operating environment of this tutorial: linux7.3 system, Dell G3 computer.
How to install vnc on linux
The first thing you need to know is what VNC is. VNC (Virtual Network Computing), a display screen sharing and remote operation software using RFB protocol. It is operating system agnostic and therefore works cross-platform. For example, you can use Windows to connect to a Linux computer through VNC Viewer.
The VNC system consists of a client, a server, and a protocol. The purpose of the server is to share the screen it is running on, and the server passively allows the client to control it.
Next, let’s talk about how to install VNC on Linux
1. First, check whether the VNC service is installed: Enter the command: rpm -qa | grep vnc, as shown in the figure below, it has been installed. If you do not proceed to the next step 
1-1, install VNC: [root@localhost ~]# yum install vnc vnc-server
Install tigervnc-server: [root@localhost ~]# yum install tightvnc-server
Set the VNC password for the first time (remember the password here, you will need it when you come back to use VNC Viewer): [root@localhost ~]# vncserver, note that the password here must be at least The 6-digit
can also create multiple desktops by executing the vncserver command multiple times.
2. Configure the firewall.
If the firewall is not configured, client VNC will not be able to connect to Linux. In fact, VNC is just like our remote desktop. When you want to remote your own desktop, the first thing you need to do is to change some configurations on the firewall, right? Otherwise, the remote connection fails, and the reason is the same.
Configure firewall command:
[root@localhost ~]# iptables -I INPUT -p tcp –dport 5901 -j ACCEPT
[root@localhost ~]# iptables -I INPUT -p tcp –dport 5801 -j accept
In this place, two desktops are added. The corresponding relationship between the desktop and port is: desktop 1 corresponding to 5901, desktop 2 corresponding 5801, or you can set
3 to configure the desktop client. Enter the command: [root@localhost ~]# vi /root/.vnc/xstartup, the following interface will appear: 
Press i in this interface to enter the editing state, and add the following content at the end:
[ -x /etc/vnc/xstartup ] && exec /etc/vnc/xstartup
[ -r ##HOME/.Xresources ] && xrdbHOME/.Xresources ] && xrdbHOME/.Xresources xsetroot -solid gray
vncconfig -iconic &
title “$VNCDESKTOP Desktop” &
gnome-session &
The modified interface is as shown in the figure: 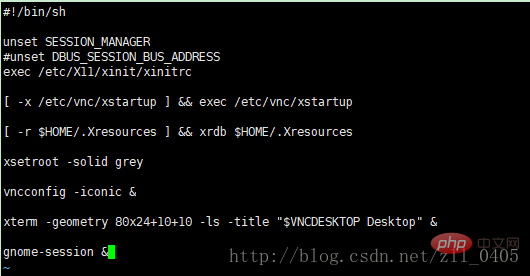 The prerequisite for installing this step is that the Gnome desktop environment is installed in Linux
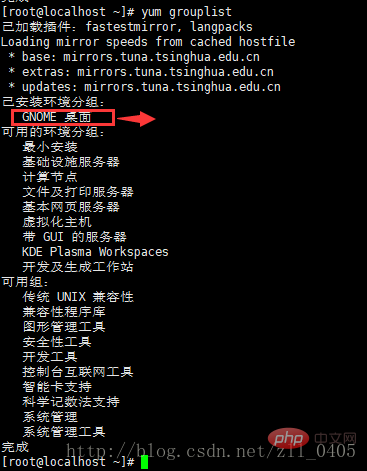
3 -1. Check whether the Gnome desktop environment is installed: enter the command: [root@localhost ~]#yum grouplist
or [root@localhost ~]#yum grouplist | more
If the gnome desktop environment is not installed, it will display:
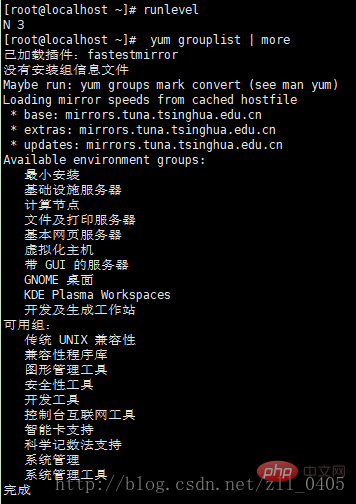 If the desktop environment has been installed, it will display:
  3-2. Install the gnome desktop graphical environment command (this process is relatively long and requires more things to install):
[root@localhost ~]# yum groupinstall “GNOME Desktop”
3-3, close and restart the service
Close the service: Vncserver –kill :1
Restart the service: vncserver :1
Use vncserver – list can check how many desktops are started
At this point, VNC has been installed. But nothing changed on Linux, and I still felt a little guilty. Just like when I used remote desktop for the first time, I finished the configuration, but I didn't know whether it was successful, so I needed to use another computer to connect to see if it could be successful.
4-1, install VNC Viewer on your computer: 
4-2, open it and create a new connection, as shown in the figure: 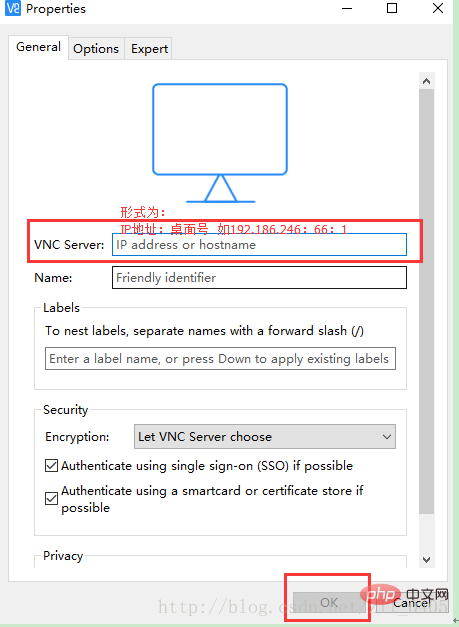
4-3, find the VNC you created, as shown in the figure below, right-click the mouse and select Connect: 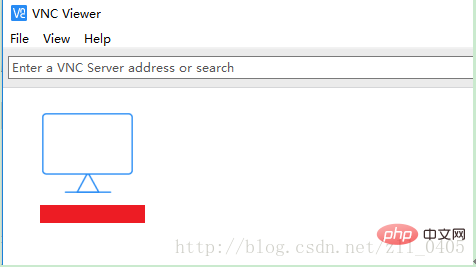
4-4, enter the password you entered when you created the VNC (if Forgot to see the introduction of 1-1, 1-1): 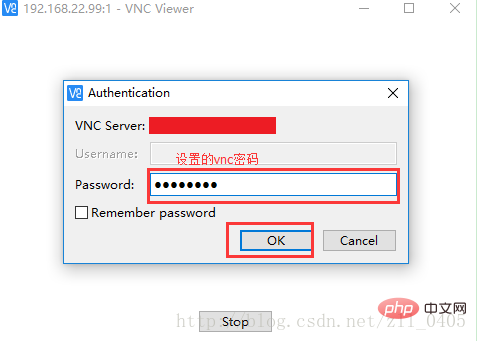
4-5, when this interface, select Continue: 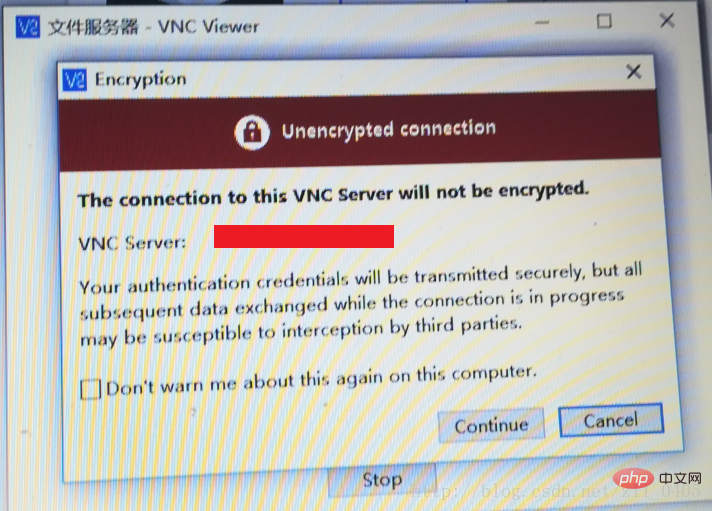
and then succeed.
After each boot, you must manually start the VNC service by entering the command): vncserver or vncserver:1
Related recommendations: "Linux Video Tutorial"
The above is the detailed content of How to install vnc on linux. For more information, please follow other related articles on the PHP Chinese website!

Hot AI Tools

Undresser.AI Undress
AI-powered app for creating realistic nude photos

AI Clothes Remover
Online AI tool for removing clothes from photos.

Undress AI Tool
Undress images for free

Clothoff.io
AI clothes remover

AI Hentai Generator
Generate AI Hentai for free.

Hot Article

Hot Tools

Notepad++7.3.1
Easy-to-use and free code editor

SublimeText3 Chinese version
Chinese version, very easy to use

Zend Studio 13.0.1
Powerful PHP integrated development environment

Dreamweaver CS6
Visual web development tools

SublimeText3 Mac version
God-level code editing software (SublimeText3)

Hot Topics
 1378
1378
 52
52
 How to start nginx in Linux
Apr 14, 2025 pm 12:51 PM
Steps to start Nginx in Linux: Check whether Nginx is installed. Use systemctl start nginx to start the Nginx service. Use systemctl enable nginx to enable automatic startup of Nginx at system startup. Use systemctl status nginx to verify that the startup is successful. Visit http://localhost in a web browser to view the default welcome page.
 How to check whether nginx is started
Apr 14, 2025 pm 01:03 PM
How to confirm whether Nginx is started: 1. Use the command line: systemctl status nginx (Linux/Unix), netstat -ano | findstr 80 (Windows); 2. Check whether port 80 is open; 3. Check the Nginx startup message in the system log; 4. Use third-party tools, such as Nagios, Zabbix, and Icinga.
 How to start nginx server
Apr 14, 2025 pm 12:27 PM
Starting an Nginx server requires different steps according to different operating systems: Linux/Unix system: Install the Nginx package (for example, using apt-get or yum). Use systemctl to start an Nginx service (for example, sudo systemctl start nginx). Windows system: Download and install Windows binary files. Start Nginx using the nginx.exe executable (for example, nginx.exe -c conf\nginx.conf). No matter which operating system you use, you can access the server IP
 How to solve nginx304 error
Apr 14, 2025 pm 12:45 PM
Answer to the question: 304 Not Modified error indicates that the browser has cached the latest resource version of the client request. Solution: 1. Clear the browser cache; 2. Disable the browser cache; 3. Configure Nginx to allow client cache; 4. Check file permissions; 5. Check file hash; 6. Disable CDN or reverse proxy cache; 7. Restart Nginx.
 How to solve nginx403 error
Apr 14, 2025 pm 12:54 PM
The server does not have permission to access the requested resource, resulting in a nginx 403 error. Solutions include: Check file permissions. Check the .htaccess configuration. Check nginx configuration. Configure SELinux permissions. Check the firewall rules. Troubleshoot other causes such as browser problems, server failures, or other possible errors.
 How to check whether nginx is started?
Apr 14, 2025 pm 12:48 PM
In Linux, use the following command to check whether Nginx is started: systemctl status nginx judges based on the command output: If "Active: active (running)" is displayed, Nginx is started. If "Active: inactive (dead)" is displayed, Nginx is stopped.
 How to clean nginx error log
Apr 14, 2025 pm 12:21 PM
The error log is located in /var/log/nginx (Linux) or /usr/local/var/log/nginx (macOS). Use the command line to clean up the steps: 1. Back up the original log; 2. Create an empty file as a new log; 3. Restart the Nginx service. Automatic cleaning can also be used with third-party tools such as logrotate or configured.
 Difference between centos and ubuntu
Apr 14, 2025 pm 09:09 PM
The key differences between CentOS and Ubuntu are: origin (CentOS originates from Red Hat, for enterprises; Ubuntu originates from Debian, for individuals), package management (CentOS uses yum, focusing on stability; Ubuntu uses apt, for high update frequency), support cycle (CentOS provides 10 years of support, Ubuntu provides 5 years of LTS support), community support (CentOS focuses on stability, Ubuntu provides a wide range of tutorials and documents), uses (CentOS is biased towards servers, Ubuntu is suitable for servers and desktops), other differences include installation simplicity (CentOS is thin)


