
This article brings you relevant knowledge about Git. It mainly introduces some common operation commands and analyzes them through cases. Let’s take a look at how to give him knowledge points. To summarize, I hope it will be helpful to everyone.
Recommended study: "Git Tutorial"
Git is an open source distributed version control system, used to handle any small or large project quickly and efficiently. It is currently the most popular version management tool.
SVN is a centralized version control system. The version library is centralized on the central server, and the working At that time, I used my own computer, so I first got the latest version from the central server, and then worked. After finishing the work, I needed to push the work I had done to the central server. The centralized version control system must be connected to the Internet to work. If it is on a local area network, it is okay, the bandwidth is large enough, and the speed is fast enough. If it is on the Internet, if the network speed is slow, it will be confusing.
Git is a distributed version control system, so it does not have a central server. Everyone's computer is a complete version library, so you don't need to be connected to the Internet when working. Because the versions are all on your own computer. Since everyone's computer has a complete version library, how can multiple people collaborate? For example, if you have modified file A on your computer, and someone else has also modified file A on your computer, you only need to push your modifications to each other, and you can see each other's modifications.
Git was first developed on Linux. For a long time, Git could only run on Linux and Unix systems. . However, slowly someone ported it to Windows. Now, Git can run normally on the major platforms of Linux, Unix, Mac and Windows.
To use Git, the first step is of course to install Git. Download it from https://git-for-windows.github.io (if the Internet speed is slow, please move to the domestic mirror), and then install it according to the default options.
After the download is completed, open it for installation (configure as shown below). 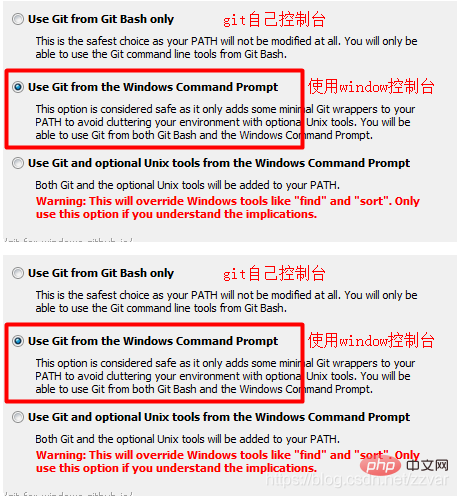
Then you just need to wait quietly for the installation to complete.After completion, click on the desktop or anywhere Right-click on an empty space in the folder, and the two menu bars shown in the figure below will appear, which means the installation is successful.
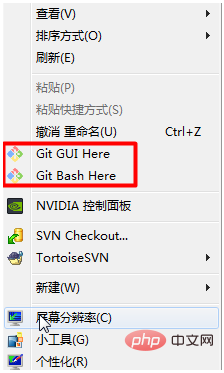
After installation, a command box will pop up. We still need to do the last step, set the identifier. . Since git is a distributed management tool, you need to set the user name and email address as identification. Just enter the following code in the pop-up box.
git config --global user.name "Your Name"git config --global user.email "email@example.com"
Note: git config --global parameter. With this parameter, it means that all Git repositories on your machine will use this configuration. Of course, you You can also specify different user names and emails for a certain warehouse.
Mainly to see the effect of the operation
Link: https://pan.baidu.com/s/ 19lIBz4IFwurxNvzXGgTqRg
Extraction code: fmte
You must create it before operating Git For a Git repository, just create an empty folder where you need it. Then enter the folder, right-click on the blank space, and click Git Bash Here to perform Git operations on the current folder. 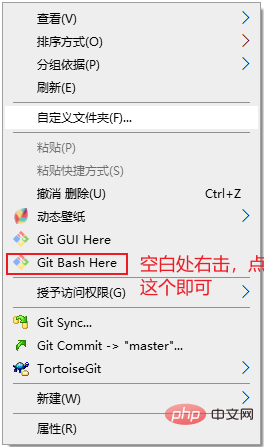

git init
cd:进入某个目录
mkdir:创建一个文件
pwd:显示当前的目录路径
鼠标选中就是复制,粘贴可以右键粘贴,也可以用使用快捷键:Shift+INS
git add a.txt

git add .
git commit -m "双引号里面是注释——你的提交说明"

原因:commit可以一次提交很多文件,所以你可以多次add不同的文件
例如:
git add file1.txt
#单个添加文件到暂存区git add file2.txt file3.txt
#多个添加文件到暂存区git add .
#添加当前文件夹下所有文件到暂存区git commit -m "add 3 files."
#提交所有暂存区的文件
使用下面命令检查当前文件状态
git status

结果:没有需要提交的文件了;
创建一个新的文件 b.txt,内容为 bbb,再来检查文件状态
结果:存在未跟踪文件没有添加到暂存区和提交到版本库;
添加 b.txt 到暂存区之后,再来检查文件状态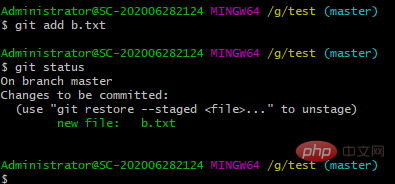
结果:暂存区中有一个新的 b.txt 文件没有添加到版本库中;
提交 b.txt 到版本库之后,然后把 b.txt 内容从 bbb 修改为 bbba,再来检查文件状态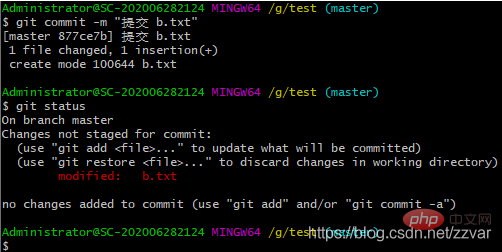
结果:被改变的文件 b.txt 没有添加到暂存区且没有提交
git add b.txtgit commit -m "提交修改的 b.txt 文件"
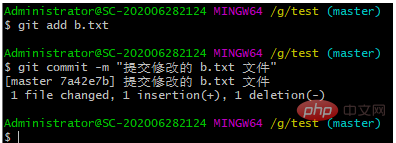
git log
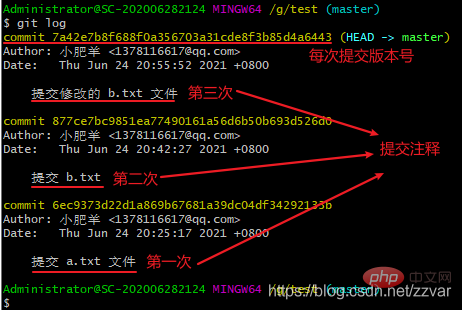
注意:使用上面命令信息多的话会进入 log 模式,想要退出,在英文输入法的前提下按 q 就可以退出了
git log --pretty=oneline

git log -1

git log
#查看全部历史提交记录git log --pretty=oneline	#精简显示所有历史提交记录git reflog
#可以查看所有分支的所有操作记录(包括已经被删除的 commit 记录和 reset 的操作)git log -p
#查看全部提交历史并展示每次修改的内容git log -2
#查看最近2次提交历史(注意:后面的数字是可以自定义的,也就是说,这种写法是 git log -n 的体现)git log -p -2
#查看最近2次提交历史并展示修改的内容git log --stat
#查看提交历史,并展示摘要内容(摘要会列出修改的文件以及每个文件中修改了多少行)
Git必须知道当前版本是哪个版本,在Git中,用HEAD表示当前版本,上一个版本就是HEAD^,上上一个版本就是HEAD^^,当然往上100个版本写100个^比较容易数不过来,所以写成HEAD~100。git reset --hard HEAD^

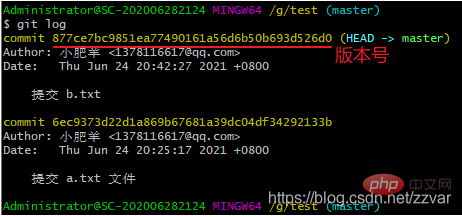
git reset --hard
git reset --hard 6ec9373d22d1a869b67681a39dc04df34292133b
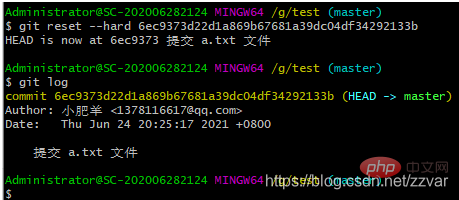
结果:从查看的历史版本结果可以看出我们回退到了 “提交 a.txt” 版本
git reflog
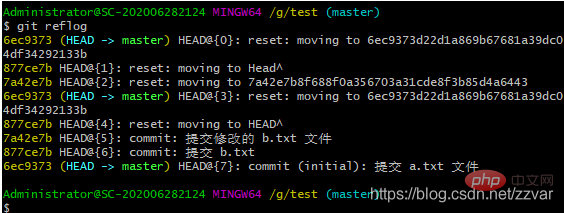
结果:reflog 可以查看所有分支的所有操作记录(包括已经被删除的 commit 记录和 reset 的操作)
git reset --hard 7a42e7b
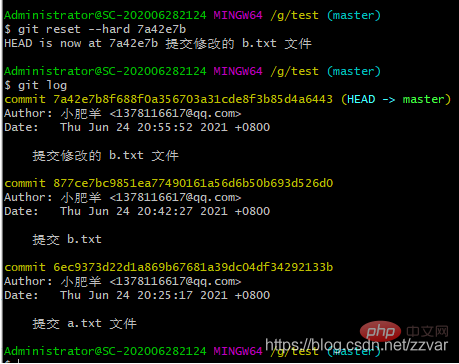
结果:历史版本信息可以看出我们已经回退到了我们想要的版本
例如:我们把 b.txt 文件内容修改为为 bbbaaa,然后用下面代码查看,可以看出我们修改了什么
git diff
# 查看不同版本之间的文件差异
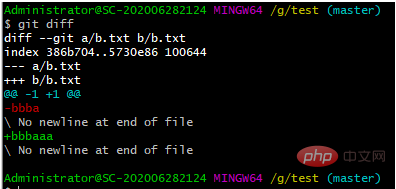
推荐使用:第一次修改 -> git add -> 第二次修改 -> git add -> git commit
注意:建议每次 commit 之前先检查是否有文件没有被 add
git checkout -- filename
git checkout -- filename可以丢弃工作区的修改:– 后面是一个空格
命令 git checkout -- readme.txt 意思就是,把 readme.txt 文件在工作区的修改全部撤销,这里有两种情况:
一:readme.txt 自修改后还没有被放到暂存区(git add),现在,撤销修改就回到和版本库一模一样的状态;
二:readme.txt 已经添加到暂存区后,又作了修改,现在,撤销修改就回到添加到暂存区后的状态。
总之,就是让这个文件回到最近一次 git commit 或 git add 时的状态。
注意:git checkout -- file 命令中的 -- 很重要,没有 -- ,就变成了**“切换到另一个分支”**的命令,我们在后面的分支管理中会再次遇到 git checkout 命令
通常直接在文件管理器中把没用的文件删了,或者用rm命令删除,例如:删除 b.txt
git rm b.txt
删除步骤
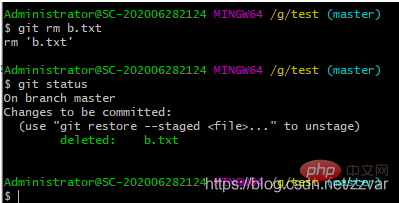
git rm b.txt --cached
b.txt 处于未跟踪状态,也就是从暂存区删除。
特别说明:处于未跟踪状态只是没有存在于暂存区,历史提交记录中的记录依然存在。
所谓的暂存区仅仅是.git目录下的一个index文件罢了,这也是为了什么被称为index(索引),当删除暂存区内容的时候,其实就是删除index文件中的内容,.git/objects目录中的内容不会被删除。
rm .git/index
git branch
#查看分支 git branch <name>
#创建分支git checkout <name>
#切换分支git checkout -b <name>
#创建 + 切换分支git merge <name>
#将某分支合并到当前分支git branch -d <name>
#删除分支</name></name></name></name></name>
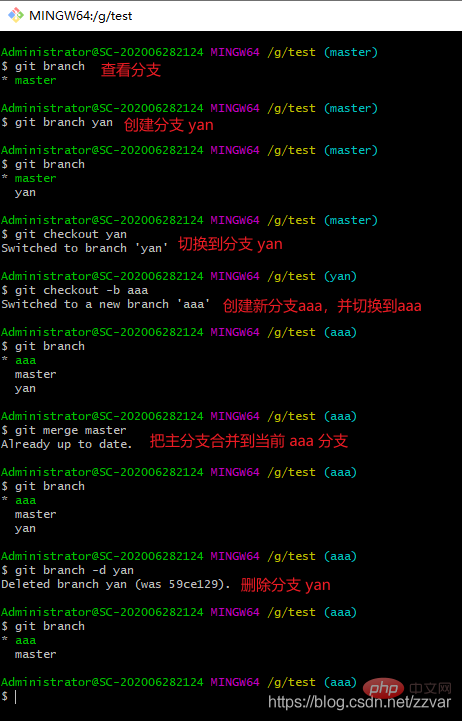
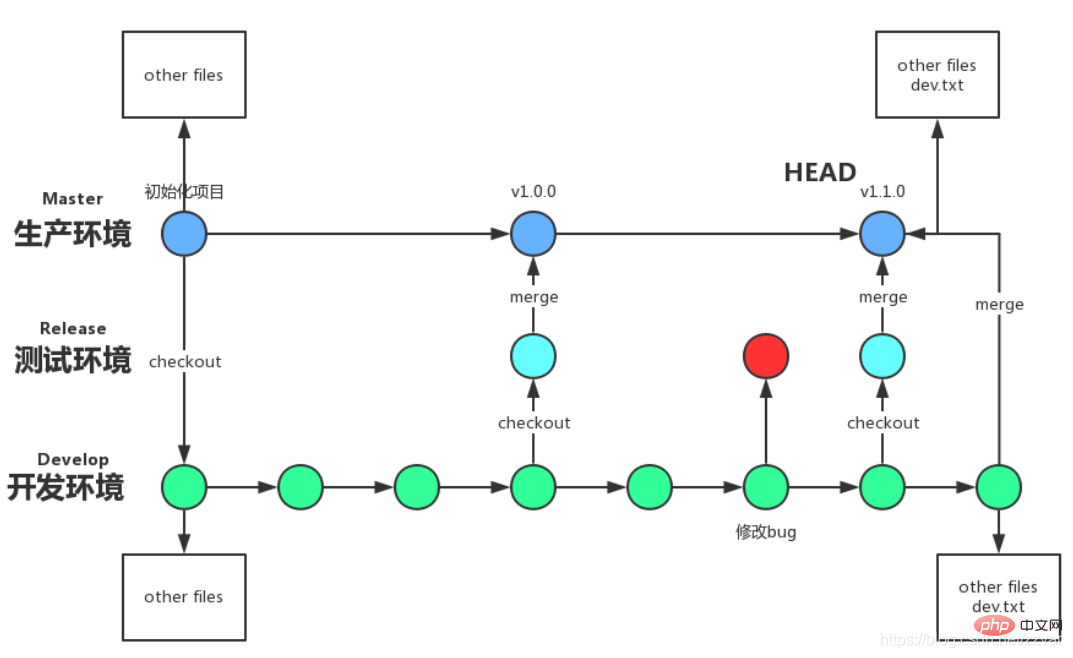
| 命令 | 作用 |
|---|---|
| git config --global user.name “Your Name” | 设置用户名 |
| git config --global user.email “email@example.com” | 设置邮箱 |
| 命令 | 作用 |
|---|---|
| git init | 初始化 git,创建 .git 文件 |
| 命令 | 作用 |
|---|---|
| cd | 进入某个目录 |
| mkdir | 创建一个文件 |
| pwd | 显示当前的目录路径 |
| 鼠标选中就是复制 | 复制 |
| 直接鼠标右键粘贴 / 快捷键:Shift+INS | 粘贴 |
| 命令 | 作用 |
|---|---|
| git add a.txt | 添加 a.txt 到暂存区 |
| git add . | 添加当前根目录下的所有文件到暂存区 |
| git commit -m “双引号里面是注释——你的提交说明” | 把暂存区的文件提交到版本库(一次全部提交) |
| 命令 | 作用 |
|---|---|
| git status | 查看文件状态(检查是否有未提交文件) |
| Command | Function |
|---|---|
| git log | View all historical commit records |
| git log --pretty=oneline | Streamlined Display all historical commit records |
| git reflog | You can view all operation records of all branches (including deleted commit records and reset Operation) |
| git log -p | View all submission history and display the contents of each modification |
| git log -2 | View the last 2 submission history (note: the following numbers can be customized, that is to say, this writing method is the embodiment of git log -n) |
| git log -p -2 | View the history of the last 2 commits and display the modified content |
| git log --stat | View the submission history and display the summary content (the summary will list the modified files and how many lines were modified in each file) |
| command | effect |
|---|---|
| ##git reset -- hard HEAD^ | Return to the previous version|
| git reset --hard HEAD~N (not -, it is a wavy line) | Roll back to the previous N versions|
| Roll back to the specified version | |
| Restore the rolled back version |
| View file differences between different versions |
| One: readme.txt has not been placed in the staging area since the modification ( | git add), now, undo the modification and return to the same state as the repository; 2: readme.txt has been added to the temporary storage area, and then modified, now, undo Modifications will return to the state after adding them to the staging area. | 10. Delete
| rm delete filerm will be automatically added to the temporary storage area after deletion, omitting the manual add commandFinally commit, the file is deleted |
##git rm b.txt --cached |
| rm .git/index | |
| 11. Branch management |
| git branch | |
| git checkout | |
| git checkout -b | |
| ##git merge | |
| git branch -d | |
| Recommended learning: " | Git Learning Tutorial | 》
The above is the detailed content of Detailed case explanation of common Git operation commands. For more information, please follow other related articles on the PHP Chinese website!
 Build your own git server
 The difference between git and svn
 git undo submitted commit
 How to undo git commit error
 How to compare the file contents of two versions in git
 Official download and installation of Euro-Italian Exchange app
 How to check port status with netstat
 Why Windows cannot access the specified device path or file