vue2How to elegantly encapsulate the echarts map in the project? The following article will introduce to you the more elegant way to encapsulate the echarts map in the vue2 project. I hope it will be helpful to you!

I have written beforeA more elegant way to encapsulate echarts in the vue project. In large-screen visualization, in addition to data charts, which are commonly used, province and city maps are displayed. Regions are also very commonly used. This is a companion article. [Related recommendations: vuejs video tutorial]
When selecting an area on a regional map, a pop-up window is required to display data. There are various styles, various arrangements of data, graphic and text mashups, Video... In addition to encapsulating the echarts regional map module, this article also introduces the implementation of custom pop-up windows and the way of dynamically loading interface data in custom pop-up windows.
vue2, vue cli3, echarts 5
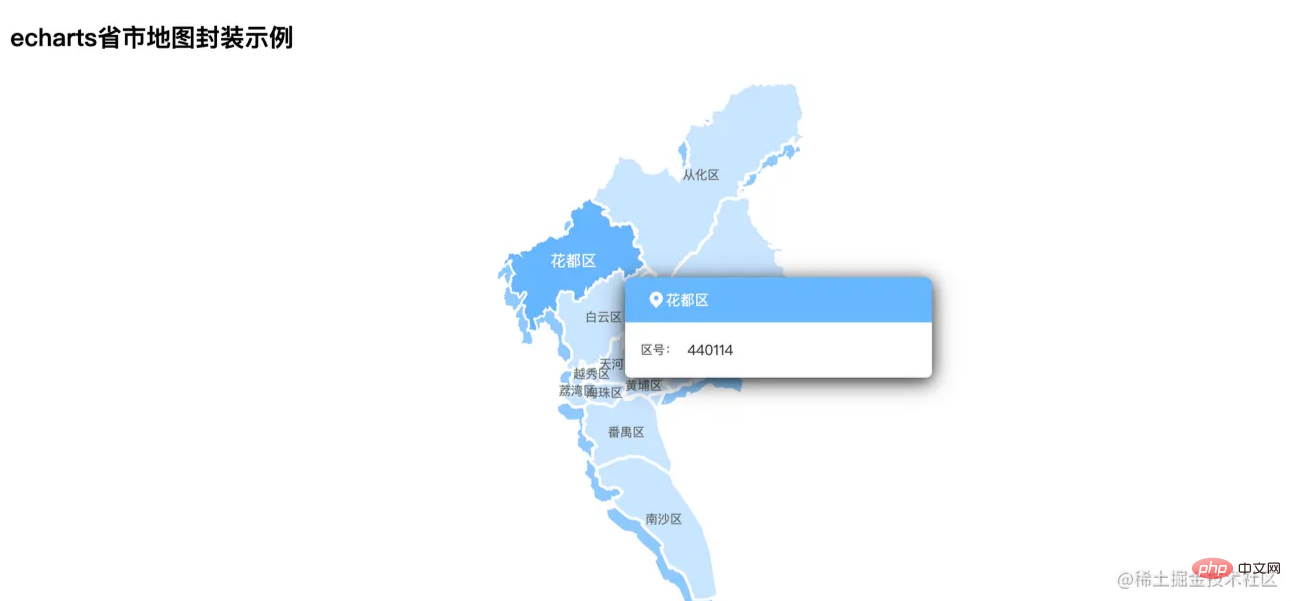
Let’s take a rendering first and explain the implementation. Effect.

5. Differences introduced between versions below x and versions above 5.x
5.x The following versionsimport echarts from 'echarts'
5.x Above version import * as echarts from 'echarts'
vue.config.jsruntimeCompiler: true
|-- public
	|-- data
		|-- 4401.json
		|-- mapdata.json
	|-- images
		|-- map-ic.png
4401.json is the geojson data of the Guangzhou area, used to display the regional map of Guangzhou to echartsmapdata.json is the fake data requested by the simulated interface. You can customize it at will. After obtaining the data, you can handle it according to the situation and pass it to the encapsulated echarts map module. The simulated interface request here is Knowledge can be found here: https://juejin.cn/post/6995147964427534373/map-ic.pngPictures used in the map custom pop-up window|-- src
|-- components
|-- chart
|-- options // 存放各种图表的option
|-- map // 地图option
|-- index.jsThe specific code is as follows:
import * as echarts from 'echarts'

const getSimpleMap = (jsonMap, data, config) => {
  if (!echarts.getMap(jsonMap.mark)) {
    echarts.registerMap(jsonMap.mark, jsonMap.json)
  }
  const defaultConfig = {
    tooltip: {
      // 窗口外框
      trigger: 'item',
      padding: 0,
      borderWidth: 0,
      borderColor: '#FFFFFF',
      backgroundColor: '#FFFFFF',
      formatter: (params) => {
        const { data } = params
        const str = `

                        ${data.name}


                                区号:
                                ${data.hoverObj == null ? '' : data.hoverObj.adcode}


                `
        return str
      }
    },
    geo: {
      map: jsonMap.mark,
      type: 'map',
      layoutCenter: ['50%', '50%'],
      layoutSize: '150%',
      zoom: 0.65,
      roam: false,
      itemStyle: {
        normal: {
          areaColor: 'rgba(201, 229, 255, 1)',
          shadowColor: 'rgba(142, 201, 255, 1)',
          shadowOffsetX: -5,
          shadowOffsetY: 12
        }
      }
    },
    series: [
      {
        type: 'map',
        map: jsonMap.mark, // 自定义扩展图表类型
        zoom: 0.65, // 缩放
        animationDuration: 1200,
        itemStyle: {
          // 地图样式
          normal: {
            borderColor: '#FFFFFF',
            borderWidth: 3,
            areaColor: 'rgba(201, 229, 255, 1)'
          }
        },
        label: {
          show: true,
          color: '#666666',
          fontSize: 12,
          fontWeight: 400
        },
        emphasis: {
          // 鼠标移入动态的时候显示的默认样式
          label: {
            show: true,
            color: '#FFFFFF',
            fontSize: 15,
            fontWeight: 600
          },
          itemStyle: {
            areaColor: 'rgba(102, 182, 255, 1)',
            borderColor: '#FFFFFF',
            borderWidth: 2
          }
        },
        layoutCenter: ['50%', '50%'],
        layoutSize: '150%',
        data: data
      }
    ]
  }
  const opt = Object.assign({}, defaultConfig, config)
  const { legend, tooltip, series, geo, grid } = opt
  const chartOpt = {
    grid,
    legend,
    tooltip,
    geo,
    series
  }
  return chartOpt
}

export default {
  getSimpleMap
}
${data.name}
区号:
${data.hoverObj == null ? '' : data.hoverObj.adcode}
`
return str
}
},
geo: {
map: jsonMap.mark,
type: 'map',
layoutCenter: ['50%', '50%'],
layoutSize: '150%',
zoom: 0.65,
roam: false,
itemStyle: {
normal: {
areaColor: 'rgba(201, 229, 255, 1)',
shadowColor: 'rgba(142, 201, 255, 1)',
shadowOffsetX: -5,
shadowOffsetY: 12
}
}
},
series: [
{
type: 'map',
map: jsonMap.mark, // 自定义扩展图表类型
zoom: 0.65, // 缩放
animationDuration: 1200,
itemStyle: {
// 地图样式
normal: {
borderColor: '#FFFFFF',
borderWidth: 3,
areaColor: 'rgba(201, 229, 255, 1)'
}
},
label: {
show: true,
color: '#666666',
fontSize: 12,
fontWeight: 400
},
emphasis: {
// 鼠标移入动态的时候显示的默认样式
label: {
show: true,
color: '#FFFFFF',
fontSize: 15,
fontWeight: 600
},
itemStyle: {
areaColor: 'rgba(102, 182, 255, 1)',
borderColor: '#FFFFFF',
borderWidth: 2
}
},
layoutCenter: ['50%', '50%'],
layoutSize: '150%',
data: data
}
]
}
const opt = Object.assign({}, defaultConfig, config)
const { legend, tooltip, series, geo, grid } = opt
const chartOpt = {
grid,
legend,
tooltip,
geo,
series
}
return chartOpt
}
export default {
getSimpleMap
}The custom pop-up window is mainly implemented in formatter of tooltip , customize the html pop-up window, and display the data to be displayed in params to the corresponding place and it is OK.
I personally like to implement the designed pop-up window style directly in pure html, and then copy it directly into formatter. Every time you encounter a different design, just modify the html in formatter and match the data to be displayed. It can be further encapsulated here. If you are interested, you can try it.
<chart-view
      class="map-view"
      :chart-option="mapOpt"
      height="100%"
@click="handleMapClick" /> :chart-option="mapOpt"This is passed to the encapsulated echarts map module Parameter, the interface data needs to be processed, see the next section for details @click="handleMapClick"Here is the data of the corresponding area when the map is clicked, used for the next step Operations, such as map drill-downinitMap(url) {
mapRequest(url).then((res) => {
const mapData = res.data
const jsonMap = { mark: this.mapName, json: mapData }
const data = mapData.features.map((item) => {
const { name, adcode } = item.properties
let hoverObj = {}
const objIndex = findElem(this.mapPopData, 'adcode', adcode)
if (objIndex !== -1) {
hoverObj = this.mapPopData[objIndex]
} else {
hoverObj = null
}
return {
name,
hoverObj: hoverObj
}
})
this.mapOpt = this.$eChartFn.getSimpleMap(jsonMap, data)
}).catch((err) => {
console.log(err, '加载地图失败')
})
}Here, the mapgeojson data and the interface return data are matched, and the pop-up data is corresponding Regional data effects.
MapgeojsonThe data must have the adcode field, so the interface data mapPopData is best to add this field for matching.
hoverObj in the above code is the matched data of each area, and finally forms an array data. Pass parameters to the encapsulated echarts module through the following code
this.mapOpt = this.$eChartFn.getSimpleMap(jsonMap, data)
For specific code, please refer to the index.js file in the echartMapTest folder
The files involved are as follows (specific Reference Code):
|-- public
	|-- data
		|-- 4401.json
		|-- mapdata.json
	|-- images
		|-- map-ic.png
|-- src
	|-- api
		|-- map.js    // 获取地图geojson数据、地图弹窗接口模拟数据
    |-- components
        |-- chart
            |-- index.vue    // 图表单文件组件,供界面调用
            |-- index.js    // 实现自动化导入options里的图表option
            |-- options    // 存放各种图表的option
                |-- map    // 地图option
                    |-- index.js
    |-- views
        |-- echartMapTest    // 实例所在
            |-- index.vue
            |-- index.scss
            |-- index.js
	|-- utils
		|---utils.js
|-- main.js // 全局引入echarts图表按代码总览的目录去代码里找着看就行了。
https://github.com/liyoro/vue-skill
以上,就是对echarts地图模块的封装,还有自定义弹窗的实现。使用和复用都比较方便了。
最近才发现 www.makeapie.com 停服了,挺好用的东西来的,感谢这么多年的奉献。
有需求的可转移到 PPChart,算是一个替代品了
The above is the detailed content of Detailed explanation of the method of elegantly encapsulating echarts map in vue2 project. For more information, please follow other related articles on the PHP Chinese website!
 The difference between vue2.0 and 3.0
 Open home folder on mac
 srt file
 ibatis
 How to cut long pictures on Huawei mobile phones
 The difference between lightweight application servers and cloud servers
 What are the main technologies of firewalls?
 What should I do if msconfig cannot be opened?
 What are the java flow control statements?