

Summarize and organize branch operations of git version management

This article brings you relevant knowledge about Git, which mainly introduces issues related to creating, deleting, viewing and merging branches in version management. I hope it will be helpful to everyone.
Recommended study: "Git Learning Tutorial"
1 Basic Concept of Branch
Single branch:
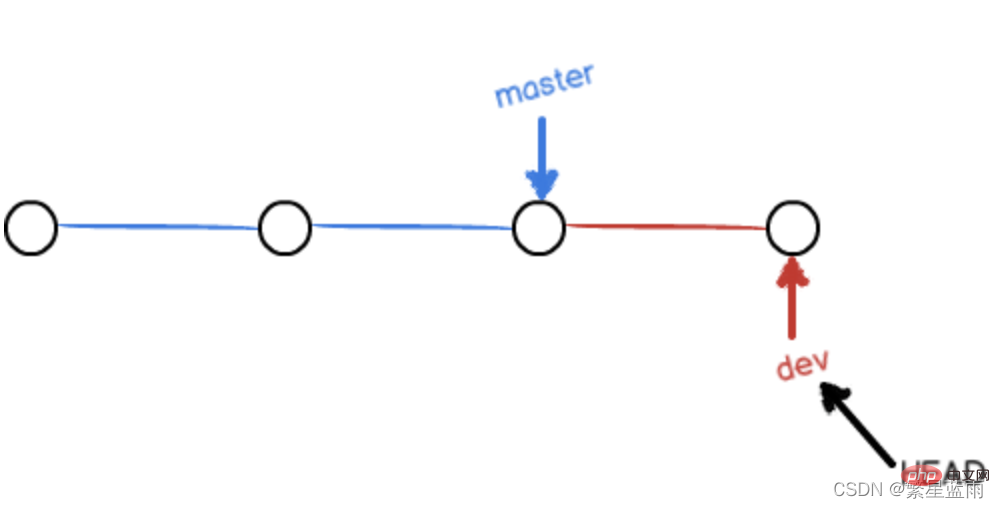
At the beginning, the master branch is a line. Git uses master to point to the latest submission, and then uses HEAD to point to master, you can determine the current branch and the submission point of the current branch:
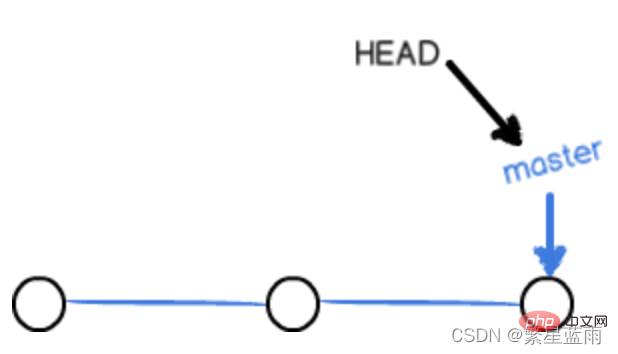
Every time you submit, the master branch will move forward one step, so that as you continue to submit , the line of the master branch is getting longer and longer.
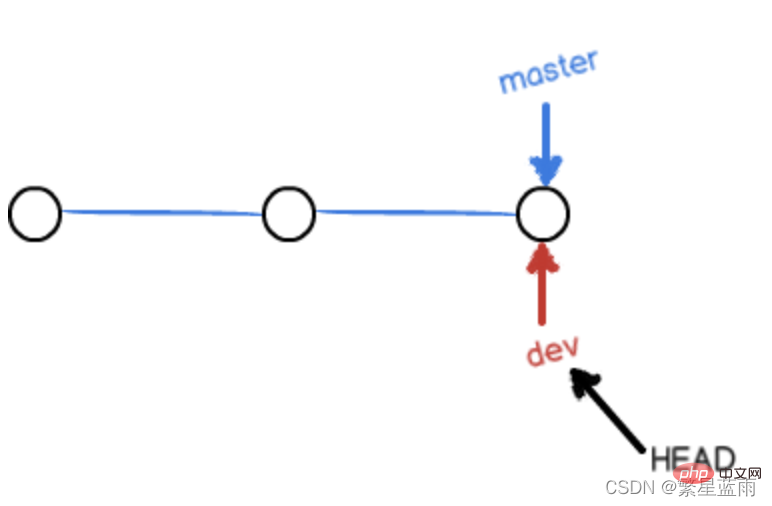
Multiple branches:
When we create a new branch, such as dev, Git creates a new pointer called dev, pointing to The same commit as master, and then point HEAD to dev, it means that the current branch is on dev
You see, Git creates A branch is very fast, because except for adding a dev pointer and changing the HEAD pointer, there are no changes to the files in the workspace!
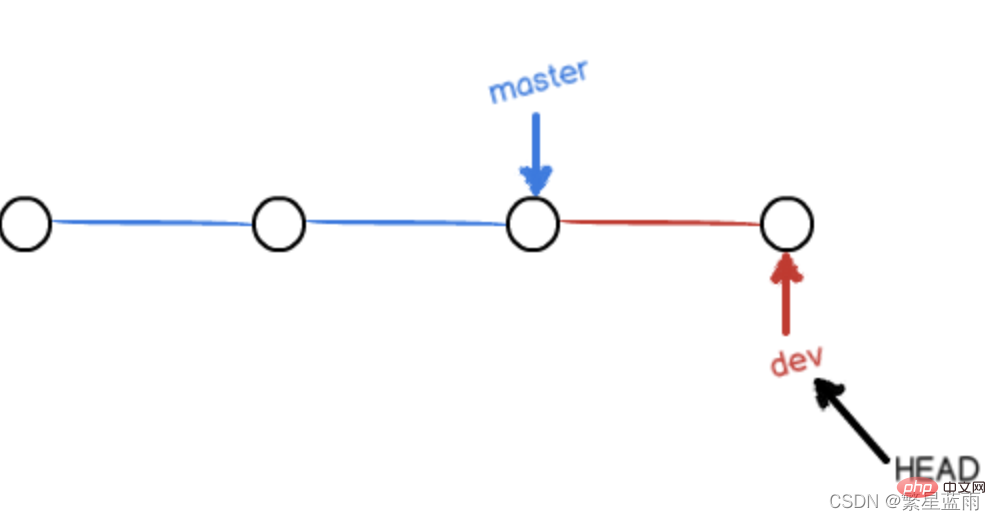
However, from now on, modifications and submissions to the workspace will be for the dev branch. For example, after a new submission, dev The pointer moves forward one step, while the master pointer remains unchanged:
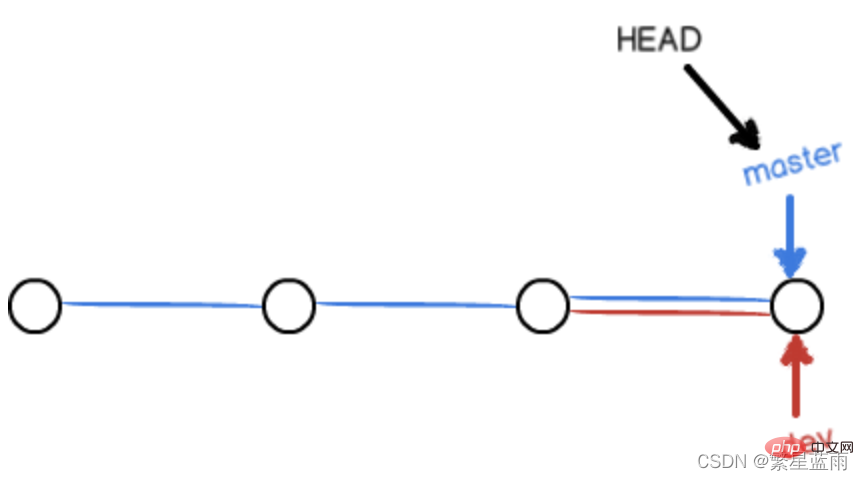
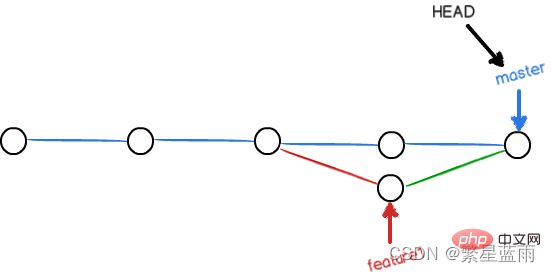
Multi-branch merge:
Point master to the current commit of dev , the merge is completed, and Git merges branches very quickly! Just change the pointer and the contents of the workspace will remain unchanged!
After merging branches, you can even delete the dev branch. Deleting the dev branch means deleting the dev pointer. After deletion, we are left with a master branch:
2 Branch Management
2.1 Create Branch
- uses
git checkout:
$ git checkout -b dev
Switched to a new branch 'dev'
git checkout command plus the -b parameter to create and switch, which is equivalent to the following two commands:
$ git branch dev
$ git checkout dev
Switched to branch 'dev'
- Use
git switch:
to create and switch to a new dev branch, you can use:
$ git switch -c dev
Note:
git switchandgit checkoutare used exactly the same for branch operations. Then you can usegit branchandgit switchas much as possible for branch operations.
Becausegit checkoutIn addition to operating branches, it can also operate files (can rewrite the workspace).
2.2 View branch
$ git branch
* dev
  master
2.3 Merge branch
git mergeCommand: used to merge the specified branch to the current branch.
# 切换回当前的分支:$ git checkout master
Switched to branch 'master'# 合并到指定分支:$ git merge dev
Updating 599dbdb..4aac6c7
Fast-forward
 readme.txt | 1 + 1 file changed, 1 insertion(+)
The Fast forward mode ("fast forward mode") is used above, but in this mode, after deleting the branch, the branch information will be lost.
If you want to forcefully disable Fast forward mode, Git will generate a new commit during merge, so that branch information can be seen from the branch history.
$ git merge --no-ff -m "merge with no-ff" dev
Merge made by the 'recursive' strategy.
 readme.txt | 1 + 1 file changed, 1 insertion(+)
The merged result is as follows: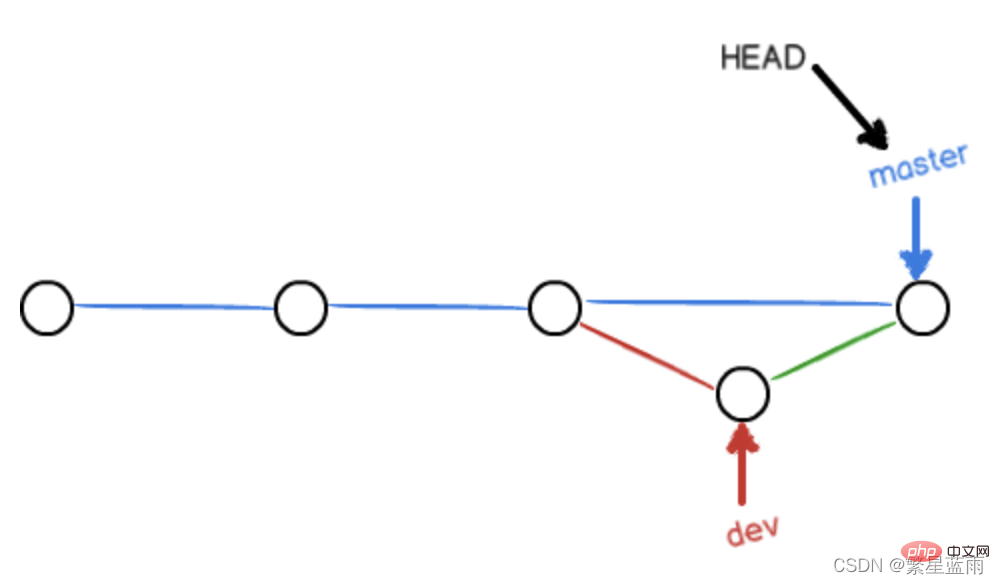
2.4 Delete branch
$ git branch -d dev
Deleted branch dev (was 4aac6c7).
3 Resolve merge conflicts
Conflict situations occur As shown in the figure below, Git cannot perform "quick merge" and must manually resolve conflicts before committing. 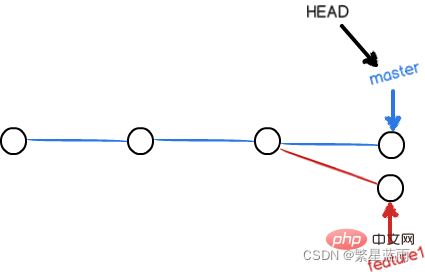
Result after merge conflict:
3.1 Solve it on the git official website
ClickMerge request, select the branch content we need, and then select merge. 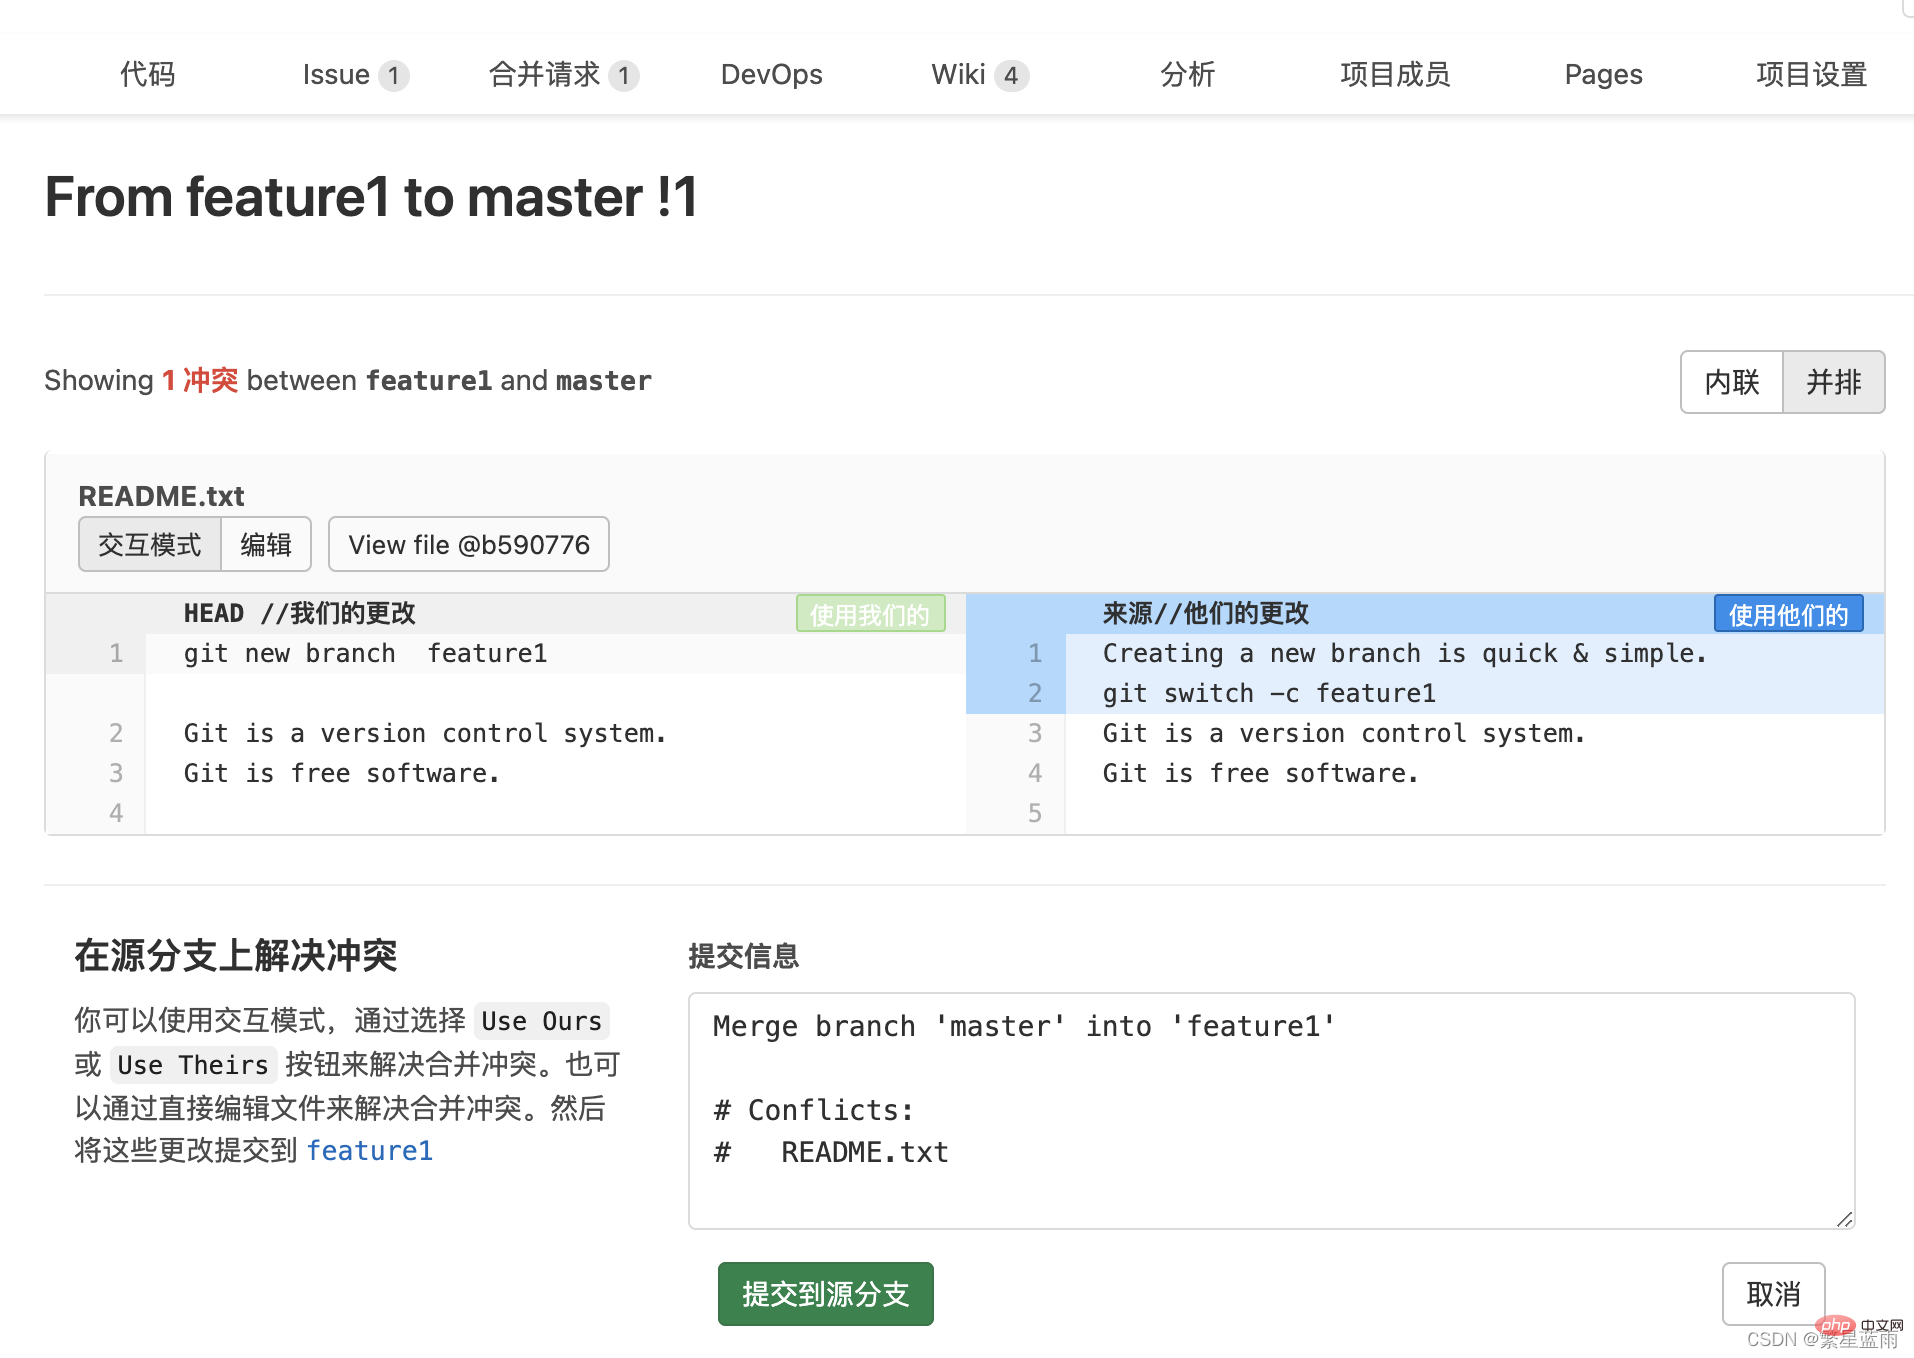
3.2 Local solution
- Step 1. Pull and check the branch used for merging
git fetch origingit checkout -b "feature1" "origin/feature1"
- Steps 2. View and make changes locally
Git using>> ;>>>> Mark the content of different branches, such as the following:
Git is a distributed version control system.
Git is free software distributed under the GPL.
Git has a mutable index called stage.
Git tracks changes of files.>>>>>> feature1
- 步骤三. 合并分支并解决冲突
git fetch origingit checkout "master"git merge --no-ff "feature1"
- 步骤四. 推送代码并合并
git push origin "master"
其他方法为:
- 法1:
保留本地最新修改,并拉取仓库中 的代码到本地
git stash
git pull origin master
git stash pop
- 法2:
放弃本地代码,新修改的都不要了,退回上一版本,再拉取代码到本地
git reset --hard
git pull origin master

# 或git fetch --allgit reset --hard origin/master
git pull
4 分支转移
git cherry-pick命令的作用,就是将指定的提交commit应用于其他分支。
$ git cherry-pick \<commithash></commithash>
上面命令就会将指定的提交commitHash,应用于当前分支。这会在当前分支产生一个新的提交,当然它们的哈希值会不一样。
举例来说,代码仓库有master和feature两个分支。
 a - b - c - d Master \\
 e - f - g Feature
现在将提交f应用到master分支。
\# 切换到 master 分支
$ git checkout master\# Cherry pick 操作
$ git cherry-pick f
上面的操作完成以后,代码库就变成了下面的样子。
 a - b - c - d - f Master \\
 e - f - g Feature
从上面可以看到,master分支的末尾增加了一个提交f。
git cherry-pick命令的参数,不一定是提交的哈希值,分支名也是可以的,表示转移该分支的最新提交。
$ git cherry-pick feature
上面代码表示将feature分支的最近一次提交,转移到当前分支。
Cherry pick 支持一次转移多个提交。
$ git cherry-pick \<hasha> \<hashb></hashb></hasha>
上面的命令将 A 和 B 两个提交应用到当前分支。这会在当前分支生成两个对应的新提交。
如果想要转移一系列的连续提交,可以使用下面的简便语法。
$ git cherry-pick A..B
上面的命令可以转移从 A 到 B 的所有提交。它们必须按照正确的顺序放置:提交 A 必须早于提交 B,否则命令将失败,但不会报错。
注意,使用上面的命令,提交 A 将不会包含在 Cherry pick 中。如果要包含提交 A,可以使用下面的语法。
$ git cherry-pick A^..B
`git cherry-pick`命令的常用配置项如下。

#### -e,--edit

打开外部编辑器,编辑提交信息。

#### -n,--no-commit

只更新工作区和暂存区,不产生新的提交。

#### -x

在提交信息的末尾追加一行`cherry picked from commit ...`,方便以后查到这个提交是如何产生的。

#### -s,--signoff

在提交信息的末尾追加一行操作者的签名,表示是谁进行了这个操作。

#### -m parent-number,--mainline parent-number

如果原始提交是一个合并节点,来自于两个分支的合并,那么 `Cherry pick` 默认将失败,因为它不知道应该采用哪个分支的代码变动。

`-m`配置项告诉 Git,应该采用哪个分支的变动。它的参数`parent-number`是一个从1开始的整数,代表原始提交的父分支编号。

```bash
$ git cherry-pick -m 1 \<commithash></commithash>
上面命令表示,Cherry pick 采用提交commitHash来自编号1的父分支的变动。
一般来说,1号父分支是接受变动的分支,2号父分支是作为变动来源的分支。
如果操作过程中发生代码冲突,Cherry pick会停下来,让用户决定如何继续操作。
(1)–continue
用户解决代码冲突后,第一步将修改的文件重新加入暂存区(git add .),第二步使用下面的命令,让 Cherry pick 过程继续执行。
$ git cherry-pick --continue
(2)–abort
发生代码冲突后,放弃合并,回到操作前的样子。
(3)–quit
发生代码冲突后,退出 Cherry pick,但是不回到操作前的样子。
Cherry pick 也支持转移另一个代码库的提交,方法是先将该库加为远程仓库。
转移另一个代码库的提交
$ git remote add target git://gitUrl
上面命令添加了一个远程仓库target。
然后,将远程代码抓取到本地。
$ git fetch target
上面命令将远程代码仓库抓取到本地。
接着,检查一下要从远程仓库转移的提交,获取它的哈希值。
$ git log target/master
最后,使用git cherry-pick命令转移提交。
$ git cherry-pick \<commithash></commithash>
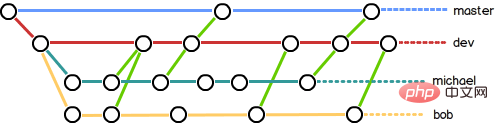
5 常用的分支
在实际开发中,我们应该按照几个基本原则进行分支管理:
首先,master分支应该是非常稳定的,也就是仅用来发布新版本,平时不能在上面干活;
其次,干活都在dev分支上,也就是说,dev分支是不稳定的,到某个时候,比如1.0版本发布时,再把dev分支合并到master上,并在master分支发布1.0版本;
小伙伴们每个人都在dev分支上干活,每个人都有自己的分支,时不时地往dev分支上合并就可以了。
5.1 bug分支
在开发过程中,bug 就像家常便饭一样。有了 bug 就需要修复,在 Git 中,由于分支是如此的强大,所以,每个 bug 都可以通过一个新的临时分支来修复,修复后,合并分支,然后将临时分支删除。
当你接到一个修复一个代号101的 bug 的任务时,很自然地,你想创建一个分支 issue-101 来修复它,但是,等等,当前正在dev上进行的工作还没有提交:
$ git status
On branch dev
Changes to be committed: (use "git reset HEAD \<file>..." to unstage)

 new file: hello.py

Changes not staged for commit: (use "git add \<file>..." to update what will be committed)
 (use "git checkout -- \<file>..." to discard changes in working directory)

 modified: readme.txt</file></file></file>
并不是你不想提交,而是工作只进行到一半,还没法提交,预计完成还需1天时间。但是,必须在两个小时内修复该 bug,怎么办?
幸好,Git还提供了一个stash功能,可以把当前工作现场“储藏”起来,等以后恢复现场后继续工作:
$ git stash
Saved working directory and index state WIP on dev: f52c633 add merge
现在,用git status查看工作区,就是干净的(除非有没有被Git管理的文件),因此可以放心地创建分支来修复 bug。
首先确定要在哪个分支上修复 bug,假定需要在master分支上修复,就从master创建临时分支:
$ git checkout master
Switched to branch 'master'Your branch is ahead of 'origin/master' by 6 commits. (use "git push" to publish your local commits)$ git checkout -b issue-101
Switched to a new branch 'issue-101'
现在修复bug,需要把“Git is free software …”改为“Git is a free software …”,然后提交:
$ git add readme.txt
$ git commit -m "fix bug 101"[issue-101 8842ff5] fix bug 101
 1 file changed, 1 insertion(+), 1 deletion(-)
修复完成后,切换到master分支,并完成合并,最后删除issue-101分支:
$ git switch master
Switched to branch 'master'Your branch is ahead of 'origin/master' by 6 commits. (use "git push" to publish your local commits)$ git merge --no-ff -m "merged bug fix 101" issue-101
Merge made by the 'recursive' strategy.
 readme.txt | 2 +- 1 file changed, 1 insertion(+), 1 deletion(-)
太棒了,原计划两个小时的 bug 修复只花了5分钟!现在,是时候接着回到dev分支干活了!
$ git switch dev
Switched to branch 'dev'$ git status
On branch dev
nothing to commit, working tree clean
工作区是干净的,刚才的工作现场存到哪去了?用git stash list命令看看:
$ git stash list
stash@{0}: WIP on dev: f52c633 add merge工作现场还在,Git 把stash内容存在某个地方了,但是需要恢复一下,有两个办法:
一是用git stash apply恢复,但是恢复后,stash内容并不删除,你需要用git stash drop来删除;
另一种方式是用git stash pop,恢复的同时把stash内容也删了:
$ git stash pop
On branch dev
Changes to be committed: (use "git reset HEAD \<file>..." to unstage)

 new file: hello.py

Changes not staged for commit: (use "git add \<file>..." to update what will be committed)
 (use "git checkout -- \<file>..." to discard changes in working directory)

 modified: readme.txt

Dropped refs/stash@{0} (5d677e2ee266f39ea296182fb2354265b91b3b2a)</file></file></file>再用git stash list查看,就看不到任何stash内容了:
$ git stash list
你可以多次stash,恢复的时候,先用git stash list查看,然后恢复指定的stash,用命令:
$ git stash apply stash@{0}在master分支上修复了bug后,我们要想一想,dev分支是早期从master分支分出来的,所以,这个bug其实在当前dev分支上也存在。
那怎么在dev分支上修复同样的bug?重复操作一次,提交不就行了?在 Git 中还有比这更简单的方法可以实现。
同样的 bug,要在dev上修复,我们只需要把8842ff5 fix bug 101这个提交所做的修改“复制”到dev分支。注意:我们只想复制8842ff5 fix bug 101这个提交所做的修改,并不是把整个master分支merge过来。
为了方便操作,Git 专门提供了一个cherry-pick命令,让我们能复制一个特定的提交到当前分支:
$ git branch\* dev
 master
$ git cherry-pick 8842ff5[dev 0944c8c] fix bug 101
 1 file changed, 1 insertion(+), 1 deletion(-)
Git 自动给dev分支做了一次提交,注意这次提交的commit是0944c8c,它并不同于master的8842ff5,因为这两个commit只是改动相同,但确实是两个不同的commit。用git cherry-pick,我们就不需要在dev分支上手动再把修 bug 的过程重复一遍。
有些聪明的童鞋会想了,既然可以在master分支上修复bug后,在dev分支上可以“重放”这个修复过程,那么直接在dev分支上修复 bug,然后在master分支上“重放”行不行?当然可以,不过你仍然需要git stash命令保存现场,才能从dev分支切换到master分支。
5.2 feature分支
在开发过程中,除了 bug 外,也还会有无穷无尽的新的功能要不断添加进来。
添加一个新功能时,你肯定不希望因为一些实验性质的代码,把主分支搞乱了,所以,每添加一个新功能,最好新建一个feature分支,在上面开发,完成后,合并,最后,删除该feature分支。
现在,你终于接到了一个新任务:开发代号为Vulcan的新功能,该功能计划用于下一代星际飞船。
于是准备开发:
$ git switch -c feature-vulcan
Switched to a new branch 'feature-vulcan'
5分钟后,开发完毕:
$ git add vulcan.md

$ git status
On branch feature-vulcan
Changes to be committed: (use "git reset HEAD \<file>..." to unstage)

 new file: vulcan.md

$ git commit -m "add feature vulcan"[feature-vulcan d12cf23] add feature vulcan 1 file changed, 3 insertions(+)
 create mode 100644 vulcan.md</file>
切回dev,准备合并:
$ git switch dev
一切顺利的话,feature分支和bug分支是类似的,合并,然后删除。
但是!就在此时,接到上级命令,因经费不足,新功能必须取消!虽然白干了,但是这个包含机密资料的分支还是必须就地销毁:
$ git branch -d feature-vulcan
error: The branch 'feature-vulcan' is not fully merged.
If you are sure you want to delete it, run 'git branch -D feature-vulcan'.
销毁失败。Git 友情提醒,feature-vulcan分支还没有被合并,如果删除,将丢失掉修改,如果要强行删除,需要使用大写的-D参数。。
现在我们强行删除:
$ git branch -D feature-vulcan
Deleted branch feature-vulcan (was d12cf23).
终于删除成功!
推荐学习:《Git教程》
The above is the detailed content of Summarize and organize branch operations of git version management. For more information, please follow other related articles on the PHP Chinese website!

Hot AI Tools

Undresser.AI Undress
AI-powered app for creating realistic nude photos

AI Clothes Remover
Online AI tool for removing clothes from photos.

Undress AI Tool
Undress images for free

Clothoff.io
AI clothes remover

Video Face Swap
Swap faces in any video effortlessly with our completely free AI face swap tool!

Hot Article
Hot Tools

Notepad++7.3.1
Easy-to-use and free code editor

SublimeText3 Chinese version
Chinese version, very easy to use

Zend Studio 13.0.1
Powerful PHP integrated development environment

Dreamweaver CS6
Visual web development tools

SublimeText3 Mac version
God-level code editing software (SublimeText3)
Hot Topics
 1386
1386
 52
52

 How to delete a repository by git
Apr 17, 2025 pm 04:03 PM
How to delete a repository by git
Apr 17, 2025 pm 04:03 PM
To delete a Git repository, follow these steps: Confirm the repository you want to delete. Local deletion of repository: Use the rm -rf command to delete its folder. Remotely delete a warehouse: Navigate to the warehouse settings, find the "Delete Warehouse" option, and confirm the operation.
 How to download git projects to local
Apr 17, 2025 pm 04:36 PM
How to download git projects to local
Apr 17, 2025 pm 04:36 PM
To download projects locally via Git, follow these steps: Install Git. Navigate to the project directory. cloning the remote repository using the following command: git clone https://github.com/username/repository-name.git
 How to generate ssh keys in git
Apr 17, 2025 pm 01:36 PM
How to generate ssh keys in git
Apr 17, 2025 pm 01:36 PM
In order to securely connect to a remote Git server, an SSH key containing both public and private keys needs to be generated. The steps to generate an SSH key are as follows: Open the terminal and enter the command ssh-keygen -t rsa -b 4096. Select the key saving location. Enter a password phrase to protect the private key. Copy the public key to the remote server. Save the private key properly because it is the credentials for accessing the account.
 What to do if the git download is not active
Apr 17, 2025 pm 04:54 PM
What to do if the git download is not active
Apr 17, 2025 pm 04:54 PM
Resolve: When Git download speed is slow, you can take the following steps: Check the network connection and try to switch the connection method. Optimize Git configuration: Increase the POST buffer size (git config --global http.postBuffer 524288000), and reduce the low-speed limit (git config --global http.lowSpeedLimit 1000). Use a Git proxy (such as git-proxy or git-lfs-proxy). Try using a different Git client (such as Sourcetree or Github Desktop). Check for fire protection
 How to check the warehouse address of git
Apr 17, 2025 pm 01:54 PM
How to check the warehouse address of git
Apr 17, 2025 pm 01:54 PM
To view the Git repository address, perform the following steps: 1. Open the command line and navigate to the repository directory; 2. Run the "git remote -v" command; 3. View the repository name in the output and its corresponding address.
 How to update code in git
Apr 17, 2025 pm 04:45 PM
How to update code in git
Apr 17, 2025 pm 04:45 PM
Steps to update git code: Check out code: git clone https://github.com/username/repo.git Get the latest changes: git fetch merge changes: git merge origin/master push changes (optional): git push origin master
 How to solve the efficient search problem in PHP projects? Typesense helps you achieve it!
Apr 17, 2025 pm 08:15 PM
How to solve the efficient search problem in PHP projects? Typesense helps you achieve it!
Apr 17, 2025 pm 08:15 PM
When developing an e-commerce website, I encountered a difficult problem: How to achieve efficient search functions in large amounts of product data? Traditional database searches are inefficient and have poor user experience. After some research, I discovered the search engine Typesense and solved this problem through its official PHP client typesense/typesense-php, which greatly improved the search performance.
 How to use git commit
Apr 17, 2025 pm 03:57 PM
How to use git commit
Apr 17, 2025 pm 03:57 PM
Git Commit is a command that records file changes to a Git repository to save a snapshot of the current state of the project. How to use it is as follows: Add changes to the temporary storage area Write a concise and informative submission message to save and exit the submission message to complete the submission optionally: Add a signature for the submission Use git log to view the submission content
