Pinia is a new state management library developed by Vue, so how can novices get started with Pinia? The following article will introduce you to Pinia and introduce its core features and simple usage. I hope it will be helpful to you!

Vuex is an old Vue state management library that everyone is familiar with
Pinia is a brand new one developed specifically for Vue by members of the Vue.js team State management library, and has been included in the official github
Why do we need to develop another Pinia when there is Vuex?
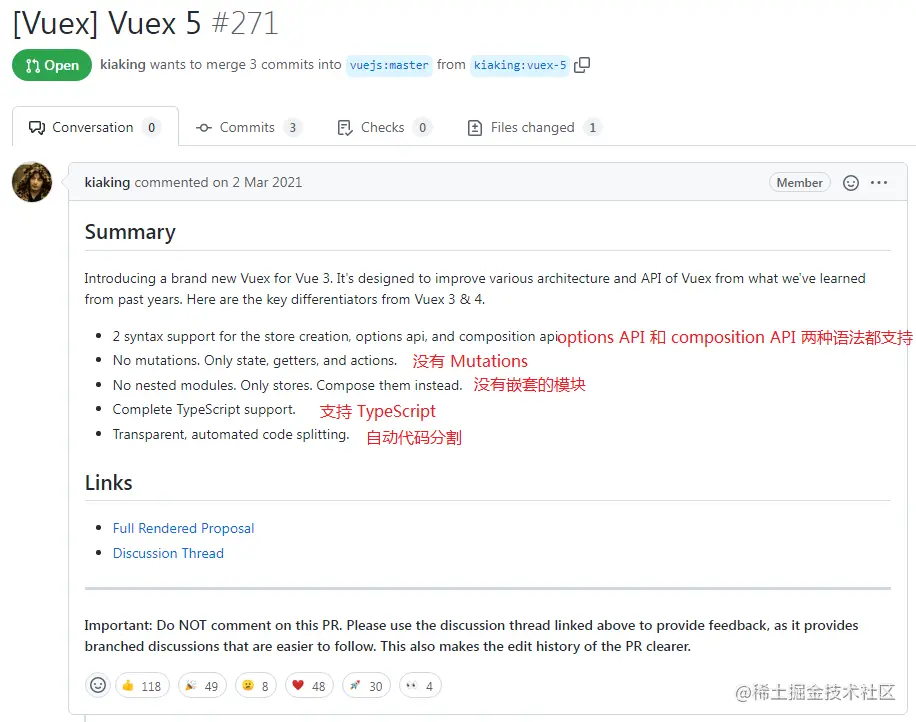
Let’s take a picture first to look at the proposal for Vuex5 at that time, which is what the next generation Vuex5 should look like. [Related recommendations: vuejs video tutorial]

Vuex: State, Gettes, Mutations(synchronization), Actions(Asynchronous)
Pinia: State、Gettes、Actions(Synchronous Asynchronous All supported)
4.x
2.x
Supports synchronous and asynchronous
Support Vue3 TypeScript as an example
npm install pinia
main.ts Initialization configuration
import { createPinia } from 'pinia'createApp(App).use(createPinia()).mount('#app')user.ts in the store directory. For example, we first define and export a name The module for user
import { defineStore } from 'pinia'
export const userStore = defineStore('user', {
    state: () => {
        return {
            count: 1,
            arr: []
        }
    },
    getters: { ... },
    actions: { ... }
})defineStore receives two parameters
The second parameter is an object, and the options inside are similar to Vuex
state 用来存储全局状态,它必须是箭头函数,为了在服务端渲染的时候避免交叉请求导致的数据状态污染所以只能是函数,而必须用箭头函数则为了更好的 TS 类型推导getters 就是用来封装计算属性,它有缓存的功能actions 就是用来封装业务逻辑,修改 state比如我们要在页面中访问 state 里的属性 count
由于 defineStore 会返回一个函数,所以要先调用拿到数据对象,然后就可以在模板中直接使用了
<template>
<div>{{ user_store.count }}</div>
</template>
<script setup>
import { userStore } from '../store'
const user_store = userStore()
// 解构
// const { count } = userStore()
</script>比如像注释中的解构出来使用,是完全没有问题的,只是注意了,这样拿到的数据不是响应式的,如果要解构还保持响应式就要用到一个方法 storeToRefs(),示例如下
<template>
<div>{{ count }}</div>
</template>
<script setup>
import { storeToRefs } from 'pinia'
import { userStore } from '../store'
const { count } = storeToRefs(userStore)
</script>原因就是 Pinia 其实是把 state 数据都做了 reactive 处理,和 Vue3 的 reactive 同理,解构出来的也不是响应式,所以需要再做 ref 响应式代理
这个和 Vuex 的 getters 一样,也有缓存功能。如下在页面中多次使用,第一次会调用 getters,数据没有改变的情况下之后会读取缓存
<template>
    <div>{{ myCount }}</div>
    <div>{{ myCount }}</div>
    <div>{{ myCount }}</div>
</template>注意两种方法的区别,写在注释里了
getters: {
    // 方法一,接收一个可选参数 state
    myCount(state){
        console.log('调用了') // 页面中使用了三次,这里只会执行一次,然后缓存起来了
        return state.count + 1
    },
    // 方法二,不传参数,使用 this
    // 但是必须指定函数返回值的类型,否则类型推导不出来
    myCount(): number{
        return this.count + 1
    }
}更新 state 里的数据有四种方法,我们先看三种简单的更新,说明都写在注释里了
<template>
<div>{{ user_store.count }}</div>
<button @click="handleClick">按钮</button>
</template>
<script setup>
import { userStore } from '../store'
const user_store = userStore()
const handleClick = () => {
// 方法一
user_store.count++
// 方法二,需要修改多个数据,建议用 $patch 批量更新,传入一个对象
user_store.$patch({
count: user_store.count1++,
// arr: user_store.arr.push(1) // 错误
arr: [ ...user_store.arr, 1 ] // 可以,但是还得把整个数组都拿出来解构,就没必要
})
// 使用 $patch 性能更优,因为多个数据更新只会更新一次视图
// 方法三,还是$patch,传入函数,第一个参数就是 state
user_store.$patch( state => {
state.count++
state.arr.push(1)
})
}
</script>第四种方法就是当逻辑比较多或者请求的时候,我们就可以封装到示例中 store/user.ts 里的 actions 里
可以传参数,也可以通过 this.xx 可以直接获取到 state 里的数据,需要注意的是不能用箭头函数定义 actions,不然就会绑定外部的 this 了
actions: {
    changeState(num: number){ // 不能用箭头函数
        this.count += num
    }
}调用
const handleClick = () => {
    user_store.changeState(1)
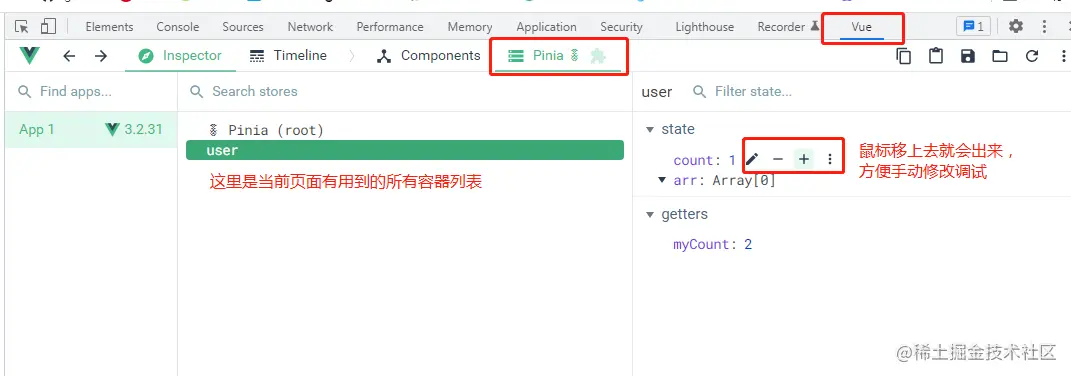
}打开开发者工具的 Vue Devtools 就会发现 Pinia,而且可以手动修改数据调试,非常方便

示例:
我们先定义示例接口 api/user.ts
// 接口数据类型
export interface userListType{
    id: number
    name: string
    age: number
}
// 模拟请求接口返回的数据
const userList = [
    { id: 1, name: '张三', age: 18 },
    { id: 2, name: '李四', age: 19 },
]
// 封装模拟异步效果的定时器
async function wait(delay: number){
    return new Promise((resolve) => setTimeout(resolve, delay))
}
// 接口
export const getUserList = async () => {
    await wait(100) // 延迟100毫秒返回
    return userList
}然后在 store/user.ts 里的 actions 封装调用接口
import { defineStore } from 'pinia'
import { getUserList, userListType } from '../api/user'
export const userStore = defineStore('user', {
    state: () => {
        return {
            // 用户列表
            list: [] as userListType // 类型转换成 userListType
        }
    },
    actions: {
        async loadUserList(){
            const list = await getUserList()
            this.list = list
        }
    }
})页面中调用 actions 发起请求
<template>
<ul>
<li v-for="item in user_store.list"> ... </li>
</ul>
</template>
<script setup>
import { userStore } from '../store'
const user_store = userStore()
user_store.loadUserList() // 加载所有数据
</script>在一个模块的 actions 里需要修改另一个模块的 state 数据
示例:比如在 chat 模块里修改 user 模块里某个用户的名称
// chat.ts
import { defineStore } from 'pinia'
import { userStore } from './user'
export const chatStore = defineStore('chat', {
    actions: {
        someMethod(userItem){
            userItem.name = '新的名字'
            const user_store = userStore()
            user_store.updateUserName(userItem)
        }
    }
})user 模块里
// user.ts
import { defineStore } from 'pinia'
export const userStore = defineStore('user', {
    state: () => {
        return {
            list: []
        }
    },
    actions: {
        updateUserName(userItem){
            const user = this.list.find(item => item.id === userItem.id)
            if(user){
                user.name = userItem.name
            }
        }
    }
})The above is the detailed content of How to get started with Vue's new state management Pinia, read this article!. For more information, please follow other related articles on the PHP Chinese website!