Git learning: understanding the git merge command
This article will help you learn about Git branches and introduce the Git Merge command for using branches. I hope it will be helpful to you!

In Git, merge is a way to put the forked commit history back together. The git merge command is used to integrate the branch you created previously using the git branch command and the content developed independently on this branch into one branch.
Please note that all the commands below will merge other branches into the current working branch. The contents of the current working branch will be updated due to the merge operation, but the target branch will not be affected at all. Again, this means git merge is typically used in conjunction with several other git commands, including using the git checkout command to select the current working branch, and using git branch -dCommand to delete merged abandoned branches.
How it works
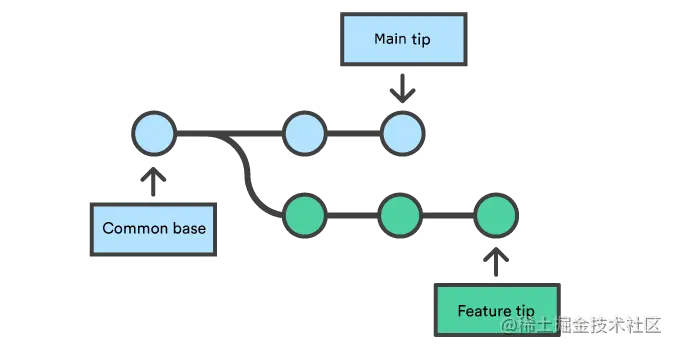
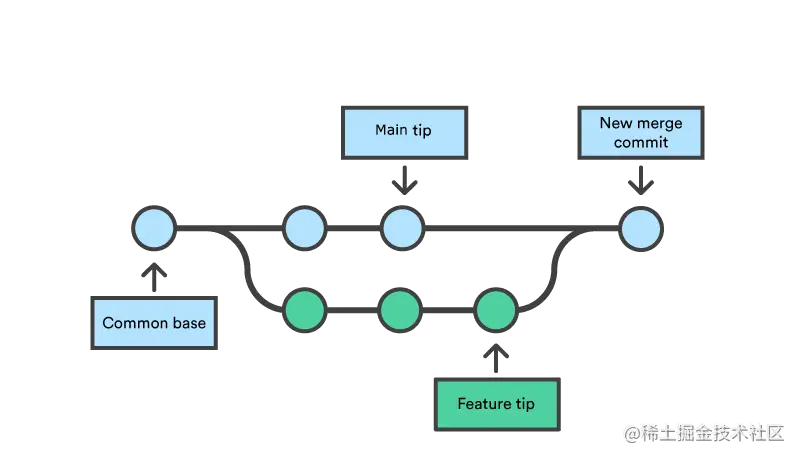
git merge will merge multiple commit sequences into a unified commit history. In the most common usage scenario, git merge is used to merge two branches. In the remainder of this document, we will focus on this merge scenario. In this scenario, git merge accepts two commit pointers, usually the top commit of the two branches, and then traces forward to the most recent common commit of the two branches. Once this common commit is found, Git creates a new "merge commit" that merges the respective commit sequences on both branches.
For example, we have a feature branch derived from the main branch, and now we want to merge this feature branch back to the main branch.

Executing the merge command will merge the specified branch into the current working branch. We assume that the current working branch is main. Git determines its own algorithm for merging commits based on the two branches (discussed in detail below).

Merge commit is different from ordinary commit, because merge commit will have two parent commits. When you create a merge commit, Git will try to automatically merge two separate commit histories into one. However, when Git finds that a certain piece of data contains changes in the commit history of both sides, it will not be able to automatically merge it. This situation is called a version conflict. At this time, Git requires manual intervention to continue the merge.
Preparing for Merger
Before the actual merge operation, some preparation steps need to be carried out to ensure that the merge process can proceed smoothly.
Confirm the branch that receives the merge
Execute the git status command to check the status of the current branch, and make sure that HEAD points to the correct branch that receives the merge branch. If not, execute the git checkout command to switch to the correct branch. In our example, execute git checkout main.
Get the latest remote commit
Ensure that both branches involved in the merge operation are updated to the latest status of the remote warehouse. Execute git fetch to pull the latest commit from the remote warehouse. Once the fetch operation is completed, in order to ensure that the main branch is synchronized with the remote branch, the git pull command needs to be executed.
Merge
When the preparations mentioned above are complete, the merger can officially begin. Execute the git merge <branch></branch> command, where is the name of the target branch that needs to be merged into the current branch.
Fast-forward merge
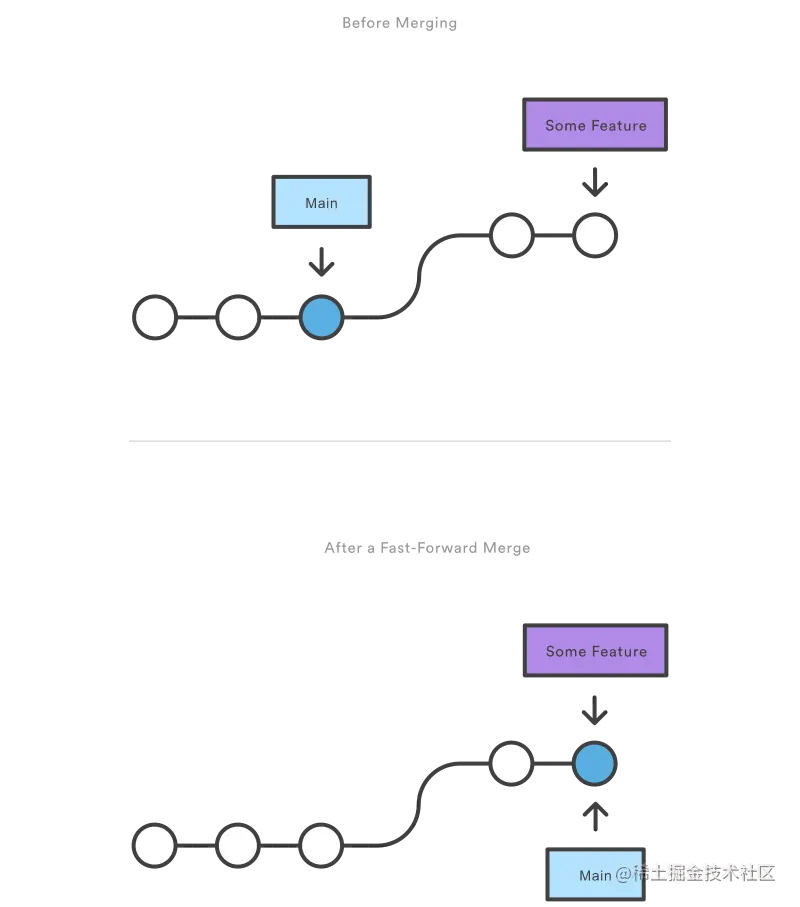
When the submission history between the current working branch and the merge target branch is a linear path, fast-forward merge can be performed. In this case, there is no need to actually merge the two branches. Git only needs to move the top pointer of the current branch to the top of the target branch (that is, fast forward). In this case, the fast-forward merge successfully merges the commit history into one place. After all, the commits in the target branch are now included in the commit history of the current branch. For the process of fast-forward merging the function branch into the main branch, please refer to the figure below:

However, the fast-forward merge occurs when the two branches are divided. In the case of cross, execution is not allowed. When the commit history of the target branch relative to the current branch is not linear, Git can only decide how to merge the two branches through the three-way merge algorithm. The three-way merge algorithm requires the use of a dedicated commit to integrate the commit histories of both sides. This term comes from the fact that in order for Git to generate a merge commit, it needs to use three commits: the top commit of the two branches, and their common ancestor commit.
Although you can actually choose to use these different merge strategies, most developers prefer fast-forward merging (by utilizing the rebasing command), especially for small feature development or bug fixes; On the other hand, for merging long-term development function branches, the three-way merge method is more preferred. In the second scenario, the merge commit generated by merge will be retained in the commit history as a mark of the merge of the two branches.
Next we use the first example below to show how to perform fast-forward merging. The following command will first create a new branch, make two commits on the new branch, and then use fast-forward merge to merge the new branch back to the main branch.
# Start a new feature
git checkout -b new-feature main
# Edit some files
git add <file>
git commit -m "Start a feature"
# Edit some files
git add <file>
git commit -m "Finish a feature"
# Merge in the new-feature branch
git checkout main
git merge new-feature
git branch -d new-feature
The workflow in this example is usually used for short-term functional development. This development process is more regarded as a relatively independent development process, and correspondingly it is a long-term development process that requires coordination and management. Feature development branch.
Also note that in this example Git will not issue a warning for the git branch -d command because the content of new-feature has been merged into the main branch.
In some cases, although the commit history of the target branch is linear relative to the current branch and can be fast-forward merged, you still want to have a merge commit to mark that the merge has occurred at this commit, then You can use the --no-ff option when executing the git merge command.
git merge --no-ff <branch>
The above command will merge the specified branch into the current branch, but will always generate a merge commit (even if this merge operation can be fast-forwarded). This command is useful when you need to mark merge events in the repository's commit history.
Three-way merge
The following example is similar to the above, but because the main branch itself also changes as the feature branch moves forward, Therefore, a three-way merge is required when merging. This scenario is quite common when carrying out large-scale feature development or when multiple developers are developing at the same time.
Start a new feature
git checkout -b new-feature main
# Edit some files
git add <file>
git commit -m "Start a feature"
# Edit some files
git add <file>
git commit -m "Finish a feature"
# Develop the main branch
git checkout main
# Edit some files
git add <file>
git commit -m "Make some super-stable changes to main"
# Merge in the new-feature branch
git merge new-feature
git branch -d new-feature
It should be noted that in this case, because there is no way to directly move the top pointer of main to the new-feature branch, Git cannot perform fast forwarding merge.
In most actual work scenarios, new-feature should be a very big function, and the development process lasts for a long time, which inevitably leads to the There are also new commits on the main branch. If your feature branch size is as small as the example above, you can use rebase to rebase the new-feature branch to the main branch, and then perform a fast-forward merge. This will also avoid creating too much redundancy in the project's commit history.
Resolving conflicts
If the two branches to be merged have modified the same part of the same file, Git cannot determine which version of the content should be used. When this happens, the merge process is stopped before the merge commit is committed to give the user a chance to fix these conflicts manually.
The great thing about Git's merge process is that it uses the well-known edit/stage/commit workflow to resolve conflicts. When a merge conflict is encountered, executing the git status command will list which files contain conflicts and need to be resolved manually. For example, when both branches modify the same part of the hello.py file, you will see information similar to the following:
On branch main
Unmerged paths:
(use "git add/rm ..." as appropriate to mark resolution)
both modified: hello.py
How conflicts are displayed
When Git encounters a conflict during the merge process, it will edit the relevant content in the affected file and add visual markers to show the different content of this part of the conflict. These visual markers are: <<<<<<<,========,>>>>>>>. To find the specific location where a conflict occurred, it's easy to search for these visual markers in the file.
here is some content not affected by the conflict
<<<<<<< main
this is conflicted text from main
=======
this is conflicted text from feature branch
>>>>>>> feature branch;
Generally speaking, the content before the ====== mark comes from the branch receiving the merge, and the content after it comes from the branch to be merged.
Once the conflicting parts are found, the conflicts can be corrected as needed. When you have completed the conflict repair and are ready to continue merging, you only need to execute the git add command to add the files with resolved conflicts to the staging area and tell Git that these conflicts have been resolved. After this, execute git commit just like submitting the code normally to complete the merge commit. This process is exactly the same as submitting code under normal circumstances, which means that handling conflicts is a piece of cake for ordinary developers.
Also note that merge conflicts can only occur during a three-way merge, and no conflicts will occur during a fast-forward merge.
Summary
This article is an overview of the git merge command. In the process of using Git, merging is a very important operation. This article discusses the mechanics behind merge operations and the differences between fast-forward merges and three-way merges. The key points that readers need to remember are as follows:
The Git merge process is to merge different commit sequences into a unified commit history
Git There are two main methods in the merge process: fast-forward merge and three-way merge
Unless there is a conflict in the two commit sequences, Git can usually merge the commits automatically
Recommended study: "Git Tutorial"
The above is the detailed content of Git learning: understanding the git merge command. For more information, please follow other related articles on the PHP Chinese website!

Hot AI Tools

Undresser.AI Undress
AI-powered app for creating realistic nude photos

AI Clothes Remover
Online AI tool for removing clothes from photos.

Undress AI Tool
Undress images for free

Clothoff.io
AI clothes remover

AI Hentai Generator
Generate AI Hentai for free.

Hot Article

Hot Tools

Notepad++7.3.1
Easy-to-use and free code editor

SublimeText3 Chinese version
Chinese version, very easy to use

Zend Studio 13.0.1
Powerful PHP integrated development environment

Dreamweaver CS6
Visual web development tools

SublimeText3 Mac version
God-level code editing software (SublimeText3)

Hot Topics
 How to install deepseek
Feb 19, 2025 pm 05:48 PM
There are many ways to install DeepSeek, including: compile from source (for experienced developers) using precompiled packages (for Windows users) using Docker containers (for most convenient, no need to worry about compatibility) No matter which method you choose, Please read the official documents carefully and prepare them fully to avoid unnecessary trouble.
 Summary of FAQs for DeepSeek usage
Feb 19, 2025 pm 03:45 PM
DeepSeekAI Tool User Guide and FAQ DeepSeek is a powerful AI intelligent tool. This article will answer some common usage questions to help you get started quickly. FAQ: The difference between different access methods: There is no difference in function between web version, App version and API calls, and App is just a wrapper for web version. The local deployment uses a distillation model, which is slightly inferior to the full version of DeepSeek-R1, but the 32-bit model theoretically has 90% full version capability. What is a tavern? SillyTavern is a front-end interface that requires calling the AI model through API or Ollama. What is breaking limit
 What are the AI tools?
Nov 29, 2024 am 11:11 AM
AI tools include: Doubao, ChatGPT, Gemini, BlenderBot, etc.
 What are the Grayscale Encryption Trust Funds? Common Grayscale Encryption Trust Funds Inventory
Mar 05, 2025 pm 12:33 PM
Grayscale Investment: The channel for institutional investors to enter the cryptocurrency market. Grayscale Investment Company provides digital currency investment services to institutions and investors. It allows investors to indirectly participate in cryptocurrency investment through the form of trust funds. The company has launched several crypto trusts, which has attracted widespread market attention, but the impact of these funds on token prices varies significantly. This article will introduce in detail some of Grayscale's major crypto trust funds. Grayscale Major Crypto Trust Funds Available at a glance Grayscale Investment (founded by DigitalCurrencyGroup in 2013) manages a variety of crypto asset trust funds, providing institutional investors and high-net-worth individuals with compliant investment channels. Its main funds include: Zcash (ZEC), SOL,
 Delphi Digital: How to change the new AI economy by parsing the new ElizaOS v2 architecture?
Mar 04, 2025 pm 07:00 PM
ElizaOSv2: Empowering AI and leading the new economy of Web3. AI is evolving from auxiliary tools to independent entities. ElizaOSv2 plays a key role in it, which gives AI the ability to manage funds and operate Web3 businesses. This article will dive into the key innovations of ElizaOSv2 and how it shapes an AI-driven future economy. AI Automation: Going to independently operate ElizaOS was originally an AI framework focusing on Web3 automation. v1 version allows AI to interact with smart contracts and blockchain data, while v2 version achieves significant performance improvements. Instead of just executing simple instructions, AI can independently manage workflows, operate business and develop financial strategies. Architecture upgrade: Enhanced A
 As top market makers enter the crypto market, what impact will Castle Securities have on the industry?
Mar 04, 2025 pm 08:03 PM
The entry of top market maker Castle Securities into Bitcoin market maker is a symbol of the maturity of the Bitcoin market and a key step for traditional financial forces to compete for future asset pricing power. At the same time, for retail investors, it may mean the gradual weakening of their voice. On February 25, according to Bloomberg, Citadel Securities is seeking to become a liquidity provider for cryptocurrencies. The company aims to join the list of market makers on various exchanges, including exchanges operated by CoinbaseGlobal, BinanceHoldings and Crypto.com, people familiar with the matter said. Once approved by the exchange, the company initially planned to set up a market maker team outside the United States. This move is not only a sign
 Significantly surpassing SFT, the secret behind o1/DeepSeek-R1 can also be used in multimodal large models
Mar 12, 2025 pm 01:03 PM
Researchers from Shanghai Jiaotong University, Shanghai AILab and the Chinese University of Hong Kong have launched the Visual-RFT (Visual Enhancement Fine Tuning) open source project, which requires only a small amount of data to significantly improve the performance of visual language big model (LVLM). Visual-RFT cleverly combines DeepSeek-R1's rule-based reinforcement learning approach with OpenAI's reinforcement fine-tuning (RFT) paradigm, successfully extending this approach from the text field to the visual field. By designing corresponding rule rewards for tasks such as visual subcategorization and object detection, Visual-RFT overcomes the limitations of the DeepSeek-R1 method being limited to text, mathematical reasoning and other fields, providing a new way for LVLM training. Vis
 Bitwise: Businesses Buy Bitcoin A Neglected Big Trend
Mar 05, 2025 pm 02:42 PM
Weekly Observation: Businesses Hoarding Bitcoin – A Brewing Change I often point out some overlooked market trends in weekly memos. MicroStrategy's move is a stark example. Many people may say, "MicroStrategy and MichaelSaylor are already well-known, what are you going to pay attention to?" This is true, but many investors regard it as a special case and ignore the deeper market forces behind it. This view is one-sided. In-depth research on the adoption of Bitcoin as a reserve asset in recent months shows that this is not an isolated case, but a major trend that is emerging. I predict that in the next 12-18 months, hundreds of companies will follow suit and buy large quantities of Bitcoin


