Let's analyze how to recover data from MySQL binlog
This article brings you relevant knowledge about mysql, which mainly introduces issues related to binlog. Binlog is generally called archive log. Let’s take a look at how to use binlog to restore mysql. The data in , I hope it will be helpful to everyone.

Recommended study: mysql learning tutorial
We often hear people say that as long as you are willing, MySQL can be restored to half a month Even any state within a month. There are also many jokes on the Internet about deleting databases and running away. . .
So today Brother Song wants to talk to you about the binlog in MySQL, and teach you step by step how to use binlog to restore data in MySQL. In this way, if you accidentally delete the database in the future, you don’t have to run. On the way.
The more important logs in MySQL include binlog (archive log), redo log (redo log) and undo log. The main ones related to our article are binlog. The other two logs will be available in the future. I will introduce it to you in detail later.
1. binlog
binlog We generally call it archive log in Chinese. If you have seen the MySQL master-slave setup that Song Ge posted before, you should have an impression of this log. When we build the MySQL master Binlog is inseparable from the slave (Portal: MySQL8 master-slave replication pitfall guide).
Binlog is the log of the MySQL Server layer, not the log that comes with the storage engine. It records all DDL and DML (excluding data query statements) statements, and is recorded in the form of events, including statements. The execution time, etc. should be noted:
- binlog is a kind of logical log. What is recorded in it is the original logic of a SQL statement. For example, if a certain field is given 1, please note that This is different from the physical log of redo log (what modifications were made on a certain data page).
- When the binlog file is full, it will automatically switch to the next log file to continue writing without overwriting the previous log. This is also different from the redo log. The redo log is written in a loop, that is, it is written later. may overwrite previously written ones.
- Generally speaking, when we configure binlog, we can specify the validity period of the binlog file, so that after expiration, the log file will be automatically deleted, thus avoiding taking up more storage space.
According to the official MySQL documentation, after turning on binlog, there will be about 1% performance loss, but this is still acceptable. Generally speaking, binlog has two important usage scenarios:
- MySQL master-slave replication: open binlog on the host, the host synchronizes the binlog to the slave, and the slave synchronizes data through the binlog, thereby achieving data synchronization between the host and the slave.
- MySQL data recovery, by using the mysqlbinlog tool combined with the binlog file, the data can be restored to a certain moment in the past.
2. Open binlog
For the convenience of demonstration, Brother Song installed MySQL in Docker. Let's use this as an example to start today's demonstration. If your friends still don’t know how to use docker, you can reply to docker in the background of the official account. There is a tutorial written by Brother Song.
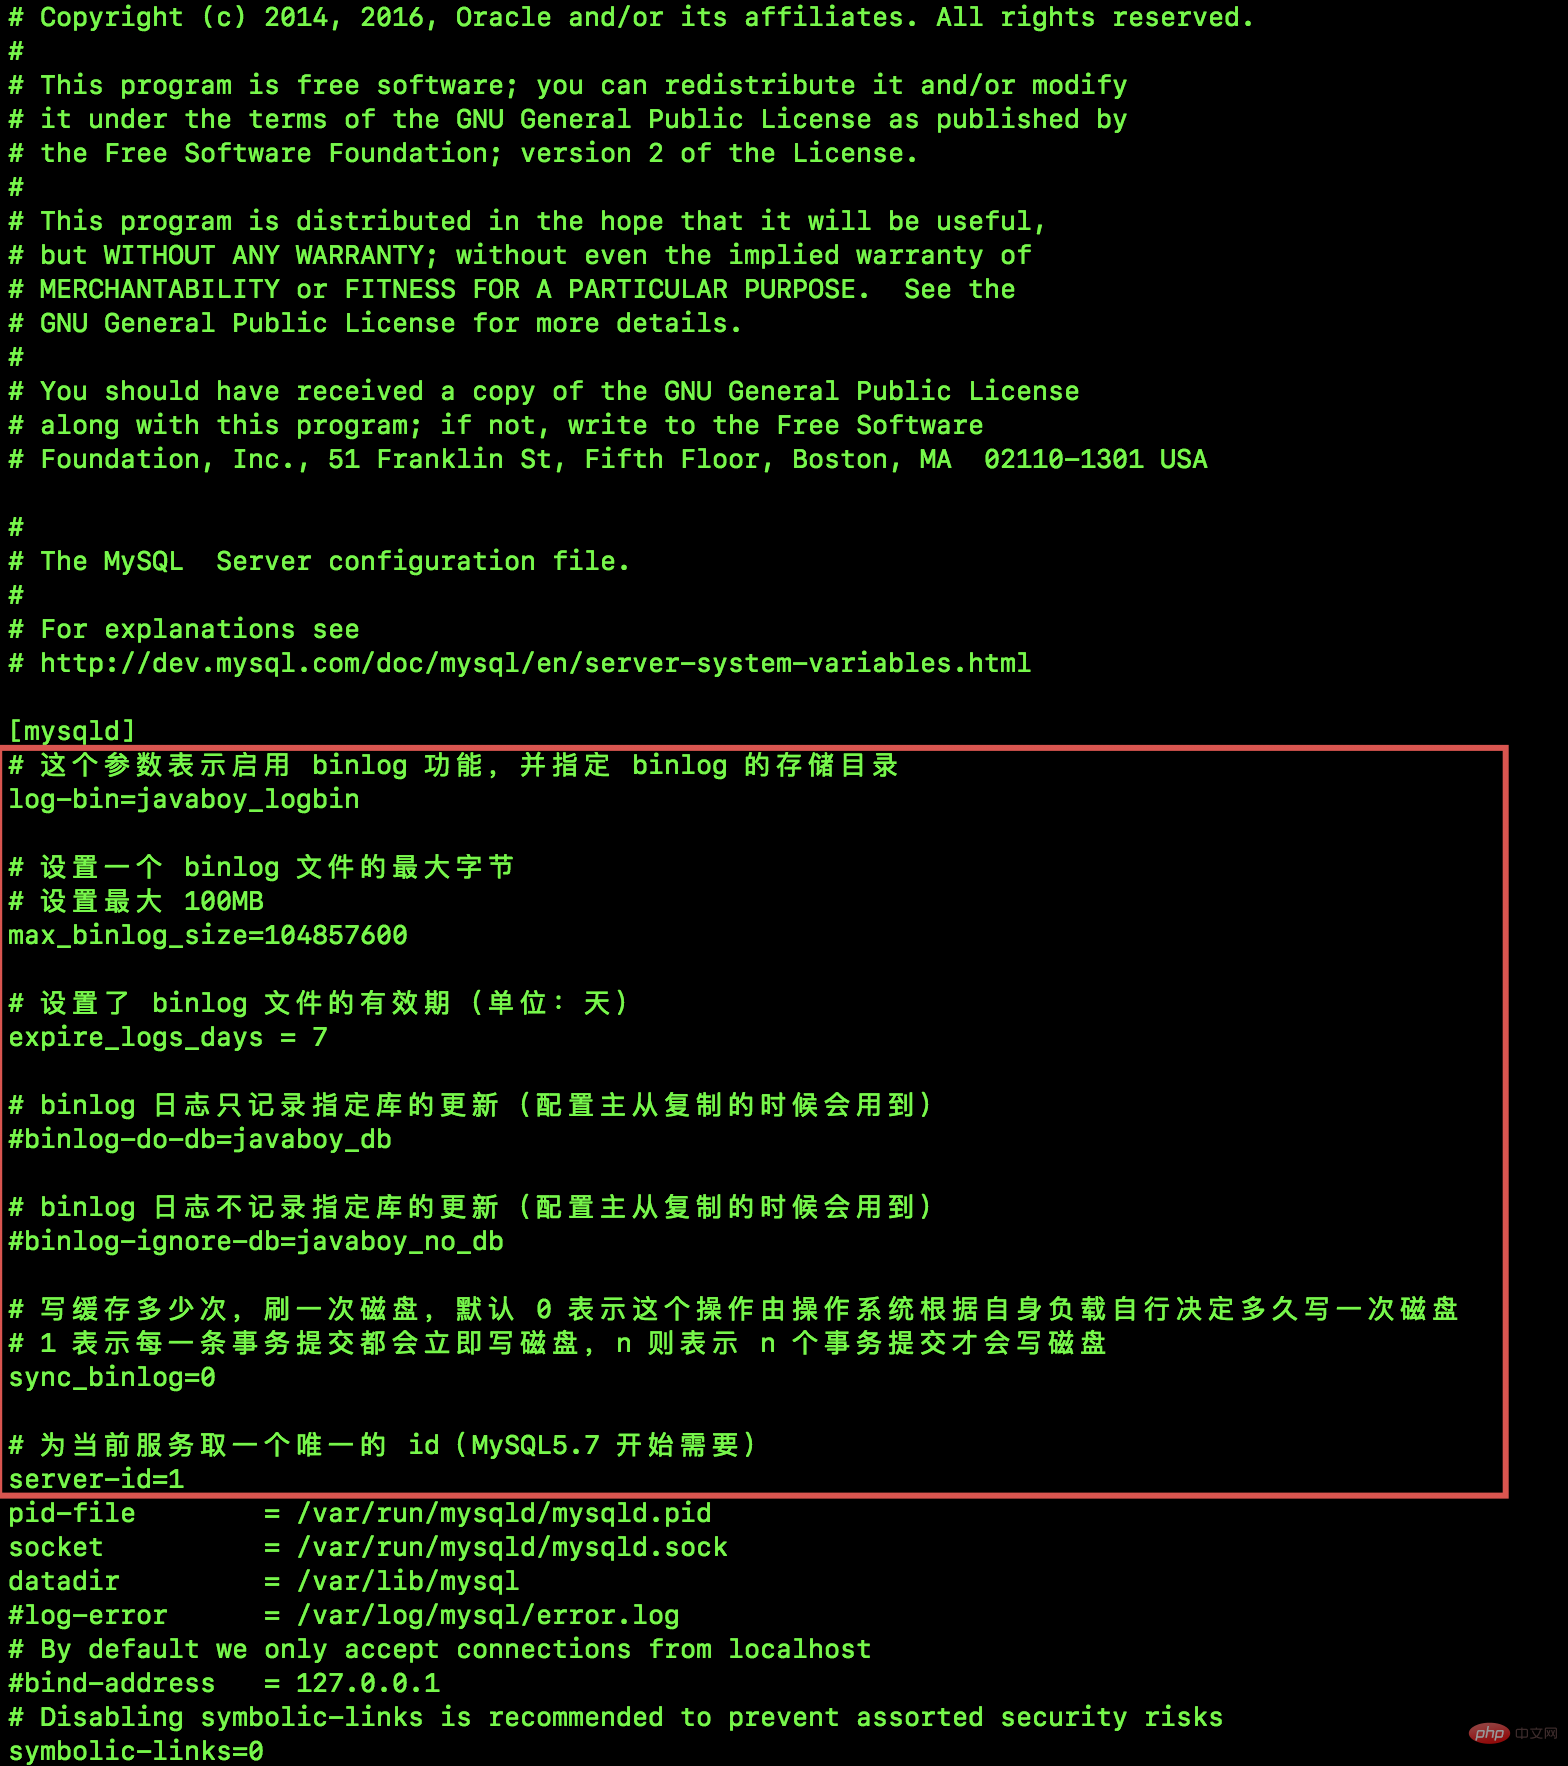
First we install MySQL in docker, and then enter the container. You can check whether binlog is turned on by running the following command:

/etc/mysql/mysql.conf.d directory of the container.

# 这个参数表示启用 binlog 功能,并指定 binlog 的存储目录
log-bin=javaboy_logbin

# 设置一个 binlog 文件的最大字节
# 设置最大 100MB
max_binlog_size=104857600

# 设置了 binlog 文件的有效期(单位:天)
expire_logs_days = 7

# binlog 日志只记录指定库的更新(配置主从复制的时候会用到)
#binlog-do-db=javaboy_db

# binlog 日志不记录指定库的更新(配置主从复制的时候会用到)
#binlog-ignore-db=javaboy_no_db

# 写缓存多少次,刷一次磁盘,默认 0 表示这个操作由操作系统根据自身负载自行决定多久写一次磁盘
# 1 表示每一条事务提交都会立即写磁盘,n 则表示 n 个事务提交才会写磁盘
sync_binlog=0

# 为当前服务取一个唯一的 id(MySQL5.7 之后需要配置)
server-id=1
docker restart mysql1
show variables like 'log_bin%'; You can see that binlog has been turned on.

- log_bin_basename:这个是将来产生的 binlog 日志文件的名称前缀,换句话说,根据大家目前所看到的配置,将来产生的 binlog 日志文件名为
javaboy_logbin.xxx,这个文件中将会用来记录所有的 DDL 和 DML 语句事件。 - log_bin_index:这个是 binlog 的索引文件,保存了所有 binlog 的目录,因为 binlog 可能会有多个。我们可以来查看一下现在的
javaboy_logbin.index文件:

可以看到,目前只有一个 logbin 文件。
3. 常见 binlog 操作
接下来我们再来介绍几个常见的 binlog 操作命令。
- 查看所有 binlog 日志
通过如下方式我们可以查看 binlog 日志列表:
show master logs;

可以看到,我这里目前只有一个日志文件,文件名为 javaboy_logbin.000001,File_size 表示这个文件占用的字节大小是 154。
- 查看 master 状态
这个命令我们在搭建 MySQL 主从的时候经常会用到,如下:

这个时候可以看到最新的 binlog 日志文件名称以及最后一个操作事件的 Position 值(这个值有啥用,我们后面会给大家详细介绍)。
- 刷新 binlog
正常来说,一个 binlog 写满之后,会自动切换到下一个 binlog 开始写,不过我们也可以执行一个 flush logs 命令来手动刷新 binlog,手动刷新 binlog 之后,就会产生一个新的 binlog 日志文件,接下来所有的 binlog 日志都将记录到新的文件中。如下:
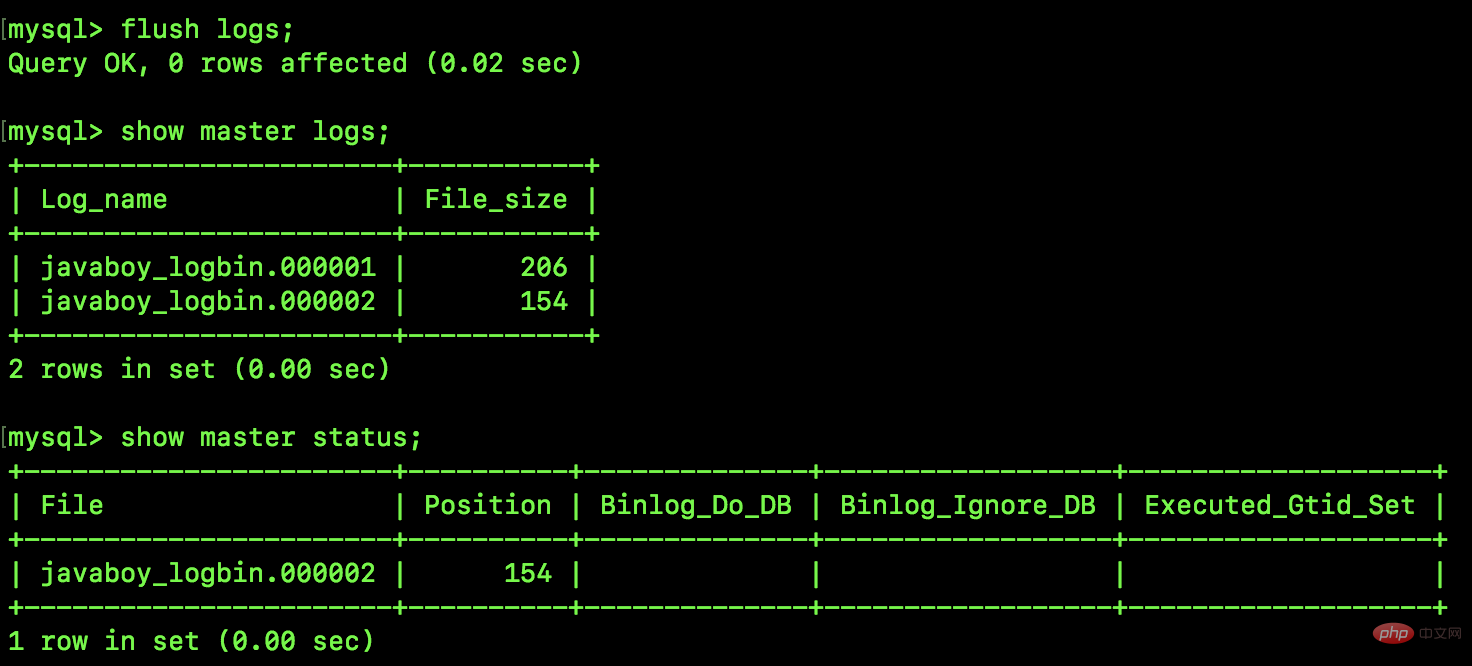
由上图可以看到,我们刷新日志之后,再通过 show master logs 去查看日志,发现日志文件已经多了一个新产生的了,然后再通过 show master status 去查看最新的日志文件信息,发现也已经变为 javaboy_logbin.000002。
- 重置 binlog
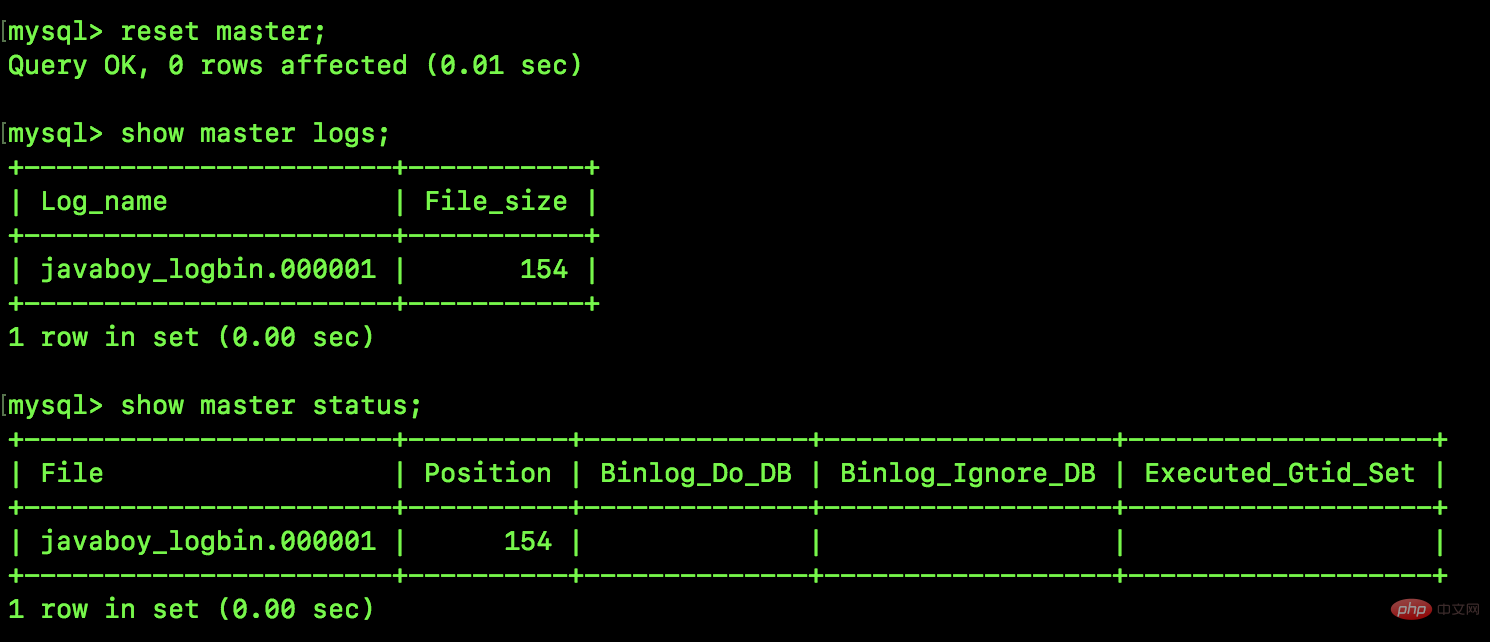
reset master 可以重置 binlog 日志文件,让日志重新从 000001 开始记录,不过如果当前主机有一个或者多个从机在运行,那么该命令就运行不了(因为从机是通过 binlog 来实现数据库同步的,主机把 binlog 清空了,从机会报找不到 binlog 的错误)。
- 查看 binlog
由于 binlog 是二进制日志文件,所以要是直接打开,那肯定是看不了的:

没有看到任何有用的信息。
为了查看 binlog,MySQL 为我们提供了两个官方工具,我们一个一个来看,首先是 mysqlbinlog 命令,如下:
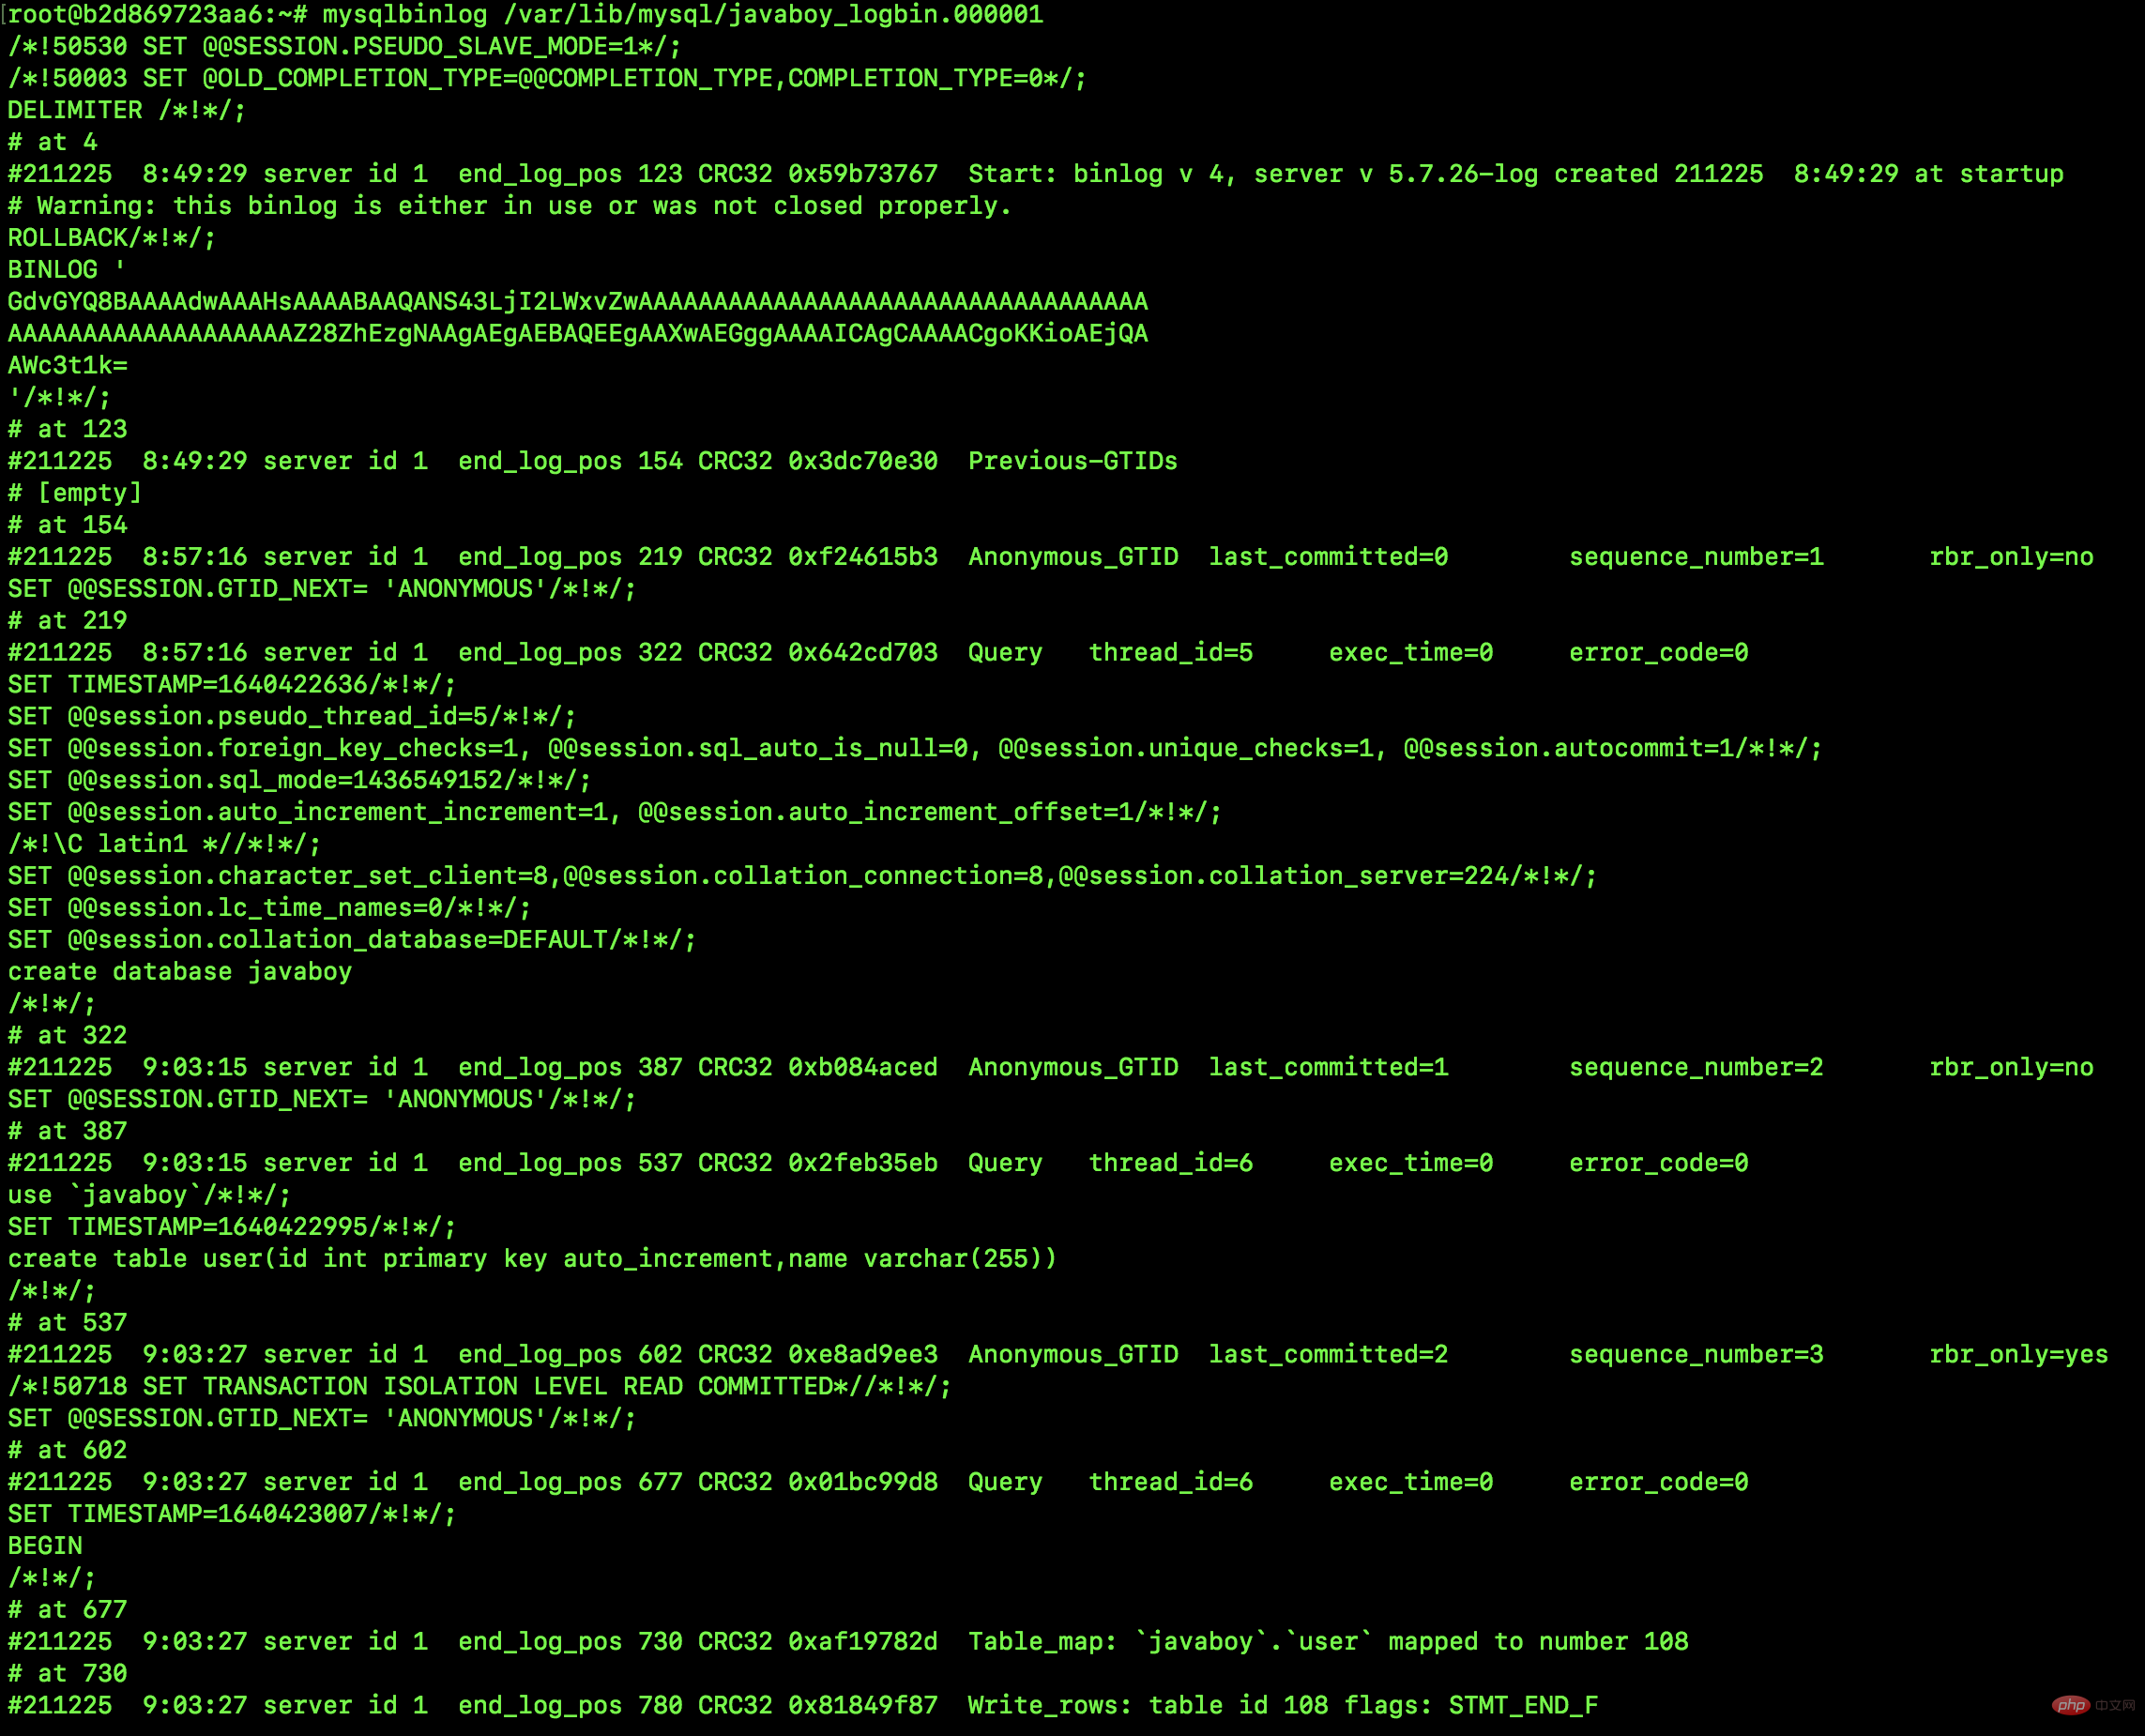
虽然看起来乱糟糟的,不过仔细看着其实都有迹可循。因为我这里是一个新安装的数据库,里边只是创建了一个名为 javaboy 的库,然后创建了一个名为 user 的表加了两条数据,其他什么事情都没做,所以创建库的脚本我们其实能够从纷杂的文件中找到。
产生的日志文件中有一个 end_log_pos 是日志文件的 pos 点,这个将来在数据恢复的时候有用。
不过这种查看方式不够人性化,我们说 binlog 是按照事件来记录日志的,所以如果我们能够按照事件的方式查看日志,就会好很多,我们再来看看如下一个命令:
show binlog events [IN 'log_name'] [FROM pos] [LIMIT [offset,] row_count];
这个表示以事件的方式来查看 binlog,这里涉及到几个参数:
- log_name:可以指定要查看的 binlog 日志文件名,如果不指定的话,表示查看最早的 binlog 文件。
- pos:从哪个 pos 点开始查看,凡是 binlog 记录下来的操作都有一个 pos 点,这个其实就是相当于我们可以指定从哪个操作开始查看日志,如果不指定的话,就是从该 binlog 的开头开始查看。
- offset:这是是偏移量,不指定默认就是 0。
- row_count:查看多少行记录,不指定就是查看所有。
我们来看一个简单的例子:
show binlog events in 'javaboy_logbin.000001';

这下就清晰多了,我们可以看到之前的所有操作,例如:
- 在 Pos 219-322 之间创建了一个库。
- 在 Pos 387-537 之间创建了一张表。
- 在 Pos 677-780 之间添加了一条记录。
- …
4. 数据恢复实战
好啦,有了前面的基础知识准备,接下来松哥来给大家手把手演示一个删库/恢复的场景。
我先来说说我这个数据库目前的情况。
这是一个新安装的数据库,里边我新建了一个数据库名为 javaboy,javaboy 库中新建了一张表名为 user,user 中有两条记录,如下:
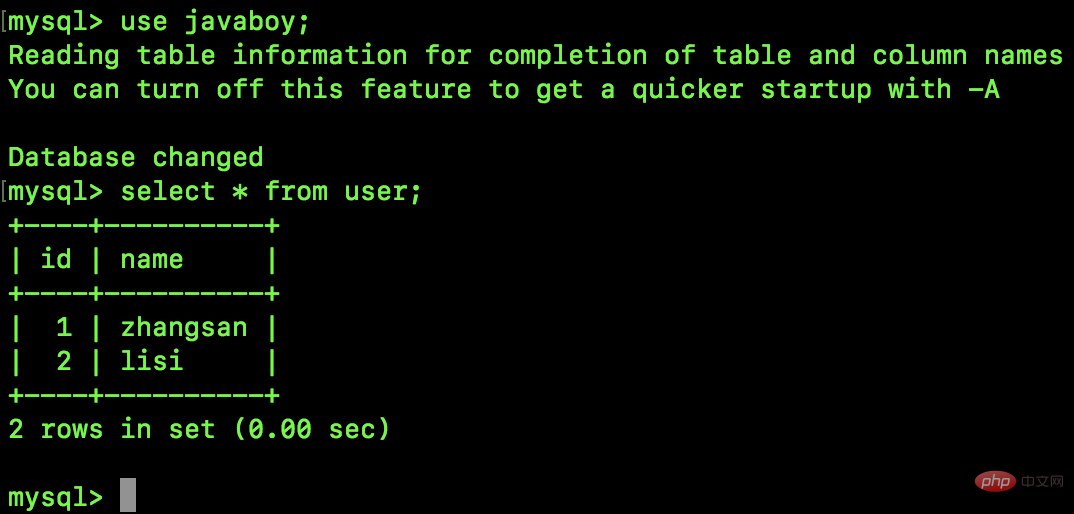
现在假设我们定期(每周三凌晨三点)对数据库进行备份。
现在凌晨三点了,数据库自动备份开始了,我们通过如下命令将数据库备份成 SQL 脚本,如下:
mysqldump -uroot -p --flush-logs --lock-tables -B javaboy>/root/javaboy.bak.sql

这里有几个参数跟大家解释下:
- -u、-p 这两个就不用说了。
- –flush-logs:这个表示在导出之前先刷新 binlog,刷新 binlog 之后将会产生新的 binlog 文件,后续的操作都存在新的 binlog 中。
- –lock-tables:这个表示开始导出前,锁定所有表。需要注意的是当导出多个数据库时,–lock-tables 分别为每个数据库锁定表,因此这个选项不能保证导出文件中的表在数据库之间的逻辑一致性,不同数据库表的导出状态可以完全不同。
- -B:这个表示指定导出的数据库名称,如果使用
--all-databases或者-A代替-B表示导出所有的数据库。
以上命令执行完成后,会在 /root 目录下生成一个 javaboy.bak.sql 文件,该文件就是备份的 sql 文件了。
这是星期三凌晨三点发生的事情。
接下来到了星期四早上,来上班了,一顿操作后,往数据库中又添加了两条操作,如下:
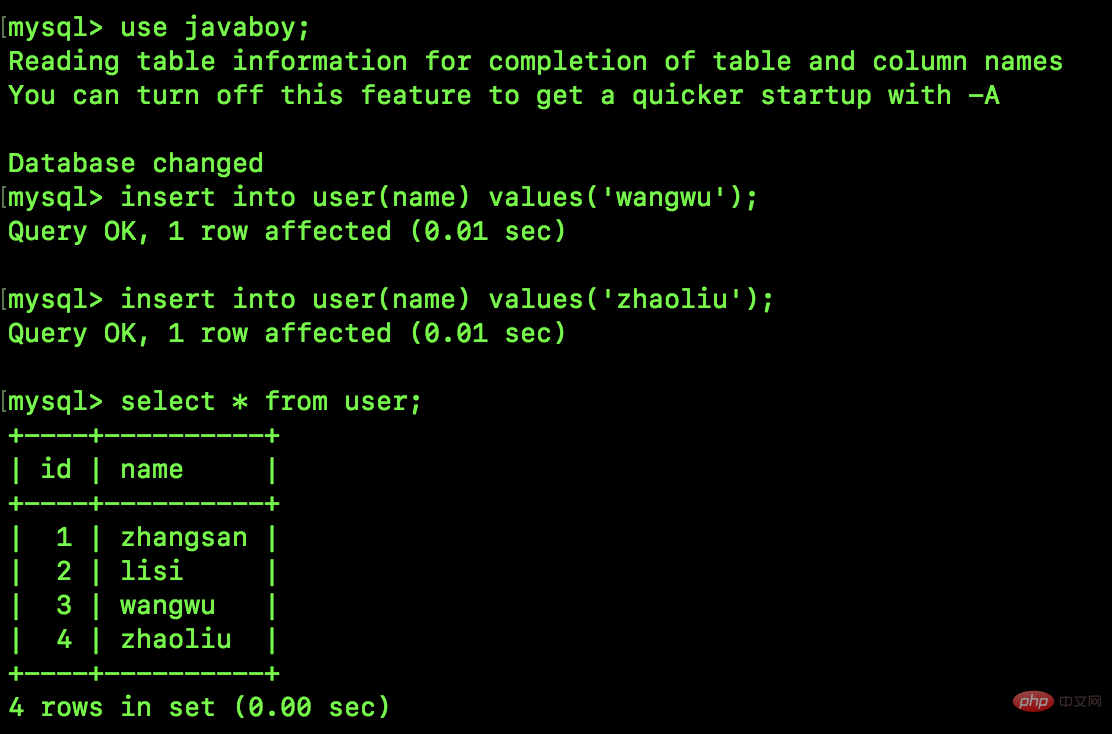
接下来,小 X 今天跟领导吵架了很不爽,决定删除跑路:

领导发现了大惊,当即要求立马恢复数据。这时候该你表现了。
首先,我们有星期三凌晨的备份文件,先用那个文件进行数据恢复:
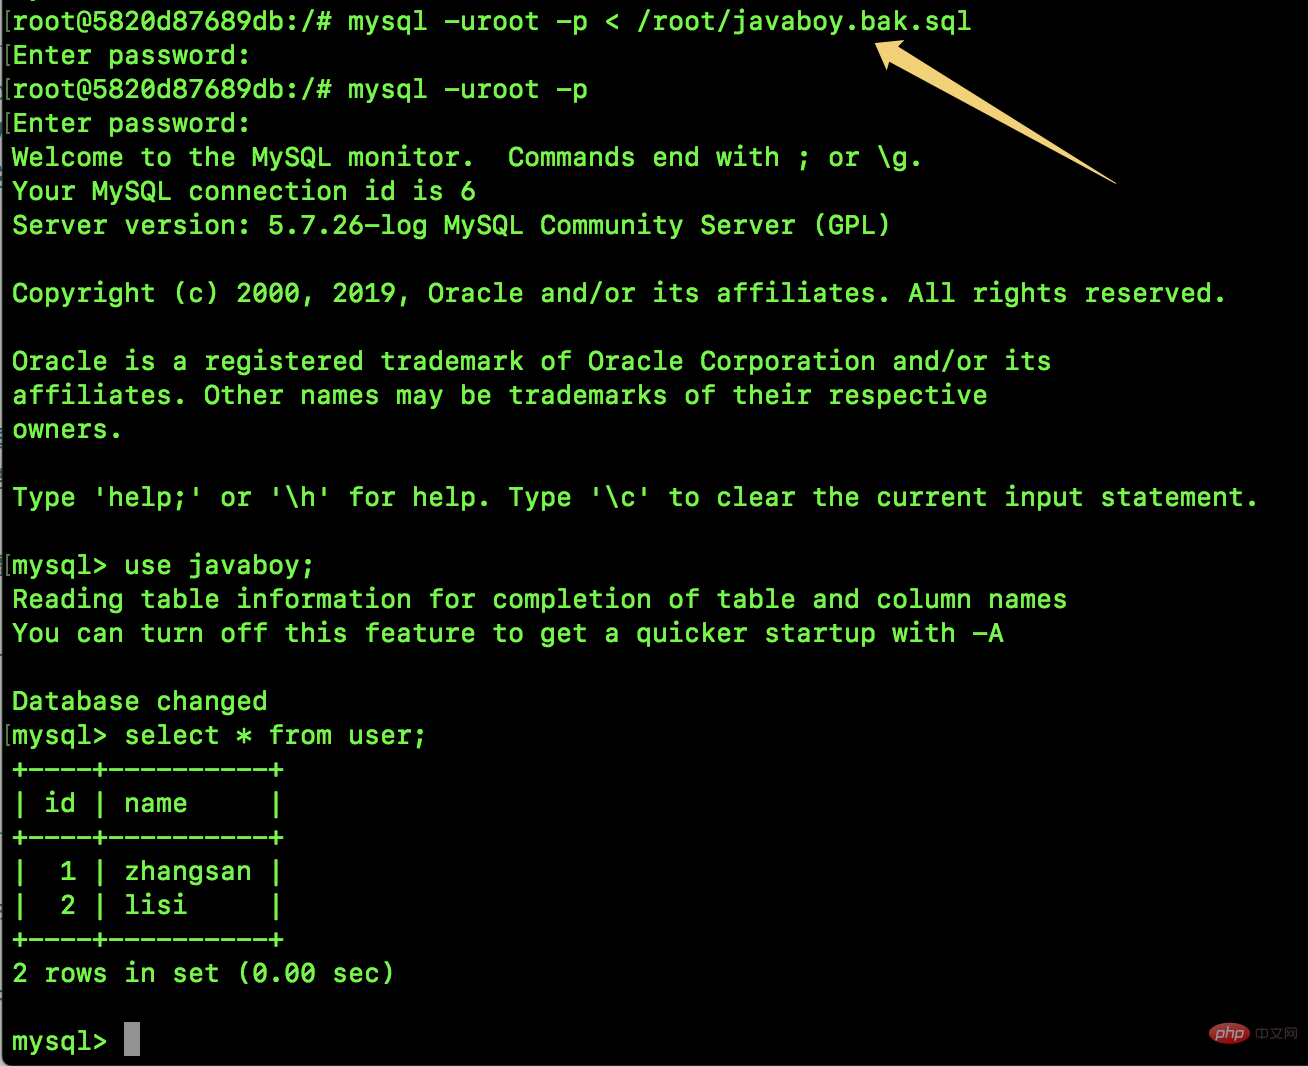
恢复之后,现在到星期三早上凌晨三点的数据有了。
从星期三早上凌晨三点到星期四的数据现在没了。
这个时候我们就要借助于 binlog 来恢复了。大家还记得,我们星期三凌晨三点执行备份的时候,用了一个参数叫做 --flush-logs,使用了该参数表示从备份那一刻起,新的 binlog 将产生在一个新的日志文件中,对于我们这里来说,新的 binlog 文件当然就是 javaboy_logbin.000002 了,我们去查看一下该文件:
show binlog events in 'javaboy_logbin.000002';
我这里生成的该文件比较长,我截取其中一部分:

可以看到,在 764-865 这个 Pos 中发生了删库跑路事件,那么我们只需要回放该文件将数据恢复到 764 这个位置即可。
由于 javaboy_logbin.000002 文件是在星期三凌晨三点备份之后产生的新文件,因此这个文件从起始到 764 这个 Pos 之间的操作,就是星期三凌晨三点到删库之前的操作了。
那么我们来看下通过 binlog 来恢复数据的命令:
mysqlbinlog /var/lib/mysql/javaboy_logbin.000002 --stop-position=764 --database=javaboy | mysql -uroot -p
那么这里涉及到两个参数:
- –stop-position=764 表示恢复到 764 这个 Pos,不指定的话就把按整个文件恢复了,如果按当前文件恢复的话,由于这个 binlog 文件中有删除数据库的语句,那么就会导致执行完该 binlog 之后,javaboy 库又被删除了。
- –database=javaboy 表示恢复 javaboy 这个库。
另外还有一个我们这里没用到的参数叫做 --start-position,这个表示起始的 Pos,不指定的话表示从头开始数据恢复。
好啦,弄完之后,再来查看数据库:
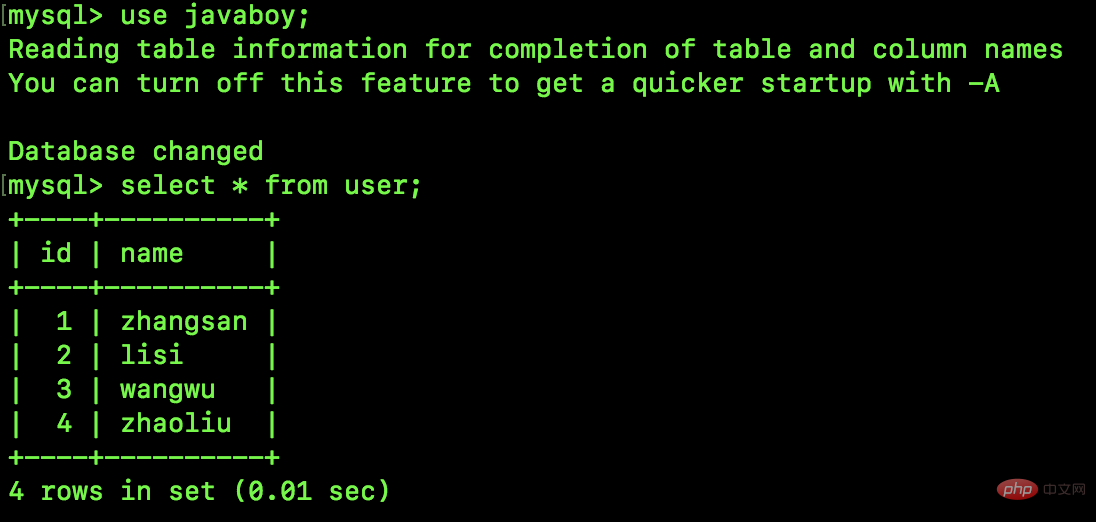
数据恢复啦~
注意:所有操作之前,记得该备份就备份(防止你操作错了又回不去),松哥为了省事上面省略了一些备份操作。
5. Summary
Okay, today’s article mainly shares the binlog log of MySQL with friends, and uses a small case to demonstrate how to achieve database deletion and recovery through binlog. Okay, interested friends can try it (don’t try it on the production library) ~
Recommended learning: mysql tutorial
The above is the detailed content of Let's analyze how to recover data from MySQL binlog. For more information, please follow other related articles on the PHP Chinese website!

Hot AI Tools

Undresser.AI Undress
AI-powered app for creating realistic nude photos

AI Clothes Remover
Online AI tool for removing clothes from photos.

Undress AI Tool
Undress images for free

Clothoff.io
AI clothes remover

AI Hentai Generator
Generate AI Hentai for free.

Hot Article

Hot Tools

Notepad++7.3.1
Easy-to-use and free code editor

SublimeText3 Chinese version
Chinese version, very easy to use

Zend Studio 13.0.1
Powerful PHP integrated development environment

Dreamweaver CS6
Visual web development tools

SublimeText3 Mac version
God-level code editing software (SublimeText3)

Hot Topics
 PHP's big data structure processing skills
May 08, 2024 am 10:24 AM
Big data structure processing skills: Chunking: Break down the data set and process it in chunks to reduce memory consumption. Generator: Generate data items one by one without loading the entire data set, suitable for unlimited data sets. Streaming: Read files or query results line by line, suitable for large files or remote data. External storage: For very large data sets, store the data in a database or NoSQL.
 How to optimize MySQL query performance in PHP?
Jun 03, 2024 pm 08:11 PM
MySQL query performance can be optimized by building indexes that reduce lookup time from linear complexity to logarithmic complexity. Use PreparedStatements to prevent SQL injection and improve query performance. Limit query results and reduce the amount of data processed by the server. Optimize join queries, including using appropriate join types, creating indexes, and considering using subqueries. Analyze queries to identify bottlenecks; use caching to reduce database load; optimize PHP code to minimize overhead.
 How to use MySQL backup and restore in PHP?
Jun 03, 2024 pm 12:19 PM
Backing up and restoring a MySQL database in PHP can be achieved by following these steps: Back up the database: Use the mysqldump command to dump the database into a SQL file. Restore database: Use the mysql command to restore the database from SQL files.
 How to insert data into a MySQL table using PHP?
Jun 02, 2024 pm 02:26 PM
How to insert data into MySQL table? Connect to the database: Use mysqli to establish a connection to the database. Prepare the SQL query: Write an INSERT statement to specify the columns and values to be inserted. Execute query: Use the query() method to execute the insertion query. If successful, a confirmation message will be output.
 How to fix mysql_native_password not loaded errors on MySQL 8.4
Dec 09, 2024 am 11:42 AM
One of the major changes introduced in MySQL 8.4 (the latest LTS release as of 2024) is that the "MySQL Native Password" plugin is no longer enabled by default. Further, MySQL 9.0 removes this plugin completely. This change affects PHP and other app
 How to use MySQL stored procedures in PHP?
Jun 02, 2024 pm 02:13 PM
To use MySQL stored procedures in PHP: Use PDO or the MySQLi extension to connect to a MySQL database. Prepare the statement to call the stored procedure. Execute the stored procedure. Process the result set (if the stored procedure returns results). Close the database connection.
 How to create a MySQL table using PHP?
Jun 04, 2024 pm 01:57 PM
Creating a MySQL table using PHP requires the following steps: Connect to the database. Create the database if it does not exist. Select a database. Create table. Execute the query. Close the connection.
 The difference between oracle database and mysql
May 10, 2024 am 01:54 AM
Oracle database and MySQL are both databases based on the relational model, but Oracle is superior in terms of compatibility, scalability, data types and security; while MySQL focuses on speed and flexibility and is more suitable for small to medium-sized data sets. . ① Oracle provides a wide range of data types, ② provides advanced security features, ③ is suitable for enterprise-level applications; ① MySQL supports NoSQL data types, ② has fewer security measures, and ③ is suitable for small to medium-sized applications.


