Linux file query commands: 1. locate, used to find files that meet the conditions, the syntax is "locate [select parameters] [style]"; 2. find, used to find files in the specified directory, the syntax "find [OPTION]... [search path] [search conditions] [processing action]".

#The operating environment of this tutorial: linux5.9.8 system, Dell G3 computer.
There are two common commands for querying files in Linux:
locate
find
locate
locate allows users to quickly search whether there are specified files in the file system. The method is to first create a database that includes the names and paths of all files in the system. Then when searching, you only need to query this database without actually going deep into the file system. In a general distribution, database creation is automatically executed in crontab.
1. Command format:
locate [选择参数] [样式]
2. Command function:
The locate command can quickly find files when searching the database. locate is a fuzzy search. The database is updated by the updatedb program. updatedb is created periodically by the cron daemon. The locate command searches the database. It is faster than searching the entire hard disk data, but the disadvantage is that if the files found by locate are recently created or renamed, they may not be found. In the default setting, updatedb will run once a day. You can Update the setting value by modifying the crontab. (etc/crontab)
locate is designated to search for files that meet the conditions. It will store the file and directory names in the database. When locate queries files, it will search for /var/lib/mlocate/mlocage. db, to find files or directories that meet the template style conditions. You can use special characters (such as "*" or "?", etc.) to specify the template style. If the specified template is kcpa*ner, locate will find all starting characters. A file or directory whose string is kcpa and ends with ner. For example, if the name is kcpartner, if the directory name is kcpa_ner, all files in the directory, including subdirectories, will be listed.
The function of locate command is similar to that of find. However, locate uses the update program to first create an index database for all files and directory data in the hard disk. When executing loacte, the index is directly searched. The query speed will be reduced. Faster, the index database is generally managed by the operating system, but you can also directly issue an update to force the system to modify the index database immediately.
3. Command parameters:
#-e will be excluded from the search range.
-1 if yes 1. Then start safe mode. In safe mode, users will not see files with permissions that do not allow them to see. This will start to slow down because locate must go to the actual file system to obtain the file's permission information.
-f excludes specific file systems. For example, we do not place files in the proc file system in the database unreasonably.
-q Quiet mode, no error messages will be displayed.
-n Display at most n outputs.
-r Use regular expressions to search for conditions.
-o Specifies the name of the database.
-d Specify the path to the database
-h Display auxiliary messages
-V Display the version information of the program
4. Usage example:
Example 1: Search for all files starting with sh in the etc directory
[root@CentOS7 ~#]locate /etc/sh
/etc/shadow
/etc/shadow-
/etc/shells
[root@centos7 ~#]locate -r "/etc/\sh "  # 正则,锚定词首
/etc/shadow
/etc/shadow-
/etc/shells
[root@centos7 ~#]
Instance 2: Ignore case
[root@centos7 ~#]locate -i ~/d
/root/Desktop/root/Documents/root/Downloads
/root/d1
/root/dd
/var/lib/pcp/pmdas/root/domain.h
[root@centos7 ~#]
Instance 3: Update database
[root@centos7 ~#]locate ~/a
/root/anaconda-ks.cfg
[root@centos7 ~#]updatedb
[root@centos7 ~#]locate ~/a
/root/a.sh
/root/anaconda-ks.cfg
[root@centos7 ~#]
find
1. Main purpose:
The find command is a real-time search tool that completes the search for files by traversing the specified path; when using this command, if no parameters are selected, it will be in the current directory. Search subdirectories and files and display them; in addition, any string before the parameter will be regarded as the name of the directory to be searched. Because it is a real-time traversal search, find has the following characteristics: accurate real-time search, slow speed may only search directories that the user has read and execution permissions.
2.find syntax:
<br/>
Find path: specify the specific target path, the default is the current directory
Search conditions: The specified search criteria can be based on file name, size, type, permissions and other criteria; the default is to find all files under the specified path
Processing action : Operate on files that meet the conditions, and output to the screen by default
3. Search conditions:
According to the file Search by name and inode
Search by owner and group
Search by file type
4. Processing action:
-ls: 类似于对查找到的文件执行 ls -l 命令
-delete: 删除查找到的文件
-fls file: 查找到的所有长格式的信息保存至指定文件中
-ok COMMMAND {} \; 对查找到的每个文件执行由COMMAND指定的命令,且都会交互式要求用户确认
-exec COMMAND {} \; 对查找到的每个文件执行由COMMAND指定的命令;
{}: 用于引用查找至的文件名称自身
find 传递查找到的文件至后面指定的命令时,查找到所有符号条件的文件一次性传递给后面的命令
有些命令不能接受过多的参数,此时命令执行可能会失败,用 xargs 来规避此问题
find |xargs COMMAND
5.常用参数:
文件名和inode类:
-name "文件名称":支持使用glob, *, ?, [], [^]
-iname "文件名称":不区分字母大小写
-inum n:按inode号查找
-somefile name:相同的inode号文件
-links n:链接数为n的文件
-regex "PATTERN":以PATTERN匹配整个文件路径字符串,而不仅仅是文件名称
属主属组类:
-user USERNAME:查找属主为指定用户(UID)的文件
-group GROUPNAME:查找属组为指定组(GID)的文件
-uid UserID:查找属主为指定的UID号的文件
-gid GroupID:查找属组为指定的GID号的文件
-nouser:查找没有属主的文件
-nogroup:查找没有属组的文件
文件类型类:
b block (buffered) special
c character (unbuffered) special
d directory
p named pipe (FIFO)f regular file
l symbolic link
s socket
逻辑组合条件类:
组合条件:
与:-a
或:-o
非:-not, !
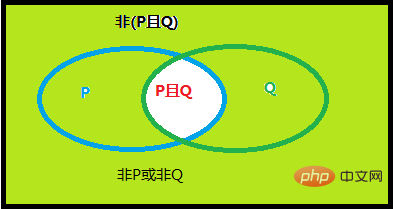
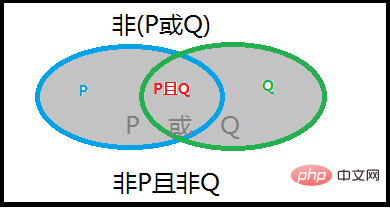
摩根定律:
(非P) 或(非Q) = 非(P且Q)
(非P) 且 (非Q) = 非(P或Q)


文件大小类:
-size [+|-]#UNIT
    常用单位:k,M,G
#UNIT: (#-1,#]
    如:5M 表示 (4M,5M]
-#UNIT: [0,#-1]
    如:-5M 表示 [0,5M]
+#UNIT: (#,oo)
如:+5M 表示 (6M,oo)关于文件大小类的解释:为什么-size 5M 还是找精确的5M而是表示(4M,5M], 试想文件的大小指什么?是指文件数据的大小还是包括了元数据后的大小,那你找元数据的大小有意义吗?但文件的大小肯定是包含元数据大小的,而我们一般以文件大小找文件时往往考虑的是文件数据的大小;另外,精确查找一定大小的文件意义不大;所以这里的大小会有1个单位的浮动。
时间戳类:
以”天”为单位:
    -atime [+|-]#
        #: [#,#+1)
        +#: [#+1,oo)
        -#: [0,#)
    -mtime
    -ctime
以“分钟”为单位:
    -amin
    -mmin
-cmin关于时间戳类的解释:为什么-atime 3 表示的是 [3,4),这个就很好解释了,我们这儿所说的时间是指时间段而非时刻,一“天”与一“分钟”都是指一个时间段,只有[3,4)这个半闭半开的区间才能完整地表示第三天。
权限类:
-perm [/|-]MODE
    MODE: 精确匹配权限
    /MODE: 任何一类(u,g,o)对象的权限中只要能一位匹配即可,属于或关系。以前用'+',CentOS 7以'/'替代之
    -MODE: 每一类对象都必须同时拥有指定权限,属于与关系
0:表示不关注示例:
find -perm 644 表示要严格匹配644的文件
find -perm +222 表示u,g,o任何一类用户有写权限即匹配
find -perm -222 表示仅严格匹配写权限,即每个用户必须要有写权限
find -perm -002 表示仅严格匹配other用户的写权限
6.使用示例:
实例1:将配置文件备份到指定目录下并添加扩展名.org
[root@localhost ~]# find . -name "*.conf" -exec cp -r {} /testdir/{}.org \;
[root@localhost ~]# cd /testdir/
[root@localhost testdir]# ls
a.conf.org  b.conf.org
[root@localhost testdir]#实例2:.提示删除存在时间超过3天以上的属主为young的临时文件
[root@localhost ~]# find /tmp -ctime +3 -user young -exec rm -fr {} \;
[root@localhost ~]#实例3:在主目录中查找可被其它用户写入的文件
[root@localhost ~]# find ~ -perm -002
/root/num
[root@localhost ~]# find ~ -perm -002 -exec chmod o-w {} \;
[root@localhost ~]# ll num
--w--w---- 1 root root 35 Jan 21 05:55 num实例4:查找/var目录下属主为root,且属组为mail的所有文件
[root@localhost ~]# find /var -user root  -group mail -ls #默认关系就是与
1179652    4 drwxrwxr-x   2 root     mail         4096 Jan 23 11:04 /var/spool/mail
实例5:查找/var目录下不属于root、lp、gdm的所有文件
[root@localhost ~]# find /var ! -user root ! -user lp ! -user gdm
实例6:查找/var目录下最近一周内其内容修改过,同时属主不为root,也不是postfix的文件
[root@localhost ~]# find /var/ -mtime -7 ! -user root ! -user postfix -ls
1179676    4 drwx------   3 daemon   daemon       4096 Jan 23 11:04 /var/spool/at
524399    4 drwx------   2 nginx    nginx        4096 Jan 23 03:16 /var/log/nginx
524413    0 -rw-r--r--   1 nginx    root            0 Jan 23 03:16 /var/log/nginx/access.log
524391    0 -rw-r--r--   1 nginx    root            0 Jan 21 03:44 /var/log/nginx/error.log
132174    4 drwx------   3 nginx    nginx        4096 Jan 21 03:44 /var/lib/nginx
132175    4 drwx------   7 nginx    nginx        4096 Jan 21 03:44 /var/lib/nginx/tmp
132173    4 drwx------   2 nginx    root         4096 Jan 21 03:44 /var/lib/nginx/tmp/client_body
132219    4 drwx------   2 nginx    root         4096 Jan 21 03:44 /var/lib/nginx/tmp/proxy
132221    4 drwx------   2 nginx    root         4096 Jan 21 03:44 /var/lib/nginx/tmp/uwsgi
132222    4 drwx------   2 nginx    root         4096 Jan 21 03:44 /var/lib/nginx/tmp/scgi
132220    4 drwx------   2 nginx    root         4096 Jan 21 03:44 /var/lib/nginx/tmp/fastcgi
实例7:查找当前系统上没有属主或属组,且最近一个周内曾被访问过的文件
[root@bash ~]# find / -nouser -o -nogroup -a -atime -7
实例8:查找/etc目录下大于1M且类型为普通文件的所有文件
[root@bash ~]# find /etc/ -size +1M -type f
/etc/selinux/targeted/policy/policy.29
/etc/udev/hwdb.bin
实例9:查找/etc目录下所有用户都没有写权限的文件
[root@bash ~]# find /etc/ ! -perm /222
/etc/pki/ca-trust/extracted/java/cacerts
/etc/pki/ca-trust/extracted/openssl/ca-bundle.trust.crt
/etc/pki/ca-trust/extracted/pem/tls-ca-bundle.pem
/etc/pki/ca-trust/extracted/pem/email-ca-bundle.pem
/etc/pki/ca-trust/extracted/pem/objsign-ca-bundle.pem
/etc/lvm/profile/cache-mq.profile
/etc/lvm/profile/cache-smq.profile
/etc/lvm/profile/command_profile_template.profile
/etc/lvm/profile/metadata_profile_template.profile
/etc/lvm/profile/thin-generic.profile
/etc/lvm/profile/thin-performance.profile
/etc/openldap/certs/password
/etc/gshadow
/etc/dbus-1/system.d/cups.conf
/etc/shadow
/etc/gshadow-
/etc/ld.so.conf.d/kernel-3.10.0-327.el7.x86_64.conf
/etc/shadow-
/etc/udev/hwdb.bin
/etc/machine-id
/etc/pam.d/cups
/etc/sudoers
实例10:查找/etc目录下至少有一类用户没有执行权限的文件
[root@bash ~]# find /etc/ ! -perm -111 # 至少有一类用户没有就是所有用户都没有
实例11:.查找/etc/init.d目录下,所有用户都有执行权限,且其它用户有写权限的文件
[root@bash ~]# find /etc/init.d -perm -113
/etc/init.d
或者
[root@bash ~]# find /etc/init.d -perm -111 -perm -002
/etc/init.d
实例12:摩根定律找出/tmp目录下,属主不是root,且文件名不以f开头的文件
[root@centos7 ~]#find /tmp \( -not -user root -a -not -name 'f*' \) -ls
即
[root@centos7 ~]#find /tmp -not \( -user root -o -name 'f*' \) -ls
实例13:查找/etc/下,除/etc/sane.d目录的其它所有.conf后缀的文件
[root@bash ~]# find /etc -path '/etc/sane.d' -prune -o -name '*.conf'
实例14:匹配文件路径或文件
[root@bash ~]# find /usr/ -path '*local'
/usr/bin/abrt-action-analyze-ccpp-local
/usr/share/doc/postfix-2.10.1/examples/qmail-local
/usr/share/aclocal
/usr/libexec/postfix/local
/usr/local
实例15:基于正则表达式匹配文件路径
[root@bash ~]# find . -regex ".*txt$"
./.mozilla/firefox/4dqu966q.default/revocations.txt
./vimrc/spf13-vim/LICENSE.txt
./a.txt
相关推荐:《Linux视频教程》
The above is the detailed content of What are the commands to query files in Linux?. For more information, please follow other related articles on the PHP Chinese website!