Git is an open source distributed version control system that can effectively and quickly handle version management of projects from small to very large projects. Git is developed and implemented through C language.
Git and SVN are two completely different version control systems. Git is a distributed version control system, while SVN is a centralized version control system. To compare the differences between Git and SVN, you first need to understand the basic concepts of distributed version control systems and centralized version control systems.
Centralized version control system: A notable feature is that the version library is stored on a central server. The central server manages the version information and branch information of the project in a unified manner. Each member of the team needs to pull the latest code from the central server before starting work. After completing the work, submit the code to the central server. The centralized version server has two disadvantages:
Distributed version control system: The biggest difference from the centralized version control system is that
all members of the team have a complete version library on their work computers and there is no central server. , This is equivalent to each member of the team having his own small library (version library), and members can exchange books in their own library with each other (submit their modifications to each other). There is no need for a central server to manage and coordinate management. When actually using a distributed version control system, it is rare to push the version library on computers between two people. This is because sometimes you are not in the same LAN, or your colleague's computer is shut down. Therefore, distributed version control systems usually also have a computer that acts as a "central server", but the role of this server is only to facilitate "exchanging" everyone's modifications. Without it, everyone can still work, but it is inconvenient to exchange modifications. .
The version library on this computer that acts as the "central server" is called the remote version library, and the version libraries on other member computers are called local version libraries. More on this later.
The network topology of the distributed version control system is shown in the figure below:
3. System environment
System | Version |
Windows | Windows10 |
Linux | Ubuntu16.04 |
4. Install Git client
After talking about the basic concepts of Git, let’s install a Git client and play around. Here is a brief introduction to the installation of the Git client based on different operating systems.
Under Linux system
First check whether the Git client has been installed on the computer through the git --version command.

If you have already installed it, you can skip this chapter. If it is not installed, continue reading below:
Linux systems have different distribution versions. You can check the Linux version through the cat /proc/version command.
- Installing Git under Debian or Ubuntu
In Debian or Ubuntu, you can install Git through the apt package management tool. The command is as follows:
sudo apt-get install git
Copy after login
- Red Hat or Installing Git under CentOS
Red Hat or CentOS can install Git through the yum package management tool. The command is as follows:
yum install git -y
Copy after login
If the yum command cannot be found, you need to install the yum tool first. You can refer to the following command
#删除yum.repos.d目录下所有文件rm -f /etc/yum.repos.d/*#然后重新下载阿里的yum源wget -O /etc/yum.repos.d/CentOS-Base.repo http://mirrors.aliyun.com/repo/Centos-7.repo#清理缓存yun clean all
Copy after login
Under Windows system
The official download address of Git is: Git download address
After downloading the installation package, keep clicking Next Ready to install. Again I won’t go into details.
5. Local repository operation
After installing Git under Windows, two applications, Git Bash and Git GUI, will appear. Git Bash is the command line tool of Git, and Git GUI is It is a visualization tool for Git (generally rarely used).
Create a local repository
Creating a local repository is divided into two steps:
The first step is to create an empty folder named: git_learn.
The second step is to execute the git init command in the folder to turn the folder into a repository that can be managed by git.
After performing the second step, a hidden folder named .git will appear in the git_learn directory, which is the git version library. Remember not to manually modify any content in the .git folder to avoid the local version library becoming unavailable.
After the local version library is built, you can create a file in the git_learn folder for testing. A file named readme.txt is created here.
Add to the staging area
The readme.txt file can be submitted to the staging area through the git add readme.txt command (the concept of the staging area will be introduced in detail later). If there are multiple files to be added, you can execute the git add . command.
Submit to the repository
Because git has a complete local repository, you also need to submit the readme.txt file created earlier to the current branch of the local repository. The default is master. The command format is git commit -m '<message>'</message>, where your submission remarks are written.
Workspace and staging area
There are two very important concepts here, one is the workspace and the other is the staging area (a concept unique to Git).
Workspace
The workspace is the directory that can be seen on your computer (excluding hidden files). For example: the git_learn directory is a workspace.
Staging area
The workspace has a hidden directory .git. This is not a workspace, but a Git repository. The most important one is the stage.
There is also the first branch that Git automatically creates for us called master, and a pointer to master called HEAD.
The workspace, staging area, git add command and git comit command were mentioned earlier. So what's the relationship between them? Let’s use a flow chart to show it below:
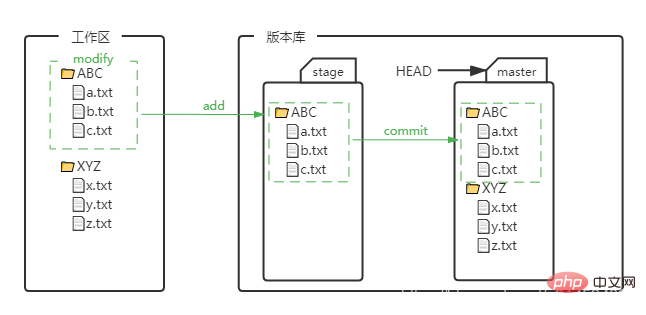
Use the add command to submit the ABC folder in the workspace to the temporary storage area stage, and use the commit command to submit the ABC folder in the stage to the current stage. branch master.
Manage modifications
Git manages modifications rather than files. Modification here refers to any operation on the workspace, including adding files, deleting files, modifying files, etc. Even adding a sentence or deleting a character in the file can be considered a modification. The following is an example, still taking the readme.txt file as an example:
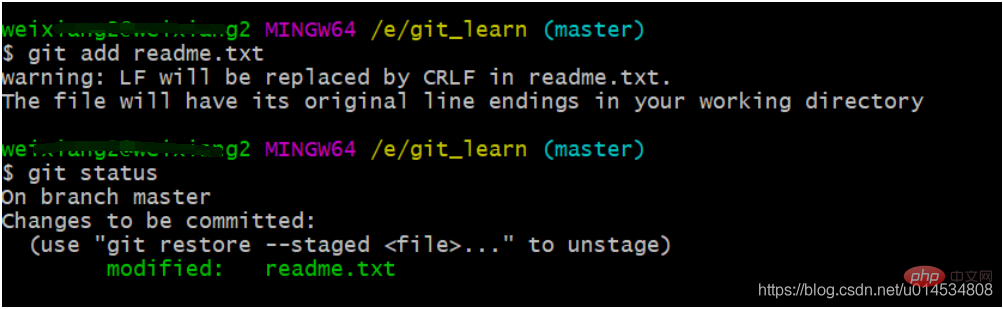
- 第一次在readme.txt文件中增加一个词语 gittest。然后执行
git add readme.txt,并通过命令git status查看状态。
hello world
gittest
- 第二次再在readme.txt文件上添加一行内容
git tracks changes。
hello world
gittest
git tracks changes
直接执行git commit -m 'git tracks changes'命令。然后通过 git status,可以发现第二次的修改没有提交。这是因为第二次的修改没有先提交到暂存区中。

我们的操作过程是第一次修改 -> git add -> 第二次修改 -> git commit。当使用git add 命令后,在工作区中的第一次修改被放入暂存区中,准备提交,在工作区中的第二次修改没有被放入暂存区中,所以,git commit只负责把暂存区中的修改提交到当前分支。所以第二次的修改没有提交。
也就是说,所有的修改必须先通过git add 提交到暂存区,然后通过git commit 提交到当前分支。。在实际开发中一般是将所有修改合并起来add,然后在一起commit。
删除文件
当前分支上有一个已经废弃不用的文件,该如何删除呢?比如要删除一个名为test1.txt文件。只需要两行命令。
git rm test1.txtgit commit -m "remove test.txt"
Copy after login
5.Ubuntu搭建私有的git仓库
前面介绍了在实际开发中,一般会拿一台电脑作为“中央仓库”,充当中央仓库的电脑需要安装一个代码仓库软件,这里选用开源软件GitLab,它是基于git实现的在线代码仓库软件,提供web可视化管理界面,可以在本地部署。通常用于企业团队内部协作开发。当然,如果你不想搭建私人的git仓库,那么也可以直接使用最大的同性交友网站Github(使用与GitLab类似)。
那么该如何在Ubuntu上安装GitLab软件,搭建私有的Git仓库呢?
- 安装必须的一些服务
#更新apt源sudo apt-get update#安装依赖包,运行命令sudo apt-get install curl openssh-server ca-certificates postfixsudo apt-get install -y postfix
Copy after login
- 接着信任 GitLab 的 GPG 公钥:
curl https://packages.gitlab.com/gpg.key 2> /dev/null | sudo apt-key add - &>/dev/null
Copy after login
- 配置镜像路径
由于国外的下载速度过慢,所以配置清华大学镜像的路径。
sudo vi /etc/apt/sources.list.d/gitlab-ce.list
Copy after login
在该文件中写入如下代码
deb https://mirrors.tuna.tsinghua.edu.cn/gitlab-ce/ubuntu xenial main
Copy after login
- 安装gitlab-ce
sudo apt-get updatesudo apt-get install gitlab-ce
Copy after login
安装gitlab-ce成功之后。
5. 修改外部url
在gitlab配置文件/etc/gitlab/gitlab.rb中修改外部url,改为自己的ip地址或者域名。
sudo vi /etc/gitlab/gitlab.rb
Copy after login
找到external_url,修改其默认的地址,这里改成了我本机局域网IP:192.168.40.138
external_url 'http://192.168.40.138/' ## 本机的局域网ip地址为192.168.41.128
Copy after login
- 执行配置
前面步骤顺利的话就可以执行配置了,该过程可能需要较长的时间。
sudo gitlab-ctl reconfigure
Copy after login
- 启动GitLab
sudo gitlab-ctl start
Copy after login
可以通过ps -ef|grep gitlab 命令查看GitLab是否启动成功。
8. 进行浏览器访问
GitLab成功启动之后就可以通过浏览器访问GitLab的主页了。在浏览器上输入http://192.168.40.138/;
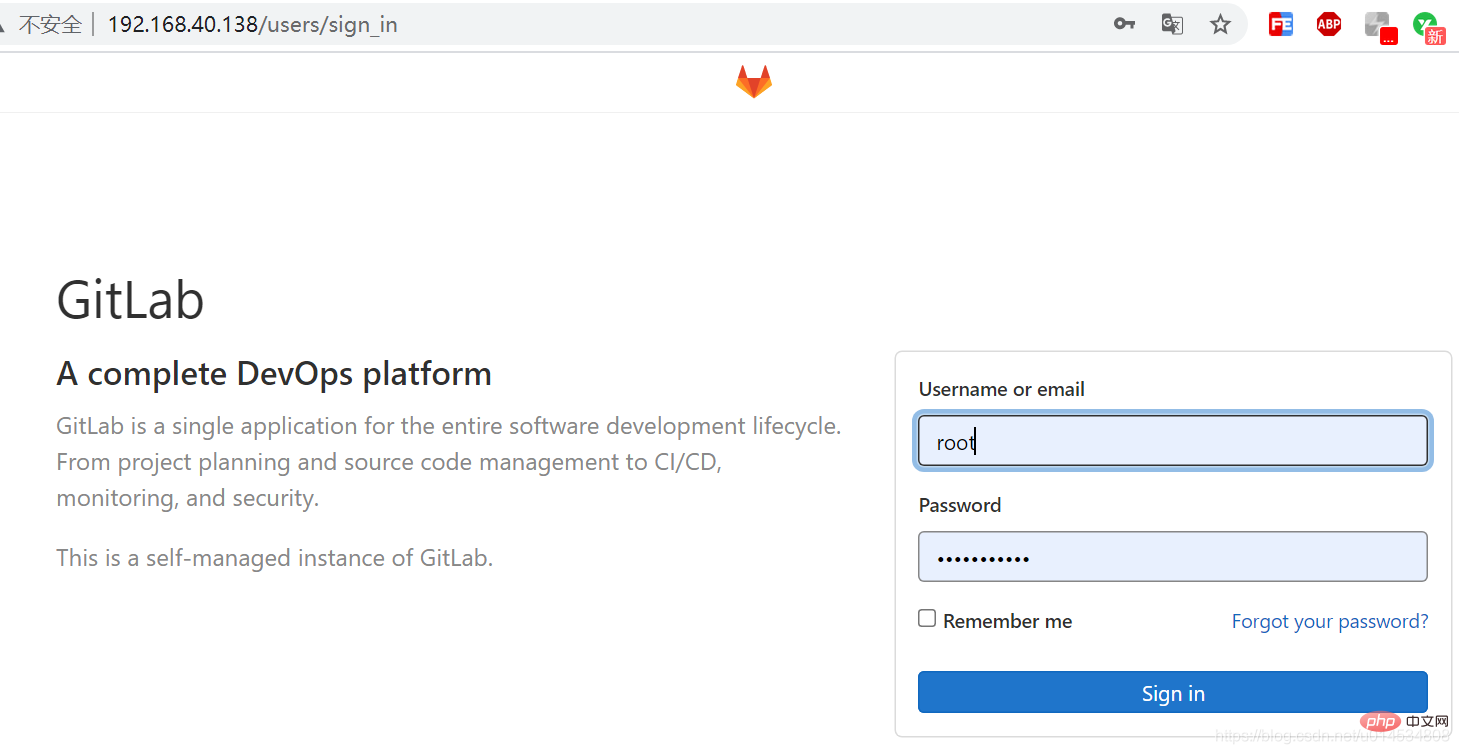
默认输入的用户名是root用户,输入的密码是root的账户密码。
至此GitLab的安装就全部结束,我们也成功的搭建了属于自己的Git仓库。
GitLab的使用
添加用户
点击设置按钮,进入设置栏,选中Users->New User 进入添加用户页面。
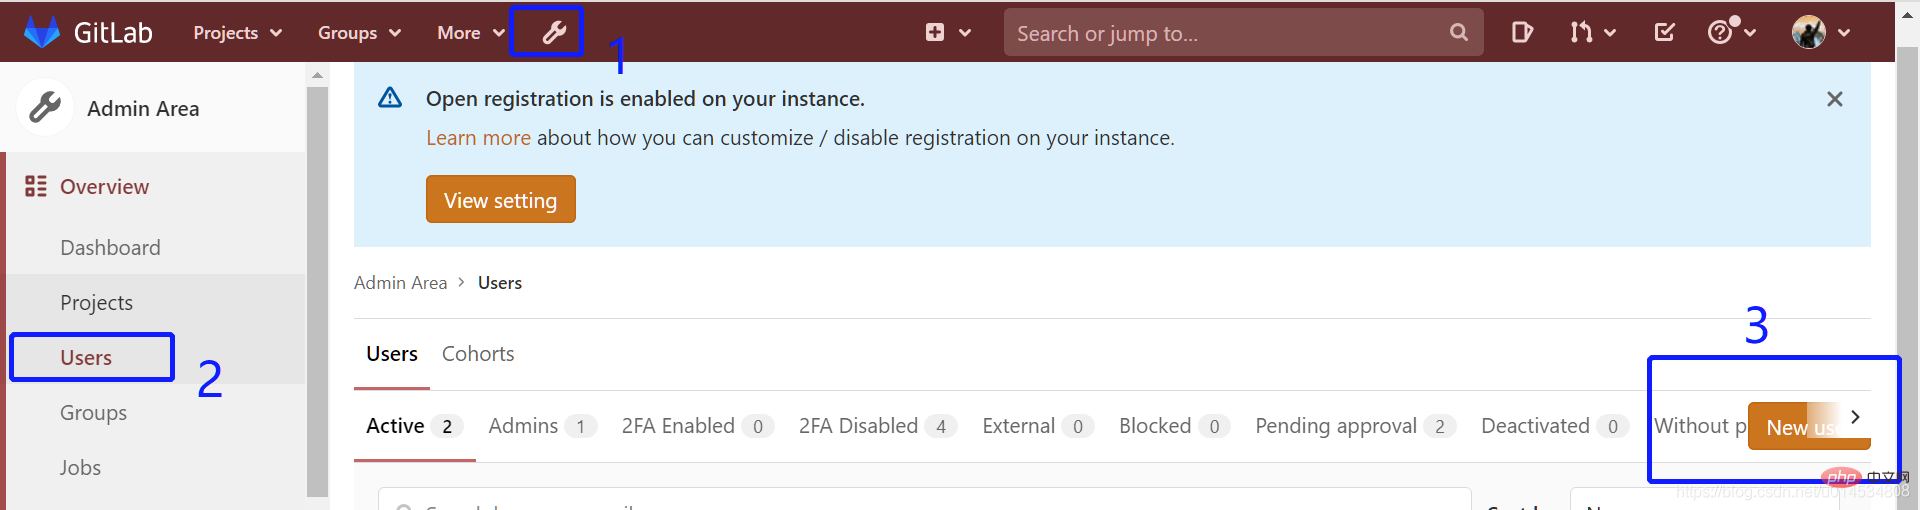

输入姓名,用户名,和邮箱即可注册添加新用户。
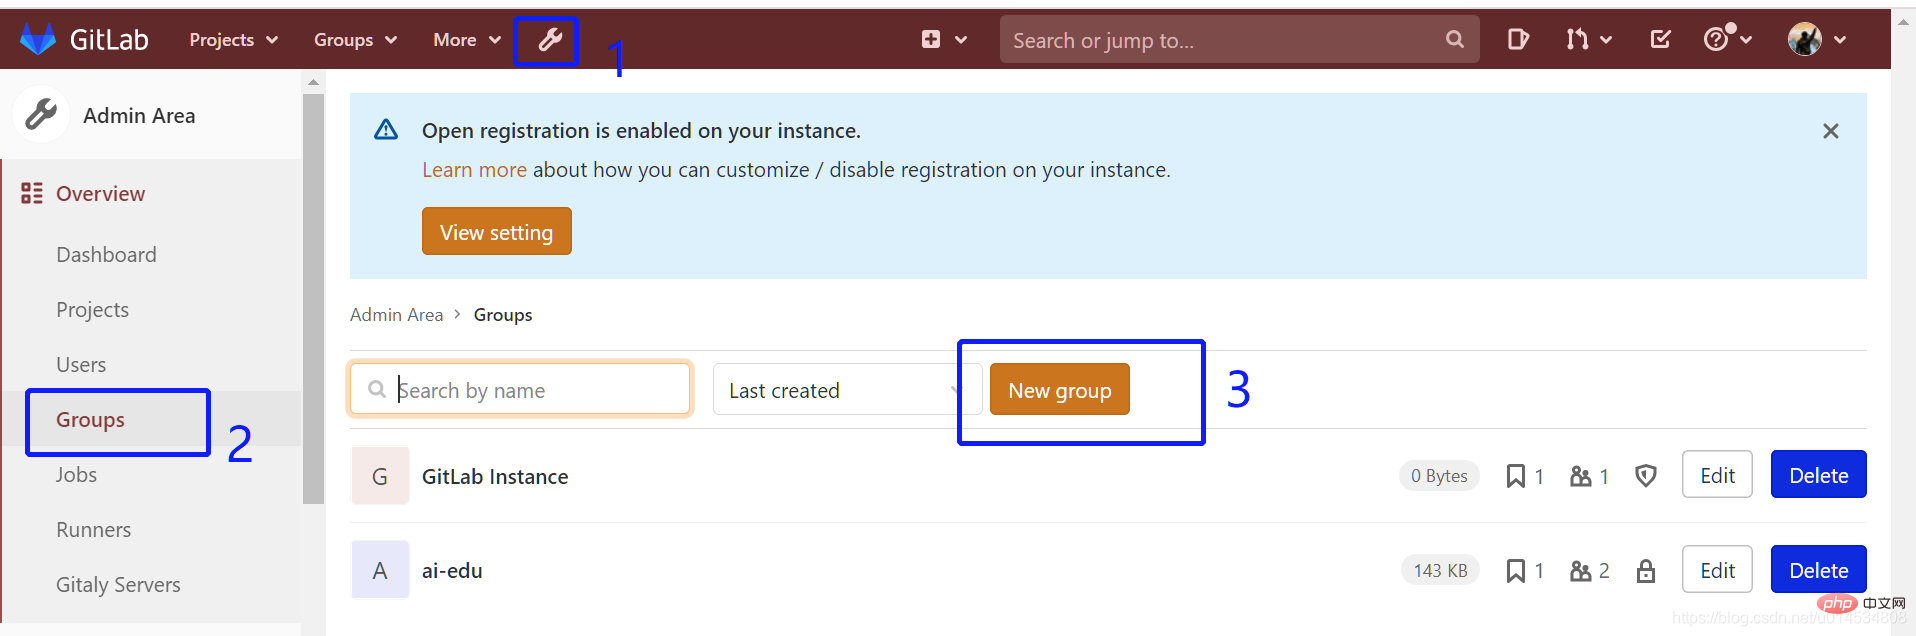
添加团队
用户添加好之后,就是将用户添加到团队中,GitLab中默认会有一个名为GitLab Instance的团队,你也可以添加自己的团队,这里我添加了一个名为ai_edu的团队。并在团队中添加了两个成员。
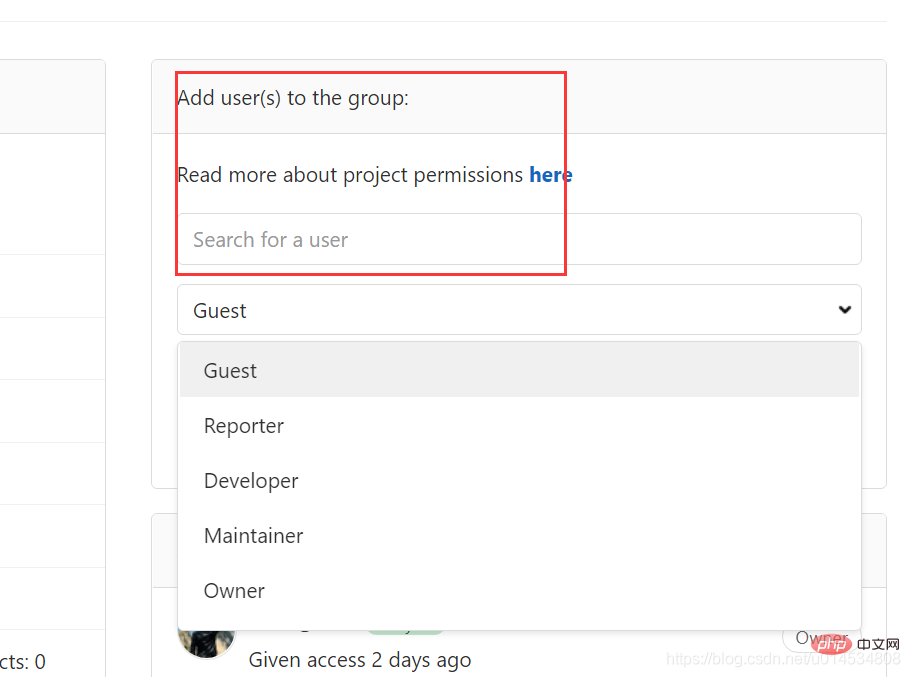
选中要添加成员的团队,在右侧会出现一个添加Add user(s) to the group的栏目。再此栏目中所有用户并添加到团队中。用户的角色有游客,测试人员,开发人员,管理者,拥有者等几个不同的角色。
新建远程仓库
说完了用户和团队的设置后,现在就进入了重点了,如何新建一个远程仓库。同样也是比较方便。操作步骤是:Project->Your projects->New project
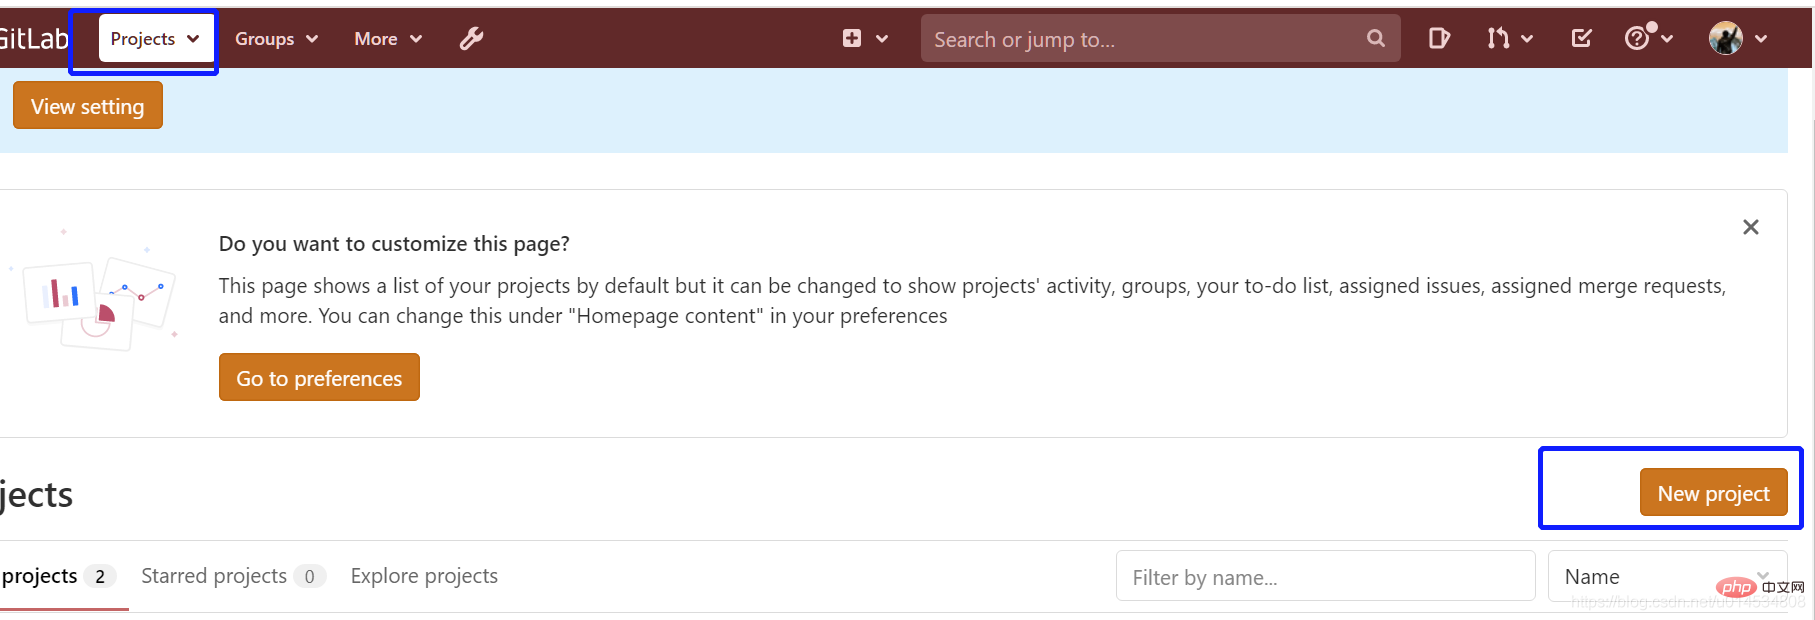
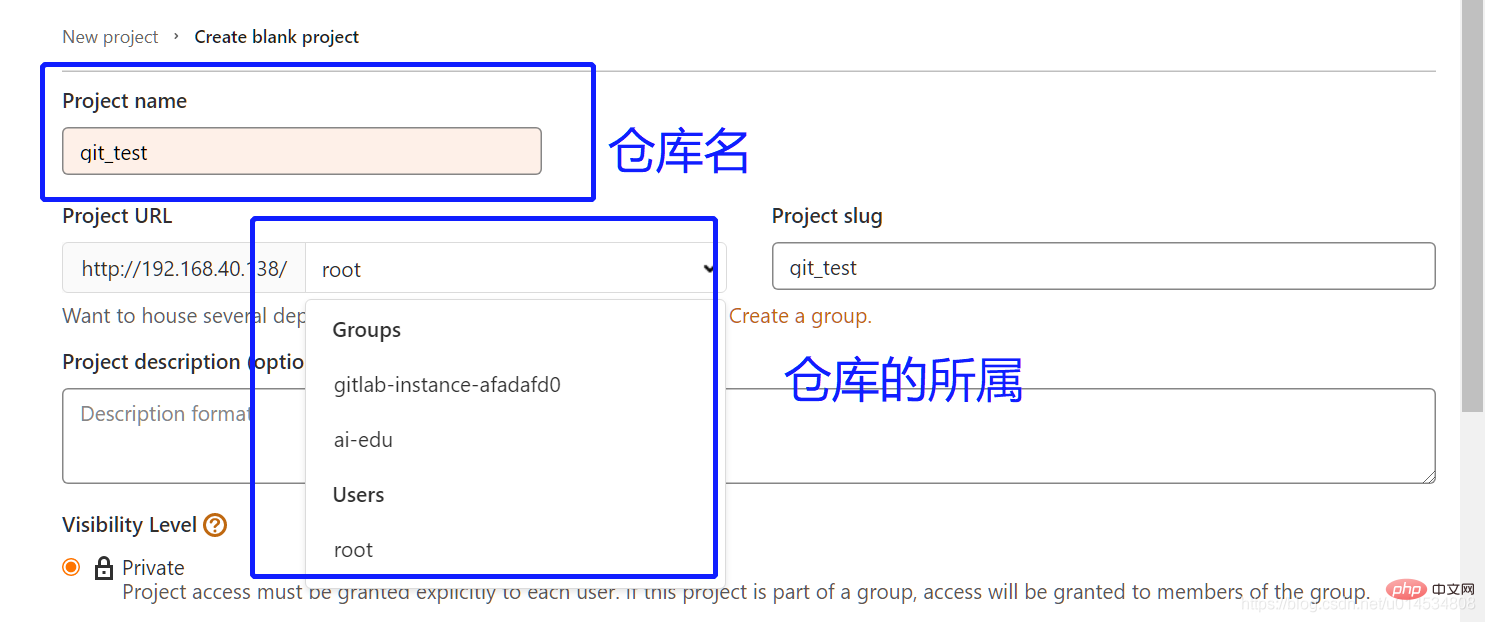
这里新建了一个名为git_test的远程仓库,仓库的所有这是属于ai_edu团队。

这里仓库的权限等级有三个等级,分别是:Private(只有你团队的人才能拉取和推送代码),Internal(除了黑名单之外的用户可以拉取和推送代码)。Public (所有的用户都可以拉取)。
SSH key的配置(生成公钥和私钥)
为啥要配置SSH key呢?这是因为GitLab与你的电脑是通过SSH协议来通信的。说白了,如果你没有配置SSH key的话,则你不能推送代码到远程库。这里首先在你本地生成公钥和私钥文件,然后把公钥文件的内容复制到GitLab上。
- 配置用户名
git config --global user.name “username”
Copy after login
- 配置邮箱
git config --global user.email jayxiang31@gmail.com
Copy after login
jayxiang31@gmail.com替换成你实际的邮箱地址。不需要加单引号。
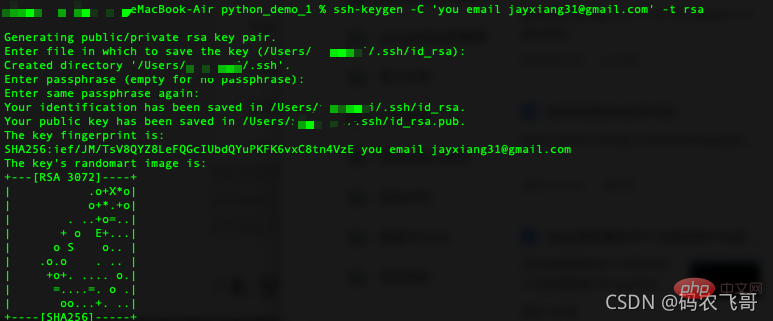
4. 生成公钥和私钥
ssh-keygen -C 'you email jayxiang31@gmail.com' -t rsa
Copy after login
如果简单些的话可以直接填写ssh-keygen 命令。邮箱地址填写前面设置的邮箱地址。有提示的话一直按Enter键。正确执行后会输入如下信息
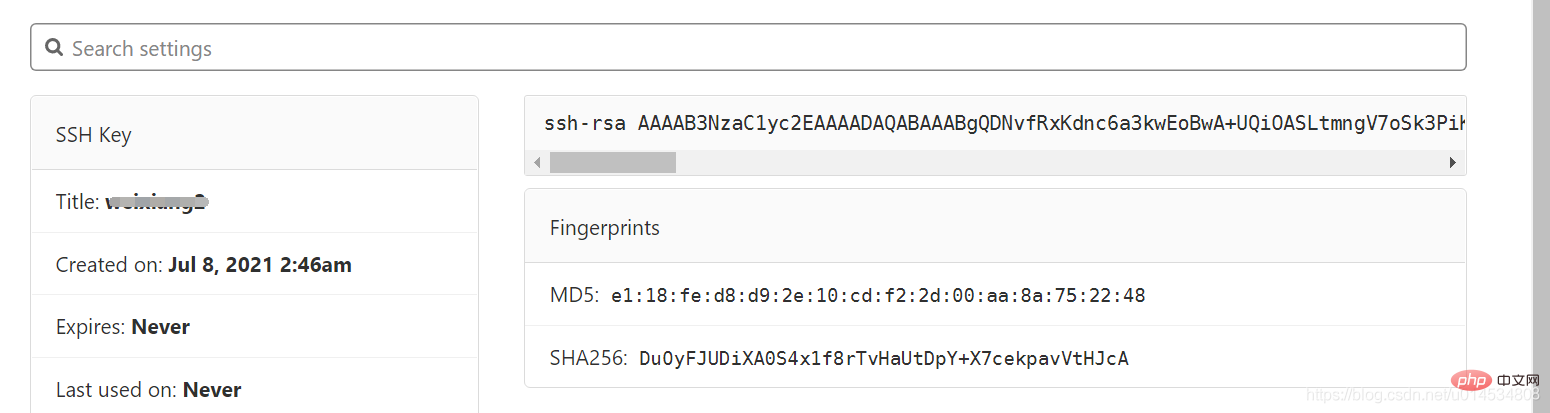
2 找到公钥文件id_rsa.pub,复制公钥内容到GitLab
6. 分支管理
创建与合并分支
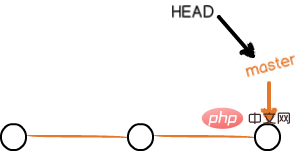
分支的概念:分支就是每次提交创建的点所连接成的时间线。这条时间线就是一个分支,默认的话只有一个主分支master分支。HEAD严格来说不是指向提交,而是指向master,master才是指向提交,HEAD指向的就是当前分支。
一开始的时候,master分支就是一条线,Git用master指向最新的提交,再用HEAD指向master,就能够确定当前的分支以及当前分支的提交点。
每次提交,master分支都会向前进移动一步,这样随着你不断提交,master分支的线也会越来越长。其结构如下图所示:
1. 创建dev分支
当我们新创建一个分支dev时,Git会创建一个指针dev指向master分支当前的提交点。当切换到dev分支后,HEAD指针会指向dev。也就是说HEAD始终是指向当前分支的。
git checkout -b dev
Copy after login
git checkout 加上-b参数表示创建并切换到dev分支上,相当于下面两条命令。
$ git branch dev
$ git checkout dev
Copy after login
执行该上面的命令之后的git的提交时间线如下图所示:

当在dev分支上提交代码(未改变master分支)之后,dev分支会不断的向后推进。而master指针的指向则不会变。

git checkout命令是一个比较特殊的命令,传入不同的参数会有截然不同的效果。例如:git checkout -- file 命令,表示的意思是撤销file文件中所有的修改。所以Git还提供了git switch命令用于创建和切换分支。
## 创建并切换到新的dev分支git switch -c dev## 切换到已有的master分支git switch master
Copy after login
2. 查看所有分支
分支创建好之后,可以通过git branch命令进行查看。
3. 分支合并
当团队成员在dev分支上开发完毕之后,就可以将dev分支上的内容合并到master分支上,合并分支的原理就是将master指针指向dev的当前提交。Git合并分支只是改了下指针,工作区的内容没有改变。

其合并的命令分两步,第一步是切换到master分支,第二步是合并dev分支
#切换到master分支git checkout master#合并dev分支git merge dev
Copy after login
- 删除dev分支
现在dev分支的内容也合并到了master分支上了,可以将dev分支删除了。Git删除dev分支其实就是删除dev指针。删除之后又只剩下master分支了。需要注意的是必须要先切换到master分支上再进行删除dev分支的操作。删除dev分支的命令如下:
git branch -d dev
Copy after login
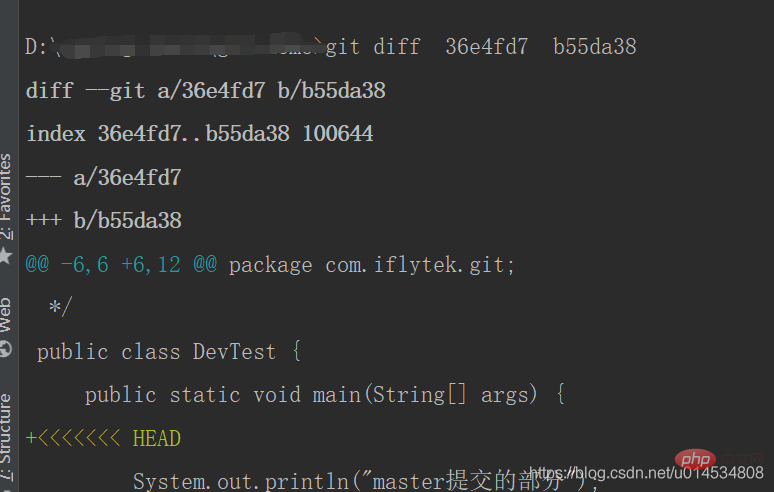
解决冲突
在团队协作过程中,难免会碰到各种修改冲突。那么该如何解决这些冲突呢? 例如:你和你同事分别修改了readme.txt文件,那么当你们同时提交时就会出现冲突。又或者在你在master分支和feature1分支上分别修改了readme.txt文件。那么当你合并feature1分支到master分支时就会出现冲突。举个栗子吧:
- 在feature1分支上给readme.txt文件中加上了文本
处理冲突。然后提交到feature1分支。
- 切换到master分支,给readme.txt文件中加上文本
冲突处理
master有冲突
Copy after login
然后提交到master分支上。
3. 将feature1分支合并到master分支,此时就会出现合并冲突。如下图所示:
冲突之后,Git用>>>>>>标记出不同分支的内容。如下图所示:
处理冲突的方式就是编辑冲突内容。然后重新提交。
$ git add README.md
$ git commit -m "解决冲突"
Copy after login
比较差异
- 比较两个提交之间的差异
git diff 36e4fd7 b55da38
- 比较工作区与仓库区的不同,HEAD表示最新的那次提交
git diff HEAD
分支管理策略
通常情况下,Git在合并分支时,会使用Fast forward模式。但是,这种模式下,删除分支后,会丢掉分支信息。如下图所示,删除dev分支之后,分支的信息也就就丢失了

如果要强制禁用Fast forward模式,Git会在merge时生成一个新的commit。当删除分支时就不会丢失分支信息。其命令是
git merge --no-ff -m "merge with no-ff" dev
准备合并dev分支,其中--no-ff参数,表示禁用Fast forward,因为本次合并要创建一个新的commit,所以加上-m参数。把commit描述写进去。
Bug分支
当你接到一个修复代号为01的bug的任务时,很自然地,你会创建一个分支issue-01来修复它,但是,如果这是你正在dev分支上进行的工作还没有提交,提交吧,可是你在dev上的工作只进行了一般,还没法提交,预计完成还需1天的时间。但是,现在必须要在两个小时内修复代号01的bug。这时候该怎么办呢?你不是期望有一个功能可以隐藏你当前在dev上未提交的工作,然后,切换到issue-01分支修改bug呢。
通过stash功能可以满足你的愿望,将当前工作现场隐藏起来。如下图所示:执行git stash命令之后,新建的hello.html文件就从工作区中消失了。
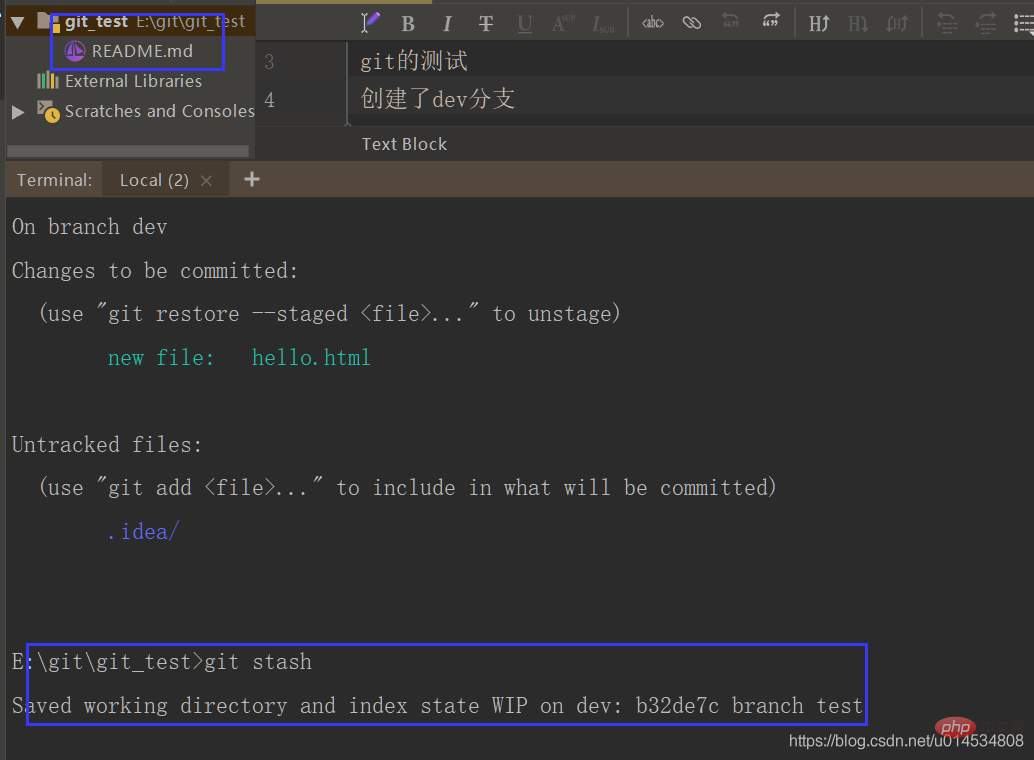
保存工作现场
git stash
Copy after login
git stash命令可以将当前未提交的工作隐藏起来。让你的工作区变的干净清爽。
查看工作现场
git stash list 可以查看当前仓库所有已经保存的工作现场。
git stash list
Copy after login
恢复工作现场
现在代号为01的bug已经修复好了,你可以继续切换到dev分支上进行开发了。那么这时候你需要做的第一件事就是恢复之前保存的工作现场。恢复工作现场的命令是:
git stash apply
Copy after login
删除工作现场
通过git stash apply 命令可以恢复工作现场。但是,恢复之后工作现场还在。那么这时候我们还需要一个命令来删除工作现场。其命令是:
git stash drop
Copy after login
恢复并删除工作现场
恢复工作现场一条命令,删除工作现场又是一条命令。未免有点繁琐了吧。有没有将两者合二为一的命令呢?答案是有的:通过下面的命令就可以实现:
git stash pop
Copy after login
在master分支上修复了bug后,我们想一想,dev分支是早期从master分支分出来的,所以,这个bug其实在当前dev分支上也存在。那怎么在dev分支上修复同样的bug?重复操作一次,提交不就行了?这种方法也不是不行,如果该BUG涉及的修改过多,这样的方式就显得有点捉襟见肘了。那么我们能不能把修改BUG做的提交复制到当前的dev分支呢?答案是有的:
合并某一次的提交
git cherry-pick 821ea4d
Copy after login
通过git cherry-pick 命令可以将单个的提交复制到当前分支。可以通过 git log 查看提交的提交的版本号。
feature分支
添加一个新功能时,你肯定不希望因为一些实验性质的代码,把主分支搞乱了,所以,每添加一个新功能,最好新建一个feature分支,在上面开发,完成后,合并,最后,删除该feature分支。
前面介绍可以通过git branch -d branchname 命令删除分支。但是,如果被删除的分支还没有合并到主分支的话,用该命令删除的话分支的话,Git会抛出一个错误提示并不能删除该分支。如下:要删除一个名为feature-01的分支。但是该分支还没有被merge。这时候就需要强制删除分支的命令了。
git branch -D feature-01
Copy after login
其中feature-01为待删除的分支名。其实就是将-d参数换成-D参数。
远程仓库(多人协作)
前面说了那么多,好像都是一个人在本地操作,没有涉及到多人协作的情况。这在团队开发中肯定是不可能的啦,因为我们是一个team。那么多人协作的情况涉及哪些操作呢?
本地仓库关联远程仓库
git remote add origin http://192.168.40.138/ai-edu/git-demo.git
Copy after login
或者,推荐使用下面这种,因为前面配置了SSH公钥和私钥
git remote add origin git@gitee.com:jayxiang31/python_learn.git
Copy after login
第一次先拉取远程库中的README.md和.gitignore等文件
git pull --rebase origin master
Copy after login
克隆远程仓库
前面第三章已经搭好了私有的Git仓库管理器GitLab。同时也创建了一个名为git_test的仓库。现在要做的就是将远程仓库克隆下来。克隆的命令是git clone
git clone http://192.168.40.138/ai-edu/git_test.git
Copy after login
其中http://192.168.40.138/ai-edu/git_test.git 是远程仓库的地址。
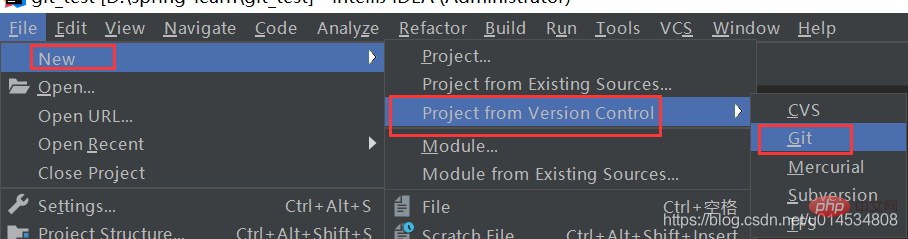
当然也可以在IDEA上直接通过图形界面操作,还省去了导入项目的过程。其操作步骤是:
- 选中
File->New->Project from Version Control->Git。如下图所示:
- 在URL中填入远程仓库的地址,点击Clone按钮。如下图所示:
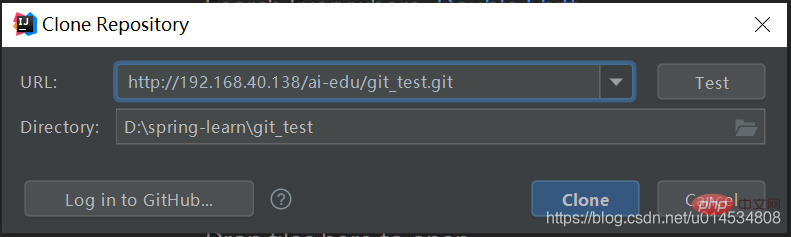
需要注意的是默认情况下只会克隆master分支,其他的分支不会被克隆下来。其他的分支需要通过git pull命令拉取,后面会详细介绍。
删除远程Git仓库
git remote rm origin
Copy after login
查看远程分支
通过git remote命令可以查看远程仓库,origin表示远程主机。
通过git remote -v 命令可以查看远程仓库详细的信息,包括远程仓库的地址。
$ git remote -v
origin  http://192.168.40.138/ai-edu/git_test.git (fetch)origin  http://192.168.40.138/ai-edu/git_test.git (push)
Copy after login
上面显示了可以抓取和推送的origin的地址。如果没有推送权限,就看不到push的地址。
推送分支
现在将远程仓库克隆下来了,那么该如何将当前分支上所有的本地提交推送到远程库呢?答案是通过git push命令,其语法结构是git push <remote branch> <local branch></local></remote> 其中<remote branch></remote>表示远程分支名,<local branch></local>表示本地分支名。
git push origin master
Copy after login
该语句表示将本地的master分支推送到远程的origin分支上。在实际应用中会在git push命令后面加上-u参数,就像git push -u origin master这样。这是因为如果当前分支与多个主机存在追踪关系,则可以使用 -u 参数指定一个默认主机,这样后面就可以不加任何参数使用git push。那么哪些分支该与远程分支保持一致呢?一般认为:
- master 分支是主分支,需要时时与远程同步
- dev分支是开发分支,团队所有成员都需要在上面工作,所以也需要与远程同步
- bug分支只用于在本地修复bug,就没必要推到远程了,除非老板要看看你每周到底修复了几个bug;
- feature分支是否推到远程,取决于你是否和你的小伙伴合作在上面开发。
说白了就是需要团队协作的分支一定要推送到远程库,否则则不需要
创建远程分支
通过git push命令还能创建远程分支。
git push origin dev
Copy after login
假设你本地已经有了dev分支。通过上面的命令可以将dev分支推送到远程库,并创建远程的dev分支。
拉取分支
通过git pull命令可以拉取远程仓库的数据和分支信息。假设如下这个场景:你同事在他本地创建了一个dev分支,并提交到了远程库。同时你也在本地创建了一个dev库,当你push时会推送失败。结果如下图所示:
因为你同事的最新提交和你试图推送的的提交有冲突。解决的办法就是根据Git的提示,先用git pull把最新的提交从origin/dev抓下来,然后,在本地合并,解决冲突后,在推送。
$ git pull
There is no tracking information for the current branch.
Please specify which branch you want to merge with.
See git-pull(1) for details.    git pull <remote> <branch>If you wish to set tracking information for this branch you can do so with:    git branch --set-upstream-to=origin/<branch> dev</branch></branch></remote>
Copy after login
git pull也失败了。原因是没有指定本地dev分支与远程origin/dev分支的链接,根据提示,设置dev和origin/dev的链接:
关联本地分支和远程分支
$ git branch --set-upstream-to=origin/dev dev
Branch 'dev' set up to track remote branch 'dev' from 'origin'.
Copy after login
关联好本地分支和远程分支之后,在pull就能成功了。这回git pull成功,但是合并有冲突,需要手动解决,解决的方式也是在本地手动处理冲突文件,解决后,提交,在push。
删除远程分支
通过
git push origin :dev
Copy after login
命令可以删除远程dev分支。但是这时候本地的dev分支还是存在的。所以还需要通过git branch -d dev删除本地的dev分支。
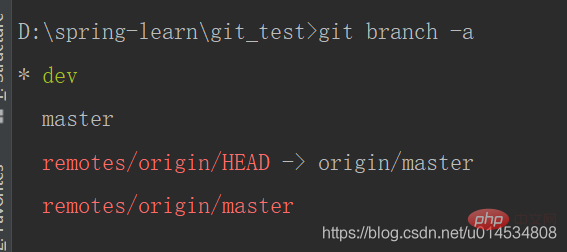
查看分支
通过git branch可以查看本地分支
通过git branch -a 可以查看本地分支和远程分支。
版本回退
在实际开发中我们经常会碰到这样一个场景,比如:你误提交了一段有问题的代码,导致其他同事更新代码之后项目启动不了,这时候该怎么办呢?我们首先想到的就是将版本回退。回退到之前那个没有问题的版本。
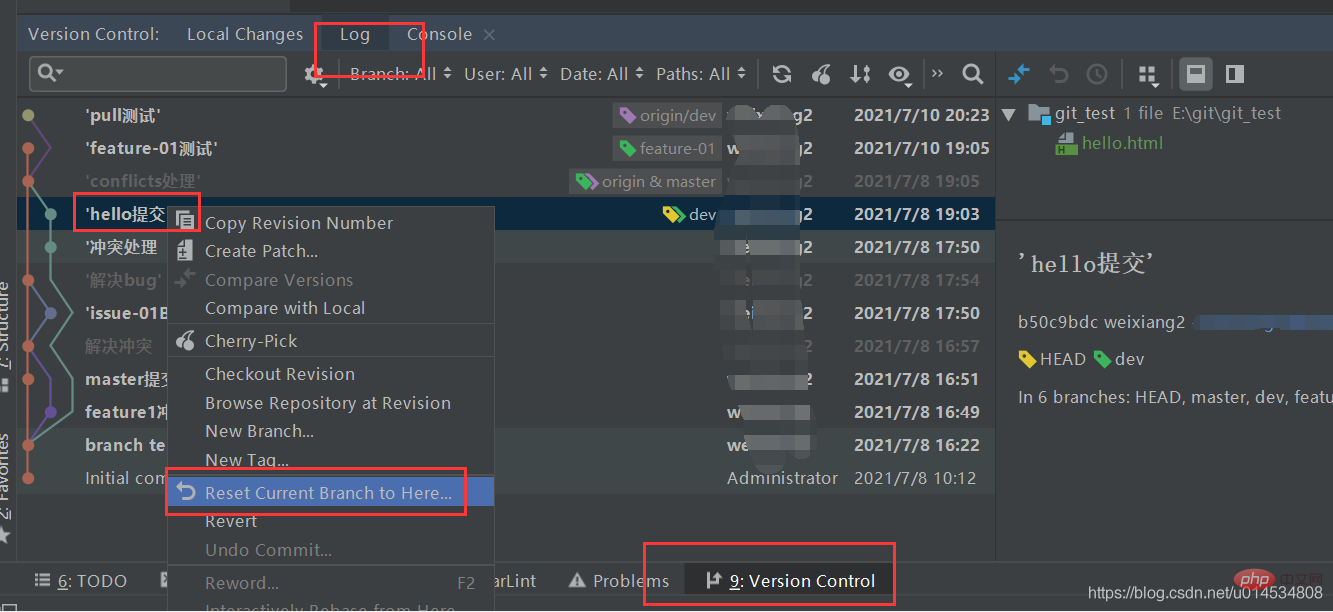
- 通过
git log 命令找到当前的仓库所有的提交日志。然后,找到你需要回退到的版本。如下图所示:
- 回退到上一个版本:
git reset HEAD
- 回退到指定版本:
git reset commitId 其中commitId是指定版本的版本号,比如这里将版本信息回退到b50c9bdcbf9641d33e4b531bd96dc1f27d4bf602 这个版本。那么命令就是:
git reset b50c9bdcbf9641d33e4b531bd96dc1f27d4bf602
Copy after login
回退之后,再次通过git log查看,则最新的提交日志已经变成了hello 提交这个版本了。
当然,通过IDEA来回退则更加的简单。直接在Version Control->Log 在待回退到的版本上右键,选中Reset Current Branch to Here 即可。
其实回退操作的本质,就是将HEAD指针的指向要回退的那个版本上。
分支重命名
git branch -m oldname newname
Copy after login
7. 标签管理
标签管理比较简单,再此只是简单描述一下。
#创建标签 v1.0git tag v1.0#查看标签git tag#删除标签v1.0git tag -d v0.1#推送标签git push origin --tags#删除远程标签git push origin :refs/tags/v1.0
Copy after login
下面就用一张图来做一个总结吧。
这张图清晰的表明了Git的基本流程。
推荐学习:《Git教程》
The above is the detailed content of Completely master the construction and branch management of Git warehouse. For more information, please follow other related articles on the PHP Chinese website!


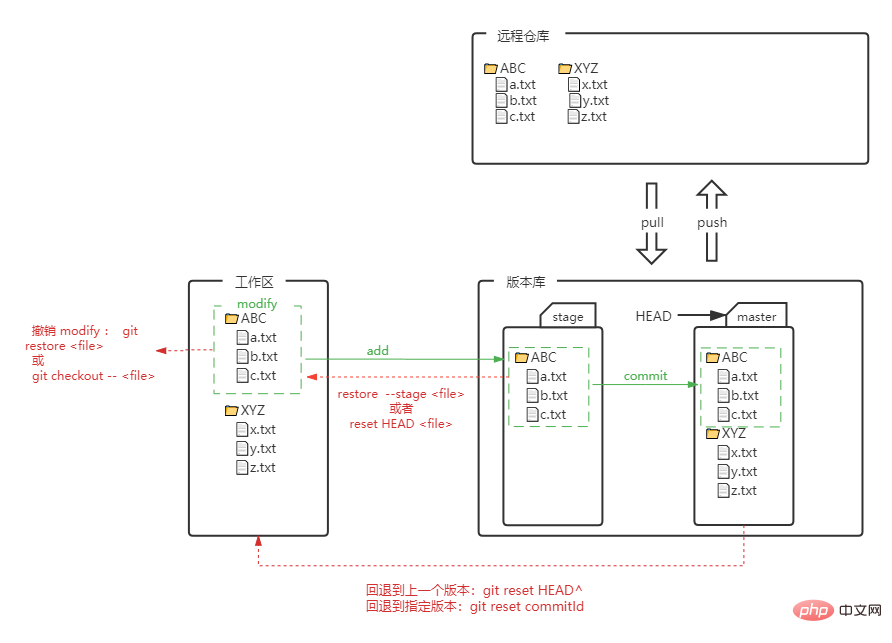
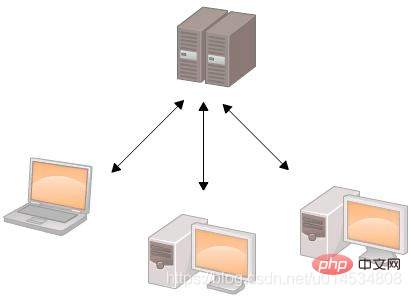 It can be seen that the work computers of all members of the team only deal with the central server. If the version library is compared to a book library, then everyone (each computer) needs to borrow books from the library first (pull the latest code), read them and then return them to the library (submit them to the central server after modification)
 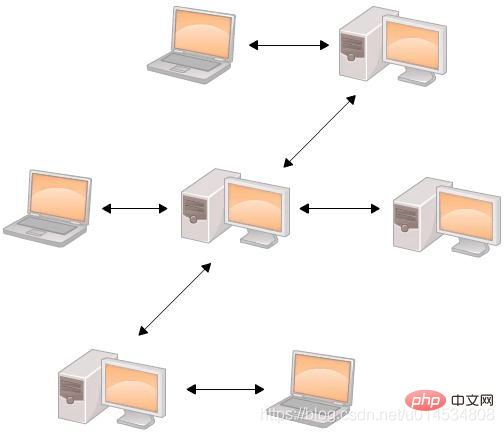 The distributed version control system eliminates the central server, which fully reflects the core of distribution The concept is decentralization. There are two benefits to this:


![[Web front-end] Node.js quick start](https://img.php.cn/upload/course/000/000/067/662b5d34ba7c0227.png)


