Learn about the new features in CSS3 @layer in one article
This article will give you an in-depth understanding of the new feature @layer in CSS3. I hope it will be helpful to you!

Entering 2022, new features of CSS are emerging one after another, and the new feature that has attracted the most attention in the CSS circle recently is none other than CSS @layer.
This article will use the most concise language to quickly let readers understand what the new CSS @layer specification is.
Problems that existed in CSS priorities in the past
If there are a lot of styles on our page, such as custom styles when we develop the page, there are also Introduced component library styles. At this time the style will be very confusing and difficult to manage.
When we want to override some styles that are not written by us, we often have to override those styles by using style names with higher priority weight.
At the same time, when style priority feels difficult to control, developers are accustomed to abusing !important to solve it, which in turn leads to a more confusing style structure in the future.
Based on the background of allowing CSS to be better controlled and managed, CSS @layer came into being.
What is CSS @layer?
CSS @layer is defined from CSS Cascading and Inheritance Level 5.
What is CSS @layer? Simply put, @layer in CSS @rule declares a cascading layer, and rules in the same layer will be cascaded together. This gives developers control over the cascading mechanism. More control.
The syntax is also very simple, look at this example:
@layer utilities {
  /* 创建一个名为 utilities 的级联层 */
}In this way, we create a @layer cascading layer named utilities.
@layer How to use cascading layers?
Manage style priority through @layer cascading layer
@layer The biggest function of the cascading layer is to control the priority between different styles.
Look at the following example, we define two @layer cascade layers A and B:
<div></div>
div {
    width: 200px;
    height: 200px;
}
@layer A {
    div {
        background: blue;
    }
}
@layer B {
    div {
        background: green;
    }
}Because the order of @layer B is ranked @ After layer A, so the priority of all styles in @layer B will be higher than @layer A, and the final color of the div is green:

Of course, if there are too many @layers in the page, it may not be easy to remember the order of all @layers, so there is another way of writing.
We can name multiple @layer layers at the same time, and then add the style rules.
<div></div>
@layer B, C, A;
div {
    width: 200px;
    height: 200px;
}
@layer A {
    div {
        background: blue;
    }
}
@layer B {
    div {
        background: green;
    }
}
@layer C {
    div {
        background: orange;
    }
}In the above code, we first define @layer B, C, A three @layer cascade layers. Then the CSS code for each cascading layer is added to the subsequent CSS code, but the priority of the style is:
A > C > B
Therefore, the color value of the final div is the color defined in @layer A, which is blue:

At this point, the role of CSS @layer can be clearly seen.
Using CSS @layer, we can divide different CSS modules into different @layers, and use the order to control the global style priority.
Three ways to introduce definitions of @layer cascading layers
There are actually two ways to introduce definitions of @layer cascading layers mentioned above. Here we will describe them again. There are three ways to introduce CSS. @layer way of cascading layers.
1. Directly create a block-level @layer rule, which contains CSS rules that act inside the layer:
@layer utilities {
  p {
    padding: .5rem;
  }
}2. A cascading layer can be passed @import To create, the rules exist in the imported style sheet:
@import(utilities.css) layer(utilities);
3. Create a named cascade layer, but do not specify any style. The style can then be added anywhere within the CSS:
@layer utilities;
// ...
// ...
@layer utilities {
    p {
        color: red;
    }
}Non-@layer wrapping layer and @layer intra-layer style priority
Of course, there is another situation here , how does the priority of a style that is not wrapped by @layer compare with that of a style that is wrapped by @layer?
Look at this example:
@layer A { a { color: red; } }
@layer B { a { color: orange; } }
@layer C { a { color: yellow; } }
a { color: green; } /* 未被 @layer 包裹的样式 */There will be a very important conclusion here, non-@layer wrapped styles have a higher priority than @layer wrapped styles, therefore, the ordering of the above rules is:
Styles not wrapped by @layer> @layer C > @layer B > @layer A
匿名层与嵌套层
还有两种层级关系,分别是匿名层和嵌套层。
匿名层
允许创建一个不带名字的 @layer:
@layer {
  p {
    margin: 1rem;
  }
}这里,创建了一个匿名层。匿名层的两个重要特性:
创建后无法向其再添加规则
该层和其他命名层功能一致,优先级也遵循后定义的匿名层,比其他已定义的 @layer 层,优先级更高
看一个例子:
<div></div>
div {
    width: 200px;
    height: 200px;
}
@layer {
    div {
        background: pink;
    }
}
@layer B, C, A;
@layer A {
    div {
        background: blue;
    }
}
@layer B {
    div {
        background: green;
    }
}
@layer C {
    div {
        background: orange;
    }
}上述代码,我们首先定义了一个匿名层,指定了 div 的颜色为 pink,而后又定义了 @layer B, C, A。这里优先级顺序为:
A > C > B > 匿名层
最终的颜色为 @layer A 内的颜色值 -- blue:

如果,我们将匿名层放在最后的话:
div {
    width: 200px;
    height: 200px;
}
@layer B, C, A;
@layer A {
    div {
        background: blue;
    }
}
@layer B {
    div {
        background: green;
    }
}
@layer C {
    div {
        background: orange;
    }
}
@layer {
    div {
        background: pink;
    }
}此时,样式的优先级顺序为:
匿名层 > A > C > B
最终的颜色为匿名层内的颜色值 -- pink:

嵌套层
说完了匿名层,我们再来看看嵌套层。
顾名思义,嵌套层的意思就是在 @layer 内部,我们可以再嵌套使用 @layer 级联层。像是这样:
@layer A {
  @layer B{
    ...
  }
}当然,它还有另外一种语法,上述代码等价于:
@layer A.B {
  ...
}了解了这个后,那么,看这样一个例子:
<div></div>
div {
    width: 200px;
    height: 200px;
}
@layer A {
    div {
        background: blue;
    }

    @layer B {
        div {
            background: red;
        }
    }
}我们在 @layer A 中嵌套一个 @layer B,同时都定义了一个 div 的样式,最终 div 的 background 到底是什么颜色呢?
最终为蓝色 background: blue,为什么呢?这个很好记忆,我们假设如果没有 @layer A 这一层包裹,其实就是上述说的 @layer 层与非 @layer 层的优先级比较,这里,非 @layer 层(我们可以理解为更高级别的一层 @layer)的优先级更高。
因此,对于单个 @layer 内的嵌套关系,样式优先级为:
@layer A > @layer A.B
多层嵌套层的优先级关系
OK,再看这样一种情况:
div {
    width: 200px;
    height: 200px;
}
@layer A {
    div {
        background: blue;
    }
    @layer B {
        div {
            background: red;
        }
    }
}
@layer C {
    div {
        background: yellow;
    }
    @layer D {
        div {
            background: green;
        }
    }
}这里存在同时存在多个嵌套 @layer 的情况。那么这种情况优先级又是如何划分呢?
这里的规则是,优先级高的 @layer,无论是否存在嵌套,优先级都整体比优先级低的 @layer(无论是否存在嵌套)高,因此,这里的优先级排序是:
@layer C > @layer C.D > @layer A > @layer A.B
!important 对 CSS @layer 的影响
再来看看 !important 对 CSS @layer 的影响。
这里可以分为几种情况,先看其中一种:
<div></div>
div {
    width: 200px;
    height: 200px;
    background: black;
}
@layer A {
    div {
        background: blue;
    }
    @layer B {
        div {
            background: red;
        }
    }
}
@layer C {
    div {
        background: yellow;
    }
    @layer D {
        div {
            background: green!important;
        }
    }
}上述代码,我们给 @layer C.D 的 <div> 添加了一个 !important 规则。
如果,不考虑 !important 规则,那么实际的 CSS 优先级为(序号越高,优先级越高):
@layer A.B
@layer A
@layer C.D
@layer C
非 layer 包裹块
那么,<div> 的颜色应该为黑色 black。然而,这里给 @layer C.D 的 <div> 添加了一个 !important 规则。
实际上,最终 <div> 的颜色为 green,也就是最终的优先级排序为(序号越高,优先级越高):
@layer A.B
@layer A
@layer C
非 layer 包裹块
!important 下的 @layer C.D
也就是说,这里 !important 规则的优先级还是凌驾于非 !important 规则之上的。
上述 DEMO 还是比较有意思的,感兴趣的可以看看:CodePen Demo -- CSS Cascade @layer Demo
https://codepen.io/Chokcoco/pen/KKZKBRr
非 @layer 包含块 !important 与 @layer 包含块 !important
到这里,你也许会以为你懂了。好,我们再来看一个 DEMO,如果我们给非 @layer 包含块,也加上一个 !important 规则,事情就变得有趣了。
<div></div>
div {
    width: 200px;
    height: 200px;
    background: black!important;
}
@layer A {
    div {
        background: blue;
    }
    @layer B {
        div {
            background: red;
        }
    }
}
@layer C {
    div {
        background: yellow;
    }
    @layer D {
        div {
            background: green!important;
        }
    }
}仔细看上述代码,非 @layer 包含块,我们也加上了一个 而实际上,这里最终 这是一个非常重要的特性,在比较正常(非 这个,更进一步的话,我们需要去了解 CSS Cascading 相关的知识了。 在 CSS @layer 之前,我们简单看一张图: 上图表面的是在没有 CSS @layer 之前,CSS 样式申明的优先级排序,根据 CSS Cascading 4(Current Work) 标准,定义的当前规范下申明的层叠顺序优先级如下(越往下的优先级越高,下面的规则按升序排列): 按照上述算法,可以得到一个样式优先级的排序,大概是这样(越往下的优先级越高,下面的规则按升序排列): User Agent - 用户代理普通样式 User - 用户设置的普通样式 Author - 页面作者普通样式 Animations - 动画样式 ❗️Author - 页面作者 !important 样式 ❗️User - 用户设置的 !important 样式 ❗️User Agent - 用户代理的 !important 样式 Transitions - 过渡样式 简单解释一下:用户代理样式:浏览器会有一个基本的样式表来给任何网页设置默认样式。这些样式统称用户代理样式页面作者样式:网页的作者可以定义文档的样式,这是最常见的样式表。大多数情况下此类型样式表会定义多个,它们构成网站的视觉和体验,即页面主题,可以理解为页面作者样式用户样式:读者,作为浏览器的用户,可以使用自定义样式表定制使用体验,自定义用户偏好,可以理解为用户样式 关于 CSS Cascading,也就是层叠规范,你可以看看我的这篇文章加深理解 -- 深入理解 CSS(Cascading Style Sheets)中的层叠(Cascading)。 https://github.com/chokcoco/iCSS/issues/76 而当有了 CSS @layer 之后,这个层叠优先级顺序有了更新,具体优先级如下: 整体会变更为复杂一些,但是总体还是遵循了两个规则: 在比较 综上,便是关于 CSS @layer 的基础相关知识。 CSS @layer 的诞生,让我们有能力更好的划分页面的样式层级,更好的处理内部样式与外部引用样式的优先级顺序,属于比较重大的一次革新。 同时,它也让我们意识到要逐渐摒弃大规模使用 当然,时至今天(2022-03-14),我们来看一眼兼容性: Although it has become popular, the latest versions of Chrome, Safari, Firefox, and Edge have begun to support CSS @layer, and it can currently be used initially through some polyfills , I believe that it will become an indispensable part of business CSS code in the near future. There has been a lot of discussion on CSS @layer on the Internet. Here are some high-quality articles. If you are interested, you can continue reading: Okay, this article ends here, I hope it will be helpful to you:) (Learning video sharing :webfrontend)!important 规则,按照上述我能描述的规则来看,非 @layer 包含块的优先级高于 @layer 包含块,那么正常而言,我们不难猜测,这里 background: black!important 的优先级应该要比 background: green!important 高,最终 <div> 应该展示黑色。<div> 的颜色还是 green。这里就又有一个非常有意思的知识点了,!important 下样式优先级的规则与非 !important 正常状态下刚好相反。!important)规则时,越是级联(排序较后的 @layer 规则),优先级越低;反之,在比较 !important 规则时,越是级联靠后的(排序较后的 @layer 规则),优先级越高。CSS Cascade 规范


!important 样式高于非 !important 样式!important 规则时,优先级顺序与正常规则相反,在正常状态下优先级越低的,在 !important 下优先级越高总结一下
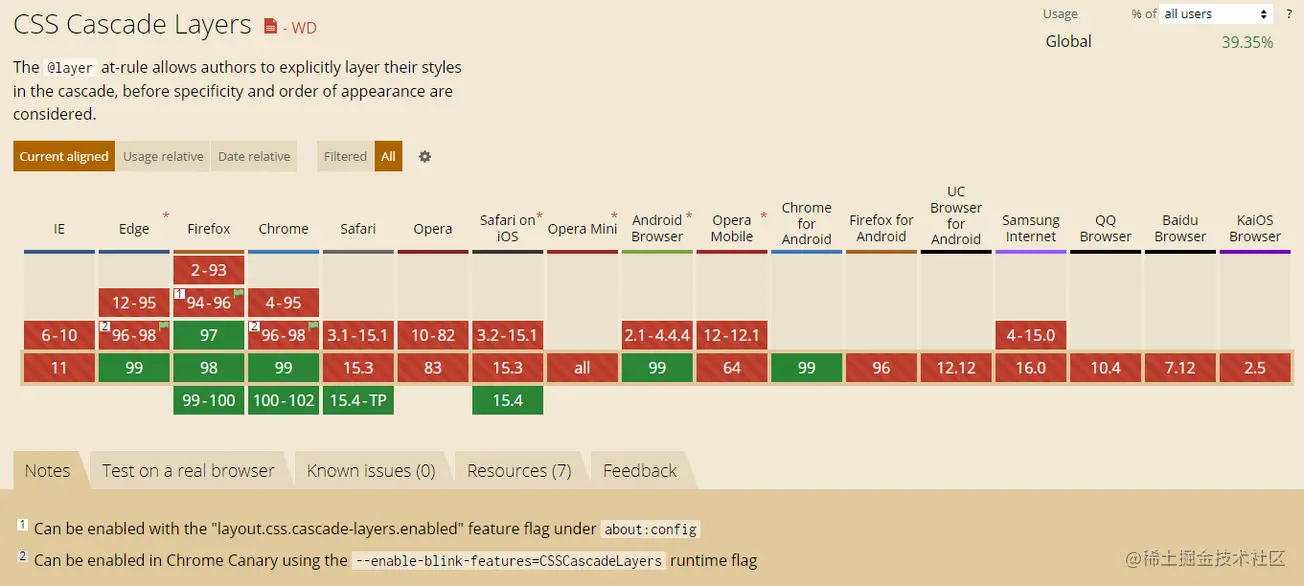
!important 去覆盖样式优先级的错误做法,避免许多因为优先级问题带来的不必要的副作用。
Extended reading
Finally
The above is the detailed content of Learn about the new features in CSS3 @layer in one article. For more information, please follow other related articles on the PHP Chinese website!

Hot AI Tools

Undresser.AI Undress
AI-powered app for creating realistic nude photos

AI Clothes Remover
Online AI tool for removing clothes from photos.

Undress AI Tool
Undress images for free

Clothoff.io
AI clothes remover

AI Hentai Generator
Generate AI Hentai for free.

Hot Article

Hot Tools

Notepad++7.3.1
Easy-to-use and free code editor

SublimeText3 Chinese version
Chinese version, very easy to use

Zend Studio 13.0.1
Powerful PHP integrated development environment

Dreamweaver CS6
Visual web development tools

SublimeText3 Mac version
God-level code editing software (SublimeText3)

Hot Topics
 1382
1382
 52
52
 How to use bootstrap in vue
Apr 07, 2025 pm 11:33 PM
Using Bootstrap in Vue.js is divided into five steps: Install Bootstrap. Import Bootstrap in main.js. Use the Bootstrap component directly in the template. Optional: Custom style. Optional: Use plug-ins.
 The Roles of HTML, CSS, and JavaScript: Core Responsibilities
Apr 08, 2025 pm 07:05 PM
HTML defines the web structure, CSS is responsible for style and layout, and JavaScript gives dynamic interaction. The three perform their duties in web development and jointly build a colorful website.
 How to write split lines on bootstrap
Apr 07, 2025 pm 03:12 PM
There are two ways to create a Bootstrap split line: using the tag, which creates a horizontal split line. Use the CSS border property to create custom style split lines.
 How to resize bootstrap
Apr 07, 2025 pm 03:18 PM
To adjust the size of elements in Bootstrap, you can use the dimension class, which includes: adjusting width: .col-, .w-, .mw-adjust height: .h-, .min-h-, .max-h-
 How to set up the framework for bootstrap
Apr 07, 2025 pm 03:27 PM
To set up the Bootstrap framework, you need to follow these steps: 1. Reference the Bootstrap file via CDN; 2. Download and host the file on your own server; 3. Include the Bootstrap file in HTML; 4. Compile Sass/Less as needed; 5. Import a custom file (optional). Once setup is complete, you can use Bootstrap's grid systems, components, and styles to create responsive websites and applications.
 How to insert pictures on bootstrap
Apr 07, 2025 pm 03:30 PM
There are several ways to insert images in Bootstrap: insert images directly, using the HTML img tag. With the Bootstrap image component, you can provide responsive images and more styles. Set the image size, use the img-fluid class to make the image adaptable. Set the border, using the img-bordered class. Set the rounded corners and use the img-rounded class. Set the shadow, use the shadow class. Resize and position the image, using CSS style. Using the background image, use the background-image CSS property.
 Understanding HTML, CSS, and JavaScript: A Beginner's Guide
Apr 12, 2025 am 12:02 AM
WebdevelopmentreliesonHTML,CSS,andJavaScript:1)HTMLstructurescontent,2)CSSstylesit,and3)JavaScriptaddsinteractivity,formingthebasisofmodernwebexperiences.
 How to use bootstrap button
Apr 07, 2025 pm 03:09 PM
How to use the Bootstrap button? Introduce Bootstrap CSS to create button elements and add Bootstrap button class to add button text


