

In-depth analysis of the basic working principles of Git

This article brings you relevant knowledge about Git, which mainly introduces the basic working principles of git, entry-level tutorials, and helps novices quickly get started with Git by playing with Git local warehouses. I hope everyone has to help.
Git Learning Tutorial"
1. Partition and Workflow
1. Git partition
Git partitions include workspace, staging area, local repository (local repository), and remote repository (remote repository).Workspace The workspace (Workspace) is the directory where the local code is located, and it is also the directory where .git/ (local warehouse) is stored.
Staging area The staging area (Index/Stage) is the cache space of the workspace and the local warehouse, which records the information about to be submitted to the local warehouse. (Version library) file modification information, the index file in the .git/ directory is the temporary storage area.
Local warehouse The local warehouse (Repository) is also called the local library or version library, which stores all local versions (commit submission records). The local warehouse The files are in the .git/ directory.
Remote warehouse Remote warehouse (Remote) On the network, GitHub, Gitee and GitLab can create remote warehouses. Like local warehouses, remote warehouses Different code versions are also stored, but these versions can come from multiple local repositories.
---------------------- --------------------------------The picture below comes from the Internet----------------- ----------------------------------------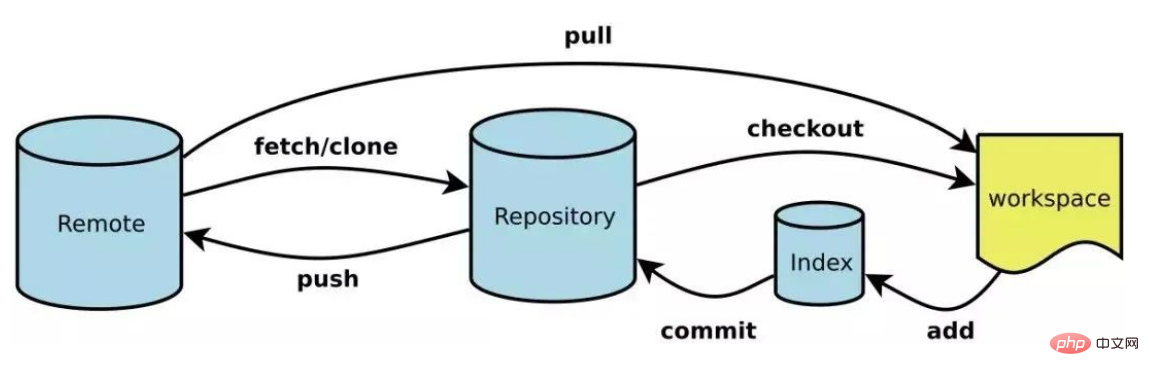
- If you want to implement the function of uploading code, use add in the workspace to add files to the temporary storage area. The temporary storage area then submits the version to the local warehouse through commit. Finally, the local warehouse uses push to push the version to the remote warehouse. ;
- Files modified in the workspace can be restored from the local warehouse or staging area through the checkout command; if you want to update the code of a branch in the workspace to the latest version of the remote warehouse, you can use the pull command;
- Use clone for the remote warehouse to copy the main branch of the remote warehouse to the local warehouse. The fetch command is similar to pull, except that pull will merge the local code, while fetch will only grab the latest version into the local repository, regardless of whether the local warehouse is There are new additions.
Enter the workspace (code storage directory), enter git init, git will create a new .git/ directory in the workspace: 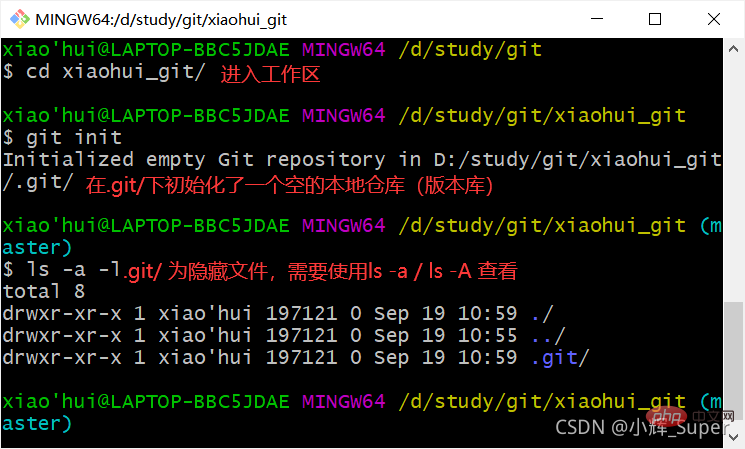
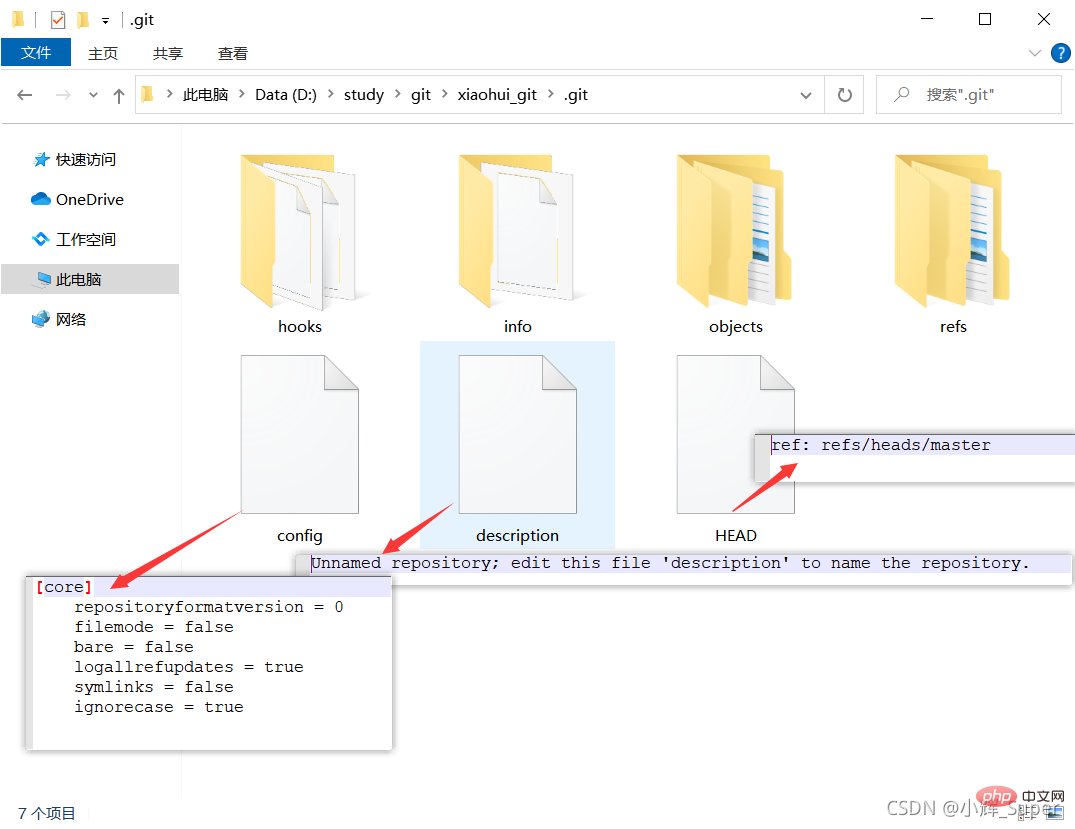 In a newly created .git/ directory, there are three text files:
- config stores the configuration information of the local warehouse;
- description is used to describe the name of the warehouse;
- HEAD is the current branch of the local warehouse, the default is master, pointing to refs/heads/master, it can be seen that the refs/ directory mainly stores some branch information;
[Note] Never manually change the files in .git/, as it may damage the structure of the local warehouse and cause adverse consequences.
3. User information configuration1. Introduction to user name and email configurationThe first thing after initializing the local warehouse is to add user configuration information to the local warehouse, including user Name and email address,The username and email address here have no direct relationship with the account of the hosting platform (such as gitee). Its only function is to let other users or the hosting platform know the uploader information of the code. The email address is messed up. Filling it out will not prevent you from being able to upload the code.
For example, I uploaded the code using "Zhang San" and "Li Si" below. The email address is not real, but the upload can still be successful: (There was an accident in the commit information) 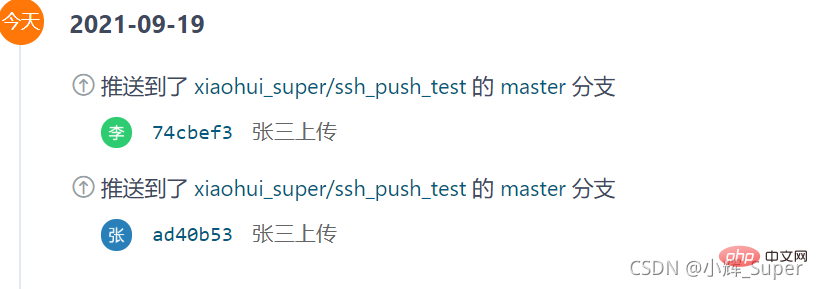
Li Four’s email address is obviously not real. 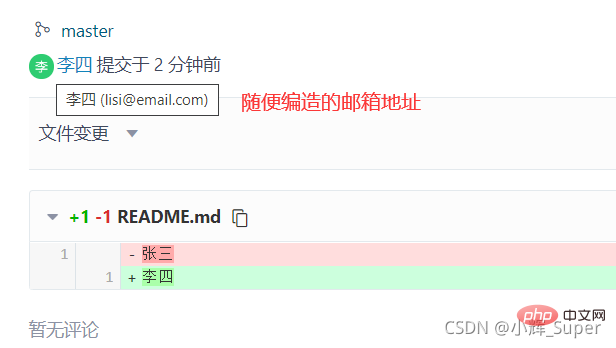
Since the email addresses of "Zhang San" and "Li Si" are not bound to gitee accounts, when you click on their avatars, the user information will not be displayed. If the gitee account submission is filled in the user configuration Email, you can check the uploader's account information on gitee. 
The submission email address of the gitee user can be set and viewed in gitee->Personal Homepage->Personal Settings->Mailbox Management: 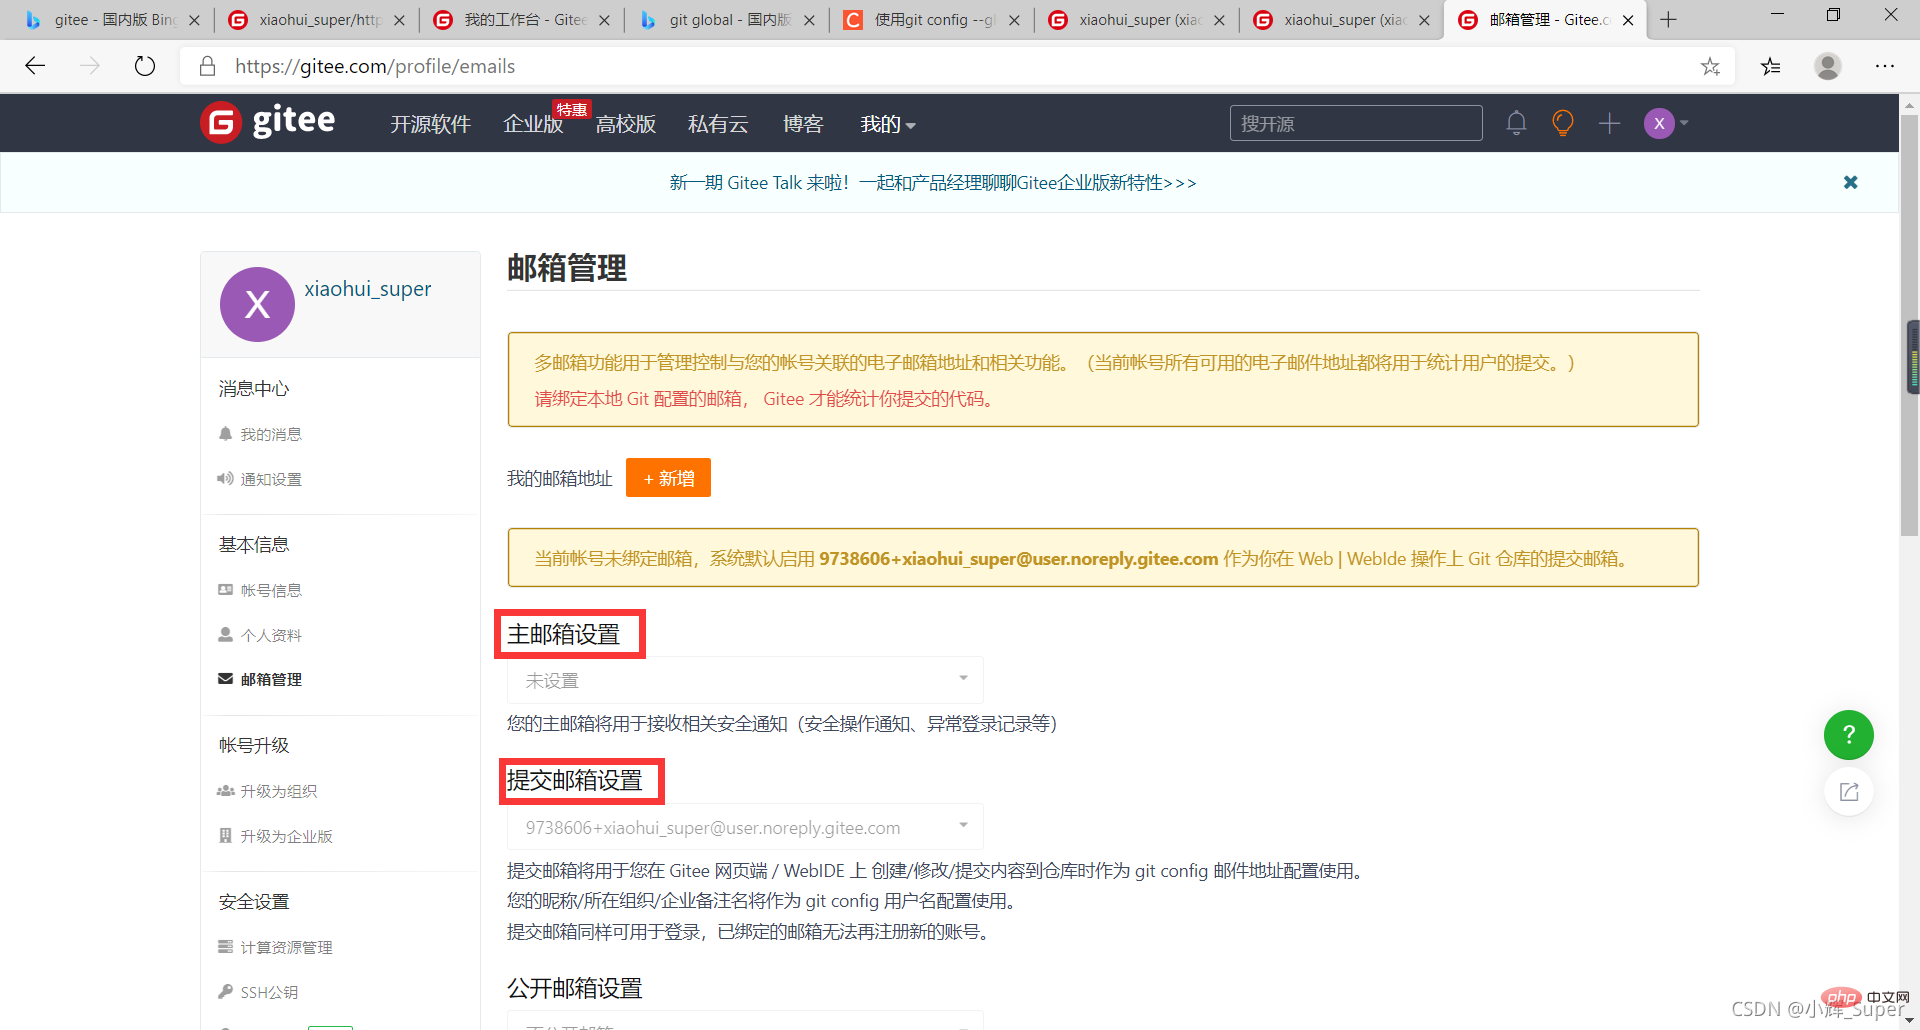
2. Use git config to configure user information
I have talked about so many things to note about user names and email addresses. In fact, user information configuration is very simple:
git config --global user.name "your name"git config --global user.email "your email"
user.name followed by user name, fill in whatever you want.
user.email is followed by the user’s email address, fill it in arbitrarily.
–global is used to configure global properties 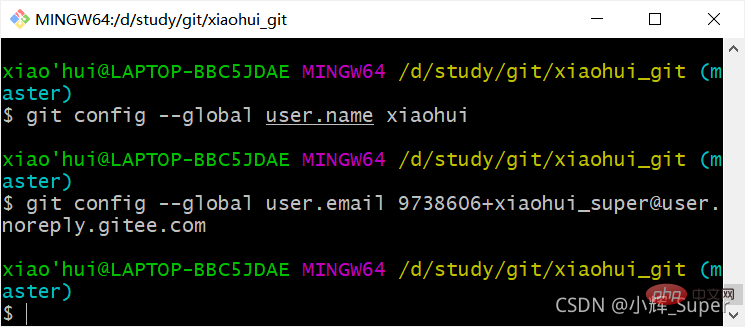
When submitting code to the local warehouse, git will first retrieve the .git/config file of the local warehouse. If there is no user information, the global configuration file will be used. (In line with the principle of proximity).
The global configuration file is stored in the system user directory/username/.gitconfig, which only contains the user attribute. 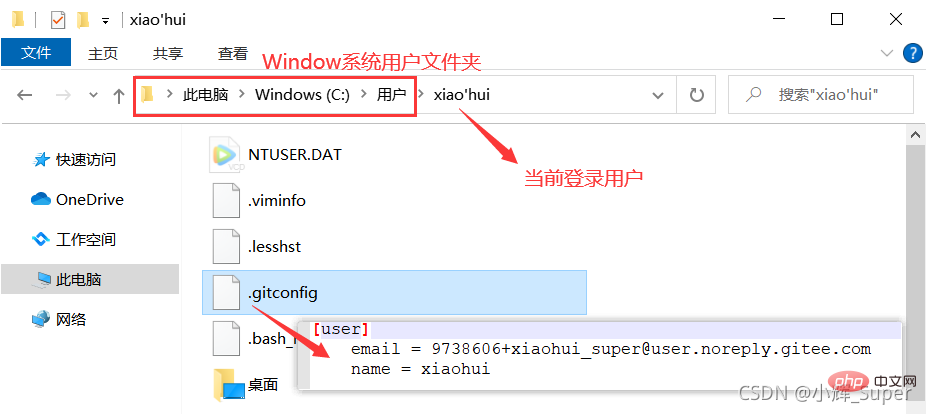
When –global is not added, only the user configuration of the local warehouse is set. The local warehouse user configuration information is stored in: .git/config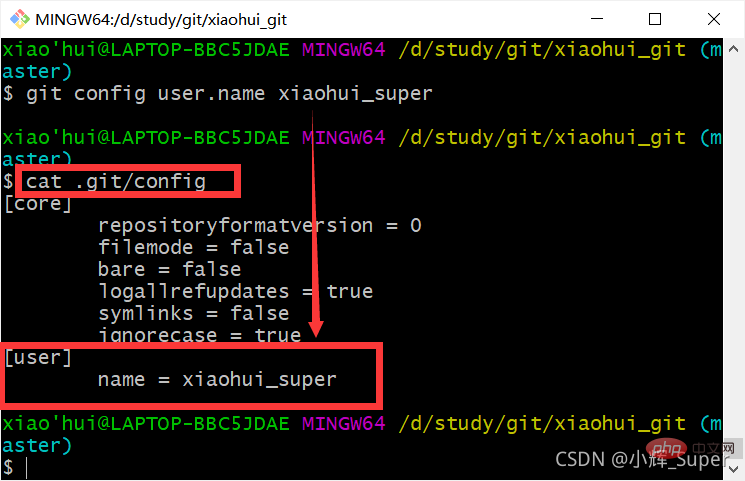
The picture above is mine Only the user name of the local configuration is set. At this time, if the modification is submitted to the local warehouse, the user name in the submission record (below) uses the local configuration. Because the user mailbox is not configured locally, the mailbox still uses the mailbox specified in the global configuration. 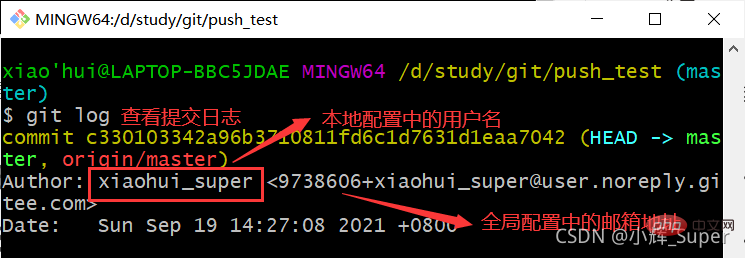
4. Manage temporary storage area files
After configuring the user information, we can start to consider submitting the code, but sometimes, we don’t want to think about the entire work All files in the area are submitted to the local warehouse (version library). The existence of the temporary storage area (index/stage) solves this problem for us. We can add the code file to the temporary storage area first. If we feel that it needs to be changed, we can delete the file from the temporary storage area until we feel that the file is selected. When you're almost done, proceed to the next step (submit to the local warehouse).
1. Git file status
Before managing the staging area, we also need to know several statuses of the workspace files:
- Untracked Untracked, no files in the staging area have been added to the workspace, and do not participate in version control;
- Unmodified Unmodified, added to version control, but are the same as the file snapshots in the repository ;
- Modified has been modified, added to version control, and is different from the snapshot when it was last added to the repository;
- Staged has been staged, The next step can be submitted to the local warehouse (version library).
---------------------------------------- ----------------The picture below comes from the Internet--------------------------------- --------------------------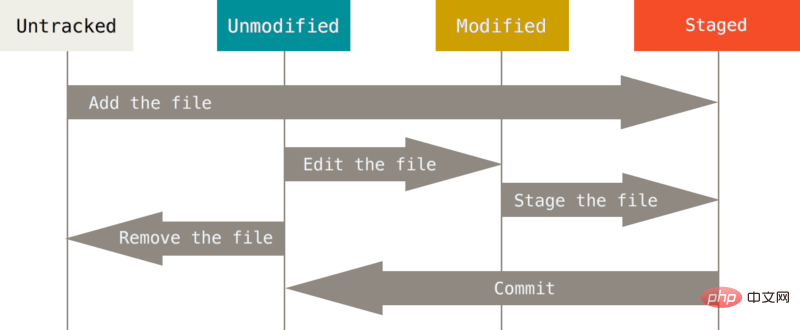
The git status command can be used to view the current status of the workspace files Status:
#查看特定文件的状态
git status [filename]#查看所有文件状态
git status

#精简的方式显示文件状态
git status -s
2. Add files to the temporary storage area
First check the status of all files in the workspace and find that there is no file: 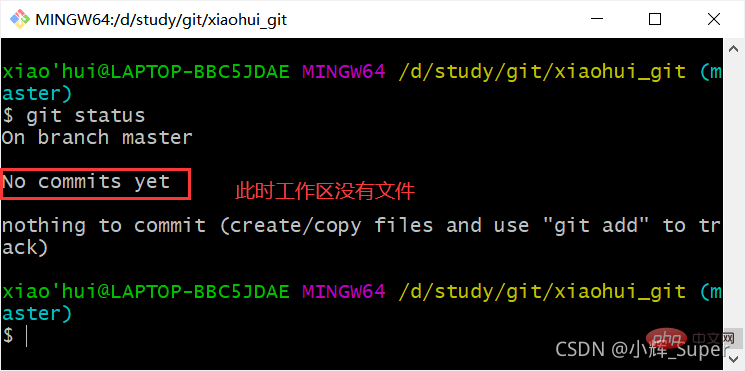
现在创建3个文件,再次使用git status(-s表示精简显示),3个文件的状态为Untracked,??为精简显示下Untracked的标志,意思是新创的文件没有被本地仓库(版本库)跟踪。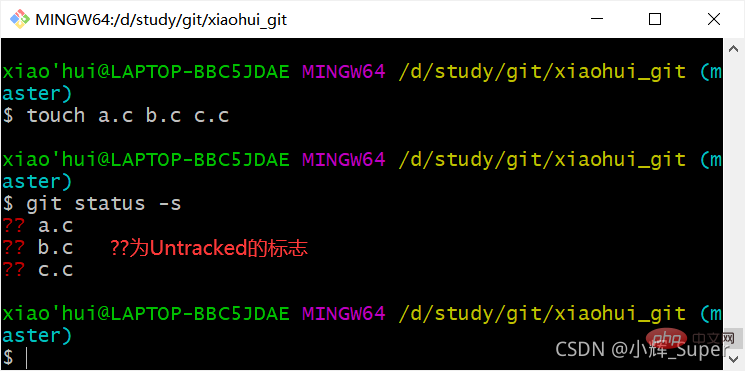
git add [文件…] 可以添加一个或多个文件到暂存区,使文件状态变为Staged,A表示该文件被add到暂存区。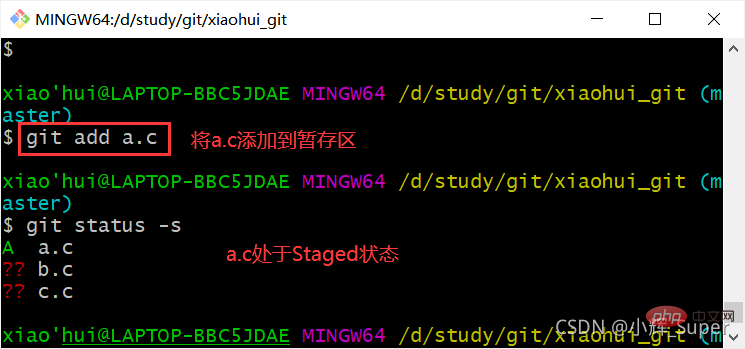
也可以使用 git add . 或 git add -A 将工作区所有文件添加到暂存库(除了.gitignore里声明的文件,本文暂不介绍)。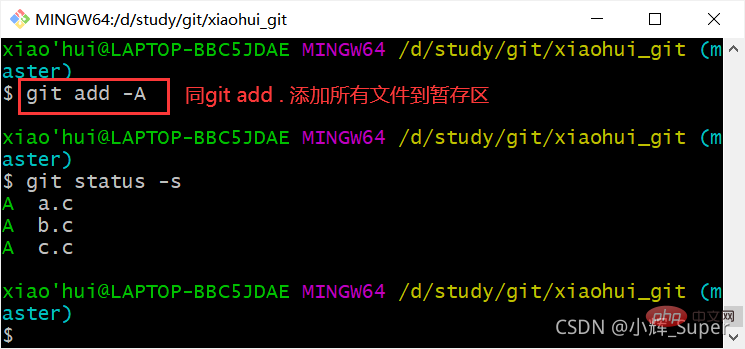
3. 删除暂存区的文件
既然可以向暂存区添加文件,那么反向操作必然也不能少,git rm --cached [文件…] 命令可以将暂存区的文件移除,使其恢复到Untracked状态。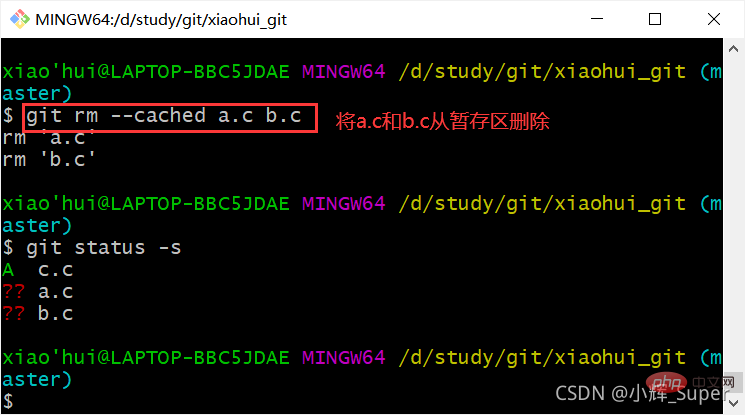
4. 文件修改管理
如果已经存入暂存区,但在文件提交到本地仓库前,我们对其进行了修改,那么它的状态将变为Modified。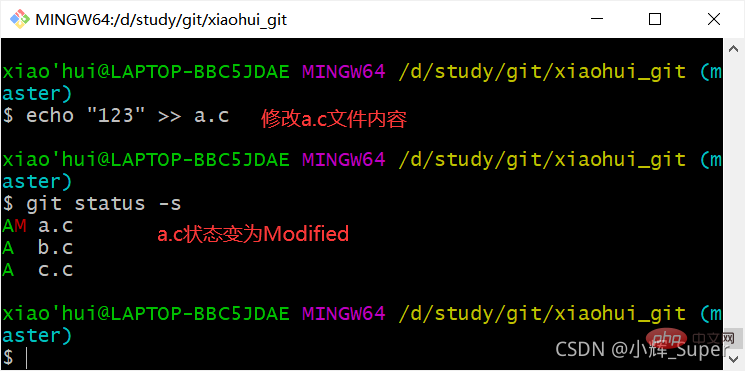
对于Modified状态的文件,我们可以使用git add将修改后的版本加入到暂存区,也可以使用git checkout -- [file...]将工作区的该文件恢复到暂存区的版本。
git add a.c重新添加a.c到暂存区: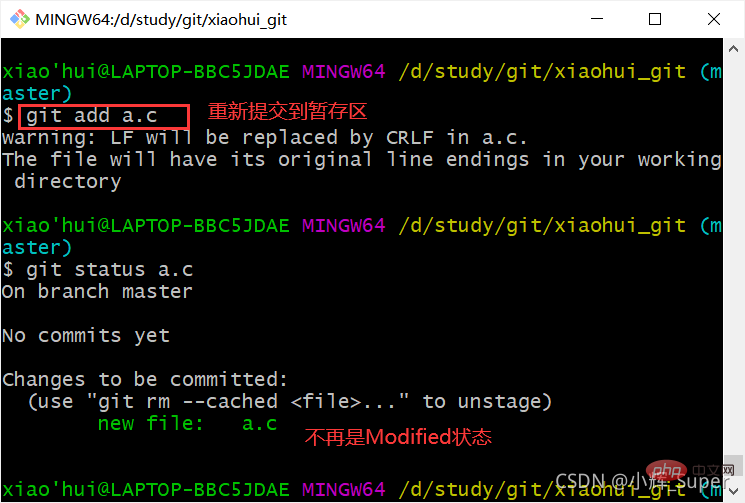
下图为使用git checkout -- a.c从暂存区恢复a.c文件,下图中我没有加 “ --”,它的作用是让checkout不检测任何其他选项参数,目的是防止该命令把a.c当做一个分支(checkout 还有一个作用是切换分支)。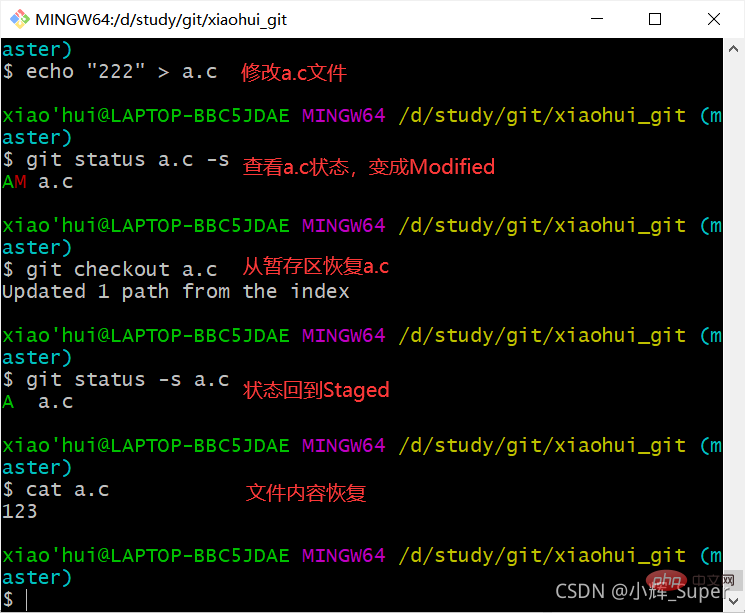
对Modified状态下的文件使用 git diff 可以得出文件修改的详细记录,git diff和diff命令虽然作用都是对比文件,但git diff的作用是对比不同的状态下的同一文件,而diff用来对比两个不同的文件。
五、提交文件到本地仓库
文件添加到暂存区的目的就是将其提交到本地仓库(版本库),提交命令为git commit -m “message”
我们可以在commit 后面添加文件,这样能指定提交的文件: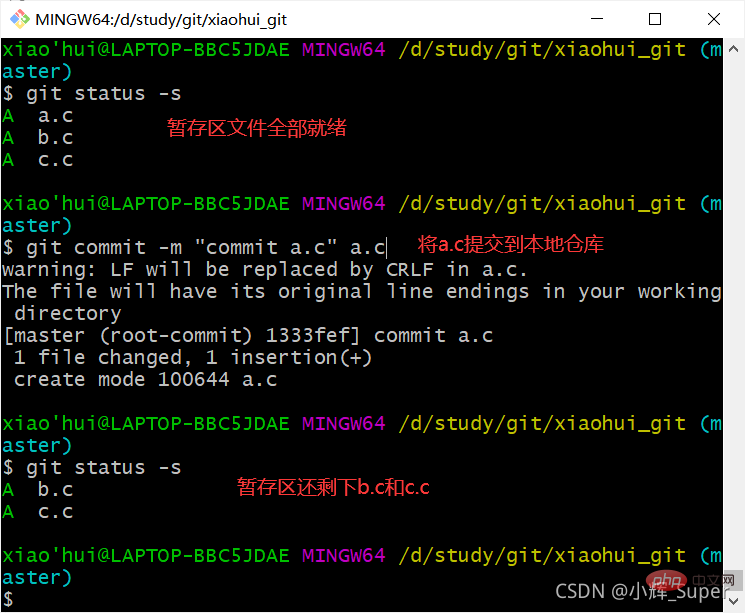
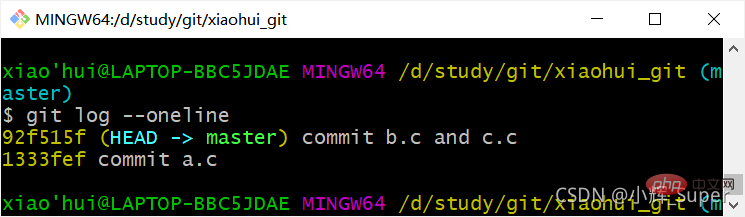
通过git log 可以查看提交记录,HEAD为本地仓库当前分支,指向主分支master: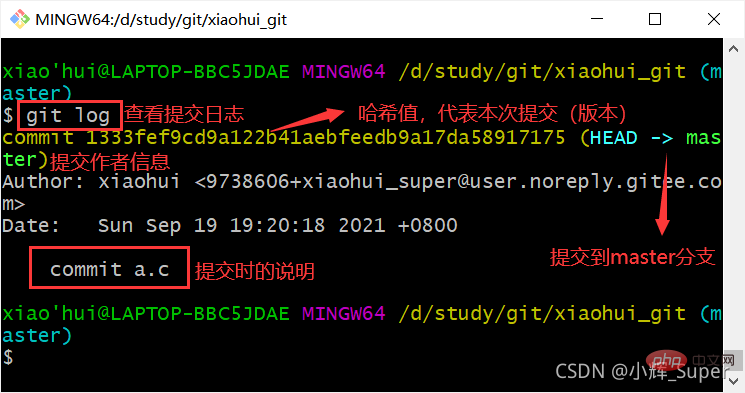
直接使用 git commit -m “message” 可以将整个暂存区都提交到本地仓库:
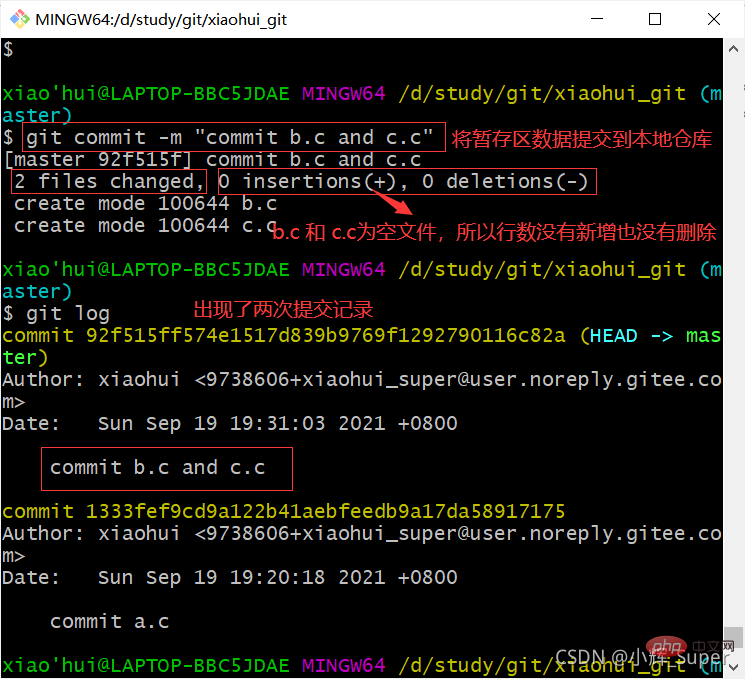
#以一行的形式显示所有提交版本:
git log --pretty=oneline
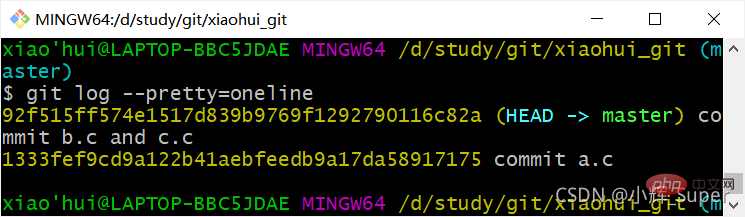
#一行显示,只显示哈希值的前7位:
git log --oneline
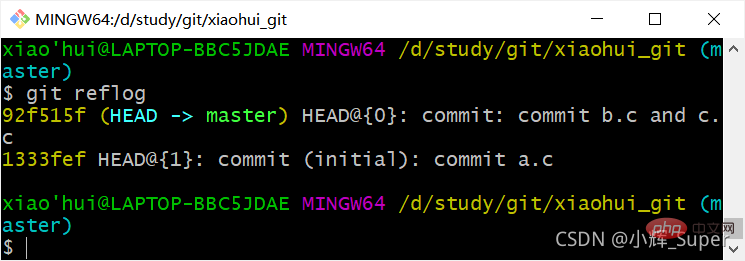
#显示历史提交版本与当前版本的间隔数:
git reflog
六、推送到远程仓库
代码文件提交到本地仓库后,还需要推送到远程仓库进行托管。
1. 创建远程仓库
我以码云为例,远程仓库的创建可以通过以下三步实现: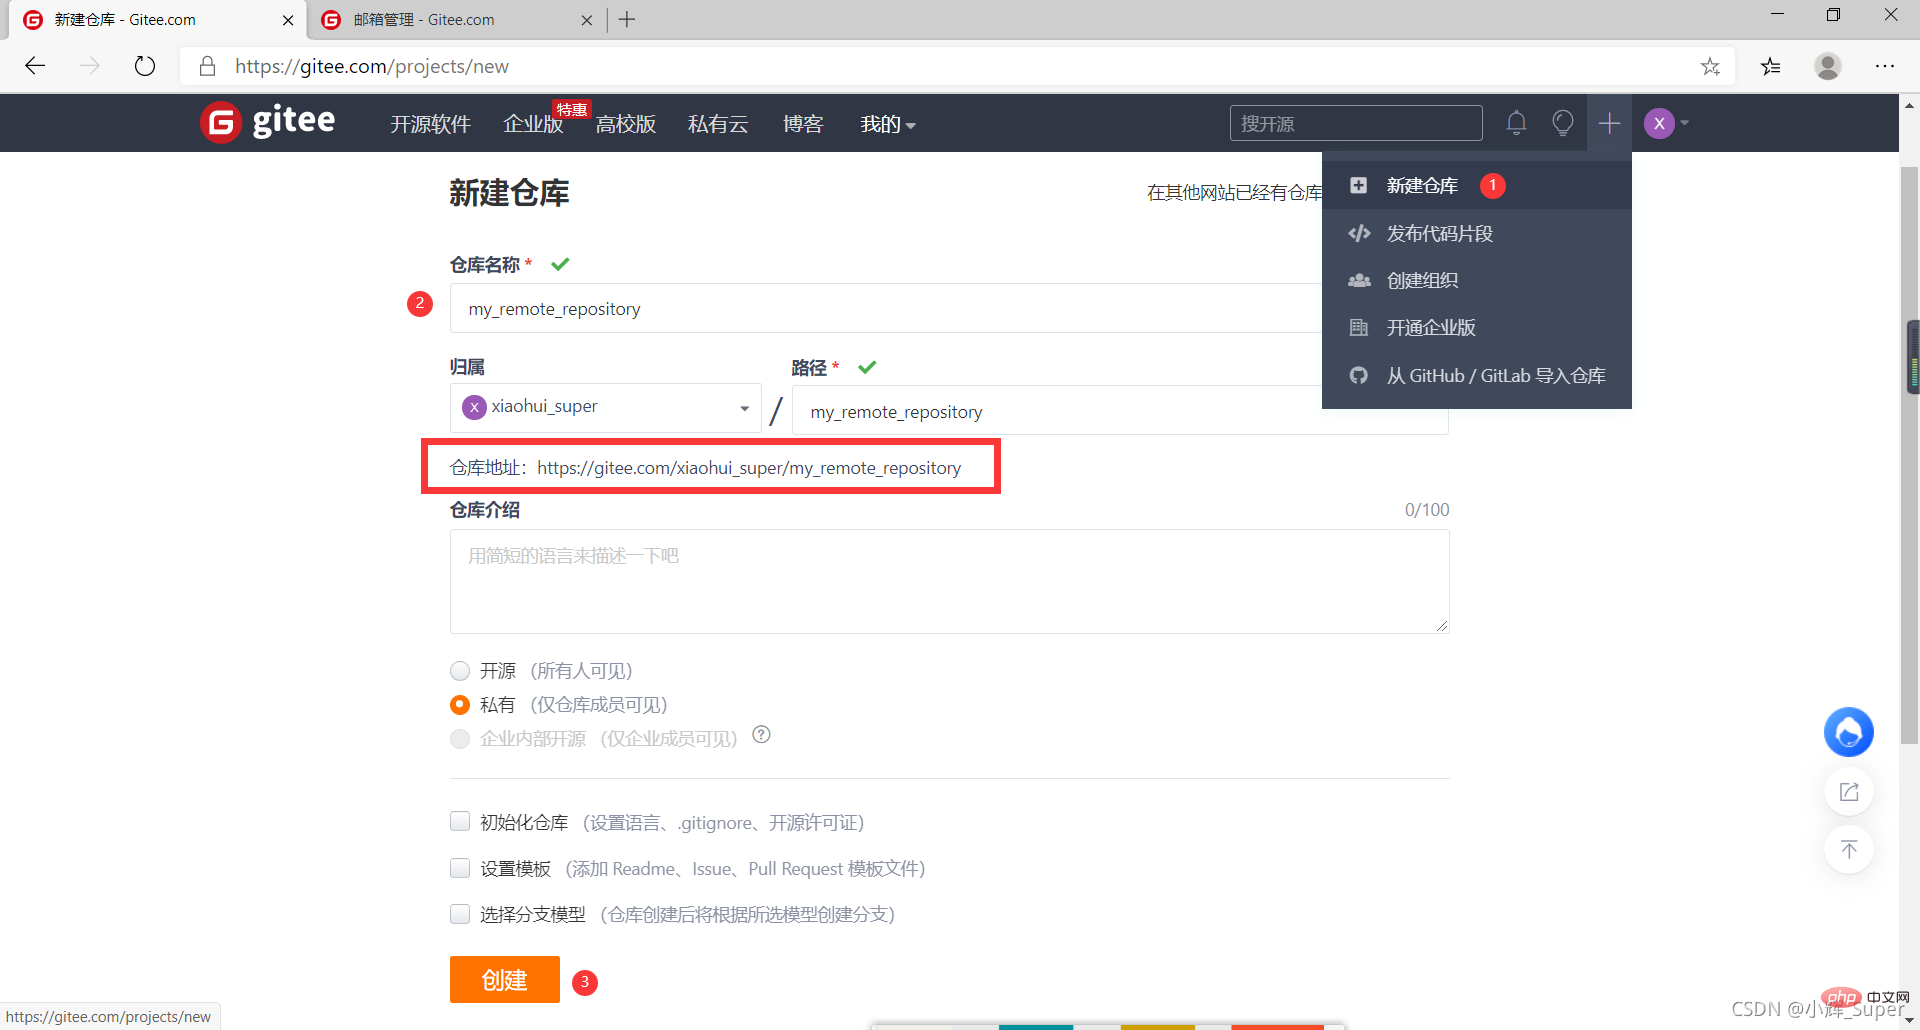
2. 添加远程仓库地址
git remote add
如果要用https的方式上传代码,需要添加远程仓库https地址;用ssh上传代码,则url填远程仓库ssh地址。
First copy the warehouse address from the code cloud warehouse homepage: 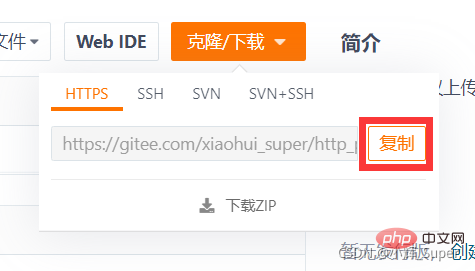
I named the local alias of the remote warehouse origin: 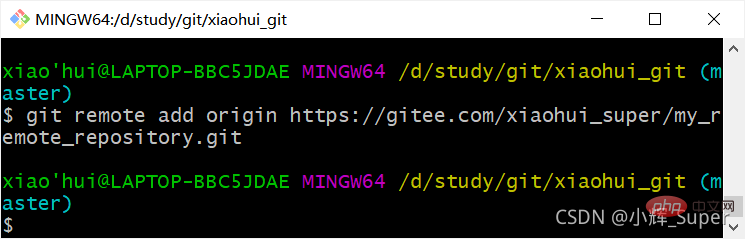
The remote warehouse can Set multiple ones, as long as the local aliases do not conflict.
3. Check the remote warehouse address
The git remote -v command can check the remote warehouse address, or you can check it through git config -l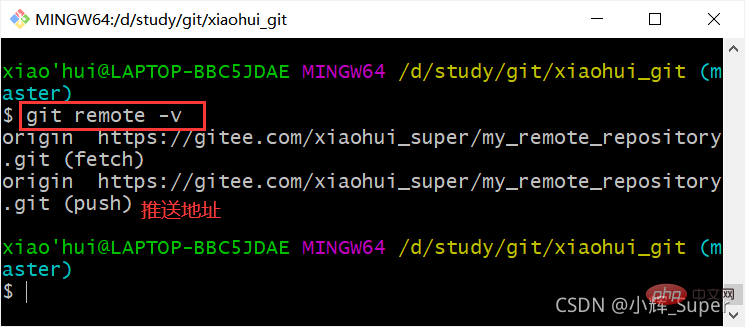
4. Delete the remote warehouse address
git remote remove 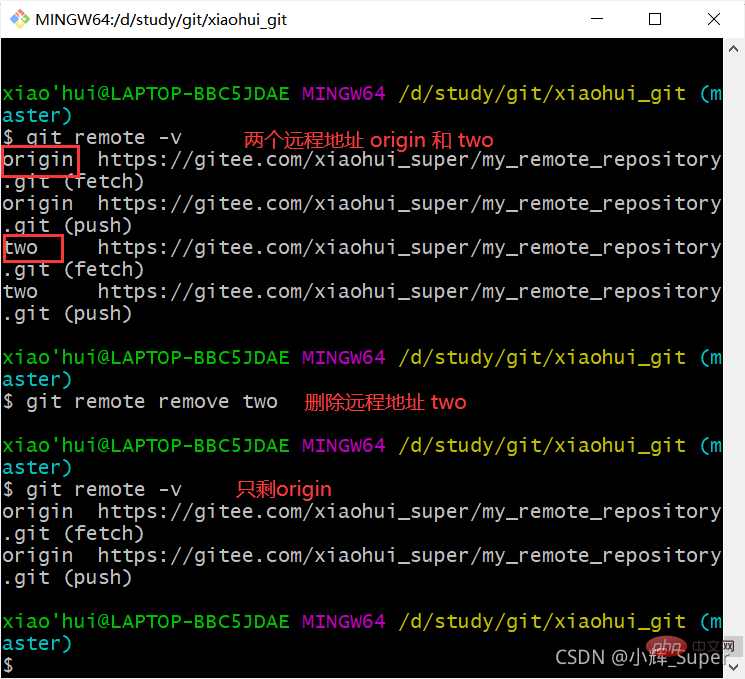
5. Push to the remote warehouse
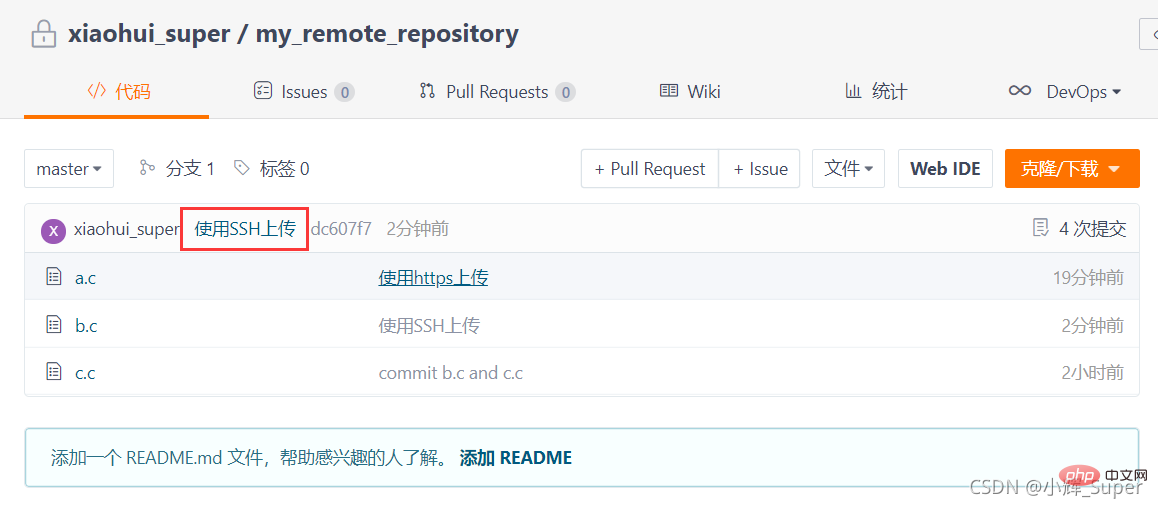
First confirm the alias of the remote warehouse. The alias corresponding to the https protocol address of the remote warehouse I currently set is https, and the alias corresponding to the ssh protocol address is ssh. These two addresses are actually It's the same warehouse, but the protocol is different. 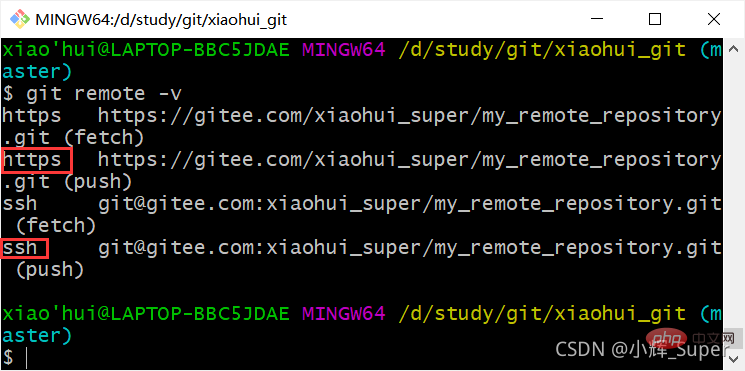
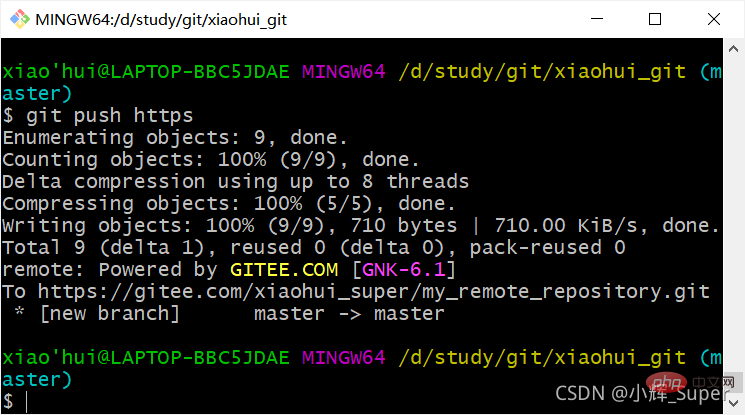
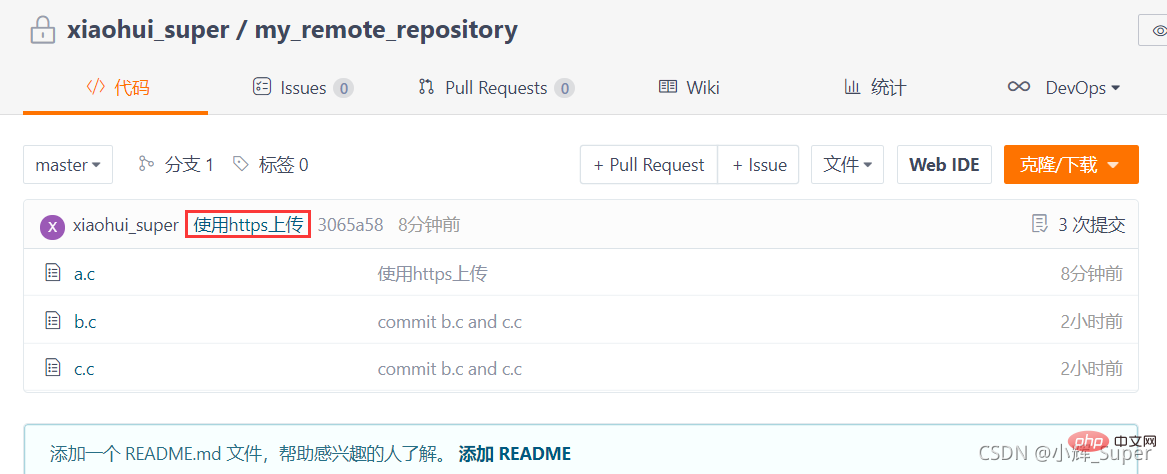
https upload
git push name can upload the local warehouse. name is the alias of the remote warehouse in the configuration file. Use https to upload. , you need to enter your account and password to complete the upload. The Window system will automatically save the account and password. If you want to modify the user name and password that Window has saved, you can refer to Modifying Gitee Login Credentials.
Sometimes the first upload will be unsuccessful. You can try to use git push -u name master. The function of this command is to use the main branch of the name warehouse as the upstream branch. -u and –set-upstream The effect is the same. 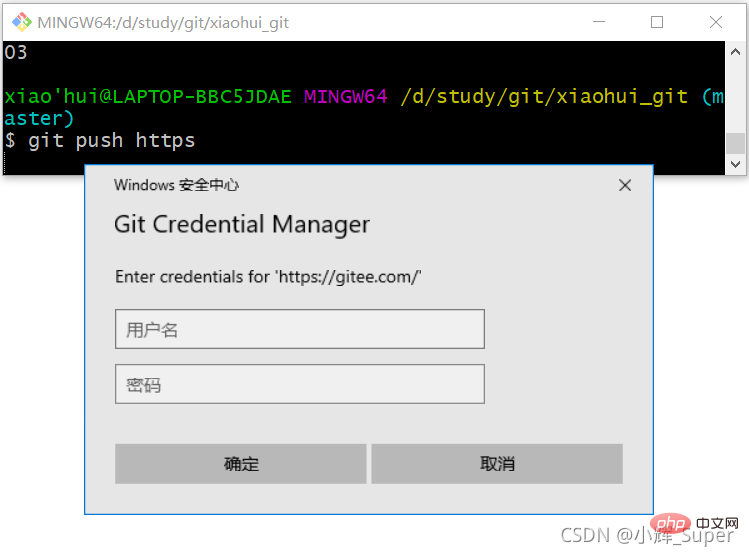
ssh upload
If you want to use ssh to upload, you need to generate an SSH key first and The public key is saved to the SSH public key setting of gitee's personal settings. For the specific process, please refer to: Generate SSH key and implement code upload
Sometimes the first upload will be unsuccessful, you can try to use git push -u name master, the function of this command is to use the main branch of the name warehouse as the upstream branch. -u and –set-upstream have the same effect. 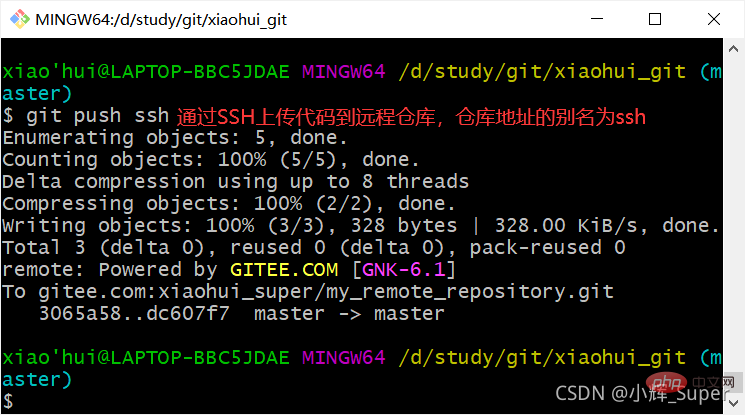
7. Clone, fetch or pull from the remote warehouse
1. Clone the remote warehouse to the local
Git cloning can copy the remote warehouse to the local one and automatically initialize the local warehouse at the same time.
Open Git bash in any directory, enter git clone
[Note]: Clone requires a password just like push. 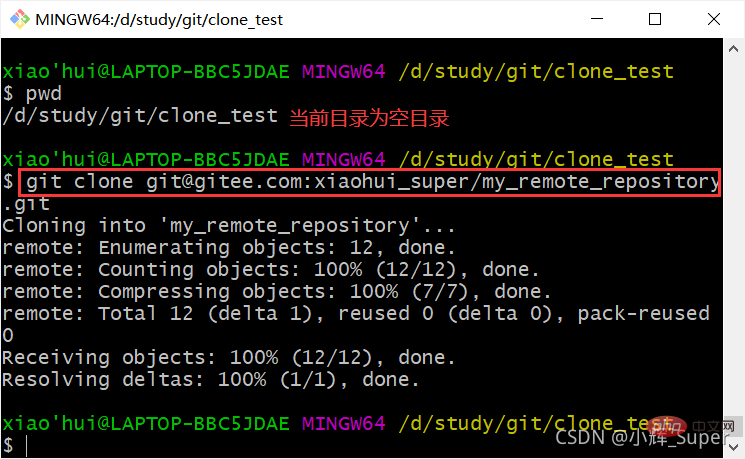
After cloning successfully, enter the warehouse directory, which is exactly the same as the workspace when uploading, and the submission log is also the same. 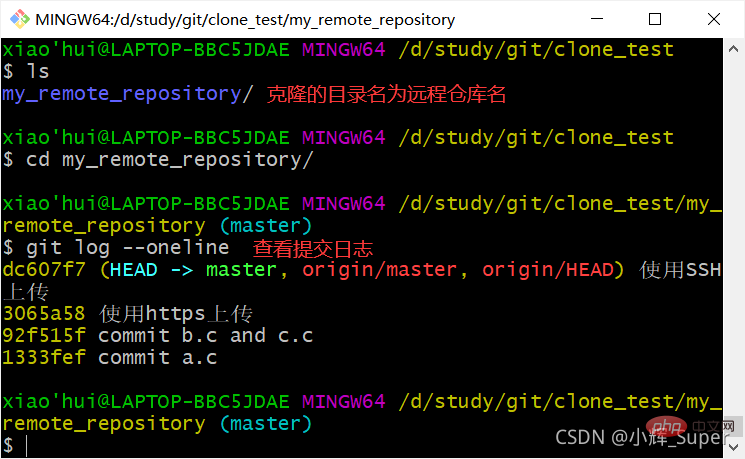
2. Get the remote warehouse (fetch)
The function of git fetch is to copy the branch of the remote warehouse to the local warehouse and save the latest version in the FETCH_HEAD branch. After obtaining the remote warehouse branch, you need to manually merge it into the current branch.
Command format: git fetch [
git merge 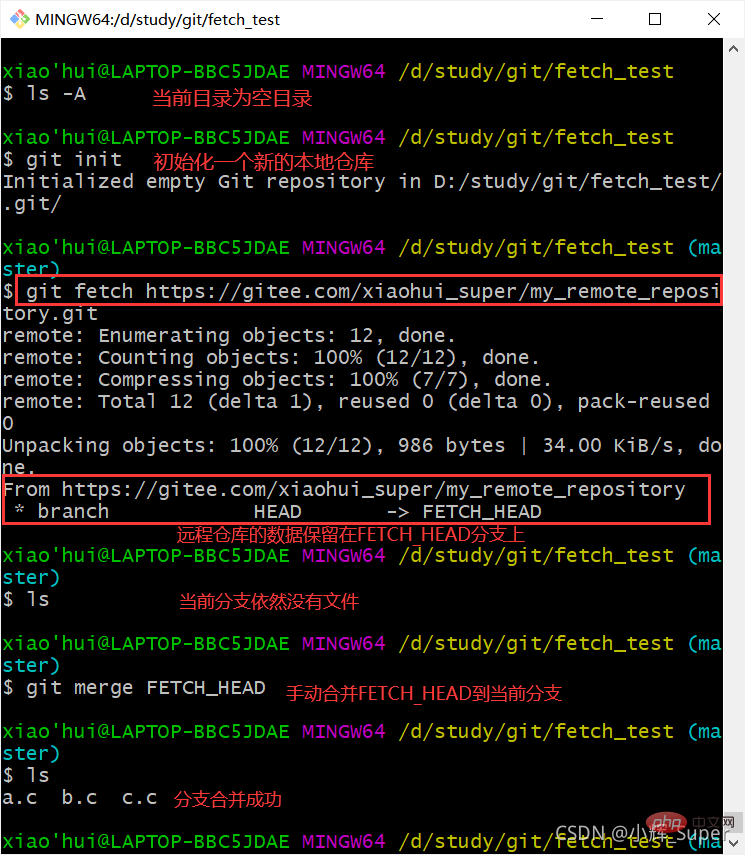
3. Pull the remote warehouse (pull)
git pull is similar to git fetch, but git pull will automatically merge the branch of the remote warehouse into the current local branch. 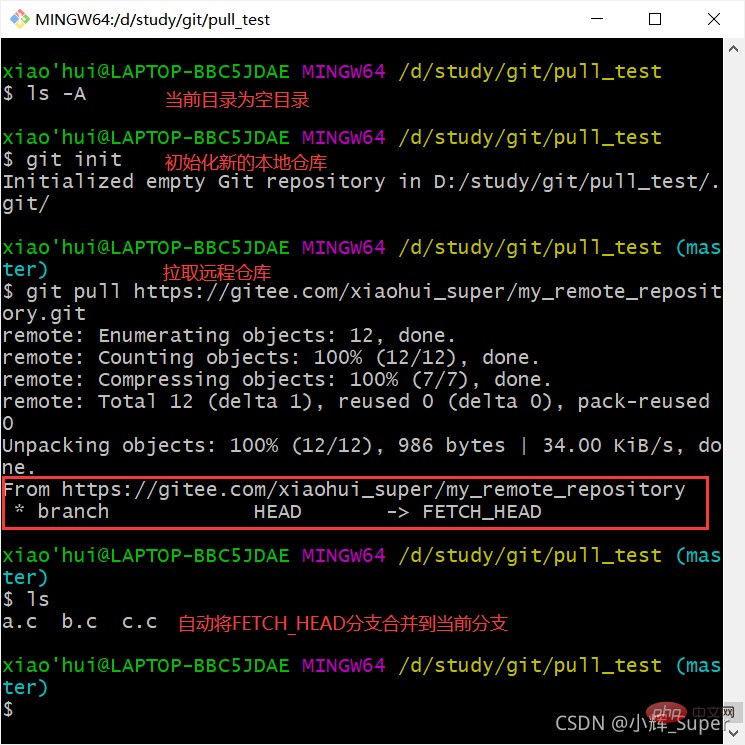
Recommended learning: "Git Video Tutorial"
The above is the detailed content of In-depth analysis of the basic working principles of Git. For more information, please follow other related articles on the PHP Chinese website!

Hot AI Tools

Undresser.AI Undress
AI-powered app for creating realistic nude photos

AI Clothes Remover
Online AI tool for removing clothes from photos.

Undress AI Tool
Undress images for free

Clothoff.io
AI clothes remover

AI Hentai Generator
Generate AI Hentai for free.

Hot Article
Hot Tools

Notepad++7.3.1
Easy-to-use and free code editor

SublimeText3 Chinese version
Chinese version, very easy to use

Zend Studio 13.0.1
Powerful PHP integrated development environment

Dreamweaver CS6
Visual web development tools

SublimeText3 Mac version
God-level code editing software (SublimeText3)
Hot Topics


 How to install deepseek
Feb 19, 2025 pm 05:48 PM
How to install deepseek
Feb 19, 2025 pm 05:48 PM
There are many ways to install DeepSeek, including: compile from source (for experienced developers) using precompiled packages (for Windows users) using Docker containers (for most convenient, no need to worry about compatibility) No matter which method you choose, Please read the official documents carefully and prepare them fully to avoid unnecessary trouble.
 Summary of FAQs for DeepSeek usage
Feb 19, 2025 pm 03:45 PM
Summary of FAQs for DeepSeek usage
Feb 19, 2025 pm 03:45 PM
DeepSeekAI Tool User Guide and FAQ DeepSeek is a powerful AI intelligent tool. This article will answer some common usage questions to help you get started quickly. FAQ: The difference between different access methods: There is no difference in function between web version, App version and API calls, and App is just a wrapper for web version. The local deployment uses a distillation model, which is slightly inferior to the full version of DeepSeek-R1, but the 32-bit model theoretically has 90% full version capability. What is a tavern? SillyTavern is a front-end interface that requires calling the AI model through API or Ollama. What is breaking limit
 What are the Grayscale Encryption Trust Funds? Common Grayscale Encryption Trust Funds Inventory
Mar 05, 2025 pm 12:33 PM
What are the Grayscale Encryption Trust Funds? Common Grayscale Encryption Trust Funds Inventory
Mar 05, 2025 pm 12:33 PM
Grayscale Investment: The channel for institutional investors to enter the cryptocurrency market. Grayscale Investment Company provides digital currency investment services to institutions and investors. It allows investors to indirectly participate in cryptocurrency investment through the form of trust funds. The company has launched several crypto trusts, which has attracted widespread market attention, but the impact of these funds on token prices varies significantly. This article will introduce in detail some of Grayscale's major crypto trust funds. Grayscale Major Crypto Trust Funds Available at a glance Grayscale Investment (founded by DigitalCurrencyGroup in 2013) manages a variety of crypto asset trust funds, providing institutional investors and high-net-worth individuals with compliant investment channels. Its main funds include: Zcash (ZEC), SOL,
 Delphi Digital: How to change the new AI economy by parsing the new ElizaOS v2 architecture?
Mar 04, 2025 pm 07:00 PM
Delphi Digital: How to change the new AI economy by parsing the new ElizaOS v2 architecture?
Mar 04, 2025 pm 07:00 PM
ElizaOSv2: Empowering AI and leading the new economy of Web3. AI is evolving from auxiliary tools to independent entities. ElizaOSv2 plays a key role in it, which gives AI the ability to manage funds and operate Web3 businesses. This article will dive into the key innovations of ElizaOSv2 and how it shapes an AI-driven future economy. AI Automation: Going to independently operate ElizaOS was originally an AI framework focusing on Web3 automation. v1 version allows AI to interact with smart contracts and blockchain data, while v2 version achieves significant performance improvements. Instead of just executing simple instructions, AI can independently manage workflows, operate business and develop financial strategies. Architecture upgrade: Enhanced A
 As top market makers enter the crypto market, what impact will Castle Securities have on the industry?
Mar 04, 2025 pm 08:03 PM
As top market makers enter the crypto market, what impact will Castle Securities have on the industry?
Mar 04, 2025 pm 08:03 PM
The entry of top market maker Castle Securities into Bitcoin market maker is a symbol of the maturity of the Bitcoin market and a key step for traditional financial forces to compete for future asset pricing power. At the same time, for retail investors, it may mean the gradual weakening of their voice. On February 25, according to Bloomberg, Citadel Securities is seeking to become a liquidity provider for cryptocurrencies. The company aims to join the list of market makers on various exchanges, including exchanges operated by CoinbaseGlobal, BinanceHoldings and Crypto.com, people familiar with the matter said. Once approved by the exchange, the company initially planned to set up a market maker team outside the United States. This move is not only a sign
 Significantly surpassing SFT, the secret behind o1/DeepSeek-R1 can also be used in multimodal large models
Mar 12, 2025 pm 01:03 PM
Significantly surpassing SFT, the secret behind o1/DeepSeek-R1 can also be used in multimodal large models
Mar 12, 2025 pm 01:03 PM
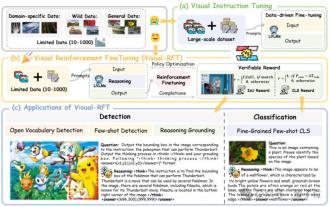
Researchers from Shanghai Jiaotong University, Shanghai AILab and the Chinese University of Hong Kong have launched the Visual-RFT (Visual Enhancement Fine Tuning) open source project, which requires only a small amount of data to significantly improve the performance of visual language big model (LVLM). Visual-RFT cleverly combines DeepSeek-R1's rule-based reinforcement learning approach with OpenAI's reinforcement fine-tuning (RFT) paradigm, successfully extending this approach from the text field to the visual field. By designing corresponding rule rewards for tasks such as visual subcategorization and object detection, Visual-RFT overcomes the limitations of the DeepSeek-R1 method being limited to text, mathematical reasoning and other fields, providing a new way for LVLM training. Vis
 Bitwise: Businesses Buy Bitcoin A Neglected Big Trend
Mar 05, 2025 pm 02:42 PM
Bitwise: Businesses Buy Bitcoin A Neglected Big Trend
Mar 05, 2025 pm 02:42 PM
Weekly Observation: Businesses Hoarding Bitcoin – A Brewing Change I often point out some overlooked market trends in weekly memos. MicroStrategy's move is a stark example. Many people may say, "MicroStrategy and MichaelSaylor are already well-known, what are you going to pay attention to?" This is true, but many investors regard it as a special case and ignore the deeper market forces behind it. This view is one-sided. In-depth research on the adoption of Bitcoin as a reserve asset in recent months shows that this is not an isolated case, but a major trend that is emerging. I predict that in the next 12-18 months, hundreds of companies will follow suit and buy large quantities of Bitcoin
 The latest tutorial on how to install the ios version installation package of Ouyi
Feb 21, 2025 pm 07:36 PM
The latest tutorial on how to install the ios version installation package of Ouyi
Feb 21, 2025 pm 07:36 PM
This guide will provide a comprehensive overview of how to install the latest installation packages from EV Exchange on iOS devices. Ouyi Exchange is a leading cryptocurrency trading platform that provides a wide range of cryptocurrency trading, asset management and investment services. By following the step-by-step instructions provided in this guide, users can easily and easily install the Euyi Exchange app on their iPhone or iPad. This guide is suitable for all iOS devices, from older models to the latest generation, and includes clear screenshots and detailed instructions to ensure a seamless installation process.
