What is unit testing? How to unit test Vue components?
本篇文章带大家了解一下Vue 组件的单元测试,介绍一下Vue 组件配置单元测试,进行单元测试的方法,希望对大家有所帮助!

我们先来简单解释一下单元测试:就是对函数的输入输出进行测试,使用断言的方式,判断我们输入的用例的结果和我们实际输入的结果是否相同
组件的单元测试就是使用单元测试工具,对组件的各种状态和行为进行测试
组件单元测试的好处
- 提供描述组件行为的文档
- 节省手动测试的时间
- 减少研发新特性时产生的bug
- 改进设计
- 促进重构
准备工作
在我们进行单元测试模拟之前,我们需要对环境进行一些配置
安装依赖
- Vue Test Utils (学习视频分享:vuejs教程)
npm install --save-dev jsdom jsdom-global
npm install --save-dev jest
npm install --save-dev @vue/vue2-jest # (use the appropriate version)
yarn add --dev babel-jest @babel/core
安装测试依赖
yarn add jest @vue/test-utils vue-jest babel-jest -D -W
这里有点小问题,如果使用下发的命令进行安装的话会出现一点点的小错误
yarn add jest @vue/test-utils vue-jest babel-jest -D
报错截图:

Jest 的配置
jest.config.js
module.exports = {
  "testMatch": ["**/__tests__/**/*.[jt]s?(x)"],
  "moduleFileExtensions": [
    "js",
    "json",
    // 告诉 Jest 处理 `*.vue` 文件
    "vue"
  ],
  "transform": {
    // 用 `vue-jest` 处理 `*.vue` 文件
    ".*\\.(vue)$": "vue-jest",
    // 用 `babel-jest` 处理 js
    ".*\\.(js)$": "babel-jest"
  }
}基于上面的测试文件的配置,我们会将每个测试文件的配置放置于__tests__下
创建测试用例:
项目地址:https://gitee.com/liuyinghao123/task/tree/master/Part7/element
我们使用:packages\input 的 input 组件进行测试
在packages\input 文件夹下 创建 __tests__ 文件夹 后创建 input.test.js
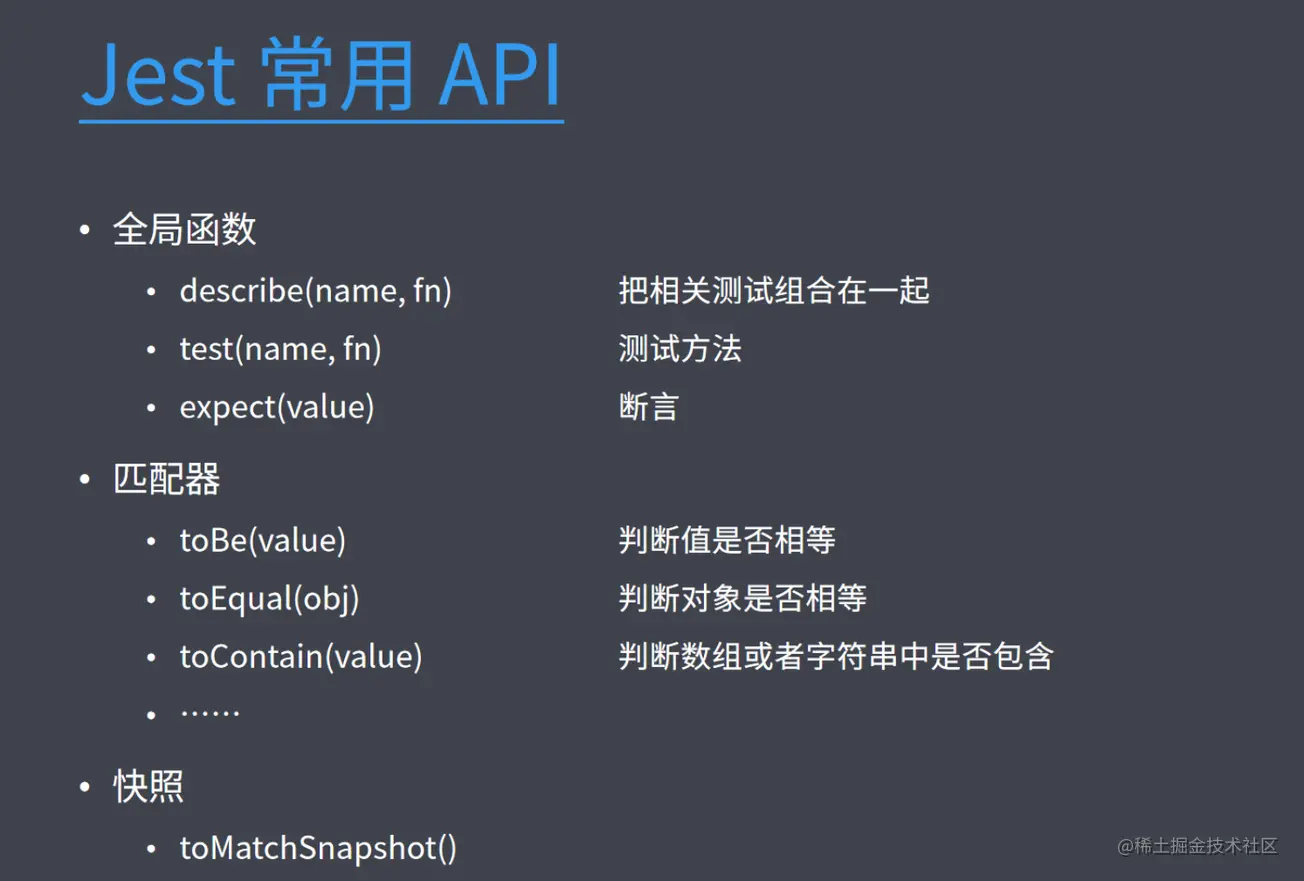
这里先给大家普及一下几个常用的API

测试用例1 判断是否是文本框
import input from '../src/input.vue'
import { mount } from '@vue/test-utils' // 挂载

describe('lg-input', () => {
  test('input-text', () => {
    const wrapper = mount(input)
    expect(wrapper.html()).toContain('input type="text"')
  })
})这里我们需要 使用@vue/test-utils提供的mount方法进行挂载,注意,这里只是在内存中进行挂载,并且我们需要保存这个包裹器返回的内容
const wrapper = mount(input)
这个用例很简单,就是想要知道我们生产的是否是一个文本框,这里一个简单的测试用例就写完了,接着我们运行一下:
yarn test
运行结果
修改用例
expect(wrapper.html()).toContain('input type="tex123123123t"')
运行结果
测试失败,提示没有找到input type="tex123123123t"的内容,符合预期,没有问题。
测试用例2 判断是否是密码框
 test('input-password', () => {
    const wrapper = mount(input, {
      propsData: {
        type: 'password'
      }
    })
    expect(wrapper.html()).toContain('input type="password"')
})我们可以通过propsData来进行设置组件的props属性
运行结果
测试用例3 组件接收值是否正确
  test('input-password', () => {
    const wrapper = mount(input, {
      propsData: {
        type: 'password',
        value: 'admin'
      }
    })
    expect(wrapper.props('value')).toBe('admin')
})这里我们通过wrapper.props获取他的props属性,拿到这个值之后,进行判断
运行结果
测试用例4 快照的使用
  test('input-snapshot', () => {
    const wrapper = mount(input, {
      propsData: {
        type: 'text',
        value: 'admin'
      }
    })
    expect(wrapper.vm.$el).toMatchSnapshot()
})我们要把挂载的dom对象拍一个快照,我们第一次调用这个方法的时候,他会把这个内容挂载到一个特殊的文本文件中,当我们再次生产测试的时候,会将我们刚刚存储的文件进行对比,如果发生了变化就会出现测试失败的情况
文件结构:
修改快照的propsData
propsData: {
    type: 'password',
    value: 'admin'
}测试结果
删除快照结果,重新生成
yarn test -u
总结
到这里我们的单元测试简单版 Demo 就这样完结了,单元测试对我们进行组件化的开发还是非常重要的,配合 stroyBooks,我们可以做到很多
(学习视频分享:web前端开发)
The above is the detailed content of What is unit testing? How to unit test Vue components?. For more information, please follow other related articles on the PHP Chinese website!

Hot AI Tools

Undresser.AI Undress
AI-powered app for creating realistic nude photos

AI Clothes Remover
Online AI tool for removing clothes from photos.

Undress AI Tool
Undress images for free

Clothoff.io
AI clothes remover

Video Face Swap
Swap faces in any video effortlessly with our completely free AI face swap tool!

Hot Article

Hot Tools

Notepad++7.3.1
Easy-to-use and free code editor

SublimeText3 Chinese version
Chinese version, very easy to use

Zend Studio 13.0.1
Powerful PHP integrated development environment

Dreamweaver CS6
Visual web development tools

SublimeText3 Mac version
God-level code editing software (SublimeText3)

Hot Topics
 1387
1387
 52
52
 How to use bootstrap in vue
Apr 07, 2025 pm 11:33 PM
Using Bootstrap in Vue.js is divided into five steps: Install Bootstrap. Import Bootstrap in main.js. Use the Bootstrap component directly in the template. Optional: Custom style. Optional: Use plug-ins.
 How to add functions to buttons for vue
Apr 08, 2025 am 08:51 AM
You can add a function to the Vue button by binding the button in the HTML template to a method. Define the method and write function logic in the Vue instance.
 How to reference js file with vue.js
Apr 07, 2025 pm 11:27 PM
There are three ways to refer to JS files in Vue.js: directly specify the path using the <script> tag;; dynamic import using the mounted() lifecycle hook; and importing through the Vuex state management library.
 How to use watch in vue
Apr 07, 2025 pm 11:36 PM
The watch option in Vue.js allows developers to listen for changes in specific data. When the data changes, watch triggers a callback function to perform update views or other tasks. Its configuration options include immediate, which specifies whether to execute a callback immediately, and deep, which specifies whether to recursively listen to changes to objects or arrays.
 What does vue multi-page development mean?
Apr 07, 2025 pm 11:57 PM
Vue multi-page development is a way to build applications using the Vue.js framework, where the application is divided into separate pages: Code Maintenance: Splitting the application into multiple pages can make the code easier to manage and maintain. Modularity: Each page can be used as a separate module for easy reuse and replacement. Simple routing: Navigation between pages can be managed through simple routing configuration. SEO Optimization: Each page has its own URL, which helps SEO.
 How to return to previous page by vue
Apr 07, 2025 pm 11:30 PM
Vue.js has four methods to return to the previous page: $router.go(-1)$router.back() uses <router-link to="/" component window.history.back(), and the method selection depends on the scene.
 How to query the version of vue
Apr 07, 2025 pm 11:24 PM
You can query the Vue version by using Vue Devtools to view the Vue tab in the browser's console. Use npm to run the "npm list -g vue" command. Find the Vue item in the "dependencies" object of the package.json file. For Vue CLI projects, run the "vue --version" command. Check the version information in the <script> tag in the HTML file that refers to the Vue file.
 How to use vue traversal
Apr 07, 2025 pm 11:48 PM
There are three common methods for Vue.js to traverse arrays and objects: the v-for directive is used to traverse each element and render templates; the v-bind directive can be used with v-for to dynamically set attribute values for each element; and the .map method can convert array elements into new arrays.


