This article brings you relevant knowledge about mysql, which mainly introduces the relevant knowledge about row-level locks in InnoDB. Row locks, also called record locks, as the name implies, are Let’s take a look at the locks added to the record. I hope it will be helpful to everyone.

Recommended learning: mysql video tutorial
Row lock, also known as record lock, as the name suggests is a lock added to the record . But please note that this record refers to locking the index entry on the index. This row lock implementation feature of InnoDB means that InnoDB uses row-level locks only when data is retrieved through index conditions. Otherwise, InnoDB will use table locks.
Whether you use a primary key index, a unique index, or a normal index, InnoDB will use row locks to lock data.
Row locks can only be used if the execution plan actually uses the index: even if the index field is used in the condition, whether to use the index to retrieve data is determined by MySQL by judging the cost of different execution plans. If MySQL believes that full table scans are more efficient. For example, for some very small tables, it will not use indexes. In this case, InnoDB will use table locks instead of row locks.
At the same time, when we use range conditions instead of equality conditions to retrieve data and request a lock, InnoDB will lock the index items of existing data records that meet the conditions.
But even row locks are divided into various types in InnoDB. In other words, even if a row lock is added to the same record, if the type is different, the effect will be different.
Here we still use the previous teacher table, add an index, and insert a few records.
mysql> desc teacher;
+--------+--------------+------+-----+---------+-------+
| Field  | Type         | Null | Key | Default | Extra |
+--------+--------------+------+-----+---------+-------+
| number | int(11)      | NO   | PRI | NULL    |       |
| name   | varchar(100) | YES  | MUL | NULL    |       |
| domain | varchar(100) | YES  |     | NULL    |       |
+--------+--------------+------+-----+---------+-------+
3 rows in set (0.00 sec)

mysql> select * from teacher;
+--------+------+--------+
| number | name | domain |
+--------+------+--------+
|      1 | T    | Java   |
|      3 | M    | Redis  |
|      9 | X    | MQ     |
|     15 | O    | Python |
|     21 | A    | Golang |
+--------+------+--------+
5 rows in set (0.00 sec)
Copy after login
Let’s take a look at the commonly used row lock types.
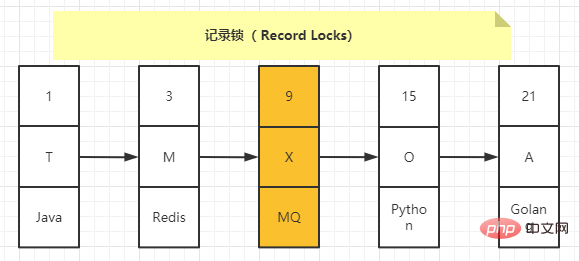
Record Locks
Also called record lock, it means to lock only one record. The official type name is: LOCK_REC_NOT_GAP. For example, the schematic diagram of adding a record lock to the record with a number value of 9 is as follows:

Record locks are divided into S locks and X locks. When a After a transaction acquires the S-type record lock of a record, other transactions can continue to acquire the S-type record lock of the record, but they cannot continue to acquire the X-type record lock; when a transaction acquires the X-type record lock of a record, Other transactions can neither continue to acquire the S-type record lock nor the X-type record lock for this record.
| T1 |
T2 |
##begin; |
|
select * from teacher where number=9 for update; |
|
##select * from teacher where number=9 for update; # Blocking |
|
Gap Locks
MySQL is allowed under the REPEATABLE READ isolation level There are two solutions to partially solve the phantom reading problem. It can be solved by using the MVCC solution or the locking solution. However, there is a problem when using the locking solution, that is, when the transaction performs the read operation for the first time, those phantom records do not yet exist, and we cannot add record locks to these phantom records. InnoDB proposes a type of lock called Gap Locks. The official type name is: LOCK_GAP. We can also call it gap lock for short.
Gap lock essentially locks the gap before and after the index, but does not lock the index itself.
T1
| T2 |
|
##begin;
|
| update teacher set domain='Redis' where name='M';
|
|
##insert into teacher value(23,'B','docker'); # Block
|
|
##insert into teacher value(23,'B','docker'); # Blocking
|
事务T1会对([A, 21], [M, 3])、([M, 3], [O, 15])之间进行上gap锁,如下图中所示:

意味着不允许别的事务在这条记录前后间隙插入新记录,所以T2就不能插入。
但是当SQL语句变为:
insert into teacher value(70,'P','docker');
Copy after login
能插入吗?当然能,因为(70,‘P’)这条记录不在被锁的区间内。
思考题
现在有表,表中有记录如下:
<span style="font-family: " microsoft yahei sans gb helvetica neue tahoma arial sans-serif>list = ['su liang','hacker','ice']<br>list.insert(1,'kiko')<br>print(list)<br>#结果:['su liang', 'kiko', 'hacker', 'ice']</span><br>
Copy after login
开启一个事务:
begin;SELECT * FROM test1 WHERE number = 3 FOR UPDATE;
Copy after login
开启另外一个事务:
INSERT INTO test1 (id, number) VALUES (2, 1); # 阻塞
INSERT INTO test1 (id, number) VALUES (3, 2); # 阻塞
INSERT INTO test1 (id, number) VALUES (6, 8); # 阻塞
INSERT INTO test1 (id, number) VALUES (8, 8); # 正常执行
INSERT INTO test1 (id, number) VALUES (9, 9); # 正常执行
INSERT INTO test1 (id, number) VALUES (10, 12); # 正常执行
UPDATE test1 SET number = 5 WHERE id = 11 AND number = 12; # 阻塞
Copy after login
为什么(6,8)不能执行,(8,8)可以执行?这个间隙锁的范围应该是[1,8],最后一个语句为什么不能执行?
解决思路:画一个number的索引数据存放的图,然后根据间隙锁的加锁方式,把锁加上,就能很快明白答案。

- 当插入的number在(1,8)区间都会被阻塞
- 当插入的number等于1、8,那么id在(1,4]、[6,7)区间会被阻塞
Next-Key Locks
有时候我们既想锁住某条记录,又想阻止其他事务在该记录前边的间隙插入新记录,所以InnoDB就提出了一种称之为Next-Key Locks的锁,官方的类型名称为:LOCK_ORDINARY,我们也可以简称为next-key锁。next-key锁的本质就是
一个记录锁和一个gap锁的合体。
默认情况下,InnoDB以REPEATABLE READ隔离级别运行。在这种情况下,InnoDB使用Next-Key Locks锁进行搜索和索引扫描,这可以防止幻读的发生。
Insert Intention Locks
我们说一个事务在插入一条记录时需要判断一下插入位置是不是被别的事务加了所谓的gap锁(next-key锁也包含gap 锁,后边就不强调了),如果有的话,插入操作需要等待,直到拥有gap锁的那个事务提交。
但是InnoDB规定事务在等待的时候也需要在内存中生成一个锁结构,表明有事务想在某个间隙中插入新记录,但是现在处于等待状态。这种类型的锁命名为Insert Intention Locks,官方的类型名称为:LOCK_INSERT_INTENTION,我们也可以称为插入意向锁。
可以理解为插入意向锁是一种锁的的等待队列,让等锁的事务在内存中进行排队等待,当持有锁的事务完成后,处于等待状态的事务就可以获得锁继续事务了。
隐式锁
锁的的维护是需要成本的,为了节约资源,MySQL在设计提出了了一个隐式锁的概念。一般情况下INSERT操作是不加锁的,当然真的有并发冲突的情况下下,还是会导致问题的。
所以MySQL中,一个事务对新插入的记录可以不显式的加锁,但是别的事务在对这条记录加S锁或者X锁时,会去检查索引记录中的trx_id隐藏列,然后进行各种判断,会先帮助当前事务生成一个锁结构,然后自己再生成一个锁结构后进入等待状态。但是由于事务id的存在,相当于加了一个隐式锁。
这样的话,隐式锁就起到了延迟生成锁的用处。这个过程,我们无法干预,是由引擎自动处理的,对我们是完全透明的,我们知道下就行了。
锁的内存结构
所谓的锁其实是一个内存中的结构,在事务执行前本来是没有锁的,也就是说一开始是没有锁结构和记录进行关联的,当一个事务想对这条记录做改动时,首先会看看内存中有没有与这条记录关联的锁结构,当没有的时候就会在内存中生成一个锁结构与之关联。比方说事务T1要对记录做改动,就需要生成一个锁结构与之关联。
锁结构里至少要有两个比较重要的属性:
- trx 信息:代表这个锁结构是哪个事务生成的。
- is_waiting:代表当前事务是否在等待。

当事务T1改动了条记录后,就生成了一个锁结构与该记录关联,因为之前没有别的事务为这条记录加锁,所以is_waiting 属性就是false,我们把这个场景就称之为获取锁成功,或者加锁成功,然后就可以继续执行操作了。
在事务T1提交之前,另一个事务T2也想对该记录做改动,那么先去看看有没有锁结构与这条记录关联,发现有一个锁结构与之关联后,然后也生成了一个锁结构与这条记录关联,不过锁结构的is_waiting属性值为true,表示当前事务需要等待,我们把这个场景就称之为获取锁失败,或者加锁失败,或者没有成功的获取到锁。
在事务T1提交之后,就会把该事务生成的锁结构释放掉,然后看看还有没有别的事务在等待获取锁,发现了事务T2还在等待获取锁,所以把事务T2对应的锁结构的is_waiting属性设置为false,然后把该事务对应的线程唤醒,让它继续执行,此时事务T2就算获取到锁了。这种实现方式非常像并发编程里AQS的等待队列。
对一条记录加锁的本质就是在内存中创建一个锁结构与之关联。那么,一个事务对多条记录加锁时,是不是就要创建多个锁结构呢?比如:
SELECT * FROM teacher LOCK IN SHARE MODE;
Copy after login
很显然,这条语句需要为teacher表中的所有记录进行加锁。那么,是不是需要为每条记录都生成一个锁结构呢?其实理论上创建多个锁结构没有问题,反而更容易理解。但是如果一个事务要获取10,000条记录的锁,要生成10,000个这样的结构,不管是执行效率还是空间效率来说都是很不划算的,所以实际上,并不是一个记录一个锁结构。
当然锁结构实际是很复杂的,我们大概了解下里面包含哪些元素。
- 锁所在的事务信息:无论是表级锁还是行级锁,一个锁属于一个事务,这里记载着该锁对应的事务信息。
- 索引信息:对于行级锁来说,需要记录一下加锁的记录属于哪个索引。
- 表锁/行锁信息:表级锁结构和行级锁结构在这个位置的内容是不同的。具体表现为表级锁记载着这是对哪个表加的锁,还有其他的一些信息;而行级锁记载了记录所在的表空间、记录所在的页号、区分到底是为哪一条记录加了锁的数据结构。
- 锁模式:锁是IS,IX,S,X 中的哪一种。
锁类型:表锁还是行锁,行锁的具体类型。
- 其他:一些和锁管理相关的数据结构,比如哈希表和链表等。
基本上来说,同一个事务里,同一个数据页面,同一个加锁类型的锁会保存在一起。
推荐学习:mysql视频教程
The above is the detailed content of MySQL knowledge points: row-level locks in InnoDB. For more information, please follow other related articles on the PHP Chinese website!


