This article will take you to understand the Buffer in Node, and talk about the browser event loop. I hope it will be helpful to everyone!

# #Binary of data
JS can directly process very intuitive data: such as strings, which we usually display to users
orHTML, is only responsible for telling the browser the address of the image
GBK, then we must read their binary data and then convert it into the corresponding text through GKB of incoming pictures and then processing them , such as through TCP## in We will find that for front-end development, usually We rarely deal with binary, but for the server side, in order to implement many functions, we must directly operate its binary data
So
Node, and it is global As we said before, Buffer stores is binary data, so how is it stored?
1 byte = 8 bit, 1M = 1024kb, 1 G = 1024 Mint type in many programming languages is long type is 8 bytes TCP transmits a byte stream, when writing When reading and reading, you need to specify the number of bytes RGB are Buffer
If we want to put a string into the Buffer, what should we do? What kind of process?
buffer
instanceconst message = 'Hello' // 使用new关键字创建buffer实例,但这种创建方法已经过期了 const buffer = new Buffer(message) console.log(buffer); // <Buffer 48 65 6c 6c 6f> console.log(buffer.toString()); // Hello
buffer The default encoding of
isBuffer class uses utf-8 encoding to encode our string, and also uses utf -8 Decode our string3 bytes of binary encodingconst message = '你好啊' // 使用Buffer.from对我们的字符串进行解码 const buffer = Buffer.from(message) console.log(buffer); // <Buffer e4 bd a0 e5 a5 bd e5 95 8a> // buffer实例中有个toString方法可以对编码进行解码 console.log(buffer.toString()); // '你好啊'
const message = '你好啊'
const buffer = Buffer.from(message, 'utf16le')
console.log(buffer); // <Buffer 60 4f 7d 59 4a 55>
console.log(buffer.toString()); // `O}YJU
There are many ways to create buffer. Here we can create
Buffer## through alloc. #
我们可以直接对buffer实例以数组的形式对每一位进行修改
// 其可以指定我们buffer的位数,比如这里传递进去的是8,那么创建出来的buffer就有8个元素,且每个元素对应的二进制数都是0
const buffer = Buffer.alloc(8)
console.log(buffer); // <Buffer 00 00 00 00 00 00 00 00>
// 赋值为十进制数字的话,buffer会帮我们转化为16进制数字再写入到对应的位置
buffer[0] = 88
// 在js中,以0x开头的就表示为16进制的数字
buffer[1] = 0x88
console.log(buffer); // <Buffer 58 88 00 00 00 00 00 00>
Buffer和文件操作
1、文本文件
buffer,也就是文件内容结果utf-8编码后的二进制数const fs = require('fs')
fs.readFile('./a.txt', (err, data) => {
console.log(data); // <Buffer e5 93 88 e5 93 88>
})const fs = require('fs')
// encoding表示解码所用的字符编码,编码默认为utf-8
fs.readFile('./a.txt', { encoding: 'utf-8' }, (err, data) => {
console.log(data); // 哈哈
})const fs = require('fs')
// 编码用的是utf16le字符编码,解码使用的是utf-8格式,肯定是解不是正确的内容的
fs.readFile('./a.txt', { encoding: 'utf16le' }, (err, data) => {
console.log(data); // 鏥袓
})
// 以上代码和下面代码类似
const msg = '哈哈'
const buffer = Buffer.from(msg, 'utf-8')
console.log(buffer.toString('utf16le')); // 鏥袓2、图片文件
对图片编码进行拷贝,达到复制图片的目的
encoding属性,因为字符编码只有在读取文本文件的时候才有用const fs = require('fs')
fs.readFile('./logo.png', (err, data) => {
console.log(data); // 打印出来的是图片文件对应的二进制编码
// 我们还可以将图片编码写入到另一个文件当中,相当于我们将该图片拷贝了一份
fs.writeFile('./bar.png', data, err => {
console.log(err);
})
})sharp这个库const sharp = require('sharp')
// 将logo.png这张图片裁剪成200x300后拷贝到文件bax.png中
sharp('./logo.png')
.resize(200, 300)
.toFile('./bax.png', (err, info) => {
console.log(err);
})
// 还可以将图片文件先转为buffer,然后在写入到文件中,也可以实现拷贝图片的目的
sharp('./logo.png')
.resize(300, 300)
.toBuffer()
.then(data => {
fs.writeFile('./baa.png', data, err => {
console.log(err);
})
})Buffer的创建过程
Buffer时,并不会频繁的向操作系统申请内存,它会默认先申请一个8 * 1024 个字节大小的内存,也就是8kb什么是事件循环?
事件循环是什么?
JS和浏览器或者Node之间的一个桥梁JS代码和浏览器API调用(setTimeout、AJAX、监听事件等)的一个桥梁,桥梁之间通过回调函数进行沟通file system、networ等)之间的一个桥梁,,桥梁之间也是通过回调函数进行沟通的
进程和线程
进程和线程是操作系统中的两个概念:
process):计算机已经运行的程序thread):操作系统能够运行运算调度的最小单位,所以CPU能够直接操作线程听起来很抽象,我们直观一点解释:
再用一个形象的例子解释
多进程多线程开发
操作系统是如何做到同时让多个进程(边听歌、边写代码、边查阅资料)同时工作呢?

CPU的运算速度非常快,他可以快速的在多个进程之间迅速的切换
浏览器和JavaScript
我们经常会说JavaScript是单线程的,但是JS的线程应该有自己的容器进程:浏览器或者Node
浏览器是一个进程吗,它里面只有一个线程吗?
tab页面时就会开启一个新的进程,这是为了防止一个页面卡死而造成所有页面无法响应,整个浏览器需要强制退出但是JavaScript的代码执行是在一个单独的线程中执行的
JS的代码,在同一时刻只能做一件事JavaScript的执行过程
函数要被压入函数调用栈中后才会被执行,下面我们来分析下代码的执行过程
const message = 'Hello World'

console.log(message);

function sum(num1, num2) {
  return num1 + num2
}

function foo() {
  const result = sum(20, 30)
  console.log(result);
}

foo()main函数中执行的messagelog函数,log函数会被放入到函数调用栈中,执行完后出栈foo函数,foo函数被压入函数调用栈中,但是执行过程中又需要调用sum函数js代码执行完毕,main函数出栈浏览器的事件循环
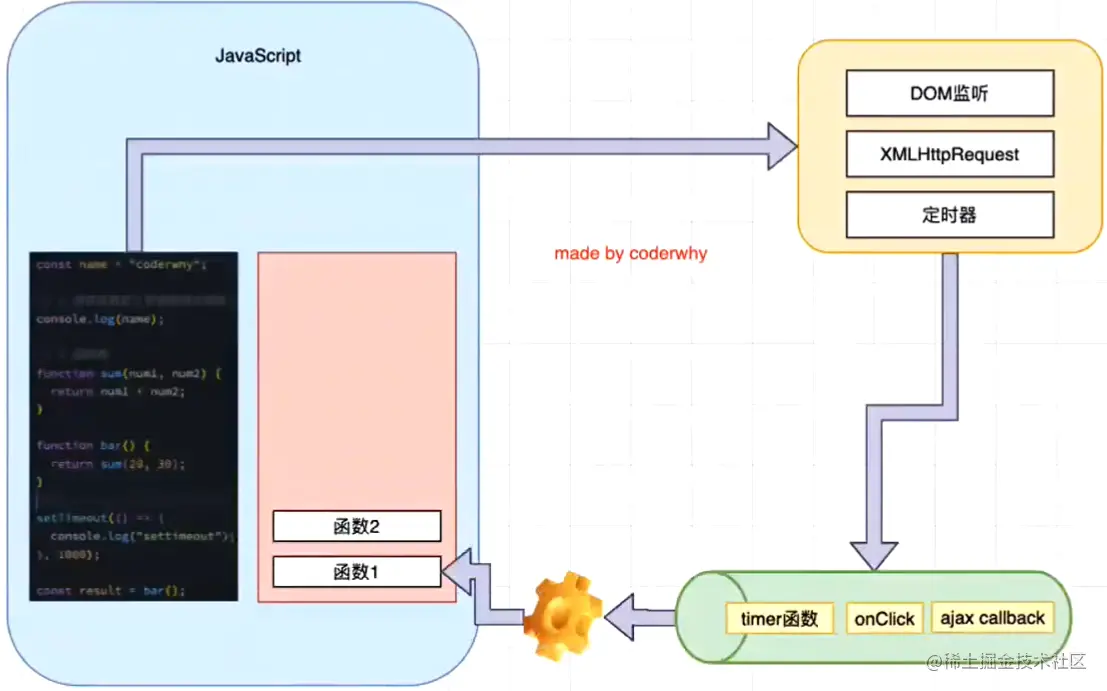
如果在执行JS代码的过程中,有异步操作呢?
setTimeout的函数调用那么,往setTimeout函数里面传入的函数(我们称之为timer函数),会在什么时候被执行呢?
web api,浏览器会提前会将回调函数存储起来,在合适的时机,会将timer函数加入到一个事件队列中为什么setTimeout不会阻塞代码的执行呢?就是因为浏览器里面维护了一个非常非常重要的东西——事件循环
浏览器中会通过某种方式帮助我们保存setTimeout中的回调函数的,比较常用的方法就是保存到一个红黑树里面
等到setTimeout定时器时间到达的时候,它就会将我们的timer回调函数从保存的地方取出来并放入到事件队列里面
事件循环一旦发现我们的队列中有东西了,并且当前函数调用栈是空的,其它同步代码也执行完之后,就会将我们队列中的回调函数依次出列放入到函数调用栈中执行(队列中前一个函数出栈后,下一个函数才会入栈)
当然事件队列中不一定只有一个事件,比如说在某个过程中用户点击了浏览器当中的某个按钮,我们可能对这个按钮的点击做了一个监听,对应了一个回调函数,那个回调函数也会被加入到我们的队列里面的,执行顺序按照它们在事件队列中的顺序执行。还有我们发送ajax请求的回调,也是加入到事件队列里面的
总结:其实事件循环是一个很简单的东西,它就是在某一个特殊的情况下,需要去执行某一个回调的时候,它就把提前保存好的回调塞入事件队列里面,事件循环再给它取出来放入到函数调用栈中

宏任务与微任务
但是事件循环中并非只维护一个队列,事实上是有两个队列,而且队列中的任务执行一定会等到所有的script都执行完毕后
macrotask queue):ajax、setTimeout、setInterval、DOM监听、UI Rendering等microtask queue):Promise的then回调、Mutation Observer API、queueMicrotask()等那么事件循环对于两个队列的优先级是怎么样的呢?
main script中的代码优先执行(编写的顶层script代码)面试题<一>
考点:main stcipt、setTimeout、Promise、then、queueMicrotask
setTimeout(() => {
  console.log('set1');4
  new Promise(resolve => {
    resolve()
  }).then(resolve => {
    new Promise(resolve => {
      resolve()
    }).then(() => {
      console.log('then4');
    })
    console.log('then2');
  })
})

new Promise(resolve => {
  console.log('pr1');
  resolve()
}).then(() => {
  console.log('then1');
})

setTimeout(() => {
  console.log('set2');
})

console.log(2);

queueMicrotask(() => {
  console.log('queueMicrotask');
})

new Promise(resolve => {
  resolve()
}).then(() => {
  console.log('then3');
})

// pr1
// 2
// then1
// queueMicrotask
// then3
// set1
// then2
// then4
// set2setTimeout会立即压入函数调用栈,执行完毕后立即出栈,其timer函数被放入到宏任务队列中
传入Promise类的函数会被立即执行,其并不是回调函数,所以会打印出pr1,并且由于执行了resolve方法,所以该Promise的状态会立即变为fulfilled,这样then函数执行的时候其对应的回调函数就会被放入到微任务队列中
又遇到了一个setTimeout函数,压栈出栈,其timer函数会被放入到宏任务队列中
遇到console.log语句,函数压栈后执行打印出了2,然后出栈
这里通过queueMicrotask绑定了个函数,该函数会被放入到微任务队列中
又遇到了new Promise语句,但是其立即就将promise的状态改为了fulfilled,所以then函数对应的回调也被放入到了微任务队列中
由于同步脚本代码已经执行完毕,现在事件循环开始要去把微任务队列和宏任务对垒的任务按照优先级顺序放入到函数调用栈中执行了,注意:微任务的优先级比宏任务高,每次想要执行宏任务之前都要看看微任务队列里面是否为空,不为空则需要先执行微任务队列的任务
第一个微任务是打印then1,第二个微任务是打印queueMicrotask,第三个微任务是打印then3,执行完毕后,就开始去执行宏任务
第一个宏任务比较复杂,首先会打印set1,然后执行了一个立即变换状态的new promise语句,其then回调会被放入到微任务队列中,注意现在微任务队列可不是空的,所以需要执行优先级较高的微任务队列,相当于该then回调被立即执行了,又是相同的new Promise语句,其对应的then对调被放入到微任务队列中,注意new Promise语句后面还有一个console函数,该函数会在执行完new Promise语句后立即执行,也就是打印then2,现在微任务对垒还是有一项任务,所以接下来就是打印then4。目前为止,微任务队列已经为空了,可以继续执行宏任务队列了
所以接下里的宏任务set2会被打印,宏任务执行完毕
整个代码的打印结果是:pr1 -> 2 -> then1 -> queueMicrotask -> then3 -> set1 -> then2 -> then4 -> set2
面试题<二>
考点:main script、setTimeout、Promise、then、queueMicrotask、await、async
知识补充:async、await是Promise的一个语法糖,在处理事件循环问题时
new Promise((resolve,rejcet) => { 函数执行 })中的代码then(res => {函数执行})中的代码async function async1() {
console.log('async1 start');
await async2()
console.log('async1 end');
}
async function async2() {
console.log('async2');
}
console.log('script start');
setTimeout(() => {
console.log('setTimeout');
}, 0)
async1()
new Promise(resolve => {
console.log('promise1');
resolve()
}).then(() => {
console.log('promise2');
})
console.log('script end');
// script start
// async1 start
// async2
// promise1
// script end
// async1 end
// promise2
// setTimeout一开始都是函数的定义,不需要压入函数调用栈中执行,直到遇到第一个console语句,压栈后执行打印script start后出栈
遇到第一个setTimeout函数,其对应的timer会被放入到宏任务队列中
async1函数被执行,首先打印出async1 start,然后又去执行await语句后面的async2函数,因为前面也说了,将await关键字后面的函数看成是new Promise里面的语句,这个函数是会被立即执行的,所以async2会被打印出来,但该await语句后面的代码相当于是放入到then回调中的,也就是说console.log('async1 end')这行代码被放入到了微任务队列里
The code continues to execute and encounters a new Promise statement, so promise1 is immediately printed, and the function in the then callback is put into the microtask queue
The last console function executes printingscript end, the synchronization code has been executed, and the event loop has to execute tasks in the macro task and micro task queues
First go to the microtask queue. The print statement corresponding to the first microtask will be executed, which means async1 end will be printed, and then promise2 is printed. At this time, the microtask queue is empty and the tasks in the macrotask queue are started.
The setTimeout corresponding to the timer function will be printed. At this time, the macrotask Also executed, the final printing sequence is: script start -> async1 start -> async2 -> promise1 -> script end -> async1 end -> promise2 -> setTimeout
For more node-related knowledge, please visit: nodejs tutorial!
The above is the detailed content of A brief analysis of Buffer in Node.js and a talk about the event loop. For more information, please follow other related articles on the PHP Chinese website!