Detailed explanation of WeChat applet view layer
This article brings you relevant knowledge about WeChat Mini Program, which mainly introduces related issues about the view layer. The view layer is responsible for displaying the data of the logical layer on the page, and at the same time Send the events of the view layer to the logic layer. Let's take a look at it. I hope it will be helpful to everyone.

[Related learning recommendations: 小program learning tutorial]
The view layer of the applet framework is composed of WXML (WeiXin Markup Language, WeChat markup language) and WXSS (WeiXin Style Sheet, WeChat style sheet) are written and displayed by components. The view layer is responsible for displaying data from the logic layer on the page and sending events from the view layer to the logic layer. WXML is used to describe the structure of the page, WXSS is used to describe the style of the page, and components are the basic components of the view. The relationship between these three can be compared to the relationship between HTML, CSS and various tags in HTML. In addition to these three, there is also a scripting language for small programs-WXS (WeiXin Script). WXS and WXML are combined to build a page structure.
1. WXML
1. Data binding
(1) Simple binding
Basic principles of data binding :
1) Define the page data in data: In the .js file corresponding to the page, just define the data into the data object.
Page({
  data:{
    //字符串类型的数据
    info: 'init data ' ,
    //数组类型的数据
    msgList: [{msg: 'hello'},{msg: "world '}]
  }
})2) Use data in WXML: Bind the data in data to the page for rendering, and use Mustache syntax (double braces) to wrap the variables. The syntax format is:
<view>{{要绑定的数据名称}}</view>Mustache The main application scenarios of the syntax are as follows:
①Content. Display data content directly on the page.
②Component properties. Use back-end variables to set the properties of some front-end components. Note that the variables enclosed by double curly braces need to be within the double quotes of the properties.
③Control attributes. Use back-end variables to control the display effect of front-end components. Note that variables enclosed by double curly braces need to be within double quotes of attributes.
④Keywords. Mainly used for logical judgment.
(2) Operation
①Ternary operation. Ternary operations can be performed within double curly braces.
In .js:
Page({
  data: {
    randomNum:Math.random()*10
  }
})In .wxml:
<view>{{randomNum>=5?'数字大于等于5':'数字小于5'}}</view>② Arithmetic operations. Within double curly brackets, basic arithmetic operations can be performed, and the results of the operations will be directly displayed.
③Logical judgment. Within the double braces, logical operations can be performed, returning true or false of boolean type, which can be used to control certain attributes.
④String operations. Within double braces, string concatenation operations can be performed.
⑤Data path operation. For array and JSON object type data, the value can be obtained by indexing within double curly brackets.
(3) Combination
①Array
②Object
2. List rendering
(1)wx:for
Through wx:for, you can loop and render repeated component structures based on the specified array. The syntax example is as follows:
In .js:
Page({
  data: {
    array:['a','b','c']
  }
})In .wxml:
<view>
 索引是:{{index}},当前项是:{{item}}
</view>The effect is as shown in the figure : 
By default, the index of the current loop item is represented by index; the current loop item is represented by item.
(2) Manually specify the index and variable name of the current item*
- Use wx:for-index to specify the variable name of the index of the current loop item
- Use wx:for-item to specify the variable name of the current item
In .wxml:
<view>
 索引是:{{idx}},当前项是:{{itemName}}
</view>The effect is as shown: 
(3) wx :key
is similar to :key in Vue list rendering. When the applet implements list rendering, it is also recommended to specify a unique key value for the rendered list items to improve rendering efficiency. The sample code is as follows:
In .js:
Page({
  data: {
    userList:[
      {id:1,name:'冠军'},
      {id:2,name:'亚军'},
      {id:3,name:'季军'}
    ]
  }
})In .wxml:
<view>{{item.name}}</view>The effect is as shown: 
The value of wx:key is provided in the following two forms:
1) String. Represents an attribute of an item in the array of the wx:for loop. The value of the attribute needs to be a unique string or number in the list and cannot be changed dynamically.
2) Reserved keyword *this. Represents an item itself in the wx:for loop. This representation requires that the item itself be a unique string or number.
3. Conditional rendering
(1)wx:if
In the mini program, use wx:if="{{condition}}" to judge Whether you need to render the code block, you can also use wx:elif and wx:else to add else judgment. Examples are as follows:
In .js:
Page({
  data: {
    type:1
  }
})In .wxml:
<view>男</view>
<view>女</view>
<view>保密</view>
(2)结合 <block></block> 使用 wx:if
如果要一次性控制多个组件的展示与隐藏,可以使用一个 <block></block> 标签将多个组件包装起来,并在<block></block> 标签上使用 wx:if 控制属性,示例如下:
<block>
 <view>view1</view>
 <view>view2</view>
</block>
注意: <block></block> 并不是一个组件,它只是一个包裹性质的容器,不会在页面中做任何渲染。
(3)hidden
在小程序中,直接使用 hidden="{{ condition }}" 也能控制元素的显示与隐藏:
<view>true隐藏,false显示</view>
(4)wx:if 对比 hidden
1)运行方式不同:
wx:if 以动态创建和移除元素的方式,控制元素的展示与隐藏。
hidden 以切换样式的方式(display: none/block;),控制元素的显示与隐藏。
2)使用建议:
频繁切换时,建议使用 hidden。
控制条件复杂时,建议使用 wx:if 搭配 wx:elif、wx:else 进行展示与隐藏的切换。
4.事件
事件是视图层到逻辑层的通信方式,它可以将用户的行为反馈到逻辑层讲行处理。事件一般绑定在组件上,当设定监听的事件被触发时,视图层会将携带了id、dataset、touches等信息的事件对象发送到逻辑层中,此时框架就会执行逻辑层中
对应的事件处理函数,来响应用户的操作。
事件分为冒泡事件和非冒泡事件。
- 冒泡事件:当一个组件上的事件被触发后,该事件会向父节点传递。
- 非冒泡事件:当一个组件上的事件被触发后,该事件不会向父节点传递。
(1)事件的使用方式
.wxml中:
<button>按钮</button>
.js中定义事件处理函数:
Page({
  // 定义按钮的事件处理函数
  btnTapHandler(event){
    console.log(event)
  }
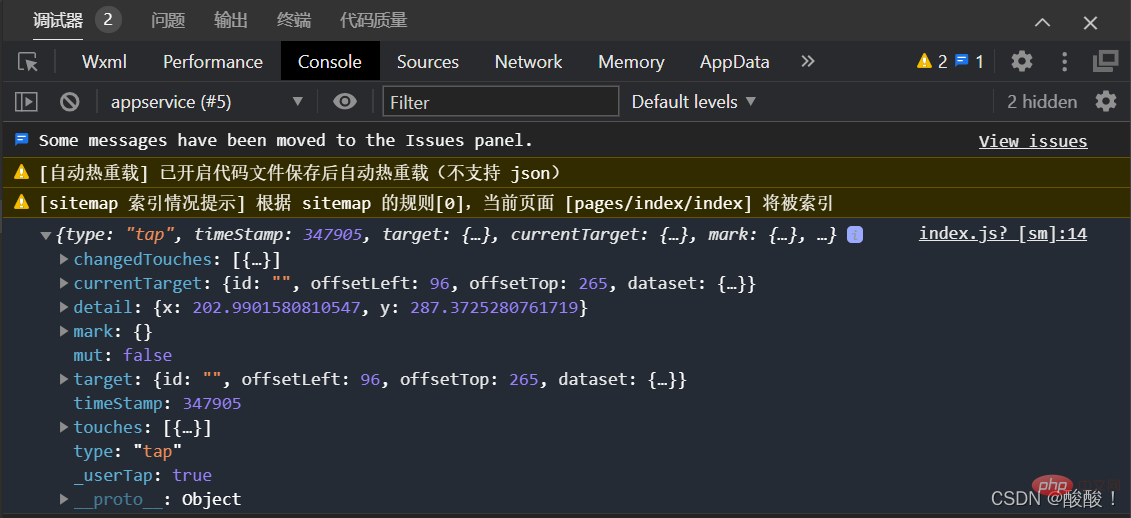
})效果如图:
调试器的Console面板输出信息大致为:
(2)事件的分类

(3)事件的绑定和冒泡
(4)事件的捕获阶段
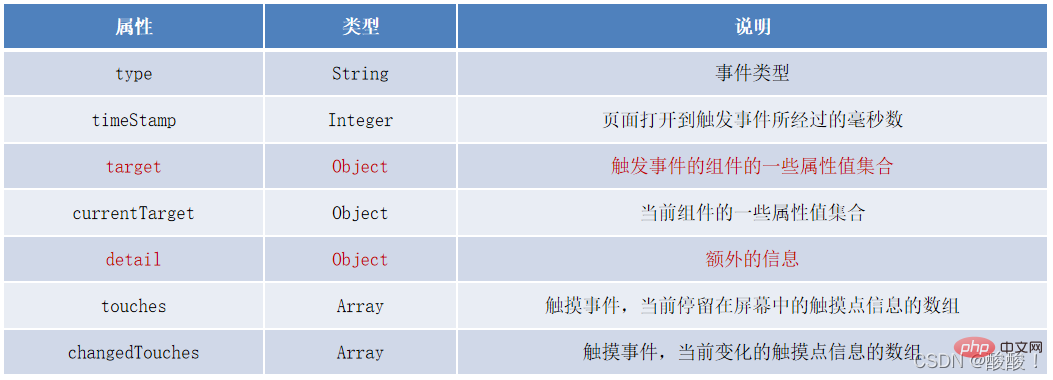
(5)事件对象
当组件触发事件时。逻辑层绑定该事件的处理函数会收到一个事件对象。
(6)在事件处理函数中为 data 中的数据赋值
通过调用 this.setData(dataObject) 方法,可以给页面 data 中的数据重新赋值。示例如下:
.wxml中:
<button>+1</button>
.js中定义事件处理函数:
Page({
  data: {
    count:0
  },

  //+1 按钮的事件处理函数
  countChange(){
    this.setData({
      count:this.data.count +1
    })
  }
})效果如图:

(7)事件传参
小程序中的事件传参比较特殊,不能在绑定事件的同时为事件处理函数传递参数。可以为组件提供 data-* 自定义属性传参,其中 * 代表的是参数的名字,示例代码如下:
.wxml中:( info 会被解析为参数的名字,数值 2 会被解析为参数的值。)
<button>+2</button>
.js中:(在事件处理函数中,通过 event.target.dataset.参数名 即可获取到具体参数的值)
Page({
  data: {
    count:0
  },

  //+2
  binTap2(event){
    this.setData({
      count:this.data.count + event.target.dataset.info
    })
  }
})效果如图:

(8)bindinput 的语法格式
在小程序中,通过 input 事件来响应文本框的输入事件。
.wxml中:
<input>
.js 中定义事件处理函数:
Page({
  //input输入框的事件处理函数
  inputHandler(event){
    console.log(event.detail.value)
  }
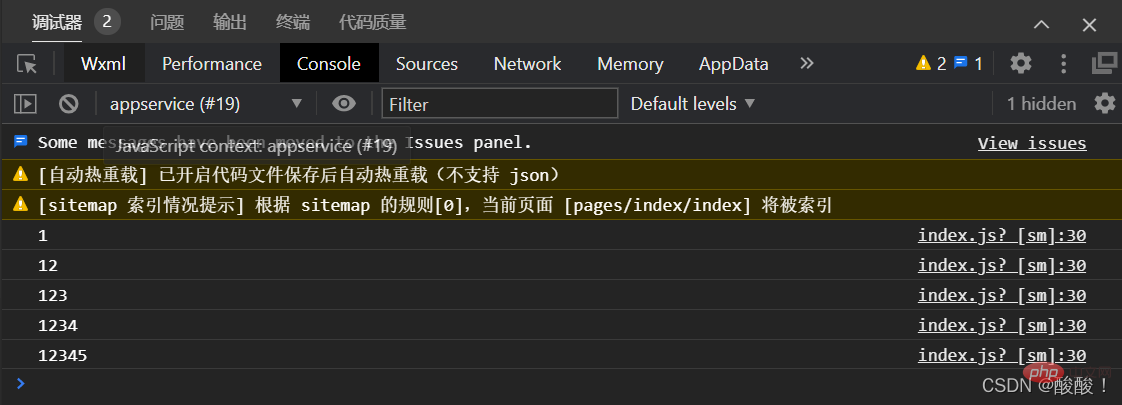
})效果如图:

(9)实现文本框和 data 之间的数据同步
实现步骤:①定义数据;②渲染结构;③美化样式;④绑定 input 事件处理函数。
5.模板
6.引用
WXML提供两种文件引用方式:import 和 include
1)import 可以在该文件中使用目标文件定义的模板。import 有作用域的概念,即只会导入目标文件中定义的模板,而不会导入目标文件导入的模板。
2)include 可以将目标文件除了<template></template><wxs></wxs>外的整个代码引入,相当于复制到 include 位置。
二、WXSS
WXSS (WeiXin Style Sheets)是一套样式语言,用于美化 WXML 的组件样式,类似于网页开发中的 CSS。WXSS 具有 CSS 大部分特性,同时,WXSS 还对 CSS 进行了扩充以及修改,以适应微信小程序的开发。
与 CSS 相比,WXSS 扩展的特性有:
- rpx 尺寸单位
- @import 样式导入
1.尺寸单位
rpx(responsive pixel)是微信小程序独有的,用来解决屏适配的尺寸单位。
rpx 的实现原理非常简单:鉴于不同设备屏幕的大小不同,为了实现屏幕的自动适配,rpx 把所有设备的屏幕,在宽度上等分为 750 份(即:当前屏幕的总宽度为 750rpx)。
- 在较小的设备上,1rpx 所代表的宽度较小
- 在较大的设备上,1rpx 所代表的宽度较大
小程序在不同设备上运行的时候,会自动把 rpx 的样式单位换算成对应的像素单位来渲染,从而实现屏幕适配。
在 iPhone6 上,屏幕宽度为375px,共有 750 个物理像素,等分为 750rpx。则:
750rpx = 375px = 750 物理像素
1rpx = 0.5px = 1物理像素
官方建议:开发微信小程序时,设计师可以用 iPhone6 作为视觉稿的标准。
2.样式导入
使用 WXSS 提供的 @import 语法,可以导入外联的样式表。
@import 后跟需要导入的外联样式表的相对路径,用 ; 表示语句结束。
3.内联样式
内联样式是框架组件上支持使用 style、class 属性来控制组件的样式。
1)style:用于接收动态样式,在运行时会进行解析。
2)class:用于指定样式规则。其值是样式规则中类选择器名(样式类名)的集合。一般将静态样式写到对应样式类名的定义中。多个样式类名之间用空格分隔。
4.选择器
和CSS一样,WXSS也需要使用选择器来决定样式的作用对象。
5.全局样式与局部样式
1)全局样式:定义在 app.wxss 中的样式为全局样式,作用于每一个页面。
2)局部样式:在页面的 .wxss 文件中定义的样式为局部样式,只作用于当前页面。
注意:
当局部样式和全局样式冲突时,根据就近原则,局部样式会覆盖全局样式。
当局部样式的权重大于或等于全局样式的权重时,才会覆盖全局的样式。
三、WXS
1.概念
WXS(WeiXin Script)是小程序独有的一套脚本语言,结合 WXML,可以构建出页面的结构。
2.应用场景
wxml 中无法调用在页面的 .js 中定义的函数,但是,wxml 中可以调用 wxs 中定义的函数。因此,小程序中 wxs 的典型应用场景就是“过滤器”。
3.wxs 和 JavaScript 的关系
虽然 wxs 的语法类似于 JavaScript,但是 wxs 和 JavaScript 是完全不同的两种语言:
(1)wxs 有自己的数据类型:
- number 数值类型
- string 字符串类型
- boolean 布尔类型
- object 对象类型
- function函数类型
- array 数组类型
- date 日期类型
- regexp 正则
(2)wxs 不支持类似于 ES6 及以上的语法形式
- 不支持:let、const、解构赋值、展开运算符、箭头函数、对象属性简写、etc…
- 支持:var 定义变量、普通 function函数等类似于 ES5 的语法
(3)wxs 遵循 CommonJS 规范
- module 对象
- require() 函数
- module.exports 对象
4.内嵌 wxs 脚本
wxs 代码可以编写在 wxml 文件中的 <wxs></wxs> 标签内,就像 Javascript 代码可以编写在 html 文件中的 <script></script> 标签内一样。
wxml 文件中的每个 <wxs></wxs> 标签,必须提供 module 属性,用来指定当前 wxs 的模块名称,方便在 wxml 中访问模块中的成员。
.wxml中:
<view>{{m1.toUpper(username)}}</view>

<wxs>
  //将文本转为大写形式zs -> ZS
  module.exports.toUpper = function(str) {
    return str.toUpperCase()
  }
</wxs>5.定义外联的 wxs 脚本
wxs 代码还可以编写在以 .wxs 为后缀名的文件内,就像 javascript 代码可以编写在以 .js 为后缀名的文件中一样。示例代码如下:
//tools.wxs文件
function toLower(str) {
  return str.toLowerCase()
}

module.exports = {
  toLower: toLower
}6.使用外联的 wxs 脚本
在 wxml 中引入外联的 wxs 脚本时,必须为 标签添加 module 和 src 属性,其中:
- module 用来指定模块的名称
- src 用来指定要引入的脚本的路径,且必须是相对路径
示例代码如下:
<!--调用m2模块中的方法-->
<viewr>{{m2.toLower(country)}}

<!--引用外联的tools.wxs脚本,并命名为 m2-->
<wxs></wxs></viewr>7.WXS 的特点
(1)与 JavaScript 不同
为了降低 wxs(WeiXin Script)的学习成本, wxs 语言在设计时借大量鉴了 JavaScript 的语法。但是本质上,wxs 和 JavaScript 是完全不同的两种语言!
(2)不能作为组件的事件回调
wxs 典型的应用场景就是“过滤器”,经常配合 Mustache 语法进行使用。但是,在 wxs 中定义的函数不能作为组件的事件回调函数。
(3)隔离性
隔离性指的是 wxs 的运行环境和其他 JavaScript 代码是隔离的。体现在如下两方面:
①wxs 不能调用 js 中定义的函数
②wxs 不能调用小程序提供的 API
(4)性能好
①在 iOS 设备上,小程序内的 WXS 会比 JavaScript 代码快 2 ~ 20 倍
②在 android 设备上,二者的运行效率无差异
【相关学习推荐:小程序学习教程】
The above is the detailed content of Detailed explanation of WeChat applet view layer. For more information, please follow other related articles on the PHP Chinese website!

Hot AI Tools

Undresser.AI Undress
AI-powered app for creating realistic nude photos

AI Clothes Remover
Online AI tool for removing clothes from photos.

Undress AI Tool
Undress images for free

Clothoff.io
AI clothes remover

AI Hentai Generator
Generate AI Hentai for free.

Hot Article

Hot Tools

Notepad++7.3.1
Easy-to-use and free code editor

SublimeText3 Chinese version
Chinese version, very easy to use

Zend Studio 13.0.1
Powerful PHP integrated development environment

Dreamweaver CS6
Visual web development tools

SublimeText3 Mac version
God-level code editing software (SublimeText3)

Hot Topics
 Xianyu WeChat mini program officially launched
Feb 10, 2024 pm 10:39 PM
Xianyu's official WeChat mini program has quietly been launched. In the mini program, you can post private messages to communicate with buyers/sellers, view personal information and orders, search for items, etc. If you are curious about what the Xianyu WeChat mini program is called, take a look now. What is the name of the Xianyu WeChat applet? Answer: Xianyu, idle transactions, second-hand sales, valuations and recycling. 1. In the mini program, you can post idle messages, communicate with buyers/sellers via private messages, view personal information and orders, search for specified items, etc.; 2. On the mini program page, there are homepage, nearby, post idle, messages, and mine. 5 functions; 3. If you want to use it, you must activate WeChat payment before you can purchase it;
 WeChat applet implements image upload function
Nov 21, 2023 am 09:08 AM
WeChat applet implements picture upload function With the development of mobile Internet, WeChat applet has become an indispensable part of people's lives. WeChat mini programs not only provide a wealth of application scenarios, but also support developer-defined functions, including image upload functions. This article will introduce how to implement the image upload function in the WeChat applet and provide specific code examples. 1. Preparatory work Before starting to write code, we need to download and install the WeChat developer tools and register as a WeChat developer. At the same time, you also need to understand WeChat
 Implement the drop-down menu effect in WeChat applet
Nov 21, 2023 pm 03:03 PM
To implement the drop-down menu effect in WeChat Mini Programs, specific code examples are required. With the popularity of mobile Internet, WeChat Mini Programs have become an important part of Internet development, and more and more people have begun to pay attention to and use WeChat Mini Programs. The development of WeChat mini programs is simpler and faster than traditional APP development, but it also requires mastering certain development skills. In the development of WeChat mini programs, drop-down menus are a common UI component, achieving a better user experience. This article will introduce in detail how to implement the drop-down menu effect in the WeChat applet and provide practical
 What is the name of Xianyu WeChat applet?
Feb 27, 2024 pm 01:11 PM
The official WeChat mini program of Xianyu has been quietly launched. It provides users with a convenient platform that allows you to easily publish and trade idle items. In the mini program, you can communicate with buyers or sellers via private messages, view personal information and orders, and search for the items you want. So what exactly is Xianyu called in the WeChat mini program? This tutorial guide will introduce it to you in detail. Users who want to know, please follow this article and continue reading! What is the name of the Xianyu WeChat applet? Answer: Xianyu, idle transactions, second-hand sales, valuations and recycling. 1. In the mini program, you can post idle messages, communicate with buyers/sellers via private messages, view personal information and orders, search for specified items, etc.; 2. On the mini program page, there are homepage, nearby, post idle, messages, and mine. 5 functions; 3.
 Use WeChat applet to achieve carousel switching effect
Nov 21, 2023 pm 05:59 PM
Use the WeChat applet to achieve the carousel switching effect. The WeChat applet is a lightweight application that is simple and efficient to develop and use. In WeChat mini programs, it is a common requirement to achieve carousel switching effects. This article will introduce how to use the WeChat applet to achieve the carousel switching effect, and give specific code examples. First, add a carousel component to the page file of the WeChat applet. For example, you can use the <swiper> tag to achieve the switching effect of the carousel. In this component, you can pass b
 How to use PHP to develop the second-hand transaction function of WeChat applet?
Oct 27, 2023 pm 05:15 PM
How to use PHP to develop the second-hand transaction function of WeChat applet? As a popular mobile application development platform, WeChat applet is used by more and more developers. In WeChat mini programs, second-hand transactions are a common functional requirement. This article will introduce how to use PHP to develop the second-hand transaction function of the WeChat applet and provide specific code examples. 1. Preparation work Before starting development, you need to ensure that the following conditions are met: the development environment of the WeChat applet has been set up, including registering the AppID of the applet and setting it in the background of the applet.
 Implement image filter effects in WeChat mini programs
Nov 21, 2023 pm 06:22 PM
Implementing picture filter effects in WeChat mini programs With the popularity of social media applications, people are increasingly fond of applying filter effects to photos to enhance the artistic effect and attractiveness of the photos. Picture filter effects can also be implemented in WeChat mini programs, providing users with more interesting and creative photo editing functions. This article will introduce how to implement image filter effects in WeChat mini programs and provide specific code examples. First, we need to use the canvas component in the WeChat applet to load and edit images. The canvas component can be used on the page
 Implement image rotation effect in WeChat applet
Nov 21, 2023 am 08:26 AM
To implement the picture rotation effect in WeChat Mini Program, specific code examples are required. WeChat Mini Program is a lightweight application that provides users with rich functions and a good user experience. In mini programs, developers can use various components and APIs to achieve various effects. Among them, the picture rotation effect is a common animation effect that can add interest and visual effects to the mini program. To achieve image rotation effects in WeChat mini programs, you need to use the animation API provided by the mini program. The following is a specific code example that shows how to


