Comprehensive JavaScript node operations in one article
This article brings you relevant knowledge about javascript, which mainly introduces related issues about node operations, including parent nodes, child nodes, sibling nodes, adding, deleting and copying nodes. Let’s take a look at the content below. I hope it will be helpful to everyone.

[Related recommendations: javascript video tutorial, web front-end]
In our web page, In addition to using the methods provided by DOM to obtain nodes, you can also use the hierarchical relationship of nodes to obtain nodes. They are relatively simple. Let’s summarize them today!
Node Overview
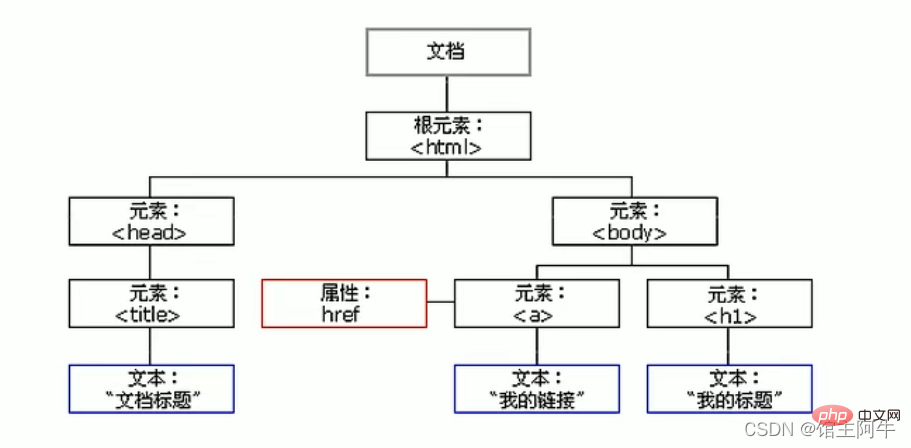
All content in a web page is a node (label, attribute, text, comment, etc.). In the DOM, node is represented by node.
All nodes in the HTML DOM tree are accessible through JavaScript, and all HTML elements (nodes) can be modified, created or deleted. 
Generally, nodes have at least three basic attributes: nodeType (node type), nodeName (node name) and nodeValue (node value).
- The element node nodeType is 1
- The attribute node nodeType is 2
- The text node nodeType is 3 (text nodes include text, spaces, newlines, etc.)
In our actual development, node operations mainly operate on element nodes.
Node level
Using the DOM tree, nodes can be divided into different hierarchical relationships. The most common one is the hierarchical relationship between father, son, and brother.
1. Parent node
node.parentNode
- The parentNode property can return the parent node of a node, note that it is the nearest parent node.
- If the specified node has no parent node, return null.
<p>
        </p><p></p>

    <script>
        var son = document.querySelector(".son");
        console.log(son.parentNode);
    </script>
2. Child nodes
1.node.childNodes (standard)
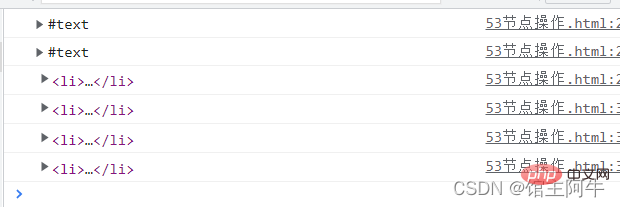
node .childNodes returns a collection containing the child nodes of the specified node. This collection is an immediately updated collection.
- 我是li
- 我是li
- 我是li
- 我是li

Why are there five text nodes here? They actually correspond to five line breaks. See the picture below: 
These five line breaks are text nodes. Plus four li element nodes, a total of 9
Note: The return value contains all child nodes, including element nodes, text nodes, etc.
If you only want to get the element nodes inside, you need to handle it specially. So we generally do not advocate the use of childNodes.
	var ul = document.querySelector('ul');
for (var i = 0;i2.node.children (non-standard)
node.children is a read-only property that returns all child element nodes. It only returns child element nodes, and other nodes are not returned (this is what we focus on).
Although children is a non-standard, it is supported by various browsers, so we can use it with confidence.
- 我是li
- 我是li
- 我是li
- 我是li

3. The first child node and the last child node
1.node. firstChild
2.node. lastChild
firstChild returns the first child node. If it cannot find it, returns null. The same applies to lastChild. Likewise, all nodes are included.
3.node. firstElementChild
firstElementChild returns the first child element node, or null if not found.
4.node. lastElementChild
lastElementChild returns the last child element node, or null if not found.
Note: These two methods have compatibility issues and are only supported by IE9 and above.
5.node.children[0]
5.node.children[node.children.length - 1]
Note: The actual development method is not compatible Sexual issues.
- 我是li
- 我是li
- 我是li
- 我是li

4.兄弟节点
1.node. nextSibling
nextSibling 返回当前元素的下一个兄弟节点,找不到则返回 null 。同样,也是包含所有的节点。
2.node. previousSibling
previousSibling 返回当前元素上一个兄弟节点,找不到则返回null。同样,也包含所有的节点。
3.node. nextElementSibling
nextElementSibling 返回当前元素下一个兄弟元素节点,找不到返回 null 。
4.node. previousElementSibling
previousElementSibling 返回当前元素上一个兄弟元素节点,找不则返回 null 。
注意:这两个方法有兼容性问题,IE9以上才支持。
那么如何封装一个满足兼容性,又可以找到兄弟元素节点的函数呢
   function getNextElementSibling(element){
       var el = element;
       while(el = el.nextSibling){
           if(el.nodeType == 1){
               return el;
           }
       }
       return null;
}上面这段封装的代码就可解决,但不必考虑太多,因为ie浏览器即将要停止服务了,所以你只要记住node. nextElementSibling 这个就行,不必担心兼容性问题。
创建节点
document.createElement (’ tagName ')
document.createElenent ()方法创建由 tagName 指定的Н TML 元素。因为这些元素原先不存在,是根据我的需求动态生成的,所以我们也称为动态创建元素节点。
添加节点与添加节点
1.node. appendChild(child)
node.appendChild ()方法将一个节点添加到指定父节点的子节点列表末尾。类似 css 里面的 after 伪元素。
2.node.insertBefore(child,指定元素)

删除节点
node.removeChild(child)
node.removeChild(child) 方法从DOM中删除一个子节点,返回删除的节点。
- aniu
- marry
- tom

复制节点(克隆节点)
node.cloneNode ()
node.cloneNode ()方法返回调用该方法的节点的一个副本。也称为克隆节点/拷贝节点
1.如果括号参数为空或者为 false ,则是浅拷贝,即只克隆复制节点本身,不克降里面的子节点。
2.如果括号参数为 true ,则是深度拷贝,会复制节点本身以及里面所有的子节点。
- aniu
- marry
- tom

【相关推荐:javascript视频教程、web前端】
The above is the detailed content of Comprehensive JavaScript node operations in one article. For more information, please follow other related articles on the PHP Chinese website!

Hot AI Tools

Undresser.AI Undress
AI-powered app for creating realistic nude photos

AI Clothes Remover
Online AI tool for removing clothes from photos.

Undress AI Tool
Undress images for free

Clothoff.io
AI clothes remover

AI Hentai Generator
Generate AI Hentai for free.

Hot Article

Hot Tools

Notepad++7.3.1
Easy-to-use and free code editor

SublimeText3 Chinese version
Chinese version, very easy to use

Zend Studio 13.0.1
Powerful PHP integrated development environment

Dreamweaver CS6
Visual web development tools

SublimeText3 Mac version
God-level code editing software (SublimeText3)

Hot Topics
 1377
1377
 52
52
 How to implement an online speech recognition system using WebSocket and JavaScript
Dec 17, 2023 pm 02:54 PM
How to use WebSocket and JavaScript to implement an online speech recognition system Introduction: With the continuous development of technology, speech recognition technology has become an important part of the field of artificial intelligence. The online speech recognition system based on WebSocket and JavaScript has the characteristics of low latency, real-time and cross-platform, and has become a widely used solution. This article will introduce how to use WebSocket and JavaScript to implement an online speech recognition system.
 WebSocket and JavaScript: key technologies for implementing real-time monitoring systems
Dec 17, 2023 pm 05:30 PM
WebSocket and JavaScript: Key technologies for realizing real-time monitoring systems Introduction: With the rapid development of Internet technology, real-time monitoring systems have been widely used in various fields. One of the key technologies to achieve real-time monitoring is the combination of WebSocket and JavaScript. This article will introduce the application of WebSocket and JavaScript in real-time monitoring systems, give code examples, and explain their implementation principles in detail. 1. WebSocket technology
 How to use JavaScript and WebSocket to implement a real-time online ordering system
Dec 17, 2023 pm 12:09 PM
Introduction to how to use JavaScript and WebSocket to implement a real-time online ordering system: With the popularity of the Internet and the advancement of technology, more and more restaurants have begun to provide online ordering services. In order to implement a real-time online ordering system, we can use JavaScript and WebSocket technology. WebSocket is a full-duplex communication protocol based on the TCP protocol, which can realize real-time two-way communication between the client and the server. In the real-time online ordering system, when the user selects dishes and places an order
 How to implement an online reservation system using WebSocket and JavaScript
Dec 17, 2023 am 09:39 AM
How to use WebSocket and JavaScript to implement an online reservation system. In today's digital era, more and more businesses and services need to provide online reservation functions. It is crucial to implement an efficient and real-time online reservation system. This article will introduce how to use WebSocket and JavaScript to implement an online reservation system, and provide specific code examples. 1. What is WebSocket? WebSocket is a full-duplex method on a single TCP connection.
 JavaScript and WebSocket: Building an efficient real-time weather forecasting system
Dec 17, 2023 pm 05:13 PM
JavaScript and WebSocket: Building an efficient real-time weather forecast system Introduction: Today, the accuracy of weather forecasts is of great significance to daily life and decision-making. As technology develops, we can provide more accurate and reliable weather forecasts by obtaining weather data in real time. In this article, we will learn how to use JavaScript and WebSocket technology to build an efficient real-time weather forecast system. This article will demonstrate the implementation process through specific code examples. We
 Simple JavaScript Tutorial: How to Get HTTP Status Code
Jan 05, 2024 pm 06:08 PM
JavaScript tutorial: How to get HTTP status code, specific code examples are required. Preface: In web development, data interaction with the server is often involved. When communicating with the server, we often need to obtain the returned HTTP status code to determine whether the operation is successful, and perform corresponding processing based on different status codes. This article will teach you how to use JavaScript to obtain HTTP status codes and provide some practical code examples. Using XMLHttpRequest
 How to use insertBefore in javascript
Nov 24, 2023 am 11:56 AM
Usage: In JavaScript, the insertBefore() method is used to insert a new node in the DOM tree. This method requires two parameters: the new node to be inserted and the reference node (that is, the node where the new node will be inserted).
 How to get HTTP status code in JavaScript the easy way
Jan 05, 2024 pm 01:37 PM
Introduction to the method of obtaining HTTP status code in JavaScript: In front-end development, we often need to deal with the interaction with the back-end interface, and HTTP status code is a very important part of it. Understanding and obtaining HTTP status codes helps us better handle the data returned by the interface. This article will introduce how to use JavaScript to obtain HTTP status codes and provide specific code examples. 1. What is HTTP status code? HTTP status code means that when the browser initiates a request to the server, the service


