Detailed explanation of Redis cluster operation examples
This article brings you relevant knowledge about Redis, which mainly organizes issues related to cluster operations, including adding redis instances, configuring 8007 as the master node, and configuring 8008 as 8007 Let’s take a look at the nodes and so on. I hope it will be helpful to everyone.

Recommended learning: Redis video tutorial
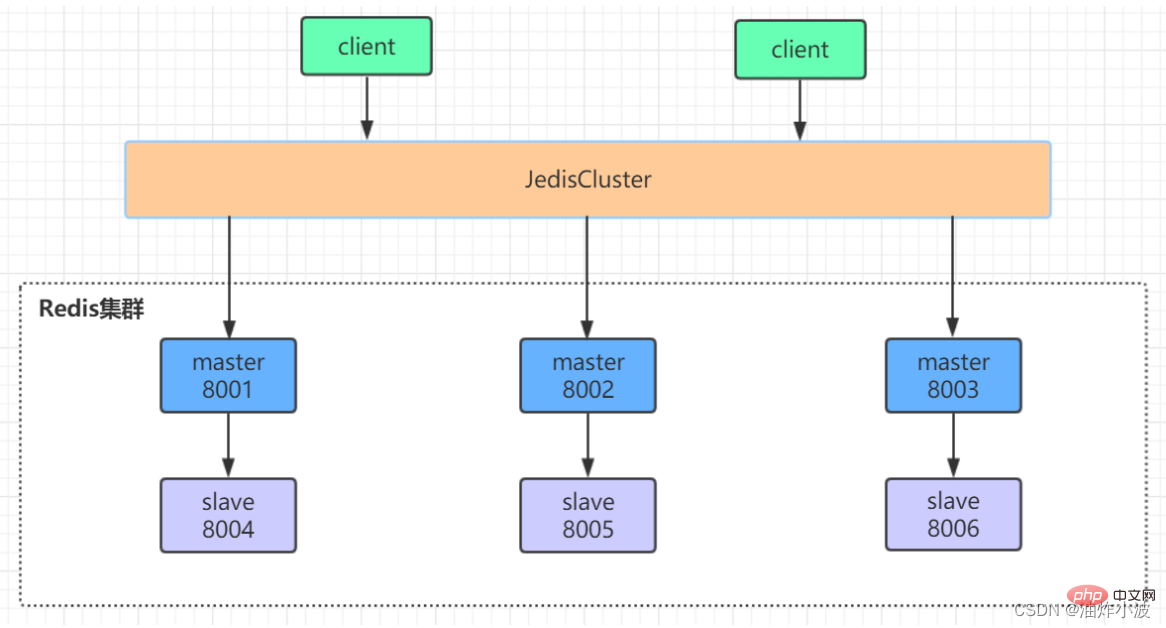
Based on the existing foundation, here is a basic version of three main and three From, the architecture is as follows

##1. Start the cluster/usr/local/redis‐5.0.3/src/redis‐server /usr/local/redis‐cluster/8001/redis.conf
/usr/local/redis‐5.0.3/src/redis‐server /usr/local/redis‐cluster/8002/redis.conf
/usr/local/redis‐5.0.3/src/redis‐server /usr/local/redis‐cluster/8003/redis.conf
/usr/local/redis‐5.0.3/src/redis‐server /usr/local/redis‐cluster/8004/redis.conf
/usr/local/redis‐5.0.3/src/redis‐server /usr/local/redis‐cluster/8005/redis.conf
/usr/local/redis‐5.0.3/src/redis‐server /usr/local/redis‐cluster/8006/redis.conf
Copy after login
/usr/local/redis‐5.0.3/src/redis‐server /usr/local/redis‐cluster/8001/redis.conf
/usr/local/redis‐5.0.3/src/redis‐server /usr/local/redis‐cluster/8002/redis.conf
/usr/local/redis‐5.0.3/src/redis‐server /usr/local/redis‐cluster/8003/redis.conf
/usr/local/redis‐5.0.3/src/redis‐server /usr/local/redis‐cluster/8004/redis.conf
/usr/local/redis‐5.0.3/src/redis‐server /usr/local/redis‐cluster/8005/redis.conf
/usr/local/redis‐5.0.3/src/redis‐server /usr/local/redis‐cluster/8006/redis.conf
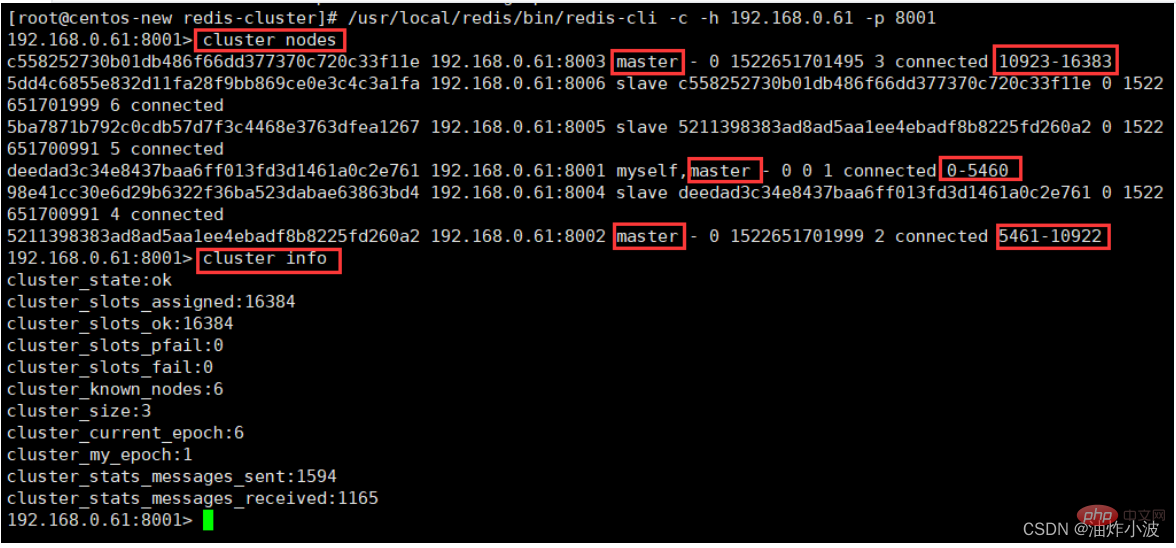
View cluster status: cluster nodes
As can be seen from the above figure, the entire cluster is running normally, with three master nodes and three slave nodes, 
- The instance node of port 8001 stores hash slots 0-5460,
- The instance node of port 8002 stores hash slots 5461-10922,
- The instance node of port 8003 stores these hash slots 10923-16383,
The three master nodes store all the hash slots The storage slots that make up the redis cluster. The slave point is the backup slave node of each master node. The storage slots are not displayed.
2. Cluster operation
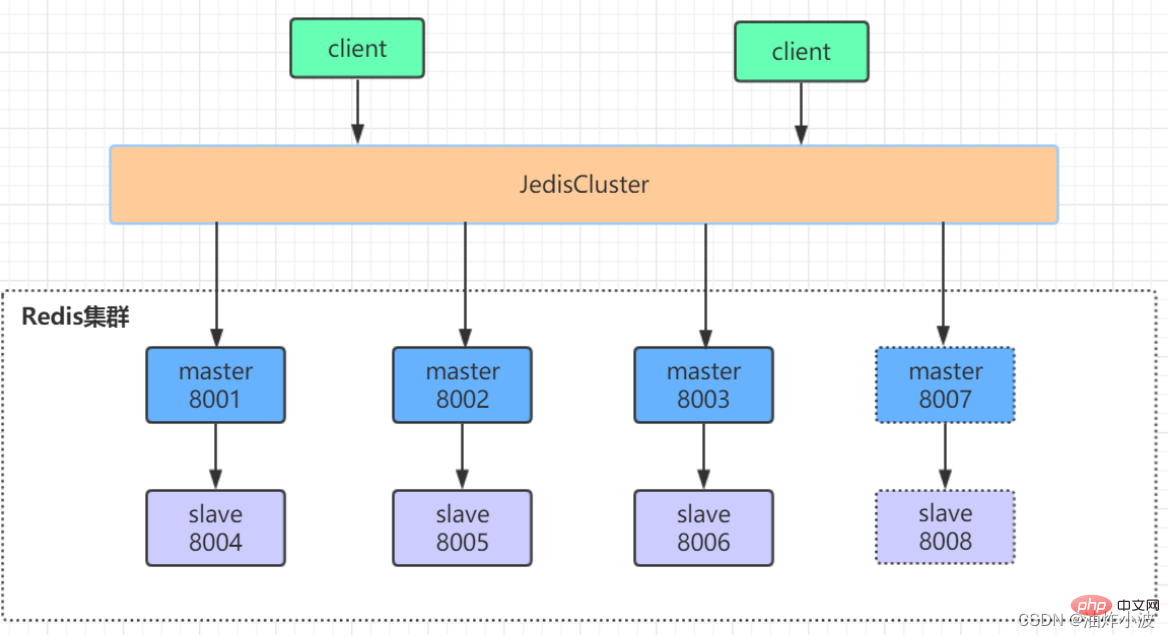
We add one more master (8007) and one slave (8008) based on the original cluster. After adding nodes See the following figure for the cluster. New nodes are represented by dotted boxes

2.1. Add a redis instance
## Create 8007 and 8008 folders under /usr/local/redis-cluster, and copy the redis.conf file under the 8001 folder to the 8007 and 8008 folders Nextmkdir 8007 8008
cd 8001
cp redis.conf /usr/local/redis‐cluster/8007/
cp redis.conf /usr/local/redis‐cluster/8008/
# 修改8007文件夹下的redis.conf配置文件
vim /usr/local/redis‐cluster/8007/redis.conf
# 修改如下内容:
port:8007
dir /usr/local/redis‐cluster/8007/
cluster‐config‐file nodes‐8007.conf
# 修改8008文件夹下的redis.conf配置文件
vim /usr/local/redis‐cluster/8008/redis.conf
# 修改内容如下:
port:8008
dir /usr/local/redis‐cluster/8008/
cluster‐config‐file nodes‐8008.conf
# 启动8007和8008俩个服务并查看服务状态
/usr/local/redis‐5.0.3/src/redis‐server /usr/local/redis‐cluster/8007/redis.conf
/usr/local/redis‐5.0.3/src/redis‐server /usr/local/redis‐cluster/8008/redis.conf
ps ‐el | grep redis
2.2. Configure 8007 as the master node
Use the add-node command to add a new master node 8007 (master), the previous ip:port is a new node, and the latter ip:port is a known existing node. If you see the "[OK] New node added correctly" prompt at the end of the log, it means that the new node has been added successfully/usr/local/redis‐5.0.3/src/redis‐cli ‐a user ‐‐cluster add‐node 192.168.0.61:8007 192.168.0.61:8001
/usr/local/redis‐5.0.3/src/redis‐cli ‐a user ‐c ‐h 192.168.0.61 ‐p 8001

192.168.0.61:8001> cluster nodes

Use the redis-cli command to allocate a hash slot for 8007, find any master node in the cluster, and re-shard itNote: When the node is added successfully, the newly added node will not have any data because it has not been allocated any slot (hash slot). We need to manually allocate hash for the new node. Slot
/usr/local/redis‐5.0.3/src/redis‐cli ‐a user ‐‐cluster reshard 192.168.0.61:8001
2.3. Configure 8008 as the slave node of 8007
Add slave node 8008 to the cluster and check the cluster status/usr/local/redis‐5.0.3/src/redis‐cli ‐a user ‐‐cluster add‐node 192.168.0.61:8008 192.168.0.61:8001
 ##As shown in the figure, it is still a master node. No hash slots have been allocated.
Reason: We need to execute the replicate command to specify the master node ID of the current node (slave node). First, we need to connect the client of the newly added 8008 node, and then Use the cluster command to operate and assign the current 8008 (slave) node to a master node (the 8007 master node created before is used here)
Execute the command
/usr/local/redis‐5.0.3/src/redis‐cli ‐a user ‐c ‐h 192.168.0.61 ‐p 8008

192.168.0.61:8008> cluster replicate 2728a594a0498e98e4b83a537e19f9a0a3790f38 #后面这串id为8007的节点id

2.4、删除8080从节点[不删除四主四从]
用del-node删除从节点8008,指定删除节点ip和端口,以及节点id(红色为8008节点id)
/usr/local/redis‐5.0.3/src/redis‐cli ‐a user ‐‐cluster del‐node 192.168.0.61:8008 a1cfe35722d151cf70585cee212755653 93c0956
再次查看集群状态,如下图所示,8008这个slave节点已经移除,并且该节点的redis服务也已被停止

2.5、删除8007主节点[不删除四主四从]
因为主节点的里面是有分配了hash槽的,所以我们这里必须先把8007里的hash槽放入到其他的可用主节点中去,然后再进行移除节点操作,不然会出现数据丢失问题(目前只能把master的数据迁移到一个节点上,暂时做不了平均分配功能),执行命令如下:
/usr/local/redis‐5.0.3/src/redis‐cli ‐a user ‐‐cluster reshard 192.168.0.61:8007
迁移验证:会发现8007下面已经没有任何hash槽了,证明迁移成功!

用del-node命令删除8007主节点即可
/usr/local/redis‐5.0.3/src/redis‐cli ‐a user ‐‐cluster del‐node 192.168.0.61:8007 2728a594a0498e98e4b83a537e19f9a0a 3790f38
查看最终集群状态,发现一切恢复如初,至此水平扩展结束

推荐学习:Redis视频教程
The above is the detailed content of Detailed explanation of Redis cluster operation examples. For more information, please follow other related articles on the PHP Chinese website!

Hot AI Tools

Undresser.AI Undress
AI-powered app for creating realistic nude photos

AI Clothes Remover
Online AI tool for removing clothes from photos.

Undress AI Tool
Undress images for free

Clothoff.io
AI clothes remover

AI Hentai Generator
Generate AI Hentai for free.

Hot Article

Hot Tools

Notepad++7.3.1
Easy-to-use and free code editor

SublimeText3 Chinese version
Chinese version, very easy to use

Zend Studio 13.0.1
Powerful PHP integrated development environment

Dreamweaver CS6
Visual web development tools

SublimeText3 Mac version
God-level code editing software (SublimeText3)

Hot Topics
 1376
1376
 52
52
 How to build the redis cluster mode
Apr 10, 2025 pm 10:15 PM
Redis cluster mode deploys Redis instances to multiple servers through sharding, improving scalability and availability. The construction steps are as follows: Create odd Redis instances with different ports; Create 3 sentinel instances, monitor Redis instances and failover; configure sentinel configuration files, add monitoring Redis instance information and failover settings; configure Redis instance configuration files, enable cluster mode and specify the cluster information file path; create nodes.conf file, containing information of each Redis instance; start the cluster, execute the create command to create a cluster and specify the number of replicas; log in to the cluster to execute the CLUSTER INFO command to verify the cluster status; make
 How to implement the underlying redis
Apr 10, 2025 pm 07:21 PM
Redis uses hash tables to store data and supports data structures such as strings, lists, hash tables, collections and ordered collections. Redis persists data through snapshots (RDB) and append write-only (AOF) mechanisms. Redis uses master-slave replication to improve data availability. Redis uses a single-threaded event loop to handle connections and commands to ensure data atomicity and consistency. Redis sets the expiration time for the key and uses the lazy delete mechanism to delete the expiration key.
 How to view all keys in redis
Apr 10, 2025 pm 07:15 PM
To view all keys in Redis, there are three ways: use the KEYS command to return all keys that match the specified pattern; use the SCAN command to iterate over the keys and return a set of keys; use the INFO command to get the total number of keys.
 How to view the version number of redis
Apr 10, 2025 pm 05:57 PM
To view the Redis version number, you can use the following three methods: (1) enter the INFO command, (2) start the server with the --version option, and (3) view the configuration file.
 What to do if redis-server can't be found
Apr 10, 2025 pm 06:54 PM
Steps to solve the problem that redis-server cannot find: Check the installation to make sure Redis is installed correctly; set the environment variables REDIS_HOST and REDIS_PORT; start the Redis server redis-server; check whether the server is running redis-cli ping.
 How to use redis zset
Apr 10, 2025 pm 07:27 PM
Redis Ordered Sets (ZSets) are used to store ordered elements and sort by associated scores. The steps to use ZSet include: 1. Create a ZSet; 2. Add a member; 3. Get a member score; 4. Get a ranking; 5. Get a member in the ranking range; 6. Delete a member; 7. Get the number of elements; 8. Get the number of members in the score range.
 How to read the source code of redis
Apr 10, 2025 pm 08:27 PM
The best way to understand Redis source code is to go step by step: get familiar with the basics of Redis. Select a specific module or function as the starting point. Start with the entry point of the module or function and view the code line by line. View the code through the function call chain. Be familiar with the underlying data structures used by Redis. Identify the algorithm used by Redis.
 How to use the redis command
Apr 10, 2025 pm 08:45 PM
Using the Redis directive requires the following steps: Open the Redis client. Enter the command (verb key value). Provides the required parameters (varies from instruction to instruction). Press Enter to execute the command. Redis returns a response indicating the result of the operation (usually OK or -ERR).


