This article brings you relevant knowledge about Python, which mainly organizes the related issues of Tkinter. Tkinter is a module that uses python for window design. Let’s take a look at it together. I hope Helpful to everyone.

[Related recommendations: Python3 video tutorial]
1.1. What is Tkinter
2.1. Building Windows demonstration environment
3.1. Create a window
import tkinter as tk # 在代码里面导入库,起一个别名,以后代码里面就用这个别名root = tk.Tk() # 这个库里面有Tk()这个方法,这个方法的作用就是创建一个窗口
If you just execute the above two lines of code, there will be no response when running the program, because there is only one main function, which will disappear after it is executed from top to bottom. This window will also disappear quickly, so now we have to What we do is to keep the window displayed, then we can add a loop
root.mainloop() # 加上这一句,就可以看见窗口了
Execute the above three lines of code, and we can see the window
3.2. Give the window a title
root.title('演示窗口')
3.3. Window settings
root.geometry("300x100+630+80") # 长x宽+x*y
3.3. Create a button and add a click event to the button
btn1 = tk.Button(root)
btn1["text"] = "点击"
btn1.pack() # 按钮在窗口里面的定位
from tkinter import messageboxdef test(e):
messagebox.showinfo("窗口名称","点击成功")btn1.bind("<button-1>",test) #第一个参数为:按鼠标左键的事件 第二个参数为:要执行的方法的名字</button-1>There is a method bind() in the button component. This method can realize binding
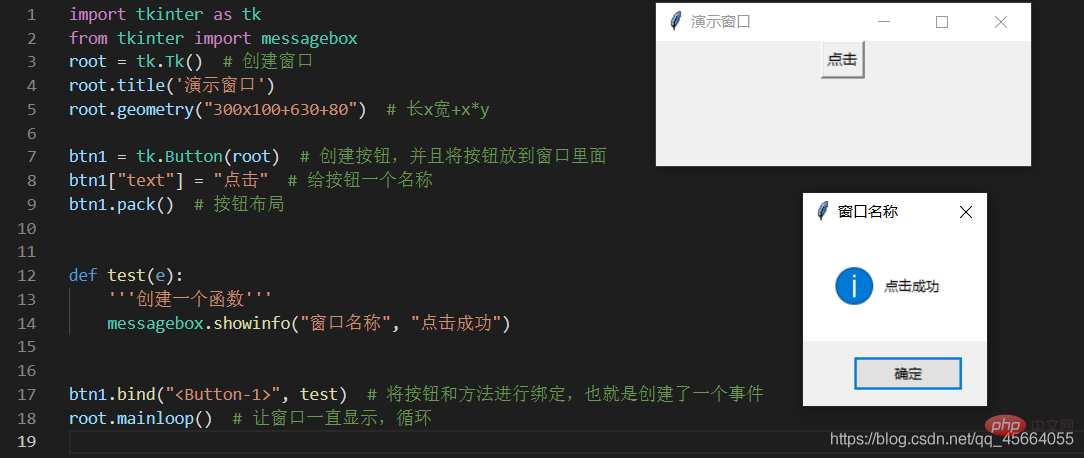
import tkinter as tkfrom tkinter import messagebox
root = tk.Tk()  # 创建窗口root.title('演示窗口')root.geometry("300x100+630+80")  # 长x宽+x*ybtn1 = tk.Button(root)  # 创建按钮,并且将按钮放到窗口里面btn1["text"] = "点击"  # 给按钮一个名称btn1.pack()  # 按钮布局def test(e):
    '''创建弹窗'''
messagebox.showinfo("窗口名称", "点击成功")btn1.bind("", test) # 将按钮和方法进行绑定,也就是创建了一个事件root.mainloop() # 让窗口一直显示,循环 
3.4. Component layout in the window
pack
这个布局管理器,要么将组件垂直的排列,要么水平的排列
grid
Grid(网格)布局管理器会将控件放置到一个二维的表格里。
主控件被分割成一系列的行和列,表格中的每个单元(cell)都可以放置一个控件。
| option | Description |
|---|---|
| The column number of the cell, a positive integer starting from 0 | |
| Spanned columns, the number of columns spanned, a positive integer | |
| The row number of the cell, from 0 Starting positive integer | |
| Spanning rows, number of rows to span, positive integer | |
| Set the spacing between subcomponents, in the x direction or y direction, the default unit is pixels, non-floating point number, the default is 0.0 | |
| and The spacing between parallel components, in the x direction or y direction, the default unit is pixels, non-floating point number, the default is 0.0 | |
| The component is close to where it is A certain foot of the cell corresponds to the southeast, northwest, center and four corners. East = "e", south = "s", west = "w", north = "n", "ne", "se", "sw", "nw"; |
| 选项 | 说明 |
|---|---|
| x,y | 组件左上角的绝对坐标(相当于窗口) |
| relx ,rely | 组件左上角的坐标(相对于父容器) |
| width , height | 组件的宽度和高度 |
| relwidth , relheight | 组件的宽度和高度(相对于父容器) |
| anchor | 对齐方式,左对齐“w”,右对齐“e”,顶对齐“n”,底对齐“s” |
import tkinter as tk
root = tk.Tk()but1 = tk.Button(root, text="按钮1")but1.place(relx=0.2, x=100, y=20, relwidth=0.2, relheight=0.5)root.title('演示窗口')root.geometry("300x150+1000+300")root.mainloop()
4.1、封装
import tkinter as tk# from tkinter import ttk -下拉选择框class GUI:

    def __init__(self):
        self.root = tk.Tk()
        self.root.title('演示窗口')
        self.root.geometry("500x200+1100+150")
        self.interface()

    def interface(self):
        """"界面编写位置"""
        passif __name__ == '__main__':
    a = GUI()
a.root.mainloop()4.2、文本显示_Label
    def interface(self):
        """"界面编写位置"""
        self.Label0 = tk.Label(self.root, text="文本显示")
        self.Label0.grid(row=0, column=0)
4.3、按钮显示_Button
    def interface(self):
        """"界面编写位置"""
        self.Button0 = tk.Button(self.root, text="按钮显示")
        self.Button0.grid(row=0, column=0)
4.4、输入框显示_Entry
    def interface(self):
        """"界面编写位置"""
        self.Entry0 = tk.Entry(self.root)
        self.Entry0.grid(row=0, column=0)
4.5、文本输入框显示_Text
# pack布局
    def interface(self):
        """"界面编写位置"""
        self.w1 = tk.Text(self.root, width=80, height=10)
        self.w1.pack(pady=0, padx=30)# grid布局
    def interface(self):
        """"界面编写位置"""
        self.w1 = tk.Text(self.root, width=80, height=10)
        self.w1.grid(row=1, column=0)
4.6、复选按钮_Checkbutton
    def interface(self):
        """"界面编写位置"""
        self.Checkbutton01 = tk.Checkbutton(self.root, text="名称")
        self.Checkbutton01.grid(row=0, column=2)
4.7、单选按钮_Radiobutton
    def interface(self):
        """"界面编写位置"""
        self.Radiobutton01 = tk.Radiobutton(self.root, text="名称")
        self.Radiobutton01.grid(row=0, column=2)
4.8、下拉选择框_Combobox
def interface(self):
        """"界面编写位置"""
        values = ['1', '2', '3', '4']
        self.combobox = ttk.Combobox(
            master=self.root,  # 父容器
            height=10,  # 高度,下拉显示的条目数量
            width=20,  # 宽度
            state='',  # 设置状态 normal(可选可输入)、readonly(只可选)、 disabled(禁止输入选择)
            cursor='arrow',  # 鼠标移动时样式 arrow, circle, cross, plus...
            font=('', 15),  # 字体、字号
            textvariable='',  # 通过StringVar设置可改变的值
            values=values,  # 设置下拉框的选项
            )
self.combobox.grid(padx=150)4.9、菜单-主菜单、子菜单
import tkinter as tkfrom tkinter import Menuclass GUI:

    def __init__(self):
        self.root = tk.Tk()
        self.root.title('演示窗口')
        self.root.geometry("500x200+1100+150")
        # 创建主菜单实例
        self.menubar = Menu(self.root)
        # 显示菜单,将root根窗口的主菜单设置为menu
        self.root.config(menu=self.menubar)
        self.interface()

    def interface(self):
        """"界面编写位置"""
        # 在 menubar 上设置菜单名,并关联一系列子菜单
        self.menubar.add_cascade(label="文件", menu=self.papers())
        self.menubar.add_cascade(label="查看", menu=self.about())

    def papers(self):
        """
        fmenu = Menu(self.menubar): 创建子菜单实例
        tearoff=1: 1的话多了一个虚线,如果点击的话就会发现,这个菜单框可以独立出来显示
        fmenu.add_separator(): 添加分隔符"--------"
        """
        fmenu = Menu(self.menubar, tearoff=0)
        # 创建单选框
        for item in ['新建', '打开', '保存', '另存为']:
            fmenu.add_command(label=item)

        return fmenu    def about(self):
        amenu = Menu(self.menubar, tearoff=0)
        # 添加复选框
        for item in ['项目复选框', '文件扩展名', '隐藏的项目']:
            amenu.add_checkbutton(label=item)

        return amenuif __name__ == '__main__':
    a = GUI()
a.root.mainloop()5.1、按钮(Button)绑定事件
    def interface(self):
        """"界面编写位置"""
        self.Button0 = tk.Button(self.root, text="运行", command=self.event)
        self.Button0.grid(row=0, column=0)

		self.Button1 = tk.Button(self.root, text="退出", command=self.root.destroy, bg="Gray")  # bg=颜色
        self.Button1.grid(row=0, column=1, sticky="e", ipadx=10)


    def event(self):
        """按钮事件"""
print("运行成功")5.2、输入框(Entry)内容获取
    def interface(self):
        """"界面编写位置"""
        self.entry00 = tk.StringVar()
        self.entry00.set("默认信息")

        self.entry0 = tk.Entry(self.root, textvariable=self.entry00)
        self.entry0.grid(row=1, column=0)

        self.Button0 = tk.Button(self.root, text="运行", command=self.event)
        self.Button0.grid(row=0, column=0)

    def event(self):
        """按钮事件,获取文本信息"""
        a = self.entry00.get()
print(a)5.2、文本输入框(Text),写入文本信息和清除文本信息
    def interface(self):
        """"界面编写位置"""
        self.Button0 = tk.Button(self.root, text="清除", command=self.event)
        self.Button0.grid(row=0, column=0)

        self.w1 = tk.Text(self.root, width=80, height=10)
        self.w1.grid(row=1, column=0)
        self.w1.insert("insert", "默认信息")

    def event(self):
        '''清空输入框'''
self.w1.delete(1.0, "end")5.3、获取复选按钮(Checkbutton)的状态
  def interface(self):
        """"界面编写位置"""
        self.Button0 = tk.Button(self.root, text="确定", command=self.event)
        self.Button0.grid(row=0, column=0)

        self.v1 = tk.IntVar()
        self.Checkbutton01 = tk.Checkbutton(self.root, text="复选框", command=self.Check_box, variable=self.v1)
        self.Checkbutton01.grid(row=1, column=0)

        self.w1 = tk.Text(self.root, width=80, height=10)
        self.w1.grid(row=2, column=0)

    def event(self):
        '''按钮事件,获取复选框的状态,1表示勾选,0表示未勾选'''
        a = self.v1.get()
        self.w1.insert(1.0, str(a)+'\n')

    def Check_box(self):
        '''复选框事件'''
        if self.v1.get() == 1:
            self.w1.insert(1.0, "勾选"+'\n')
        else:
            self.w1.insert(1.0, "未勾选"+'\n')
5.4、清除控件
    def interface(self):
        """"界面编写位置"""
        self.Button0 = tk.Button(self.root, text="确定", command=self.event)
        self.Button0.grid(row=0, column=0)

        self.Label0 = tk.Label(self.root, text="文本显示")
        self.Label0.grid(row=1, column=0)

        self.Entry0 = tk.Entry(self.root)
        self.Entry0.grid(row=2, column=0)

        self.w1 = tk.Text(self.root, width=80, height=10)
        self.w1.grid(row=3, column=0)

    def event(self):
        '''按钮事件,清除Label、Entry、Text组件'''
        a = [self.Label0, self.Entry0, self.w1]
        for i in a:
            i.grid_forget()
5.5、清除复选框勾选状态
    def interface(self):
        """"界面编写位置"""
        self.Button0 = tk.Button(self.root, text="确定", command=self.event)
        self.Button0.grid(row=0, column=0)

        self.v1 = tk.IntVar()
        self.Checkbutton01 = tk.Checkbutton(self.root, text="复选框", command=self.Check_box, variable=self.v1)
        self.Checkbutton01.grid(row=1, column=0)

        self.w1 = tk.Text(self.root, width=80, height=10)
        self.w1.grid(row=2, column=0)

    def event(self):
        '''按钮事件,清除复选框勾选状态'''
        self.Checkbutton01.deselect()

    def Check_box(self):
        '''复选框事件'''
        if self.v1.get() == 1:
            self.w1.insert(1.0, "勾选"+'\n')
        else:
            self.w1.insert(1.0, "未勾选"+'\n')
5.6、文本框(Text)内容获取
    def interface(self):
        """"界面编写位置"""
        self.Button0 = tk.Button(self.root, text="确定", command=self.event)
        self.Button0.grid(row=0, column=0)

        self.w1 = tk.Text(self.root, width=80, height=10)
        self.w1.grid(row=1, column=0)

    def event(self):
        a = self.w1.get('0.0', 'end')
print(a)5.7、下拉选择框绑定事件
    def interface(self):
        """"界面编写位置"""
        self.value = tk.StringVar()
        self.value.set('2')  # 默认值
        values = ['1', '2', '3', '4']
        self.combobox = ttk.Combobox(
            master=self.root,  # 父容器
            height=10,  # 高度,下拉显示的条目数量
            width=20,  # 宽度
            state='',  # 设置状态 normal(可选可输入)、readonly(只可选)、 disabled(禁止输入选择)
            cursor='arrow',  # 鼠标移动时样式 arrow, circle, cross, plus...
            font=('', 15),  # 字体
            textvariable=self.value,  # 通过StringVar设置可改变的值
            values=values,  # 设置下拉框的选项
            )
        # 绑定事件,下拉列表框被选中时,绑定pick()函数
        self.combobox.bind(">", self.pick)
        self.combobox.grid(padx=150)

    def pick(self, *args):  # 处理事件,*args表示可变参数
        print('选中的数据:{}'.format(self.combobox.get()))
print('value的值:{}'.format(self.value.get()))6.1、为什么要使用多线程
    def interface(self):
        """"界面编写位置"""
        self.Button0 = tk.Button(self.root, text="确定", command=self.event)
        self.Button0.grid(row=0, column=0)

        self.w1 = tk.Text(self.root, width=80, height=10)
        self.w1.grid(row=1, column=0)

    def event(self):
        '''按钮事件,一直循环'''
        a = 0
        while True:
            a += 1
            self.w1.insert(1.0, str(a)+'\n')
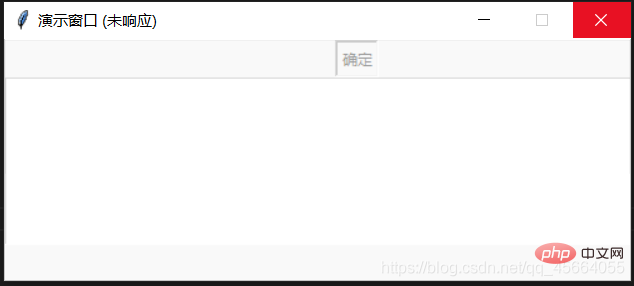
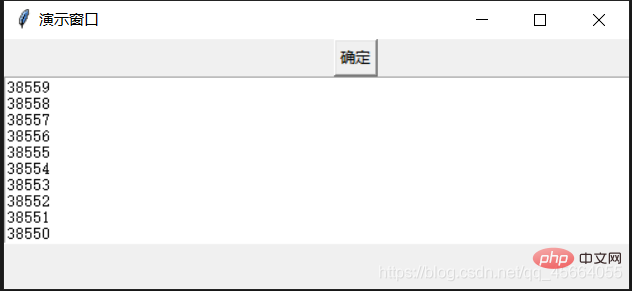
单线程下,主线程需要运行窗口,如果这个时候点击“确定”按钮,主线程就会去执行event方法,那界面就会出现“无响应”状态,如果要界面正常显示,那我们就需要用到多线程(threading)
import tkinter as tkimport threading  # 导入多线程模块class GUI:

    def __init__(self):
        self.root = tk.Tk()
        self.root.title('演示窗口')
        self.root.geometry("500x200+1100+150")
        self.interface()

    def interface(self):
        """"界面编写位置"""
        self.Button0 = tk.Button(self.root, text="确定", command=self.start)
        self.Button0.grid(row=0, column=0)

        self.w1 = tk.Text(self.root, width=80, height=10)
        self.w1.grid(row=1, column=0)

    def event(self):
        '''按钮事件,一直循环'''
        a = 0
        while True:
            a += 1
            self.w1.insert(1.0, str(a)+'\n')

    def start(self):
        self.T = threading.Thread(target=self.event)  # 多线程
        self.T.setDaemon(True)  # 线程守护,即主进程结束后,此线程也结束。否则主进程结束子进程不结束
        self.T.start()  # 启动if __name__ == '__main__':
    a = GUI()
    a.root.mainloop()
import tkinter as tkimport threadingfrom time import sleep

event = threading.Event()class GUI:

    def __init__(self):
        self.root = tk.Tk()
        self.root.title('演示窗口')
        self.root.geometry("500x200+1100+150")
        self.interface()

    def interface(self):
        """"界面编写位置"""
        self.Button0 = tk.Button(self.root, text="启动", command=self.start)
        self.Button0.grid(row=0, column=0)

        self.Button0 = tk.Button(self.root, text="暂停", command=self.stop)
        self.Button0.grid(row=0, column=1)

        self.Button0 = tk.Button(self.root, text="继续", command=self.conti)
        self.Button0.grid(row=0, column=2)

        self.w1 = tk.Text(self.root, width=70, height=10)
        self.w1.grid(row=1, column=0, columnspan=3)

    def event(self):
        '''按钮事件,一直循环'''
        while True:
            sleep(1)
            event.wait()
            self.w1.insert(1.0, '运行中'+'\n')

    def start(self):
        event.set()
        self.T = threading.Thread(target=self.event)
        self.T.setDaemon(True)
        self.T.start()

    def stop(self):
        event.clear()
        self.w1.insert(1.0, '暂停'+'\n')

    def conti(self):
        event.set()
        self.w1.insert(1.0, '继续'+'\n')if __name__ == '__main__':
    a = GUI()
a.root.mainloop()8.1、准备工作
8.2、方法
# a.py 文件import tkinter as tkimport threadingfrom b import logic  # 调用b文件中的logic类class GUI:
    def __init__(self):
        self.root = tk.Tk()
        self.root.title('演示窗口')
        self.root.geometry("500x260+1100+150")
        self.interface()

    def interface(self):
        """"界面编写位置"""
        self.Button0 = tk.Button(self.root, text="确定执行", command=self.start, bg="#7bbfea")
        self.Button0.grid(row=0, column=1, pady=10)

        self.entry00 = tk.StringVar()
        self.entry00.set("")

        self.entry0 = tk.Entry(self.root, textvariable=self.entry00)
        self.entry0.grid(row=1, column=1, pady=15)

        self.w1 = tk.Text(self.root, width=50, height=8)
        self.w1.grid(row=2, column=0, columnspan=3, padx=60)

    def seal(self):
        '''把b文件的类单独写一个方法'''
        a = self.entry00.get()
        w1 = self.w1
        logic().event(a, w1)

    def start(self):
        '''子线程无法直接执行b的类,需要把b文件单独写一个方法,然后执行'''
        self.T = threading.Thread(target=self.seal)
        self.T.setDaemon(True)
        self.T.start()if __name__ == '__main__':
    a = GUI()
a.root.mainloop()# b.py 文件import timeclass logic(): def __init__(self): pass def main(self, a, x): while True: y = int(a)+int(x) self.w1.insert(1.0, str(y)+'\n') time.sleep(1) x += 1 def event(self, a, w1): '''调用main的方法''' self.w1 = w1 x = 1 self.main(a, x)
【相关推荐:Python3视频教程 】
The above is the detailed content of Understand the use of Tkinter in python in one article. For more information, please follow other related articles on the PHP Chinese website!