

Completely master Python automatic operation GUI PyAutoGUI

This article brings you relevant knowledge about Python, which mainly sorts out the issues related to the automatic operation GUI PyAutoGUI. The desktop automation operation is by positioning the mouse on the desktop, and then based on The corresponding operation is performed at the positioned position. Let’s take a look at it. I hope it will be helpful to everyone.
【Related recommendations: Python3 video tutorial】
GUI control artifact
Our protagonist today ispyautogui, pyautogui is a pure Python GUI automation tool that allows the program to automatically control a series of mouse and keyboard operations to achieve the purpose of automated testing.
Module installation, open cmd, enter:
pip install pyautogui
Successful display: Successfully installed PyTweening-1.0.4 mouseinfo-0.1.3 pyautogui-0.9.53 pygetwindow-0.0 .9 pymsgbox-1.0.9 pyperclip-1.8.2 pyrect-0.2.0 pyscreeze-0.1.28
After installation, you can use it directly.
Guide package
import pyautogui
Mouse operation
Mouse information
- pyautogui.position() Get mouse position
- pyautogui.onScreen(x,y) Determine whether the coordinates (x,y) are within the screen and return True,Flase
Take the upper right corner as (0,0) point
Mouse movement
The most basic desktop operation is mouse operation. We can control the movement of the mouse:
- pyautogui.moveTo(x,y) absolute position movement, move to x, y
- pyautogui.moveRel(x,y) relative position movement, move from the current position
# 移动鼠标
pyautogui.moveTo(200,400,duration=2)
pyautogui.moveRel(200,500,duration=2)
The entire desktop has the upper left corner as the origin of the coordinate axis, and all operations are based on This origin is used to determine the operating position.
The first line moves the mouse to the specified pixel (200,400) position;
The second line of code moves the mouse 200px to the right and 500px downward according to the current point.
There is a common parameter duration in both lines of code. This parameter represents the movement time, that is, the movement operation is completed within the specified time, and the unit is seconds.
Run these two lines of code and observe the changes of the screen mouse. Isn’t it amazing?
Mouse click
Usually, our mouse has two buttons on the left and right, and an advanced mouse has a button in the middle.
My mouse only has two buttons, and there is no button in the middle. Alas~pyautoguiThere are corresponding processing for these three button operations:
- pyautogui.click()
(100,100, clicks=2,interval=0.5,button='right',duration=0.2)
Position, number of clicks, interval, right click (Default left click), moving interval - left: left button right: right button middle: middle button
# 鼠标点击,默认左键
pyautogui.click(100,100)
# 单击左键
pyautogui.click(100,100,button='left')
# 单击右键
pyautogui.click(100,300,button='right')
# 单击中间
pyautogui.click(100,300,button='middle')
Mouse click, if the button parameter is not specified, the default is Click the left button, the first two parameters are the location of the click coordinates.
Run this code and see what happens to your desktop?
In addition to click operations, the mouse also has double-click operations:
- pyautogui.doubleClick() #Double-click the right button
- pyautogui.leftClick() #Double-click the left button
- pyautogui.middleClick() #Double middle click
- pyautogui.tripleClick() #Double-click the screen
# 双击左键
pyautogui.doubleClick(10,10)
# 双击右键
pyautogui.rightClick(10,10)
# 双击中键
pyautogui.middleClick(10,10)
# 双击屏幕
pyautogui.tripleClick(10,10)
The operation function is also very simple, I believe everyone can understand it at a glance , if you can’t understand it at first glance, please take a few more glances!
Friends who are familiar with the front-end may immediately think that mouse operations have a process of pressing and releasing, and our screen operations also have corresponding controls:
Mouse click and release
- pyautogui.mouseUp() #Release
- pyautogui.mouseDown() #Click only requires input keys
# 鼠标按下
pyautogui.mouseDown()
# 鼠标释放
pyautogui.mouseUp()
Mouse drag
- pyautogui.dragTo() #Absolute position drag
- pyautogui.dragRel() #Relative position drag
Example: pyautogui.dragRel(-100,200,duration=0.5,button='right')
We can control the mouse to drag to the specified coordinate position, and set the operation time and keys:
pyautogui.dragTo(100,300,duration=1,button='right')
This operation effect is similar to the previous movement.
Based on the previous experience of moving, we also drag the mouse in the direction:
pyautogui.dragRel(100,300,duration=4,button='left')
Mouse scrolling
In desktop operations, we sometimes need to scroll the mouse to reach up or to At this time, we can use the scroll function to control:
- pyautogui.scroll() #(,x,y) sliding distance (up, -down) , the position
pyautogui.scroll(30000)
parameter is an integer, indicating how many units to scroll up or down. This unit may be different depending on different operating systems. If you scroll up, pass in a positive integer, and if you scroll down, pass in a negative integer.
Keyboard operation
Keyboard control
- pyautogui.keyDown() #Simulate key down, the content is the key symbol
- pyautogui. keyUp() #Simulate key release
- pyautogui.press() #Simulate a key press process, that is, the combination of keyDown and keyUP
- pyautogui.hotkey() #pressThe same difference: you can combine keystrokes
- pyautogui.typewrite() #Simulate keyboard output content
For example, how do you usually operate the keyboard by inputting an exclamation point (!)?
按住 shift 按键,然后再按住 1 按键,就可以了。用pyautogui控制就是:
pyautogui.keyDown('shift')
pyautogui.press('1')
pyautogui.keyUp('shift')运行上面的代码,如果你的鼠标是放在编辑框中,你会得到一个感叹号!
我们还可以直接输出内容:
pyautogui.typewrite('python', 1)第一个参数是输出的内容,第二个参数是间隔时间,单位是秒。
运行上面代码,你的编辑器里面就会每隔1秒钟按顺序输出 python 的6个字母。
特殊符号
有时我们需要输入键盘的一些特殊的符号按键,比如 换行、方向键等,这些有相对应的键盘字符串表示:
pyautogui.typewrite(['p','y','t','h','o','n','enter'])
pyautogui.typewrite(['p','y','t','h','o','n',' '])
运行上面代码,编辑器里面就会输出 python 之后换行。
其他特殊按键对应的字符串请参考官方说明。
快捷键
如果我要复制一个内容,大部分情况下会使用快键键 ctrl + c,按照上面讲的,我们应该这么实现:
pyautogui.keyDown('ctrl')
pyautogui.keyDown('c')
pyautogui.keyUp('c')
pyautogui.keyUp('ctrl')实现的效果和上面的4行代码相同。
键盘字符串 说明
enter(或return 或 \n) 回车
esc ESC键
shiftleft, shiftright 左右SHIFT键
altleft, altright 左右ALT键
ctrlleft, ctrlright 左右CTRL键
tab (\t) TAB键
backspace, delete BACKSPACE 、DELETE键
pageup, pagedown PAGE UP 和 PAGE DOWN键
home, end HOME 和 END键
up, down, left,right 箭头键
f1, f2, f3…. f12 F1…….F12键
volumemute, volumedown,volumeup 声音变大变小静音(有些键盘没有)
pause PAUSE键,暂停键
capslock CAPS LOCK 键
numlock NUM LOCK 键
scrolllock SCROLLLOCK 键
insert INSERT键
printscreen PRINT SCREEN键
winleft, winright Win键(windows )
command command键(Mac OS X )
option option(Mac OS X)
屏幕处理
获取屏幕截屏
我们先来假设一个场景:我现在要在屏幕上找到一个红色的点,你会怎么做?通常的做法是拿到这个红色点的颜色值,然后再对屏幕上的点逐个进行比较,直到找到为止。
pyautogui 为我们这个操作场景提供了支持,分别有三个函数可以完成这三件事情。
- img = pyautogui.screenshot() #默认是全屏,可是输入截屏大小
- img.save(‘img.jpg’)
- pyautogui.screenshot(‘image’,region=(x,y,w,h) # 返回屏幕的截图,是一个Pillow的image对象
- pyautogui.pixelMatchesColor(500,500,(12,120,400)) # 是一个对比函数,对比的是屏幕上(500,500)这一点像素的颜色,与所给的元素是否相同;
- pyautogui.locateCenterOnScreen(‘image’, region=(x,y,w,h) ) #图片匹配功能,查找image图片在屏幕中的位置,region限制查找范围
im = pyautogui.screenshot()
im.save('screenshot.png')
rgb = im.getpixel((100, 500))
print(rgb)
match = pyautogui.pixelMatchesColor(500,500,(12,120,400))
print(match)第一个是获取屏幕截图函数,它可以返回一个 Pillow 的 image 对象; 第二个是获取屏幕截图中指定坐标点的颜色,返回 rgb 颜色值;第三个是将指定坐标点的颜色和目标的颜色进行比对,返回布尔值。
我们再来升级一下需求:
我现在要在屏幕上找到 edge 浏览器的图标,你会怎么做?
通常的做法是先知道 edge 浏览器的图标长啥样,是绿色还是蓝色,是胖的还是瘦的,对吧?然后再在屏幕上去进行图标的匹配,直到找到一个图标跟我们目标图标一样,就得到了结果。
于是,我们的代码如下:
# 图像识别(一个)
oneLocation = pyautogui.locateOnScreen('1.png')
print(oneLocation)

# 图像识别(多个)
allLocation = pyautogui.locateAllOnScreen('1.png')
print(list(allLocation))你可以在桌面上将某个应用的图标截取下来,保存为图片,然后使用上面几行代码来识别,识别成功,你会返回类似下面的结果:
Box(left=20, top=89, width=33, height=34)
[Box(left=20, top=89, width=33, height=34)]
这就是图片在桌面的位置,如果找不到图片,就会返回 None。
信息框
当你在模拟一个桌面操作的时候,如果有分支操作需要根据实际情况来判断,你是不是需要有一个地方可以让你选择走哪个分支?
pyautogui 贴心地考虑到了这种情况,你可以通过弹出一个选择框来中断当前的操作,选择操作分支。
- pyautogui.alert(text=,title=,button=) #按钮框 文本,标题,按钮名
- pyautogui.confirm(text=,title=,buttons=) #组合按钮框(多个按钮)
- pyautogui.prompt(text=,title=,default=) #输入框 #文本,标题,默认文字
- pyautogui.password(text=,title=,default=,mask=) #密码输入框 #输入框 #文本,标题,默认文字,掩码样式
- pyautogui.mouseInfo() #获取鼠标的信息
way = pyautogui.confirm('领导,该走哪条路?', buttons=['农村路', '水路', '陆路'])
print(way)这里就是我们 HTML 页面的 confirm 选择框,选择了选项之后,我们可以获取到选择的选项,然后基于这个选项做判断,进入相应的操作分支。
除了选择确认框之外,还有其他一些提示信息框:
# 警告框
alert = pyautogui.alert(text='警告!敌军来袭!', title='警告框')
print(alert)
# 密码框
password = pyautogui.password('请输入密码')
print(password)
# 普通输入框
input = pyautogui.prompt('请输入指令:')
print(input)pyautogui 的基本知识就给大家介绍到这里,这个 python 模块的功能十分强大,函数都非常简单,对 python 初学者比较友好。学了这些基本知识之后,你可以运用这些基本知识的组合,去实现一些有趣的桌面自动化操作,快去尝试一把吧!
自动点赞实战
我们通过今天的基础知识的学习,我们可以通过
pyautogui+PIL结合来实现网页自动点赞的实战练习。
我们先介绍一个PIL库下一个裁剪图片的函数crop。
使用PIL裁切图片使用PIL需要引用Image,使用Image的open(file)方法可以返回打开的图片,使用crop((x1,y1,x2,y2))方法可以对图片做裁切。
该区域是一个元组,(x1,y1)是图片左上角的坐标,(x2,y2)是图片右下角的坐标。
Python Imaging Library 使用左上角为 (0, 0)的坐标系统。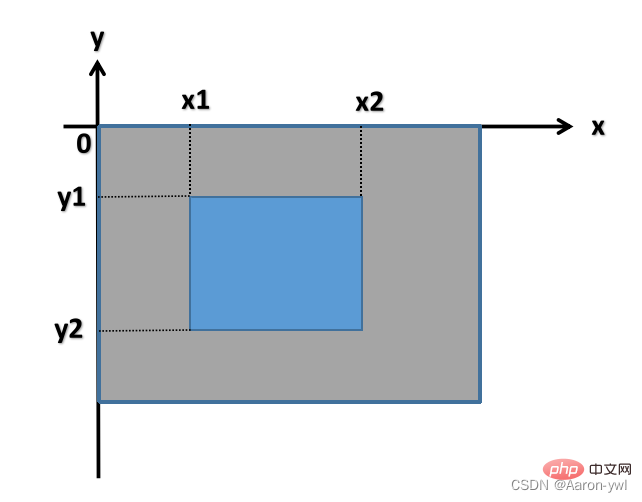
首先我们要知道点赞的图片的样子
# 截取整个屏幕
im=pyautogui.screenshot()
# 截取点赞图片
om=im.crop((1754,595,1803,631))
#将图片保存供pyautogui.locateOnScreen()使用
om.save("dianzan.png")根据截取的屏幕仅截取带赞的手势图片,可以用
pyautogui.mouseInfo()获取图片的位置(1754,595,1803,631)
或者通过pyautogui.location()来确定首尾坐标
在当前目录下得到如下图片。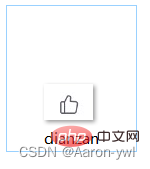
# 点赞函数
def zan(count): #为了防止一直运行下去,点赞次数由自己定义
    time.sleep(0.5)
    # 寻找刚才保存点赞手势图片
    xy = pyautogui.locateOnScreen('dianzan.png')
    # 寻找图片的中心
    center = pyautogui.center(xy)
    # 点赞
    pyautogui.click(center)
    print('点赞成功')

count = 3 # 点赞次数
while range(count):
    if pyautogui.locateOnScreen('dianzan.png'):
        zan(count)   # 调用点赞函数
        count-=1
    else:
    	#本页没有图片后,滚动鼠标;
        pyautogui.scroll(-500)
        print('没有找到目标,屏幕下滚~')
        count -= 1
print('点赞结束!')未点赞之前的图片是这样的: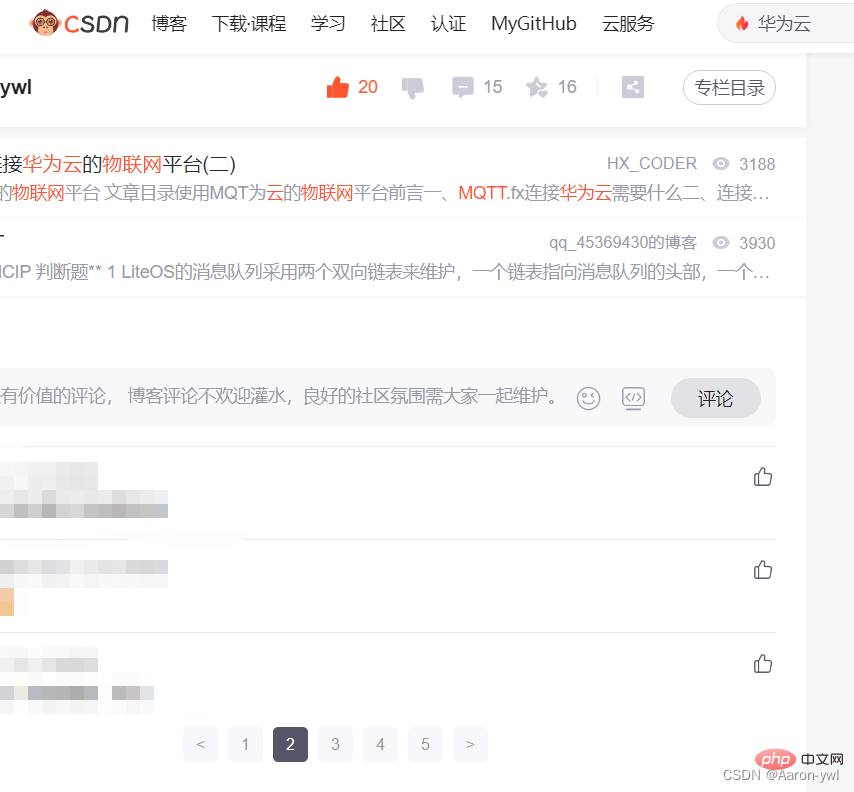
自动点赞之后:
是不是很厉害呢?其实pyautogui还可以做很多东西,比如说自动发信息,其原理还是不变的,找到对应的位置,输入内容,发送就可以了,在这里我就不演示啦!有兴趣的可以去试试哦~~~
完整代码
from PIL import Image
import pyautogui
import time

# 截取整个屏幕
im=pyautogui.screenshot()
# 截取点赞图片
om=im.crop((1754,595,1803,631))
#将图片保存供pyautogui.locateOnScreen()使用
om.save("dianzan.png")

# 点赞函数
def zan(count): #为了防止一直运行下去,点赞次数由自己定义
    time.sleep(0.5)
    # 寻找刚才保存点赞手势图片
    xy = pyautogui.locateOnScreen('dianzan.png')
    # 寻找图片的中心
    center = pyautogui.center(xy)
    # 点赞
    pyautogui.click(center)
    print('点赞成功')

count = 3 # 点赞次数
while range(count):
    if pyautogui.locateOnScreen('dianzan.png'):
        zan(count)   # 调用点赞函数
        count-=1
    else:
    	#本页没有图片后,滚动鼠标;
        pyautogui.scroll(-500)
        print('没有找到目标,屏幕下滚~')
        count -= 1
print('点赞结束!')【相关推荐:Python3视频教程 】
The above is the detailed content of Completely master Python automatic operation GUI PyAutoGUI. For more information, please follow other related articles on the PHP Chinese website!

Hot AI Tools

Undresser.AI Undress
AI-powered app for creating realistic nude photos

AI Clothes Remover
Online AI tool for removing clothes from photos.

Undress AI Tool
Undress images for free

Clothoff.io
AI clothes remover

AI Hentai Generator
Generate AI Hentai for free.

Hot Article
Hot Tools

Notepad++7.3.1
Easy-to-use and free code editor

SublimeText3 Chinese version
Chinese version, very easy to use

Zend Studio 13.0.1
Powerful PHP integrated development environment

Dreamweaver CS6
Visual web development tools

SublimeText3 Mac version
God-level code editing software (SublimeText3)
Hot Topics
 1385
1385
 52
52

 PHP and Python: Code Examples and Comparison
Apr 15, 2025 am 12:07 AM
PHP and Python: Code Examples and Comparison
Apr 15, 2025 am 12:07 AM
PHP and Python have their own advantages and disadvantages, and the choice depends on project needs and personal preferences. 1.PHP is suitable for rapid development and maintenance of large-scale web applications. 2. Python dominates the field of data science and machine learning.
 Python vs. JavaScript: Community, Libraries, and Resources
Apr 15, 2025 am 12:16 AM
Python vs. JavaScript: Community, Libraries, and Resources
Apr 15, 2025 am 12:16 AM
Python and JavaScript have their own advantages and disadvantages in terms of community, libraries and resources. 1) The Python community is friendly and suitable for beginners, but the front-end development resources are not as rich as JavaScript. 2) Python is powerful in data science and machine learning libraries, while JavaScript is better in front-end development libraries and frameworks. 3) Both have rich learning resources, but Python is suitable for starting with official documents, while JavaScript is better with MDNWebDocs. The choice should be based on project needs and personal interests.
 How is the GPU support for PyTorch on CentOS
Apr 14, 2025 pm 06:48 PM
How is the GPU support for PyTorch on CentOS
Apr 14, 2025 pm 06:48 PM
Enable PyTorch GPU acceleration on CentOS system requires the installation of CUDA, cuDNN and GPU versions of PyTorch. The following steps will guide you through the process: CUDA and cuDNN installation determine CUDA version compatibility: Use the nvidia-smi command to view the CUDA version supported by your NVIDIA graphics card. For example, your MX450 graphics card may support CUDA11.1 or higher. Download and install CUDAToolkit: Visit the official website of NVIDIACUDAToolkit and download and install the corresponding version according to the highest CUDA version supported by your graphics card. Install cuDNN library:
 Detailed explanation of docker principle
Apr 14, 2025 pm 11:57 PM
Detailed explanation of docker principle
Apr 14, 2025 pm 11:57 PM
Docker uses Linux kernel features to provide an efficient and isolated application running environment. Its working principle is as follows: 1. The mirror is used as a read-only template, which contains everything you need to run the application; 2. The Union File System (UnionFS) stacks multiple file systems, only storing the differences, saving space and speeding up; 3. The daemon manages the mirrors and containers, and the client uses them for interaction; 4. Namespaces and cgroups implement container isolation and resource limitations; 5. Multiple network modes support container interconnection. Only by understanding these core concepts can you better utilize Docker.
 How to operate distributed training of PyTorch on CentOS
Apr 14, 2025 pm 06:36 PM
How to operate distributed training of PyTorch on CentOS
Apr 14, 2025 pm 06:36 PM
PyTorch distributed training on CentOS system requires the following steps: PyTorch installation: The premise is that Python and pip are installed in CentOS system. Depending on your CUDA version, get the appropriate installation command from the PyTorch official website. For CPU-only training, you can use the following command: pipinstalltorchtorchvisiontorchaudio If you need GPU support, make sure that the corresponding version of CUDA and cuDNN are installed and use the corresponding PyTorch version for installation. Distributed environment configuration: Distributed training usually requires multiple machines or single-machine multiple GPUs. Place
 How to choose the PyTorch version on CentOS
Apr 14, 2025 pm 06:51 PM
How to choose the PyTorch version on CentOS
Apr 14, 2025 pm 06:51 PM
When installing PyTorch on CentOS system, you need to carefully select the appropriate version and consider the following key factors: 1. System environment compatibility: Operating system: It is recommended to use CentOS7 or higher. CUDA and cuDNN:PyTorch version and CUDA version are closely related. For example, PyTorch1.9.0 requires CUDA11.1, while PyTorch2.0.1 requires CUDA11.3. The cuDNN version must also match the CUDA version. Before selecting the PyTorch version, be sure to confirm that compatible CUDA and cuDNN versions have been installed. Python version: PyTorch official branch
 How to run programs in terminal vscode
Apr 15, 2025 pm 06:42 PM
How to run programs in terminal vscode
Apr 15, 2025 pm 06:42 PM
In VS Code, you can run the program in the terminal through the following steps: Prepare the code and open the integrated terminal to ensure that the code directory is consistent with the terminal working directory. Select the run command according to the programming language (such as Python's python your_file_name.py) to check whether it runs successfully and resolve errors. Use the debugger to improve debugging efficiency.
 Python: Automation, Scripting, and Task Management
Apr 16, 2025 am 12:14 AM
Python: Automation, Scripting, and Task Management
Apr 16, 2025 am 12:14 AM
Python excels in automation, scripting, and task management. 1) Automation: File backup is realized through standard libraries such as os and shutil. 2) Script writing: Use the psutil library to monitor system resources. 3) Task management: Use the schedule library to schedule tasks. Python's ease of use and rich library support makes it the preferred tool in these areas.
