Share a useful VSCode header annotation plug-in: Fileheader Pro
How to quickly make header comments in
VSCode? The following article will share with you a useful VSCode header annotation plug-in: Fileheader Pro. Will you like the Fileheader plug-in that is ready to use out of the box and can be fully customized? All in all, it’s pretty easy to use. Just leave it to it to add header comments!

[Recommended study: "vscode introductory tutorial"]
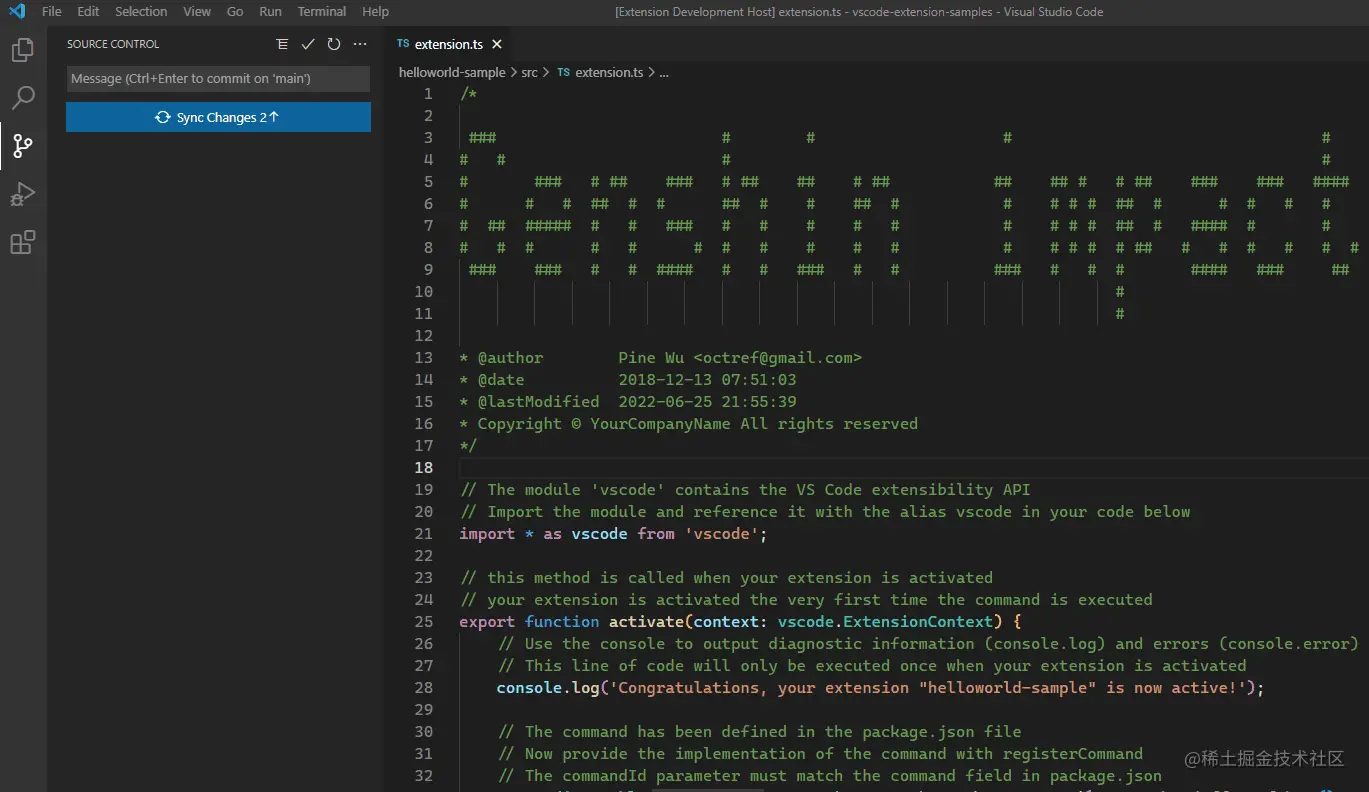
Sometimes you need to add a comment like this at the head of the code . This comment includes information such as the author, code copyright license, etc. Each repeated addition will be very troublesome for you. As a developer, your time is of course very important. Then this plug-in is born for this scene, and it can do it for you silently and without feeling. If you want to add some ASCII Art at the head of your code like this. It can suit your needs too.
/*
 * @Author: IronLu233
 * @Date: 2021-03-10 12:00:00
 * Copyright © 你的公司名字. All rights reserved.
 */
/*
#### ########   #######  ##    ## ##       ##     ##  #######   #######   #######
 ##  ##     ## ##     ## ###   ## ##       ##     ## ##     ## ##     ## ##     ##
 ##  ##     ## ##     ## ####  ## ##       ##     ##        ##        ##        ##
 ##  ########  ##     ## ## ## ## ##       ##     ##  #######   #######   #######
 ##  ##   ##   ##     ## ##  #### ##       ##     ## ##               ##        ##
 ##  ##    ##  ##     ## ##   ### ##       ##     ## ##        ##     ## ##     ##
#### ##     ##  #######  ##    ## ########  #######  #########  #######   #######

 * @author        IronLu233 <lrironsora@gmail.com>
 * @date          2022-06-12 22:33:53
 */
This code comes from here:
https://github.com/IronLu233/fileheader-pro/blob/main/src/Extension.ts
Installation and use
How to get it
- ##Fileheader Pro - Visual Studio Marketplace VSCode Expand the market and click Install
to let it silently add header comments
The information in the file comments comes from your version control tool, currently The plug-in only supports Git, and in the future it will support other version control tools such as SVN and Mercurial. So please make sure to use it in projects with Git.After installation, the default template will be able to combine most usage scenarios. When you create a new file, Fileheader will be automatically added for you. Therefore, in most cases you do not need to manually add

Fileheader Pro: Add Fileheader and press Enter, and you will see that the file comments are properly added to the head of your ingenious code.


Custom template
Although the built-in template can meet most scenarios. However, the power and integration capabilities of custom templates make it worth configuring them specifically.Don’t forget to submit your template to git, and ask the students who develop with you to also install Fileheader ProFirst we need to create a template. In your VSCode command panel, execute this command:
Fileheader Pro: Generate Custom Fileheader Template;
.vscode/fileheader.template.js.
Please modify class CustomLanguageProvider. Especially its getTemplate method. Its return value determines the final appearance of your file header comment. Additionally, languages will determine in which languages' files it can be used.
Please be sure to usetpl
for all returned strings to call the template string function, otherwise some strange problems may occur
| Field | Meaning |
|---|---|
| The time when the file was created , if it is tracked by the version control system then the creation time will be obtained from the version control system, otherwise the time when the file was created on disk | |
| file The time it was modified. The acquisition logic is the same as | birthime, is not recommended to use mtime. Because when a file is modified by multiple people, their comments about mtime will cause conflicts when the code is merged!
|
| The author name will be found in the version control tool history. If the file is new, it will use | userName |
| The author's email address, the fallback mechanism is the same as | authorName |
| The user’s name. For git, | git config user.name will be used to obtain the
|
| user's email address. For git, | will be obtained. git config user.emailGet
|
| company name. If you don’t have a company, you can go to the Industrial and Commercial Bureau to register it | |
| The name of the current project, which is the name of the folder opened by VSCode | |
| The path of the current file | |
| The directory path of the current file | |
| The file name of the current file |
fileheader-pro/fileheader.template.js at main · IronLu233/fileheader-pro (github.com)
Configuration items
FileheaderPro.disableFileds
For the default template, each field in it can be disabled through it. Disabled fields will not appear in comments. You can modify it in the settings interface of VSCodeThe default value is['mtime']
.It is not recommended to enable mtime. Because when a file is modified by multiple people, their comments about mtime will cause conflicts when the code is merged!
FileheaderPro.companyName
You need to tell the plugin the name of the company in the settings, as you can't get it from anywhere else !FileheaderPro.currentUserName and FileheaderPro.currentUserEmail
These two fields can directly overwrite theuserName and userEmail## in the template. #Variables will also indirectly affect authorName and authorEmail (when the file is not tracked by the version control tool)
The format of the date in the comment. Please refer to: https://momentjs.com/docs/#/displaying/format
FileheaderPro.autoInsertOnCreateFileWhether to enable automatically adding file headers when creating files Note. By default it is turned on
FileheaderPro.autoUpdateOnSaveWhether to update the fileheader when saving. Enabled by default.
Fileheader Pro internally only updates file header comments when needed.Q & A
How is it implemented?
Uses ES6’s
tagged templateWe can know which ones are fixed strings and which ones are variables used by users. Next, please refer to this abstract classfileheader-pro/FileheaderLanguageProvider.ts at main · IronLu233/fileheader-pro (github.com)without me Supported Languages
These languages are currently supported
Javascript- Typescript
- Python
- HTML
- CSS
- Vue
- Java Please use a custom template, or open an issue
- . Of course, you are also welcome to submit PR to contribute to Fileheader Pro For more related knowledge about VSCode, please visit:
The above is the detailed content of Share a useful VSCode header annotation plug-in: Fileheader Pro. For more information, please follow other related articles on the PHP Chinese website!

Hot AI Tools

Undresser.AI Undress
AI-powered app for creating realistic nude photos

AI Clothes Remover
Online AI tool for removing clothes from photos.

Undress AI Tool
Undress images for free

Clothoff.io
AI clothes remover

Video Face Swap
Swap faces in any video effortlessly with our completely free AI face swap tool!

Hot Article

Hot Tools

Notepad++7.3.1
Easy-to-use and free code editor

SublimeText3 Chinese version
Chinese version, very easy to use

Zend Studio 13.0.1
Powerful PHP integrated development environment

Dreamweaver CS6
Visual web development tools

SublimeText3 Mac version
God-level code editing software (SublimeText3)

Hot Topics
 1387
1387
 52
52
 How to define header files for vscode
Apr 15, 2025 pm 09:09 PM
How to define header files using Visual Studio Code? Create a header file and declare symbols in the header file using the .h or .hpp suffix name (such as classes, functions, variables) Compile the program using the #include directive to include the header file in the source file. The header file will be included and the declared symbols are available.
 What computer configuration is required for vscode
Apr 15, 2025 pm 09:48 PM
VS Code system requirements: Operating system: Windows 10 and above, macOS 10.12 and above, Linux distribution processor: minimum 1.6 GHz, recommended 2.0 GHz and above memory: minimum 512 MB, recommended 4 GB and above storage space: minimum 250 MB, recommended 1 GB and above other requirements: stable network connection, Xorg/Wayland (Linux)
 How to solve the problem of vscode Chinese annotations becoming question marks
Apr 15, 2025 pm 11:36 PM
How to solve the problem that Chinese comments in Visual Studio Code become question marks: Check the file encoding and make sure it is "UTF-8 without BOM". Change the font to a font that supports Chinese characters, such as "Song Style" or "Microsoft Yahei". Reinstall the font. Enable Unicode support. Upgrade VSCode, restart the computer, and recreate the source file.
 How to switch Chinese mode with vscode
Apr 15, 2025 pm 11:39 PM
VS Code To switch Chinese mode: Open the settings interface (Windows/Linux: Ctrl, macOS: Cmd,) Search for "Editor: Language" settings Select "Chinese" in the drop-down menu Save settings and restart VS Code
 Common commands for vscode terminal
Apr 15, 2025 pm 10:06 PM
Common commands for VS Code terminals include: Clear the terminal screen (clear), list the current directory file (ls), change the current working directory (cd), print the current working directory path (pwd), create a new directory (mkdir), delete empty directory (rmdir), create a new file (touch) delete a file or directory (rm), copy a file or directory (cp), move or rename a file or directory (mv) display file content (cat) view file content and scroll (less) view file content only scroll down (more) display the first few lines of the file (head)
 How to set vscode in Chinese
Apr 15, 2025 pm 09:27 PM
There are two ways to set up a Chinese language in Visual Studio Code: 1. Install the Chinese language package; 2. Modify the "locale" settings in the configuration file. Make sure Visual Studio Code version is 1.17 or higher.
 How to set vscode
Apr 15, 2025 pm 10:45 PM
To enable and set VSCode, follow these steps: Install and start VSCode. Custom preferences including themes, fonts, spaces, and code formatting. Install extensions to enhance features such as plugins, themes, and tools. Create a project or open an existing project. Use IntelliSense to get code prompts and completions. Debug the code to step through the code, set breakpoints, and check variables. Connect the version control system to manage changes and commit code.
 vscode Previous Next Shortcut Key
Apr 15, 2025 pm 10:51 PM
VS Code One-step/Next step shortcut key usage: One-step (backward): Windows/Linux: Ctrl ←; macOS: Cmd ←Next step (forward): Windows/Linux: Ctrl →; macOS: Cmd →


