
 Development Tools
VSCode
Detailed explanation of how to configure SSH server in VSCode for remote development
Development Tools
VSCode
Detailed explanation of how to configure SSH server in VSCode for remote development
Detailed explanation of how to configure SSH server in VSCode for remote development

This article will talk about VSCode remote development and introduce how to gain a super comfortable remote development experience through SSH and VSCode. I hope it will be helpful to everyone!
Write in front
Recently the company has an outsourcing project that requires remote development, whether it is using remote control software It's still Microsoft's Remote Desktop Connection, the experience is not very good, it feels very uncomfortable, especially Microsoft's Remote Desktop Connection, which can only be used by one person, often occurs The phenomenon of you squeezing me and I squeezing you reminds me that I used SSH to remotely connect to Linux for development a year ago. This time I will remotely connect to Windows for development.
The device version is as follows:
Remote control computer: Win11
Remote controlled computer: Win10
VSCode version: 1.67.2
Remote - SSH version: 0.80.0
【Recommended Study: "vscode introductory tutorial"]
Configuring SSH server
First we need to install an OpenSSH server, if it is a Win10 system If so, the installation is relatively simple. The steps are as follows:
The first step is to open [Settings], shortcut key [Win i], find [Applications] → [Applications and Features] → [Manage Optional Features] 】Enter;

The second step is to install the OpenSSH server. If the OpenSSH server exists in the list, it means the installation has been successful. Otherwise, click [Add Function] and then find the OpenSSH server. Install;
# During the installation, a progress bar will appear below, just wait patiently.
If you prefer the command line installation, first open PowderShell as an administrator, and then execute the following commands in sequence
# 获取SSH软件名称
Get-WindowsCapability -Online | ? Name -like 'OpenSSH*'
The output results are as follows:
Name  : OpenSSH.Client~~~~0.0.1.0
State : NotPresent
Name  : OpenSSH.Server~~~~0.0.1.0
State : NotPresent
The first one represents the SSH client, and the second one represents the SSH server
We install the SSH server here. Win10 installs the SSH client by default. The installation command is as follows :
Add-WindowsCapability -Online -Name OpenSSH.Server~~~~0.0.1.0
The output content is similar to the following, indicating that the installation is successful
Path          :
Online        : True
RestartNeeded : False
The third step is to start the SSHD service. We need to open the PowerShell command name and enter the following command:
Start-Service sshd
The fourth step is to set the service to start automatically.
Set-Service -Name sshd -StartupType 'Automatic'
The last step is to configure SSH in the firewall. You only need to copy the following command into PowerShell:
if (!(Get-NetFirewallRule -Name "OpenSSH-Server-In-TCP" -ErrorAction SilentlyContinue | Select-Object Name, Enabled)) { Write-Output "Firewall Rule 'OpenSSH-Server-In-TCP' does not exist, creating it..." New-NetFirewallRule -Name 'OpenSSH-Server-In-TCP' -DisplayName 'OpenSSH Server (sshd)' -Enabled True -Direction Inbound -Protocol TCP -Action Allow -LocalPort 22 } else { Write-Output "Firewall rule 'OpenSSH-Server-In-TCP' has been created and exists." }SSH Connecting to the server
Now we use the SSH command on our own computer to connect to the WIndows server we configured before. No matter whether your device is Mac, Windows or Linux, you can connect as long as you have the ssh command. .
Here I am using Win11, the command is as follows:
ssh administrator@0.0.0.0
The administrator here represents the user name, 0.0.0.0 represents the server ip address.
After completing the input, you need to enter yes first and then enter the password to connect successfully.
Connect through Remote-SSH
Finally, we implement remote development through Remote-SSH, an extension of VSCode. The steps are as follows:
The first step: Install the Remote-SSH extension, just search and install it directly. It looks like this:
The second step is to open [Remote Resources Manager】
The third step is to hover the mouse over [SSH TarGETS] and click [Settings]
Step 4: Click on this configuration file

Step 5: Configure:
# Read more about SSH config files: https://linux.die.net/man/5/ssh_config
Host alias # 别名,可以随便写
    HostName 0.0.0.0 # 远程连接的ip地址
User Administrator # 远程连接的用户名Step 6, click on the connection, which is the picture below Step 7: Select the little icon of the system
We will choose whatever system it is
Eight steps: Enter the server password and wait
The last step is to open the project directory for development
The configuration is now complete.
Written at the end
This article records the process of how to turn a Windows into an SSH server and connect through the SSH command and develop it in VSCode , if it is helpful to you, you can like and collect to avoid not finding it in the future~
For more related knowledge about VSCode, please visit: vscode tutorial!
The above is the detailed content of Detailed explanation of how to configure SSH server in VSCode for remote development. For more information, please follow other related articles on the PHP Chinese website!

Hot AI Tools

Undresser.AI Undress
AI-powered app for creating realistic nude photos

AI Clothes Remover
Online AI tool for removing clothes from photos.

Undress AI Tool
Undress images for free

Clothoff.io
AI clothes remover

AI Hentai Generator
Generate AI Hentai for free.

Hot Article
Hot Tools

Notepad++7.3.1
Easy-to-use and free code editor

SublimeText3 Chinese version
Chinese version, very easy to use

Zend Studio 13.0.1
Powerful PHP integrated development environment

Dreamweaver CS6
Visual web development tools

SublimeText3 Mac version
God-level code editing software (SublimeText3)
Hot Topics


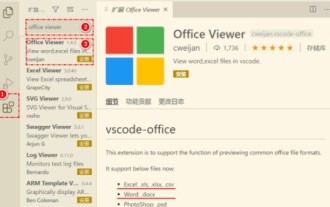 How to view word documents in vscode How to view word documents in vscode
May 09, 2024 am 09:37 AM
How to view word documents in vscode How to view word documents in vscode
May 09, 2024 am 09:37 AM
First, open the vscode software on the computer, click the [Extension] icon on the left, as shown in ① in the figure. Then, enter [officeviewer] in the search box of the extension interface, as shown in ② in the figure. Then, from the search Select [officeviewer] to install in the results, as shown in ③ in the figure. Finally, open the file, such as docx, pdf, etc., as shown below
 How to draw a flow chart with vscode_How to draw a flow chart with visual_studio code
Apr 23, 2024 pm 02:13 PM
How to draw a flow chart with vscode_How to draw a flow chart with visual_studio code
Apr 23, 2024 pm 02:13 PM
First, open visual studio code on the computer, click the four square buttons on the left, then enter draw.io in the search box to query the plug-in, click Install. After installation, create a new test.drawio file, then select the test.drawio file, enter the editing mode on the left There are various graphics on the side. You can draw the flow chart by selecting at will. After drawing, click File → Embed → svg and then select Embed. Copy the svg code. Paste the copied svg code into the html code. Open the html web page and you can see it. Click on the picture on the web page to jump to the flow chart. On this page, you can zoom in and out of the flow chart. Here, we choose to click on the pencil pattern in the lower right corner to jump to the web page.
 How to write Maude in Vscode_How to write Maude in Vscode
Apr 23, 2024 am 10:25 AM
How to write Maude in Vscode_How to write Maude in Vscode
Apr 23, 2024 am 10:25 AM
First, you can search for the Maude plug-in in the vscode plug-in manager. Then, create a new file with the extension maude to use maude's code snippets and syntax highlighting. Terminal -> New Terminal can open the vscode built-in terminal in the current folder to run the maude or full-maude program. In maude's official tutorial, there are also examples of http clients, which can be called and run as shown in the figure. If you want to associate files with the fm extension, open settings, search for fileassociations in user settings, and open settings.json. Just add an entry to the file association, that is, the entry from *.fm to maude. But full
 Caltech Chinese use AI to subvert mathematical proofs! Speed up 5 times shocked Tao Zhexuan, 80% of mathematical steps are fully automated
Apr 23, 2024 pm 03:01 PM
Caltech Chinese use AI to subvert mathematical proofs! Speed up 5 times shocked Tao Zhexuan, 80% of mathematical steps are fully automated
Apr 23, 2024 pm 03:01 PM
LeanCopilot, this formal mathematics tool that has been praised by many mathematicians such as Terence Tao, has evolved again? Just now, Caltech professor Anima Anandkumar announced that the team released an expanded version of the LeanCopilot paper and updated the code base. Image paper address: https://arxiv.org/pdf/2404.12534.pdf The latest experiments show that this Copilot tool can automate more than 80% of the mathematical proof steps! This record is 2.3 times better than the previous baseline aesop. And, as before, it's open source under the MIT license. In the picture, he is Song Peiyang, a Chinese boy. He is
 How to enable background updates in vscode How to enable background updates in vscode
May 09, 2024 am 09:52 AM
How to enable background updates in vscode How to enable background updates in vscode
May 09, 2024 am 09:52 AM
1. First, after opening the interface, click the file menu in the upper left corner. 2. Then, click the settings button in the preferences column. 3. Then, in the settings page that jumps, find the update section. 4. Finally, click the mouse to check and enable it. Download and install the new VSCode version button in the background on Windows and restart the program.
 How to add files to vscode workspace How to add files to vscode workspace
May 09, 2024 am 09:43 AM
How to add files to vscode workspace How to add files to vscode workspace
May 09, 2024 am 09:43 AM
1. First, open the vscode software, click the explorer icon, and find the workspace window 2. Then, click the file menu in the upper left corner and find the add folder to workspace option 3. Finally, find the folder location in the local disk , click the add button
 How to disable wsl configuration file in vscode How to disable wsl configuration file in vscode
May 09, 2024 am 10:30 AM
How to disable wsl configuration file in vscode How to disable wsl configuration file in vscode
May 09, 2024 am 10:30 AM
1. First, open the settings option in the settings menu. 2. Then, find the terminal column in the commonly used page. 3. Finally, uncheck the usewslprofiles button on the right side of the column.
 How to set animation smooth insertion in VScode VScode tutorial to set animation smooth insertion
May 09, 2024 am 09:49 AM
How to set animation smooth insertion in VScode VScode tutorial to set animation smooth insertion
May 09, 2024 am 09:49 AM
1. First, after opening the interface, click the workspace interface 2. Then, in the open editing panel, click the File menu 3. Then, click the Settings button under the Preferences column 4. Finally, click the mouse to check the CursorSmoothCaretAnimation button and save Just set it
