Let's talk about how to capture data using Node.js + Cheerio
To obtain the data, you must resort to web scraping. This article will introduce how to use Node and Cheerio to crawl website data. I hope it will be helpful to everyone!

Before we start, you need to abide by local laws and regulations, and do not randomly grab data that is disclosed without permission.
Prerequisites
Here are some things you will need for this tutorial:
- You will need Node.js installed. If you don't have Node, just make sure to download it for your system from the Node.js download page (https://nodejs.dev/download/)
- You will need to have a text editor installed on your machine , such as VSCode or Atom
- You should have at least a basic understanding of JavaScript, Node.js, and the Document Object Model (DOM).
What is Cheerio?
Cheerio is a tool for parsing HTML and XML in Node.js. It is very popular on GitHub, with more than 23k stars.
It's fast, flexible and easy to use. Since it implements a subset of JQuery, it's easy to get started with Cheerio if you're already familiar with JQuery.
The main difference between Cheerio and a web browser is that cheerio does not generate visual rendering, load CSS, load external resources, or execute JavaScript. It simply parses the markup and provides an API for manipulating the resulting data structures. This explains why it's also very fast - cheerio documentation.
If you want to use cheerio to fetch web pages, you need to first use packages such as axios or node-fetch to get the tags.
How to scrape web pages in Node using Cheerio
In this example we will scrape all the pages listed on this Wikipedia page ISO 3166-1 alpha-3 codes for countries and other jurisdictions. It is located under the Current Code section of the ISO 3166-1 alpha-3 page.
This is what the list of countries/jurisdictions and their corresponding codes looks like:

Step 1 - Create a working directory
In this step, you will create a directory for your project by running the following command on the terminal. This command will create a file called learn-cheerio. You can give it a different name if you wish.
mkdir learn-cheerio
learn-cheerioAfter successfully running the above command, you should be able to see a folder named created.
In the next step, you will open the directory you just created in your favorite text editor and initialize the project.
Step 2 - Initialize the Project
In this step you will navigate to the project directory and initialize the project. Open the directory you created in the previous step in your favorite text editor and initialize the project by running the following command.
npm init -y
Successfully running the above command will create a file package.json in the root of the project directory.
In the next step, you will install the project dependencies.
Step 3 - Install Dependencies
In this step, you will install the project dependencies by running the following command. This will take a few minutes, so please be patient.
npm i axios cheerio pretty
Successfully running the above command will register three dependencies in the file under field package.json. dependenciesThe first dependency is axios, the second is cheerio, and the third is pretty.
axios is a very popular http client that can run in node and browsers. We need it because cheerio is a token parser.
为了让 Cheerio 解析标记并抓取您需要的数据,我们需要axios用于从网站获取标记。如果您愿意,可以使用另一个 HTTP 客户端来获取标记。它不一定是axios.
pretty是用于美化标记的 npm 包,以便在终端上打印时可读。
在下一部分中,您将检查将从中抓取数据的标记。
第 4 步 - 检查您要抓取的网页
在从网页中抓取数据之前,了解页面的 HTML 结构非常重要。
在此步骤中,您将检查要从中抓取数据的网页的 HTML 结构。
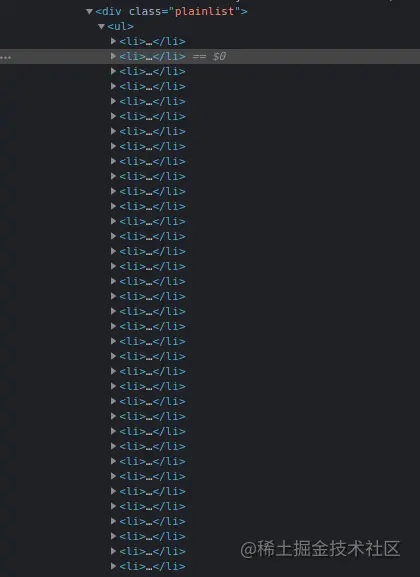
导航到Wikipedia 上的ISO 3166-1 alpha-3 代码页面。在“当前代码”部分下,有一个国家列表及其相应的代码。CTRL + SHIFT + I您可以通过按chrome 上的组合键或右键单击然后选择“检查”选项来打开 DevTools 。
这是我在 chrome DevTools 中的列表:

在下一节中,您将编写用于抓取网页的代码。
第 5 步 - 编写代码以抓取数据
在本节中,你将编写用于抓取我们感兴趣的数据的代码。首先运行以下将创建app.js文件的命令。
touch app.js
成功运行上述命令将app.js在项目目录的根目录下创建一个文件。
像任何其他 Node 包一样,在开始使用它们之前,你必须首先require axios、cheerio和。你可以通过在刚刚创建pretty的文件顶部添加下面的代码来做到这一点。app.js
const axios = require("axios");
const cheerio = require("cheerio");
const pretty = require("pretty");在我们编写用于抓取数据的代码之前,我们需要学习cheerio. 我们将解析下面的标记并尝试操作生成的数据结构。这将帮助我们学习 Cheerio 语法及其最常用的方法。
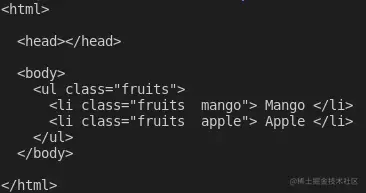
下面的标记是ul包含我们元素的li元素。
const markup = `
- Mango
- Apple
将上述变量声明添加到app.js文件中
如何在 Cheerio 中加载标记
cheerio你可以使用该cheerio.load方法加载标记。该方法将标记作为参数。它还需要另外两个可选参数。如果你有兴趣,可以在文档中阅读有关它们的更多信息。
下面,我们传递第一个也是唯一需要的参数,并将返回值存储在$变量中。我们使用该变量是因为cheerio 与Jquery$的相似性。如果你愿意,可以使用不同的变量名。
将以下代码添加到你的app.js文件中:
const $ = cheerio.load(markup);
console.log(pretty($.html()));
如果你现在通过在终端上app.js运行命令来执行文件中的代码node app.js,你应该能够在终端上看到标记。这是我在终端上看到的:

如何在 Cheerio 中选择元素
Cheerio 支持大多数常见的 CSS 选择器,例如class、id和element选择器等。在下面的代码中,我们选择带有类的元素fruits__mango,然后将所选元素记录到控制台。将以下代码添加到你的app.js文件中。
const mango = $(".fruits__mango");
console.log(mango.html()); // Mango如果你使用命令执行,上述代码行将Mango在终端上记录文本。app.js``node app.js
如何在 Cheerio 中获取元素的属性
您还可以选择一个元素并获取特定属性,例如class、id或所有属性及其对应值。
将以下代码添加到你的app.js文件中:
const apple = $(".fruits__apple");
console.log(apple.attr("class")); //fruits__apple上面的代码将登录fruits__apple终端。fruits__apple是所选元素的类。
如何循环遍历 Cheerio 中的元素列表
Cheerio 提供了.each循环遍历多个选定元素的方法。
下面,我们选择所有元素并使用该方法li循环遍历它们。.each我们在终端上记录每个列表项的文本内容。
将以下代码添加到你的app.js文件中。
const listItems = $("li");
console.log(listItems.length); // 2
listItems.each(function (idx, el) {
  console.log($(el).text());
});
// Mango
// Apple上面的代码会记录2,也就是列表项的长度,执行完代码后会在终端上显示文字Mango和。Apple``app.js
如何在 Cheerio 中将元素附加或添加到标记中
Cheerio 提供了一种将元素附加或附加到标记的方法。
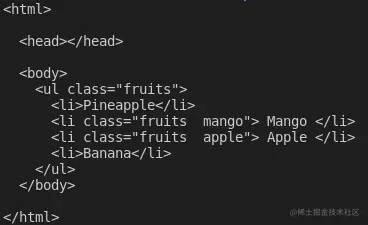
该append方法会将作为参数传递的元素添加到所选元素的最后一个子元素之后。另一方面,prepend将在选定元素的第一个子元素之前添加传递的元素。
将以下代码添加到你的app.js文件中:
const ul = $("ul");
ul.append("在向标记添加和添加元素之后,这是我登录$.html()终端时看到的内容:

这些是 Cheerio 的基础知识,可以帮助你开始网络抓取。
要从 Wikipedia 抓取我们在本文开头描述的数据,请将以下代码复制并粘贴到app.js文件中:
// Loading the dependencies. We don't need pretty
// because we shall not log html to the terminal
const axios = require("axios");
const cheerio = require("cheerio");
const fs = require("fs");

// URL of the page we want to scrape
const url = "https://en.wikipedia.org/wiki/ISO_3166-1_alpha-3";

// Async function which scrapes the data
async function scrapeData() {
  try {
    // Fetch HTML of the page we want to scrape
    const { data } = await axios.get(url);
    // Load HTML we fetched in the previous line
    const $ = cheerio.load(data);
    // Select all the list items in plainlist class
    const listItems = $(".plainlist ul li");
    // Stores data for all countries
    const countries = [];
    // Use .each method to loop through the li we selected
    listItems.each((idx, el) => {
      // Object holding data for each country/jurisdiction
      const country = { name: "", iso3: "" };
      // Select the text content of a and span elements
      // Store the textcontent in the above object
      country.name = $(el).children("a").text();
      country.iso3 = $(el).children("span").text();
      // Populate countries array with country data
      countries.push(country);
    });
    // Logs countries array to the console
    console.dir(countries);
    // Write countries array in countries.json file
    fs.writeFile("coutries.json", JSON.stringify(countries, null, 2), (err) => {
      if (err) {
        console.error(err);
        return;
      }
      console.log("Successfully written data to file");
    });
  } catch (err) {
    console.error(err);
  }
}
// Invoke the above function
scrapeData();通过阅读代码,你了解正在发生的事情吗?如果没有,我现在将详细介绍。我还对每一行代码进行了注释,以帮助你理解。
在上面的代码中,我们需要文件顶部的所有依赖项,app.js然后我们声明了scrapeData函数。在函数内部,使用axios. 然后将我们需要抓取的页面的获取 HTML 加载到cheerio.
国家/地区列表及其对应iso3代码嵌套在一个div具有 . 类的元素中plainlist。li元素被选中,然后我们使用该方法循环遍历它们.each。每个国家的数据都被抓取并存储在一个数组中。
使用命令运行上述代码后node app.js,将抓取的数据写入countries.json文件并打印在终端上。这是我在终端上看到的部分内容:
结论
感谢你阅读本文!我们已经介绍了使用cheerio. 如果你想更深入地了解并完全了解其工作原理,可以前往Cheerio 文档。
更多node相关知识,请访问:nodejs 教程!
The above is the detailed content of Let's talk about how to capture data using Node.js + Cheerio. For more information, please follow other related articles on the PHP Chinese website!

Hot AI Tools

Undresser.AI Undress
AI-powered app for creating realistic nude photos

AI Clothes Remover
Online AI tool for removing clothes from photos.

Undress AI Tool
Undress images for free

Clothoff.io
AI clothes remover

Video Face Swap
Swap faces in any video effortlessly with our completely free AI face swap tool!

Hot Article

Hot Tools

Notepad++7.3.1
Easy-to-use and free code editor

SublimeText3 Chinese version
Chinese version, very easy to use

Zend Studio 13.0.1
Powerful PHP integrated development environment

Dreamweaver CS6
Visual web development tools

SublimeText3 Mac version
God-level code editing software (SublimeText3)

Hot Topics
 1386
1386
 52
52
 Detailed graphic explanation of the memory and GC of the Node V8 engine
Mar 29, 2023 pm 06:02 PM
This article will give you an in-depth understanding of the memory and garbage collector (GC) of the NodeJS V8 engine. I hope it will be helpful to you!
 An article about memory control in Node
Apr 26, 2023 pm 05:37 PM
The Node service built based on non-blocking and event-driven has the advantage of low memory consumption and is very suitable for handling massive network requests. Under the premise of massive requests, issues related to "memory control" need to be considered. 1. V8’s garbage collection mechanism and memory limitations Js is controlled by the garbage collection machine
 Let's talk about how to choose the best Node.js Docker image?
Dec 13, 2022 pm 08:00 PM
Choosing a Docker image for Node may seem like a trivial matter, but the size and potential vulnerabilities of the image can have a significant impact on your CI/CD process and security. So how do we choose the best Node.js Docker image?
 Let's talk in depth about the File module in Node
Apr 24, 2023 pm 05:49 PM
The file module is an encapsulation of underlying file operations, such as file reading/writing/opening/closing/delete adding, etc. The biggest feature of the file module is that all methods provide two versions of **synchronous** and **asynchronous**, with Methods with the sync suffix are all synchronization methods, and those without are all heterogeneous methods.
 Node.js 19 is officially released, let's talk about its 6 major features!
Nov 16, 2022 pm 08:34 PM
Node 19 has been officially released. This article will give you a detailed explanation of the 6 major features of Node.js 19. I hope it will be helpful to you!
 Let's talk about the GC (garbage collection) mechanism in Node.js
Nov 29, 2022 pm 08:44 PM
How does Node.js do GC (garbage collection)? The following article will take you through it.
 Let's talk about the event loop in Node
Apr 11, 2023 pm 07:08 PM
The event loop is a fundamental part of Node.js and enables asynchronous programming by ensuring that the main thread is not blocked. Understanding the event loop is crucial to building efficient applications. The following article will give you an in-depth understanding of the event loop in Node. I hope it will be helpful to you!
 What should I do if node cannot use npm command?
Feb 08, 2023 am 10:09 AM
The reason why node cannot use the npm command is because the environment variables are not configured correctly. The solution is: 1. Open "System Properties"; 2. Find "Environment Variables" -> "System Variables", and then edit the environment variables; 3. Find the location of nodejs folder; 4. Click "OK".


