Detailed example of how to add animation to a single DOM element
This article brings you relevant knowledge about javascript, which mainly introduces the related issues about operating dom elements to add animation effects. Let’s take a look at it together. I hope it will be helpful to everyone.

[Related recommendations: javascript video tutorial, web front-end】
DOM animation effect
- Let an element move from left to right
<div id="box"></div>
    var box = document.getElementById("box");
    var t = null;
    t = setInterval(function(){

})Termination condition of movement
t = setInterval(function(){termination condition})
    // 元素的属性值 === 目标点
    if(dom.attr === target){
        clearInterval(t);
}Three elements of movement
Starting point
The starting point of a movement is actually The position of the current element. We obtain the position of the current element through the API and use this position as the start of the movement.
Goal
Speed
The underlying principle of motion
- Let the element change the CSS attribute value within a short interval through the timer
- Such continuous movement appears to the user as an animation effect
DOM animation effect Encapsulation
The main function of encapsulation is to allow elements to continuously change attributes within a short time interval to achieve animation effects
Single attribute motion framework:
<button id="btn">开始运动</button>
<div id="box"></div>
<div id="line"></div>
<script>
    var  box = document.getElementById("box");
    var  btn = document.getElementById("btn");
    var  target = 500;
    // 速度可以根据 起始点和目标点进行判断,从而决定正负;
    var speed  = 17;
    // - 方向;
    btn.onclick = function(){
        // 1. 获取元素初始位置;
        var _left = box.offsetLeft;
        speed  = target - _left >= 0 ? speed : -speed ;
        var interval = setInterval( function(){
            // 4. 判定运动的终止条件;
            if(Math.abs(target - _left) <= Math.abs(speed) ){
                // 因为终止时有可能没有到达目标点,因此我们把元素赋值到目标点位置;
                box.style.left = target + "px";
                clearInterval( interval );
            }else{
                // 2. 元素根据初始位置进行改变;
                _left += speed;
                // 3. DOM操作,根据已有数据让元素属性发生改变;
                box.style.left = _left + "px";
            }
        } , 30)
    }
</script>- Uniform motion package
<script>// - 提取属性名作为参数; btn.onclick = function(){
    animate( "left", 500 )}function animate( attr , target , speed = 10 ){
    // 1. 获取元素初始样式
    var _style = getComputedStyle( box );
    // 2. 根据属性要求取出当前的属性的属性值;
    var _css_style = parseInt(_style[attr]);
    speed  = target - _css_style >= 0 ? speed : -speed ;
    var interval = setInterval( function(){
        // 4. 判定运动的终止条件;
        if(Math.abs(target - _css_style) <= Math.abs(speed) ){
            // 因为终止时有可能没有到达目标点,因此我们把元素赋值到目标点位置;
            box.style[attr] = target + "px";
            clearInterval( interval );
        }else{
            // 2. 元素根据初始位置进行改变;
            _css_style += speed;
            // 3. DOM操作,根据已有数据让元素属性发生改变;
            box.style[attr] = _css_style + "px";
        }
} , 30)}</script>- Compatible transparency
<script>function animate( dom , attr , target , speed = 10 ){
    // 1. 获取元素初始样式
    var _style = getComputedStyle( dom );
    // 2. 根据属性要求取出当前的属性的属性值;
    if( attr === "opacity"){
        var _css_style = parseInt(_style[attr] * 100 );
        target *= 100;
    }else{
        var _css_style = parseInt(_style[attr]);
    }
    speed  = target - _css_style >= 0 ? speed : -speed ;
    var interval = setInterval( function(){
        // 4. 判定运动的终止条件;
        if(Math.abs(target - _css_style) <= Math.abs(speed) ){
            // 因为终止时有可能没有到达目标点,因此我们把元素赋值到目标点位置;
            if( attr === "opacity"){
                dom.style[attr] = target / 100;
            }else{
                dom.style[attr] = target + "px";
            }
            clearInterval( interval );
        }else{
            // 2. 元素根据初始位置进行改变;
            _css_style += speed;
            // 3. DOM操作,根据已有数据让元素属性发生改变;
            if( attr === "opacity"){
                dom.style[attr] = _css_style / 100 ;
            }else{
                dom.style[attr] = _css_style + "px";
            }
        }
} , 30)}</script>- Buffer motion
- Buffer motion It is a type of movement
- This type of movement is a movement in which the speed changes during the movement
- The smaller the distance, the smaller the speed
<button id="btn">开始运动</button>
<div id="box"></div>
<script>
var  box = document.getElementById("box");
var  btn = document.getElementById("btn");
btn.onclick = function(){
    animate( box , "left" , 500 )
}
function animate( dom , attr , target , transition = "buffer", speed = 10 ){
    var _style = getComputedStyle( dom );
    if( attr === "opacity"){
        var _css_style = parseInt(_style[attr] * 100 );
        target *= 100;
    }else{
        var _css_style = parseInt(_style[attr]);
    }

    if( transition === "liner"){
        speed  = target - _css_style >= 0 ? speed : -speed ;
    }

    var interval = setInterval( function(){
        if( transition === "buffer"){
            // 计算速度;
            speed = (target - _css_style) / 10;
            //速度不取整在小数部分会做很多无意义的计算;
            speed = speed > 0 ? Math.ceil(speed) :Math.floor( speed )
        }

        if(Math.abs(target - _css_style) <= Math.abs(speed) ){
            // 因为终止时有可能没有到达目标点,因此我们把元素赋值到目标点位置;
            if( attr === "opacity"){
                dom.style[attr] = target / 100;
            }else{
                dom.style[attr] = target + "px";
            }
                clearInterval( interval );
        }else{
            // 2. 元素根据初始位置进行改变;
            _css_style += speed;
            // 3. DOM操作,根据已有数据让元素属性发生改变;
            if( attr === "opacity"){
                dom.style[attr] = _css_style / 100 ;
            }else{
                dom.style[attr] = _css_style + "px";
            }
        }
    } , 30)
}
</script>
//只需要改变里面transition的值就可以调整运动模式
//buffer为缓冲运动
//liner为匀速运动Multi-attribute motion framework (extension)
- Multi-attribute motion framework
- We will start multiple timers when calling animate multiple times
- Because the data in the timer are the same, we cannot see the difference in effect
- But turning on the timer multiple times will extremely consume computer performance
- Turn off the current timer before turning it on Previous timer
<script>// 在一个定时器之中,用for循环同时执行多次dom样式操作; // 1. 需要优化的部分:参数,要把样式部分的参数优化成一个对象; function animate( dom , attrs , transition = "buffer", speed = 10 ){
    var _style = getComputedStyle( dom );
    // 获取元素当前的属性 :
    for(var attr in attrs ){
        // attr ? 要过渡的css属性名;
        // attrs[attr] ? 要过渡的当前属性;
        attrs[attr] = {
            target : attrs[attr],
            // 元素当前的属性放入到这个对象之中;
            now  : parseInt(_style[attr])
        }
    }
    // 因为直接关闭interval是没有作用的,此时的inteval是一个局部变量,每次animate被调用的时候都会直接重置;
    // 我们应该吧定时器的id放在当前正在执行过渡效果的dom对象上;
    clearInterval(dom.interval);
    dom.interval = setInterval( function(){
        for(var attr in attrs){
        // 取出 attrs 之中的目标点和当前值;
            speed = (attrs[attr].target -  attrs[attr].now) / 10 ;
            // 根据速度正负,进行速度取整;
            speed = speed > 0 ? Math.ceil( speed ) : Math.floor( speed );
            // 判定终止条件;
            if( attrs[attr].target ===  attrs[attr].now){
                // 删除已经到达目标点的属性;
                delete attrs[attr]
                // 判定attrs里面已经没有属性了;
                for(var a in attrs){
                    return false;
                }
                clearInterval(dom.interval);
            }else{
                attrs[attr].now += speed;
                dom.style[ attr ] = attrs[attr].now + "px";
            }
        }
    } , 30)}// 优化参数之后,key值是等待运动的css属性,value值是元素的目标; btn.onclick = function(){
animate( box , { width : 500 , height : 400 } )}</script>Carousel chart function implementation
 <style>
            *{
                  margin: 0;
                  padding: 0;
            }
            .container{
                  width: 1130px;
                  height: 286px;
                  margin: 0 auto;
                  position: relative;
                  overflow: hidden;
            }
            .wrapper{
                  width: 6780px;
                  position: absolute;
                  left: 0;
            }
            .slide{
                  float: left;
            }

            .slide , .slide img{
                  width: 1130px;
                  height: 286px;
            }
            .button-prev{
                  left: 0;
                  background-position: 30px center;
                  background-image: url(https://static.zcool.cn/git_z/z/widget/slider/images/svg/left_arrow.svg?v=2);
                  top: 0;
                  width: 13px;
                  height: 100%;
                  padding: 0 80px;
                  border-radius: 2px;
                  position: absolute;
                  background-repeat: no-repeat;
            }
            .button-prev:hover{
                  background-image: url(https://static.zcool.cn/git_z/z/widget/slider/images/svg/left_arrowhover.svg?v=2);
            }
            .button-next{
                  right: 0;
                  background-position: 91px center;
                  background-image: url(https://static.zcool.cn/git_z/z/widget/slider/images/svg/right_arrow.svg?v=2);
                  top: 0;
                  width: 13px;
                  height: 100%;
                  padding: 0 80px;
                  border-radius: 2px;
                  position: absolute;
                  background-repeat: no-repeat;
            }
            .button-next:hover{
                  background-image: url(https://static.zcool.cn/git_z/z/widget/slider/images/svg/right_arrowhover.svg?v=2);
            }
            .pagination{
                  position: absolute;
                  bottom: 10%;
                  width: 100%;
                  height: 10px;
                  left: 30px;
            }
            .pagination span{
                  display: inline-block;
                  width: 10px;
                  height: 10px;
                  margin-left: 10px;
                  border-radius: 50%;
                  background-color: cornflowerblue;
                  border: 2px solid transparent;
                  background-clip: content-box;
            }
            .pagination span.active{
                  border: 2px solid skyblue;
                  box-shadow: 0 0 5px skyblue;
                  background-color: #fff;
            }
</style><!-- 类名请使用和我一样的类名 -->
<div class="container">
<div class="wrapper">
<!-- 第0张图片 -->
<div class="slide">
<img src="https://img.zcool.cn/ad_manager/location/f35d611484931101c43350bbdbd5.jpg" alt="">
</div>
<div class="slide">
<img src="https://img.zcool.cn/ad_manager/location/3dcb6113a3471101c433505bbd72.jpg" alt="">
</div>
<div class="slide">
<img src="https://img.zcool.cn/ad_manager/location/65f36113a3341101c4335014b174.jpg" alt="">
</div>
<div class="slide">
<img src="https://img.zcool.cn/ad_manager/location/7f97611481181101c43350225b33.jpg" alt="">
</div>
<div class="slide">
<img src="https://img.zcool.cn/ad_manager/location/afcf6114801e1101c433507f9e28.jpg" alt="">
</div>
<!-- 最后一张图片 -->
<!-- 把第0张图片放在整个图片结构的最后 -->
<div class="slide">
<img src="https://img.zcool.cn/ad_manager/location/f35d611484931101c43350bbdbd5.jpg" alt="">
</div>
</div>
<div class="button-next"></div>
<div class="button-prev"></div>
<div class="pagination">
<span class="active"></span>
<span></span>
<span></span>
<span></span>
<span></span>
</div>
</div>
<script src="./utils.js"></script>
<script>
// 轮播图的核心就是左右切换按钮,实现显示元素下标的改变;
var index = 0 ;
var prev = 0;
var next_btn = document.querySelector(".button-next");
var prev_btn = document.querySelector(".button-prev");
var slides = document.querySelectorAll(".slide");
var wrapper = document.querySelector(".wrapper");
// 自动播放的阻止功能是在鼠标移入container容器之中就触发的;
var container = document.querySelector(".container");
var bullets = document.querySelectorAll(".pagination span");
// 绑定事件
// - 轮播图改变下标功能必须设置边界;
function bindEvent(){
next_btn.onclick = function(){
add();
bannerAnimate();
}
prev_btn.onclick = function(){
reduce()
bannerAnimate();
}
container.onmouseover = function(){
stop();
}
container.onmouseout = function(){
autoPlay();
}
bullets.forEach( function( ele , i ){
ele.onmouseover = function(){
prev = index;
// 防止穿帮逻辑;
// - 如果在假的第0张图片上(在最后一张图片上)
// - 我们先让真假图片呼喊然后在进行元素的动画效果;
if( index === 5 ){
wrapper.style.left = 0;
}
index = i;
bannerAnimate();
}
})
}
// 下标增加;
function add(){
prev = index;
if( index === slides.length - 1 ){
// 这个逻辑会在最后一张图片进行切换时进入;
// 我们让wrapper直接位移到开头,改变元素位置的同时让用户无法感知;
wrapper.style.left = 0;
// 我们需要从第0个图片切换到第一个图片;
// -因为我们最后一张图片的显示和开头图片的显示是一样的
index = 1;
}else{
index ++;
}
}
// 下标减少;
function reduce(){
prev = index;
if( index === 0 ){
wrapper.style.left = -(slides.length - 1) * 1130 + "px";
index = slides.length - 2;
}else{
index --;
}
}
// 根据我们的算法去实现动画效果;
function bannerAnimate(){
animate( wrapper , { left : - index * 1130 });
// 给对应的分页器按钮添加active;
// 先去清空所有的类名;
bullets.forEach( function( ele ){
ele.classList.remove("active")
})
// 下标需要进行特殊处理,在显示最后一张图片的时候,给第0个按钮添加active;
bullets[ index === 5 ? 0 : index ].classList.add("active");
}
bindEvent();
var interval = null;
function autoPlay(){
// 间隔3s,让js点击一下下一页按钮;
interval = setInterval( function(){
// 虚拟点击 :
next_btn.dispatchEvent( new Event("click"));
} , 3000 )
}
function stop(){
clearInterval( interval )
}
autoPlay();
</script>The example is as follows
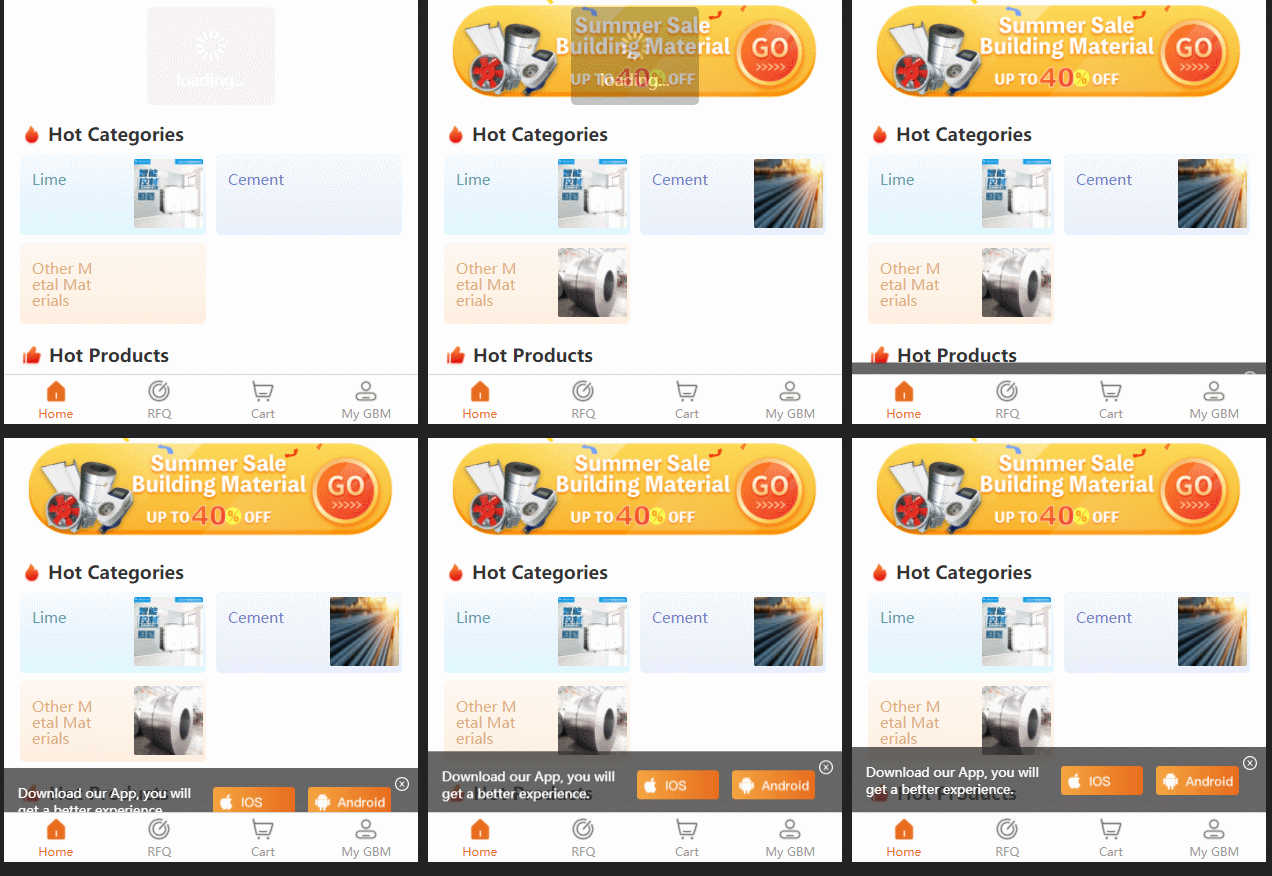
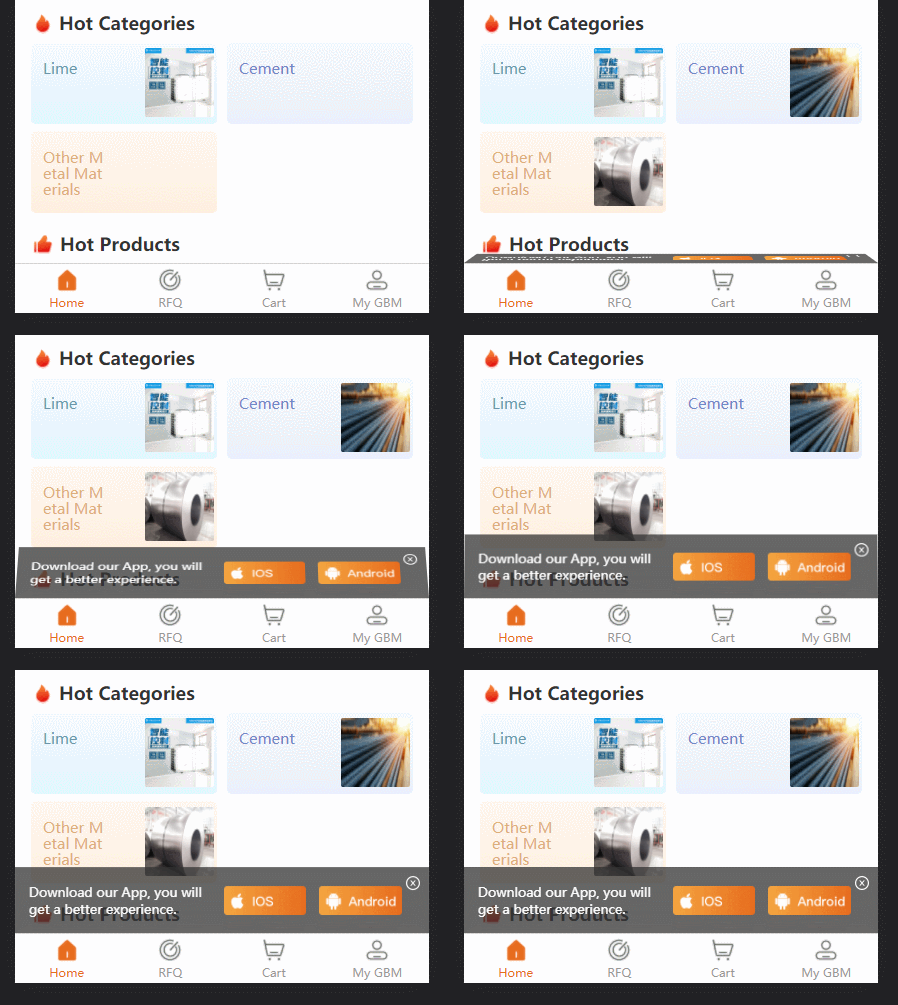
project Background: uniapp h5 application, in order to prompt users to download, there is a dom that prompts download. I originally wanted to add it to each tabbar (four in total); but I want to try another way of playing as follows: The effect is as follows:

Directly enter the code:
function showDownloadTisp() {
  console.log('--------------------------->showDownloadTisp')
  // #ifdef H5
  const parent = document.querySelector('.uni-tabbar')
  console.log('parent:', parent)
  const tips = document.createElement('p')
  tips.id = 'downloadTisp'


  tips.setAttribute('style',
    'background: rgba(51,51,51,0.75);'
  )

  tips.setAttribute('style',
    `background: rgba(51,51,51,0.75); position: fixed;width: 100%;height: ${uni.upx2px(120)}px; bottom:${uni.upx2px(-140)}px;  display: flex;flex-direction: row;justify-content: space-between;align-items:center;transition:0.5s;`
  )

  const desParent = document.createElement('p')
  const des = document.createTextNode('Download our App, you will get a better experience.')
  desParent.appendChild(des)
  desParent.setAttribute('style',
    `padding: 0;color: #FFFFFF;font-size:${uni.upx2px(24)}px;margin-left: ${uni.upx2px(27)}px;padding-right: ${uni.upx2px(25)}px;`
  )

  const iosImage = document.createElement('img')
  iosImage.src = '../static/guide/download ios.png'
  iosImage.setAttribute('style',
    `width: ${uni.upx2px(154)}px;height: ${uni.upx2px(54)}px;margin-right: ${uni.upx2px(25)}px;`)

  const anroidImage = document.createElement('img')
  anroidImage.src = '../static/guide/download android.png'
  anroidImage.setAttribute('style',
    `width: ${uni.upx2px(154)}px;height: ${uni.upx2px(54)}px;margin-right: ${uni.upx2px(50)}px;`)

  const closedImage = document.createElement('img')
  closedImage.src = '../static/guide/download closd.png'
  closedImage.setAttribute('style',
    `width: ${uni.upx2px(30)}px;height: ${uni.upx2px(30)}px;position: absolute;right:${uni.upx2px(15)}px;top: ${uni.upx2px(15)}px;padding: ${uni.upx2px(5)};`
  )

  tips.appendChild(desParent)
  tips.appendChild(iosImage)
  tips.appendChild(anroidImage)
  tips.appendChild(closedImage)


  iosImage.onclick = () => {
    //console.log("iosImage.onclick")
    window.location.href = 'https://apps.apple.com/cn/app/gbm001/id1574324240'
    // window.open('https://www.baidu.com/')
  }

  anroidImage.onclick = () => {
    //console.log("anroidImage.onclick")
    window.location.href = 'https://play.google.com/store/apps/details?id=com.vandream.gbmpro'
    // window.open('https://www.sina.com.cn/')
  }

  closedImage.onclick = () => {
    console.log("closedImage.onclick")
    tips.remove()
  }


  parent.parentNode.appendChild(tips)
  //parent.appendChild(tips)


  setTimeout(() => {
    tips.style.transform = `translateY(${uni.upx2px(-140) - 50}px);`
    //console.log(" tips.style.transform done")
  }, 2500)

  // #endif
}Create nodes through code and the code is style; And animation; just call it when the application starts;
About js setting transformation animation; here it is changed to 3D form

function showDownloadTisp() {
  // #ifdef H5
  const parent = document.querySelector('.uni-tabbar')
  // console.log('parent:', parent)
  const tips = document.createElement('p')
  tips.id = 'downloadTisp'

  // tips.setAttribute('style',
  //   'background: rgba(51,51,51,0.75);'
  // )

  // tips.setAttribute('style',
  //   `background: rgba(51,51,51,0.75); position: fixed;width: 100%;height: ${uni.upx2px(120)}px; bottom:${uni.upx2px(-140)}px;  display: flex;flex-direction: row;justify-content: space-between;align-items:center;transition:0.5s;`
  // )
  tips.setAttribute('style',
    `background: rgba(51,51,51,0.75); position: fixed;width: 100%;height: ${uni.upx2px(120)}px; bottom:50px;  display: flex;flex-direction: row;justify-content: space-between;align-items:center;transition:0.5s; transform-origin:center bottom; transform:perspective(900px) rotateX(90deg);`
  )

  const desParent = document.createElement('p')
  const des = document.createTextNode('Download our App, you will get a better experience.')
  desParent.appendChild(des)
  desParent.setAttribute('style',
    `padding: 0;color: #FFFFFF;font-size:${uni.upx2px(24)}px;margin-left: ${uni.upx2px(27)}px;padding-right: ${uni.upx2px(10)}px;`
  )

  const iosImage = document.createElement('img')
  // iosImage.src = '../static/guide/download ios.png'
  iosImage.src = 'https://img.vandream.com/54/0330f6211506cc.png'
  iosImage.setAttribute('style',
    `width: ${uni.upx2px(154)}px;height: ${uni.upx2px(54)}px;margin-right: ${uni.upx2px(25)}px;`)

  const anroidImage = document.createElement('img')
  // anroidImage.src = '../static/guide/download android.png'
  anroidImage.src = 'https://img.vandream.com/53/0330f45097465d.png'
  anroidImage.setAttribute('style',
    `width: ${uni.upx2px(154)}px;height: ${uni.upx2px(54)}px;margin-right: ${uni.upx2px(50)}px;`)

  const closedImage = document.createElement('img')
  // closedImage.src = '../static/guide/download closd.png'
  closedImage.src = 'https://img.vandream.com/52/0330f523d7709d.png'
  closedImage.setAttribute('style',
    `width: ${uni.upx2px(30)}px;height: ${uni.upx2px(30)}px;position: absolute;right:${uni.upx2px(15)}px;top: ${uni.upx2px(15)}px;padding: ${uni.upx2px(5)};`
  )

  tips.appendChild(desParent)
  tips.appendChild(iosImage)
  tips.appendChild(anroidImage)
  tips.appendChild(closedImage)

  iosImage.onclick = () => {
    console.log('iosImage.onclick')
    window.location.href = 'https://apps.apple.com/cn/app/gbm001/id1574324240'
    // window.open('https://www.baidu.com/')
  }

  anroidImage.onclick = () => {
    console.log('anroidImage.onclick')
    window.location.href = 'https://play.google.com/store/apps/details?id=com.vandream.gbmpro'
    // window.open('https://www.sina.com.cn/')
  }

  closedImage.onclick = () => {
    console.log('closedImage.onclick')
    tips.remove()
  }

  parent.parentNode.appendChild(tips)
  // parent.appendChild(tips)

  setTimeout(() => {
    // tips.style.transform = `translateY(${uni.upx2px(-140) - 50}px);`
    tips.style.transform = 'rotateX(0deg)'
    // console.log(" tips.style.transform done"):rotateX(90deg);
  }, 2500)

  // #endif
}【Related recommendations: javascript video tutorial, web front-end】
The above is the detailed content of Detailed example of how to add animation to a single DOM element. For more information, please follow other related articles on the PHP Chinese website!

Hot AI Tools

Undresser.AI Undress
AI-powered app for creating realistic nude photos

AI Clothes Remover
Online AI tool for removing clothes from photos.

Undress AI Tool
Undress images for free

Clothoff.io
AI clothes remover

Video Face Swap
Swap faces in any video effortlessly with our completely free AI face swap tool!

Hot Article

Hot Tools

Notepad++7.3.1
Easy-to-use and free code editor

SublimeText3 Chinese version
Chinese version, very easy to use

Zend Studio 13.0.1
Powerful PHP integrated development environment

Dreamweaver CS6
Visual web development tools

SublimeText3 Mac version
God-level code editing software (SublimeText3)

Hot Topics
 1387
1387
 52
52
 How to implement an online speech recognition system using WebSocket and JavaScript
Dec 17, 2023 pm 02:54 PM
How to use WebSocket and JavaScript to implement an online speech recognition system Introduction: With the continuous development of technology, speech recognition technology has become an important part of the field of artificial intelligence. The online speech recognition system based on WebSocket and JavaScript has the characteristics of low latency, real-time and cross-platform, and has become a widely used solution. This article will introduce how to use WebSocket and JavaScript to implement an online speech recognition system.
 WebSocket and JavaScript: key technologies for implementing real-time monitoring systems
Dec 17, 2023 pm 05:30 PM
WebSocket and JavaScript: Key technologies for realizing real-time monitoring systems Introduction: With the rapid development of Internet technology, real-time monitoring systems have been widely used in various fields. One of the key technologies to achieve real-time monitoring is the combination of WebSocket and JavaScript. This article will introduce the application of WebSocket and JavaScript in real-time monitoring systems, give code examples, and explain their implementation principles in detail. 1. WebSocket technology
 How to use JavaScript and WebSocket to implement a real-time online ordering system
Dec 17, 2023 pm 12:09 PM
Introduction to how to use JavaScript and WebSocket to implement a real-time online ordering system: With the popularity of the Internet and the advancement of technology, more and more restaurants have begun to provide online ordering services. In order to implement a real-time online ordering system, we can use JavaScript and WebSocket technology. WebSocket is a full-duplex communication protocol based on the TCP protocol, which can realize real-time two-way communication between the client and the server. In the real-time online ordering system, when the user selects dishes and places an order
 How to implement an online reservation system using WebSocket and JavaScript
Dec 17, 2023 am 09:39 AM
How to use WebSocket and JavaScript to implement an online reservation system. In today's digital era, more and more businesses and services need to provide online reservation functions. It is crucial to implement an efficient and real-time online reservation system. This article will introduce how to use WebSocket and JavaScript to implement an online reservation system, and provide specific code examples. 1. What is WebSocket? WebSocket is a full-duplex method on a single TCP connection.
 JavaScript and WebSocket: Building an efficient real-time weather forecasting system
Dec 17, 2023 pm 05:13 PM
JavaScript and WebSocket: Building an efficient real-time weather forecast system Introduction: Today, the accuracy of weather forecasts is of great significance to daily life and decision-making. As technology develops, we can provide more accurate and reliable weather forecasts by obtaining weather data in real time. In this article, we will learn how to use JavaScript and WebSocket technology to build an efficient real-time weather forecast system. This article will demonstrate the implementation process through specific code examples. We
 Simple JavaScript Tutorial: How to Get HTTP Status Code
Jan 05, 2024 pm 06:08 PM
JavaScript tutorial: How to get HTTP status code, specific code examples are required. Preface: In web development, data interaction with the server is often involved. When communicating with the server, we often need to obtain the returned HTTP status code to determine whether the operation is successful, and perform corresponding processing based on different status codes. This article will teach you how to use JavaScript to obtain HTTP status codes and provide some practical code examples. Using XMLHttpRequest
 How to use insertBefore in javascript
Nov 24, 2023 am 11:56 AM
Usage: In JavaScript, the insertBefore() method is used to insert a new node in the DOM tree. This method requires two parameters: the new node to be inserted and the reference node (that is, the node where the new node will be inserted).
 JavaScript and WebSocket: Building an efficient real-time image processing system
Dec 17, 2023 am 08:41 AM
JavaScript is a programming language widely used in web development, while WebSocket is a network protocol used for real-time communication. Combining the powerful functions of the two, we can create an efficient real-time image processing system. This article will introduce how to implement this system using JavaScript and WebSocket, and provide specific code examples. First, we need to clarify the requirements and goals of the real-time image processing system. Suppose we have a camera device that can collect real-time image data


