This article brings you relevant knowledge about vue, which mainly introduces the two core issues about vue, responsiveness and componentization. Let’s take a look at it together. I hope Helpful to everyone.

【Related recommendations: javascript video tutorial, vue.js tutorial】
vue2.0 response Formula
1. Object response formula
1.1 Object.defineProperty
The Object.defineProperty(obj, prop, descriptor) method will directly define a new property on an object, or modify an existing property of an object, and return this object.
obj——The object to define the attribute
prop——The name or Symbol of the attribute to be defined or modified
descriptor——Object, the attribute descriptor to be defined or modified
// descriptor{
  value: undefined, // 属性的值
  get: undefined,   // 获取属性值时触发的方法
  set: undefined,   // 设置属性值时触发的方法
  writable: false,  // 属性值是否可修改,false不可改
  enumerable: false, // 属性是否可以用for...in 和 Object.keys()枚举
  configurable: false  // 该属性是否可以用delete删除,false不可删除,为false时也不能再修改该参数}
Copy after login
Ordinary properties added through assignment operations are enumerable and will be enumerated when enumerating object properties (for...in or Object.keys method). You can change these The values of attributes can also be deleted. This method allows modifying the default extra options (or configuration).
By default, property values added using Object.defineProperty() are immutable.
Example:
const a = {b : 1}
console.log(Object.getOwnPropertyDescriptor(a, 'b'))
// {value: 1, writable: true, enumerable: true, configurable: true}

Object.defineProperty(a, 'c', {value: '2'})
console.log(Object.getOwnPropertyDescriptor(a, 'c'))
// {value: '2', writable: false, enumerable: false, configurable: false}

a.c = 3
console.log(a.c)
// 2

Object.defineProperty(a, 'c', {value: '4'})
console.log(a.c)
// error: Uncaught TypeError: Cannot redefine property: c
Copy after login
1.2 set and get
// 模拟vue响应式过程const app = document.getElementById('app')const data = {
	a: {
	  b: {
	    c: 1
	  }
	}}function render () {
  const virtualDom = `这是我的内容${data.a.b.c}`
  app.innerHTML = virtualDom}function observer (obj) {
  let value  for (const key in obj) {  // 递归设置set和get
    value = obj[key]
    if (typeof value === 'object'){
      arguments.callee(value)
    } else {
      Object.defineProperty(obj, key, {
        get: function(){
          return value        },
        set: function(newValue){
          value = newValue          render()
        }
      })
    }
  }}render()observer(data)setTimeout(() => {
  data.a.b.c = 22}, 2000)setTimeout(() => {
  data.a.b.c = 88}, 5000)
Copy after login
The above method implements data response, but there is a big problem. When we trigger set once, we need the entire page Re-render, however this value may only be used in a certain component.
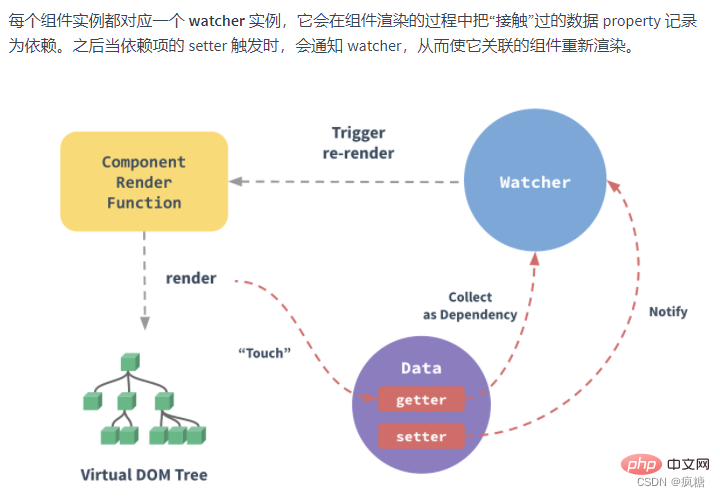
So get and set are optimized:
Object.defineProperty(data, key, {
  get: function(){
    dep.depend() // 这里进行依赖收集
    return value  },
  set: function(newValue){
    value = newValue    // render()
    dep.notify()  // 这里进行virtualDom更新,通知需要更新的组件render
  }});
Copy after login
dep is a class that Vue is responsible for managing dependencies
Supplement: Vue cannot detect the addition or addition of property Remove. Since Vue will perform getter/setter conversion on the property when initializing the instance, the property must exist on the data object in order for Vue to convert it into a responsive
const vm = new Vue({
	data: {
		a: 1
	}})// vm.a是响应式的vm.b = 2// vm.b是非响应式的
Copy after login
2. Reactive array
Vue handles changes in the array and directly triggers changes in the view through the subscript. Only push, shift and other methods can be used, and the array cannot use Object.defineProperty()
In fact, Vue uses the decorator mode to rewrite the array. These methods
Object.create(proto,[propertiesObject]) method is to create a new object, using an existing object to provide the __proto__ of the newly created object.
proto——The prototype object of the newly created object;
propertiesObject——Optional, the type is an object, if the parameter is specified and is not undefined , the passed-in object's own enumerable properties (that is, its own defined properties, rather than the enumerated properties on its prototype chain) will add the specified property value and corresponding property descriptor to the newly created object
const a = {}
// 相当于
const a = Object.create(Object.prototype)

const person = {
  isHuman: false,
  printIntroduction: function () {
    console.log(`My name is ${this.name}. Am I human? ${this.isHuman}`);
  }
};

const me = Object.create(person);

me.name = 'Matthew'; // "name" is a property set on "me", but not on "person"
me.isHuman = true; // inherited properties can be overwritten

me.printIntroduction();
// expected output: "My name is Matthew. Am I human? true"
Copy after login
const o = Object.create(Object.prototype, {
  foo: { // foo会成为所创建对象的数据属性
    writable:true,
    configurable:true,
    value: "hello"
  },
  bar: { // bar会成为所创建对象的访问器属性
    configurable: false,
    get: function() { return 10 },
    set: function(value) {
      console.log("Setting `o.bar` to", value);
    }
  }});console.log(o) // {foo: 'hello'}
Copy after login
Decorator mode in vue
const arraypro = Array.prototype    // 获取Array的原型
const arrob = Object.create(arraypro) // 用Array的原型创建一个新对象,arrob.__proto__ === arraypro,免得污染原生Array;
const arr=['push', 'pop', 'shift', 'unshift', 'splice', 'sort', 'reverse']   // 需要重写的方法

arr.forEach(function(method) {
  arrob[method] = function () {
    arraypro[method].apply(this, arguments) // 重写时先调用原生方法
    dep.notify() // 并且同时更新
  }
})

// 对于用户定义的数组,手动将数组的__proto__指向我们修改过的原型
const a = [1, 2, 3]
a.__proto__ = arrob
Copy after login
For the above method of the new object arrob, we directly assign the value. This will cause a problem, that is, the user may accidentally change our object. So we can use the Object.defineProperty we talked about earlier to avoid this problem. We create a public method def specifically to set properties whose values cannot be modified
function def (obj, key, value) {
  Object.defineProperty(obj, key, {
    // 这里我们没有指定writeable,默认为false,即不可修改
    enumerable: true,
    configurable: true,
    value: value,
  });}// 数组方法重写改为arr.forEach(function(method){
  def(arrob, method, function () {
    arraypro[method].apply(this, arguments)  // 重写时先调用原生方法
    dep.notify()// 并且同时更新
  })})
Copy after login
3. Supplement: Data properties and accessors of objects Attribute
Data attribute: It contains the location of a data value, where the data value can be read and written
Four descriptors of the data attribute:
|
Meaning |
| configurable |
means Can the property be deleted by delete to redefine the property? Can the properties of the property be modified? Can the property be modified as an accessor property? The default is true |
| enumerable |
Indicates whether the attribute can be returned through a for-in loop, the default is true |
| writable |
Indicates whether the value of the attribute can be modified, the default is true |
| value |
Contains the data value of this attribute, the default is undefined |
Accessor attribute: This attribute does not contain a data value, but a pair of get and set methods. When reading and writing accessor attributes, these two methods are used to perform operations.
Four descriptors for accessor properties:
| ##Meaning |
configurable | Indicates whether the attribute can be redefined by deleting the attribute through delete, whether the characteristics of the attribute can be modified, or whether the attribute can be modified as an accessor attribute. The default is false |
enumerable | indicates whether the attribute can be returned through a for-in loop. The default is false |
get | The function called when reading properties, the default value is undefined |
set | The function called when writing properties, the default value is undefined |
vue3.0数据响应
vue3.0的响应式和vue2.0响应式原理类似,都是在get中收集依赖,在set中通知依赖更新视图,但vue3.0使用了es6新增的proxy来代替Object.defineProperty()
proxy相对于Object.defineProperty()的好处:
- Object.defineProperty需要指定对象和属性,对于多层嵌套的对象需要递归监听,Proxy可以直接监听整个对象,不需要递归;
- Object.defineProperty的get方法没有传入参数,如果我们需要返回原值,需要在外部缓存一遍之前的值,Proxy的get方法会传入对象和属性,可以直接在函数内部操作,不需要外部变量;
- set方法也有类似的问题,Object.defineProperty的set方法传入参数只有newValue,也需要手动将newValue赋给外部变量,Proxy的set也会传入对象和属性,可以直接在函数内部操作;
- new Proxy()会返回一个新对象,不会污染源原对象
- Proxy可以监听数组,不用单独处理数组
proxy劣势: vue3.0将放弃对低版本浏览器的兼容(兼容版本ie11以上)
这样上边的observe方法就可以优化成:
function observer () {
  var self = this;
  data = new Proxy(data, {
    get: function(target, key){
      dep.depend() // 这里进行依赖收集
      return target[key]
    },
    set: function(target, key, newValue){
      target[key] = newValue;
      // render()
	  dep.notify()  // 这里进行virtualDom更新,通知需要更新的组件render
    }
  });}
Copy after login
模块化(组件化)开发
按照功能(或按照复用性)把一个页面拆成各个板块(模块),每一个模块都是一个单独的文件(单独的组件),最后把各个模块(组件)拼在一起即可!!
目的 :方便团队协作开发 实现复用
组件分类
功能型组件「UI组件库中提供的一般都是功能型组件:element/iview/antdv/vant/cube..」
- + 一般UI组件库提供的功能组件就够用了
- + 偶尔UI组件库中不存在的,才需要自己封装「难点」
- + 我们经常会把功能型组件进行二次封装(结合自己项目的业务逻辑)「特殊亮点」
业务型组件
- + 通用业务型组件「好多页面都需要用到的,我们把其封装成为公共的组件」
- + 普通组件
以后开发项目,拿到设计稿的第一件事情:划分组件「按照功能版块划分、本着复用性原则,拆的越细越好(这样才能更好的实现复用)」
组件的创建及使用
创建一个 Xxx.vue 就是创建一个vue组件{局部组件、私有组件},组件中包含:结构、样式、功能
结构:基于template构建
+ 只能有一个根元素节点(vue2)
+ vue的视图就是基于template语法构建的(各种指令&小胡子...),最后vue会把其编译为真实的DOM插入到页面指定的容器中
首先基于 vue-template-compiler 插件把template语法编译为虚拟DOM「vnode」
其次把本次编译出来的vnode和上一次的进行对比,计算出差异化的部分「DOM-DIFF」
最后把差异化的部分变为真实的DOM放在页面中渲染
样式:基于style来处理
- + lang="less" 指定使用的CSS预编译语言「需要提前安装对应的loader」
- + scoped 指定当前编写的样式是私有的,只对当前组件中的结构生效,后期组件合并在一起,保证样式之间不冲突
功能:通过script处理
+ 导出的这个对象是VueComponent类的实例(也是Vue的实例):对象 -> VueComponent.prototype -> Vue.prototype
+ 在对象中基于各种 options api 「例如:data、methods、computed、watch、filters、生命周期函数...」实现当前组件的功能
+ 在组件中的data不再是一个对象,而是一个“闭包”
+ 各个组件最后会合并在一起渲染,为了保证组件中指定的响应式数据是“私有的”,组件之间数据即使名字相同,也不会相互污染...所以需要基于闭包来管理
注意;App.vue页面入口相当于首页,写好的组件都导入到这个里面
<template>
  <div>
    {{ msg }}
  </div>
</template>

<script>
export default {
  name: "Test",
  data() {
    return {
      //编写响应式数据
      msg: "你好,世界",
    };
  },
};
</script>

<style>
.box {
  font-size: 20px;
  color: red;
}
</style>
Copy after login
私有组件(使用的时候首先进行导入,然后注册,这样视图中就可以调用组件进行渲染了)
<template>
  <div>
      //3.使用组件:可以使用单闭合或双闭合

    <test></test>
      <test>
  </test>
</div>
</template>


<script>
//1、导入组件
import Test from "./Test.vue";
export default {
  name: "App",
  components:{
    //2、注册使用的组件
    Test,
  }
};
</script>
Copy after login
创建全局组件
1. 创建一个局部组件
<template>
  <div>{{ msg }}</div>
</template>

<script>
export default {
  name: "Vote",
  data() {
    return {
      msg: "今夜阳光明媚",
    };
  },
};
</script>
Copy after login
@2 在main.js入口中,导入局部组件Vote,把其注册为全局组件
import Vote from './Vote.vue';
Vue.component('Vote', Vote)
Copy after login
@3 这样在任何组件(视图中),无需基于components注册,直接可以在视图中调用
插槽
调用组件的方式
调用组件的时候,可以使用:
双闭合
双闭合的方式可以使用插槽slot
@1 在封装的组件中,基于 标签预留位置
@2 调用组件的时候,基于双闭合的方式,把要插入到插槽中的内容写在双闭合之间
单闭合
组件的名字可以在“kebab-case”和“CamelCase”来切换:官方建议组件名字基于CamelCase命名,渲染的时候基于kebab-case模式使用!
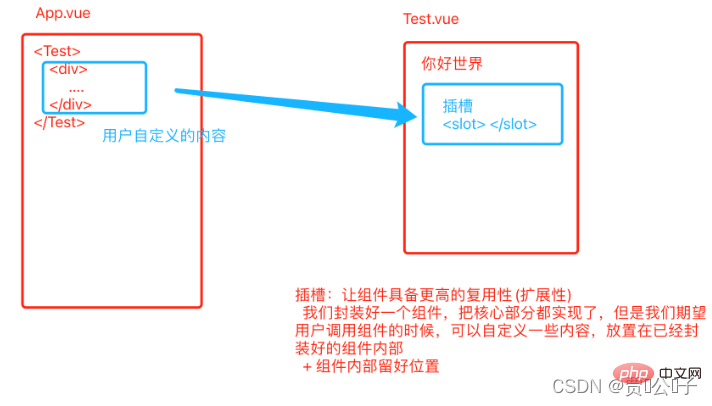
插槽的作用
- 让组件具备更高的复用性(或扩展性)
- 我们封装好一个组件,把核心部分都实现了,但是我们期望用户调用组件的时候,可以自定义一些内容,防止在已经封装好的组件内部:
插槽分为了默认插槽、具名插槽、作用域插槽,
默认插槽:只需要在调用组件<test><test></test></test>内插入我们想要的插入的html代码,会默认放到组件源代码的<slot name="default"></slot>插槽中
组件内部
slot预留位置  默认name:default
<slot></slot>
调用组件的时候
//只有一个的时候可以不用template包裹
<test>
<div>头部导航</div>
</test>
Copy after login
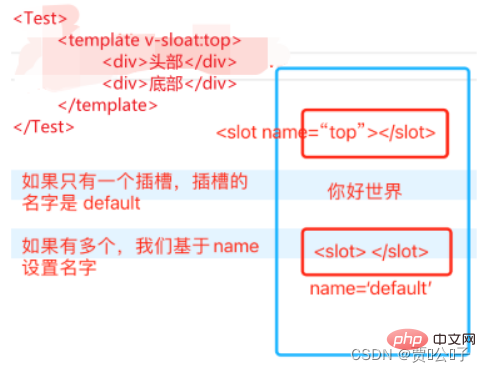
具名插槽:组件中预设好多插槽位置,为了后期可以区分插入到哪,我们把插槽设置名字
- 在调用组件
<test><test></test></test>内自己写的代码,我们用template包裹代码,并把v-slot:xxx写在template上,这时就会将xxx里面的代码,包裹到组件源代码的<slot name="”xxx“"></slot>的标签中
- ==组件内部:==
<slot name="xxx"></slot> 默认名字是default
- ==调用组件:==需要把v-slot写在template上
  组件内部
      <slot>
      默认名字是default
    调用组件:需要把v-slot写在template上
      <template>
         ...
      </template>
      <template>
         ...
      </template>
    v-slot可以简写为#:#xxx</slot>
Copy after login
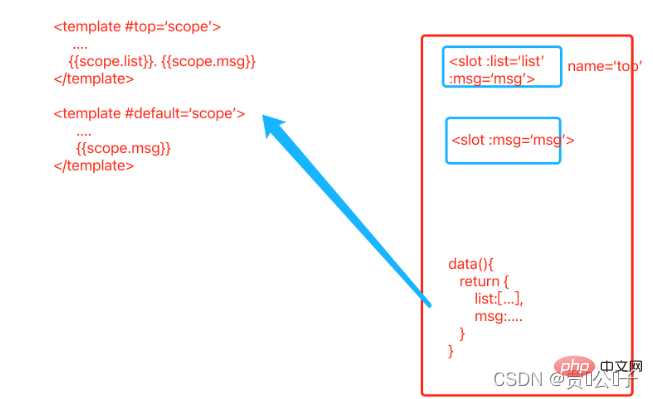
作用域插槽:把组件内部定义的数据,拿到调用组件时候的视图中使用
组件中data内的数据只能在本模块中使用,如果想让调用组件的插槽也能获取数据,就需要对组件内对的slot做bind绑定数据,调用组件的template标签做#top="AAA",获取数
   ==组件内部==:
 <slot name="top" :list="list" :msg="msg"></slot>
Copy after login
- 把组件中的list赋值给list属性,把msg赋值给msg属性,插槽中提供了两个作用域属性:list/msg
==调用组件==:
 <template #top="AAA"></template>
Copy after login
- 定义一个叫做AAA的变量,来接收插槽中绑定的所有数据(对象格式)
- 如果插槽名是default则使用
v-slot="AAA"或:default="AAA"获取数据
 组件内部
      <slot name="top" :list="list" :msg="msg"></slot>
      把组件中的list赋值给list属性,把msg赋值给msg属性,插槽中提供了两个作用域属性:list/msg

    调用组件
      <template #top="AAA"></template>
      定义一个叫做AAA的变量,来接收插槽中绑定的数据
      AAA={
        list:[...],
        msg:...
      }
Copy after login
组件传参
调用组件的时候
每创建一个组件其实相当于创建一个自定义类,而调用这个组件就是创建VueCommponent(或者Vue)类的实例
- 实例(this)->VueComponent.prototype->Vue.prototype->Object.prototype
- 当前实例可以访问Vue.prototype上的一些公共属性和方法
组件中的script中存在的状态值和属性值?
- ==状态值==:data中的数据值称为状态值
- ==属性值==:props中的数据值称为属性值
- 状态值和属性值是直接挂载到
_vode对象的私有属性中(所以状态值和属性值名字不能重复) - 我们在视图
template标签中调用状态值和属性值,不需要加this,直接调用状态名或属性名 - 我们在功能
script标签中调用状态值和属性值,需要加this调用 - ==computed(计算属性)==:也是挂载实例上的,所以他们三个都不能重名
vue中的单向数据流
父子组件传递数据时,只能由父组件流向子组件,不能由子组件流向父组件。这样会防止从子组件意外改变父级组件的状态,从而导致你的应用的数据流向难以理解。
组件传参的分类7种:
- 父组件向子组件传参:props
- 子组件向父组件传参:发布订阅(@xxx给子组件标签自定义事件、$emit)
- 组件相互传参(兄弟):发布订阅(on、emit)【2和3传参是一种】
- 祖先向后代传参(provide[提供],inject[接收])
- vue实例属性传参(parent、children[n]、root、refs)
- vuex
- localStorage sessionStorage
1.父组件向子组件传参
父组件向子组件传参:props
- 我们传给组件的值,默认是==字符串类型==的,比如msg
- 如果想传==数字类型==的,则需要调用v-bind或冒号的形式传值
- 我们每调用一次coma,都会生成一个独立的
VueComponent的实例
第一步:父组件在组件调用标签中自定义属性
//如果想把data中的状态值传递过去需要v-bind绑定
<coma msg="hello" :num="num"></coma>
Copy after login
注意 如果想把data中的状态值传递过去需要v-bind绑定
第二步:子组件通过props接收(数组,对象)
- props中的属性是只读的,子组件不能修改这些值,否则会报错
- 解决只读问题:用自定义变量接收传递过来的值,页面使用自定义变量
- props可以是对象或数组类型,对象可以对数据做校验,数组不能
    // props的值是只读的 能改,会报错
    <input type="text" v-model="num" />
    //数组格式
    props:["msg","num"]
    //对象格式
     props: {
    msg: {
      //传参类型必须是字符串
      type: String,
      //必须传参
      required: true,
    },
    num: {
      type: Number,
      //如果不传参默认是102
      default: 102,
    },
  },
    //----------------------------------------
    //用自定义变量numa接收num,然后页面使用numa(解决只读问题)
    <h1>我是子组件 coma------{{ msg }}----{{ numa }}</h1>
    <input type="text" v-model="numa" />
    props: ["msg", "num"],
      data() {
        return {
        numa: this.num,
       };
     },
Copy after login
2.子组件向父组件传参
子组件向父组件传参,基于==发布订阅(@xxx给子组件标签自定义事件、$emit)==
第一步:父组件在调用子组件的标签上需要自定义一个事件,这个事件及绑定的方法就会添加到子组件的事件池中:底层实质上是调用了this.$on("myEvent",fn)
<Coma @myEvent="getData"></Coma>
 methods: {
    getData() {},
  },
Copy after login
第二步:子组件用this.$emit()接受(this.$emit(myEvent,参数1,参数2)), 参数可以是子组件的,顺便传给父组件,实现子组件向父组件传值
  <button @click="goParentData">向父组件发送数据</button>
 data() {
    return {
      flag: "你很美",
      n: 101,
    };
  methods: {
    goParentData() {
      //执行父组件自定义的事件
      this.$emit("myEvent", this.flag, this.n);
    },
  },
Copy after login
第三步:父组件使用传递过来的数据
 data() {
    return {
      n: 0,
      flag: "",
    };
  },
  methods: {
    getData(...parans) {
      console.log(parans);
      //传递过来的是数组
      this.n = parans[0];
      this.flag = parans[1];
    },
  },
Copy after login
3.组件之间相互传参 原生事件法 (发布订阅)
b--->c发送数据
- c向事件池中添加方法(自定义方法):$on
- b执行方法把参数传过去:$emit
第一步:全局的main.js中创建一个全局的EventBus,挂载 vue的原型上 this.$bus
- 作用:将EventBus看作定义在公有属性上的事件池(事件公交),之后基于这个
$bus.$on()绑定的事件函数,在哪个vue实例上都可以基于$bus.$empty()执行,还可以传值
//创建一个全局的 Eventbus
let Eventbus=new Vue();
//挂载 vue的原型上  后期基于this.$bus
Vue.prototype.$bus=Eventbus;
Copy after login
第二步:comc向事件池中绑定事件:this.$bus.$on("事件名",函数)
  created() {
    //向事件池中添加方法
    this.$bus.$on("myEvent", () => {});
  },
Copy after login
第三步:comb从事件池中获取事件函数并执行:this.$bus.$emit("事件名",想传的参数)
    <button @click="send">发送数据给comc</button>
      data() {
        return {
          msg: "我是comb",
    };
    methods: {
    send() {
      //执行事件池中的方法,并且传参
      this.$bus.$emit("myEvent", this.msg);
    },
Copy after login
第四步 comc使用传递过来的数据
   <h1>组件 comc----{{ msg }}</h1>
     data() {
        return {
          msg: "",
      };
  //创建之后的钩子函数向事件池中添加方法
 created() {
    //向事件池中添加方法
    this.$bus.$on("myEvent", (value) => {
      console.log(value);
      this.msg = value;
    });
  },
Copy after login
4.祖先和后代相互传参
- 第一步:祖先要使用provide方法传参,不是写在methods里面,与methods同级
 data() {
    return {
      title: "我是about祖先",
    };
  },
  provide() {
    return {
      title: this.title,
    };
  },
Copy after login
第二步:后代使用inject属性接受祖先中的参数,inject是data中的数据,是数组类型
inject: ["title"],因为inject是数组类型,所以它符合如果数据项不是对象类型,则不做劫持,如果数据项是对象,则这个对象中的属性会做劫持。
  data() {
    return {
      title: "我是about祖先",
    };
  },
//祖先 传递的title是非响应式
  provide() {
    return {
      title: this.title,
    };
  },
//------------------------------
  data() {
    return {
      //obj非响应式
      obj: {
        //title是响应式
        title: "我是about祖先",
      },
    };
  },
  //祖先 传递的参数失去响应式,但里面的值会是响应式
  provide() {
    return {
      obj: this.obj,
    };
  },
Copy after login
vue实例属性传参
vue的实例中存在一些属性能够获取不同关系的元素,获取之后就可以基于这个元素获取其中的数据或方法了:
- $parent 获取父元素的数据/方法 获取父元素的整个vm实例
- 子组件可以在任何生命周期函数中获取父元素【父子组件的生命周期】
  created() {
    console.log(this.$parent.title);
  },
Copy after login
- $children 获取子元素的数据/方法(mounted钩子函数,要有下标)
this.$children[n]:获取第n个子元素的vm实例- 父组件只能在mounted生命周期函数里或之后获取子元素【父子组件的生命周期】
  mounted() {
    console.log(this.$children[0].msg);
  },
Copy after login
- $root获取根组件的数据/方法
this.$root:获取根元素的vm实例(main.js中new 的Vue实例)
et mv = new Vue({
  router,
  data() {
    return {
      rootmsg: "我是草根"
    }
  },
  render: h => h(App)
}).$mount('#app')
---------------------
  mounted() {
    console.log(this.$root.rootmsg);
  },
Copy after login
this.$refs:this的子元素中需要定义ref属性:比如ref="xxx":- ==如果ref定义在DOM标签中==:
this.$refs.xxx获取的是DOM对象 - ==如果ref定义在子组件标签中==:
this.$refs.xxx获取的是子组件的vm实例
  //获取的是dom元素
  <div ref="one">11111</div>
   mounted() {
    console.log(this.$refs.one);
  },
-----------------------------------
获取的是组件
  <comb ref="b"></comb>
  mounted() {
    console.log(this.$refs.b);
  },
//如果不是组件获取的就是dom元素,如果是组件,获取的就是组件的实例
Copy after login
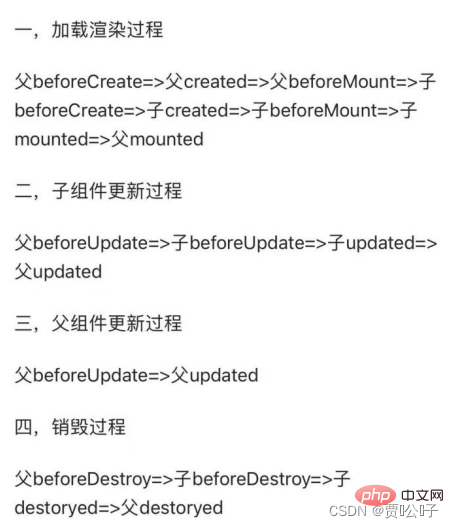
父子组件的生命周期
重点:父组件更新默认不会触发子组件更新,但是**==如果子组件中绑定调用了父组件的数据aaa,父组件的aaa数据更新触发重新渲染时,使用aaa数据{{$parent.aaa}}的子组件也会触发更新==**
一、父子组件生命周期执行过程:
- 父->
beforeCreated - 父->
created - 父->
beforeMount - 子->
beforeCreate - 子->
created - 子->
beforeMount - 子->
mounted - 父->
mounted
二、子组件更新过程:
- 父->
berforeUpdate - 子->
berforeUpdate - 子->
updated - 父->
updated
三、父组件更新过程:
- 父->
berforeUpdate - 父->
updated
四、父组件销毁过程:
- 父->
beforeDestory - 子
beforeDestory - 子
destoryed - 父->
destoryed
扩展------------------------
父组件绑定在子组件标签中的事件,是无法触发的,如何解决?
@xxx.native: 监听组件根元素的原生事件。
虚拟DOM
虚拟DOM对象:_vnode,作用:
第一步:vue内部自己定义的一套对象,基于自己规定的键值对,来描述视图中每一个节点的特征:
- tag标签名
- text文本节点,存储文本内容
- children:子节点
- data:属性
- 第二步:基于
vue-template-compiler去渲染解析 template 视图,最后构建出上述的虚拟DOM对象 - 第三步:组件重新渲染,又重新生成一个 _vnode
- 第四步:对比两次的 _vnode. 获取差异的部分
- 第五步:把差异的部分渲染为真实的DOM
组件库
element-ui:饿了么antdv :蚂蚁金服iview :京东
- Element - The world's most popular Vue UI framework
- ==vue2.xx==:elemnetui
- ==vue3.xx==:element plus
如何在项目中使用功能性组件?
==第一步==:安装element-ui:$npm i element-ui -s
==第二步==:导入:
完整导入:整个组件库都导入进来,想用什么直接用Vue.use(xxx)即可
缺点:如果我们只用几个组件,则无用的导入组件会造成项目打包体积变大[不好],所以项目中推荐使用按需导入
按需导入:
1、需要安装依赖$ npm install babel-plugin-component
样式私有化
在Vue中我们基于scoped设置样式私有化之后:
   <div data-v-5f1969a9 class="task-box">
      <button data-v-5f1969a9 type="button" class="el-button el-button--primary">
        <span>新增任务</span>
      </button>
    </div>
Copy after login
而我们编写的样式,最后会自动加上属性选择器:
 .task-box {
      box-sizing: border-box;
      ...
    }
---------编译后成为:---------
    .task-box[data-v-5f1969a9]{
      box-sizing: border-box;
    }
Copy after login
- ==组件样式私有化的原理==:设置唯一的属性(组件ID)、组件内部给所有样式后面都加上该属性选择器
- ==问题==:组件内部的元素没有设置这个属性,但是我们编写的样式是基于这个属性选择器在css设置的选择器,
- ==解决==:在组件内部的元素选择器前加
/deep/:
    /deep/.el-textarea__inner,
    	/deep/.el-input__inner{
   		 border-radius: 0;
 		 }
Copy after login
API
//main.js
	import api from '@/api/index';
	// 把存储接口请求的api对象挂载搭配Vue的原型上:
    后续在各个组件基于this.$api.xxx()就可以发送请求了,无需在每个组件中再单独导入这个api对象。
	Vue.prototype.$api=api;
Copy after login
【相关推荐:javascript视频教程、web前端】
The above is the detailed content of Detailed explanation of the two cores of VUE: responsive and component-based development. For more information, please follow other related articles on the PHP Chinese website!


