Super detailed! Graphics and text explain Vue3's combined API!
Composition API
- Composition API (Composition API) is a very valuable API update for vue3 for our developers. Let’s not focus on the specific syntax first. It has a big perception
1. composition vs options
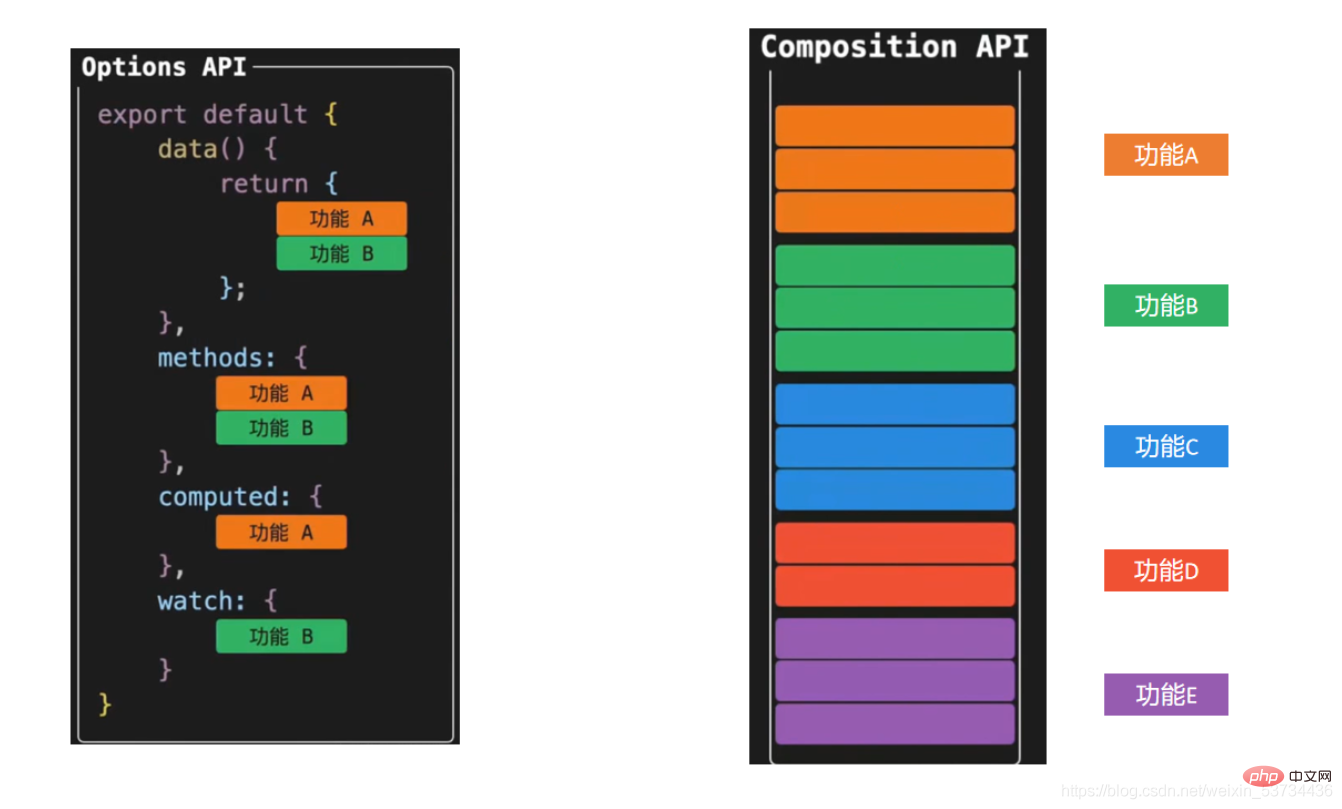
- #options The vue application developed by the API is shown on the left, and its characteristic is understanding Easy, because each option has a fixed writing position. For example, responsive data is written in the data selection, operation methods are written in the methods configuration item, etc. After the application becomes large, I believe everyone will encounter the dilemma of looking up and down for the code.
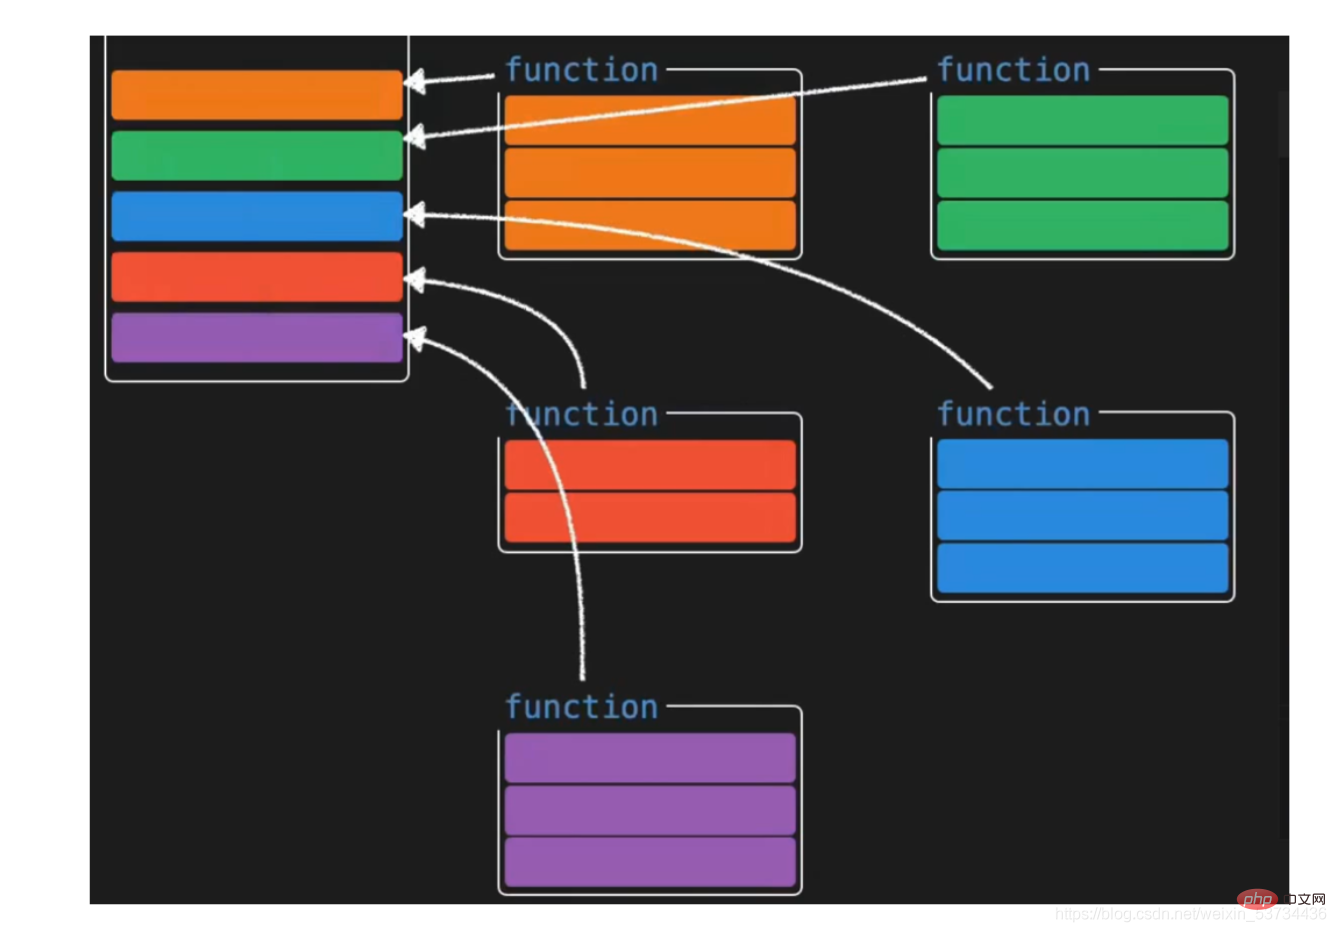
- The vue application developed by composition API is shown on the right. Its characteristic is that everything related to specific functions is put together and maintained, such as responsive data related to function A, methods of operating data, etc. Together, no matter how big the application is, you can quickly read and locate all relevant codes for a certain function, which is easy to maintain. If the function is complex and the amount of code is large, we can also perform logical split processing [Recommended: vue video tutorial 】


Special note: Optional API and combined API styles coexist Relationships are not either/or
Scenarios that require a large number of logical combinations can be enhanced using the compition API
2. Case comparison
Above we briefly learned about the new API form brought by vue3 through the diagram. Next, we use a specific small case to have a more in-depth experience of the comparison of the development models under the two APIs. Let’s first Ignore the grammatical details for the time being and focus only on the code writing form
2.1 Understanding the requirements
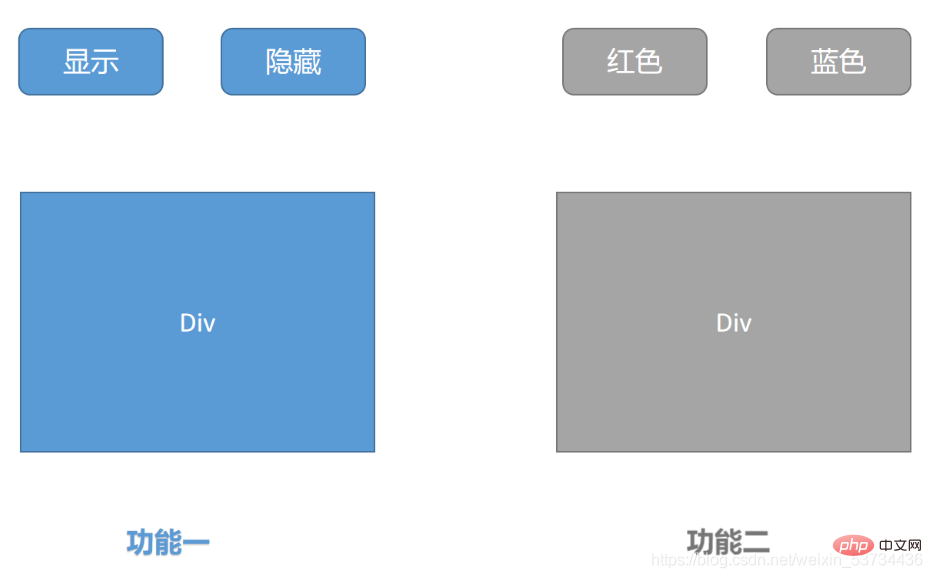
Two independent functions:
Control the display and hiding of p by clicking the button
Control the change of font color in p by clicking the button
2.2 vue2.x option Api version
<template>
<div>
<!-- 功能一模板 -->
<button @click="show">显示</button>
<button @click="hide">隐藏</button>
<div v-if="showDiv">一个被控制显隐的div</div>
</div>
<div>
<!-- 功能二模板 -->
<button @click="changeRed">红色</button>
<button @click="changeYellow">蓝色</button>
<div :style="`color:${fontColor}`">一个被控制字体颜色的的div</div>
</div>
</template>
<script>
export default {
name: 'App',
data() {
return {
showDiv: true, // 功能一数据
fontColor: '' // 功能二数据
}
},
methods: {
// 功能一方法
show() {
this.showDiv = true
},
hide() {
this.showDiv = false
},
// 功能二方法
changeRed() {
this.fontColor = 'red'
},
changeYellow() {
this.fontColor = 'blue'
}
}
}
</script>2.3 vue3.0 composition api version
<template>
<div>
<!-- 功能一模板 -->
<button @click="show">显示</button>
<button @click="hide">隐藏</button>
<div v-if="showDivFlag">一个被控制显隐的div</div>
</div>
<div>
<!-- 功能二模板 -->
<button @click="changeRed">红色</button>
<button @click="changeBlue">蓝色</button>
<div :style="`color:${fontColor}`">一个被控制字体颜色的的div</div>
</div>
</template>
<script>
import { ref } from 'vue'
export default {
name: 'App',
setup() {
// 功能一
const showDivFlag = ref(true)
function show() {
showDivFlag.value = true
}
function hide() {
showDivFlag.value = false
}
// 功能二
const fontColor = ref('')
function changeRed() {
fontColor.value = 'red'
}
function changeBlue() {
fontColor.value = 'blue'
}
return { showDivFlag, show, hide, fontColor, changeRed, changeBlue }
}
}
</script>2.4 composition api version optimization
There may be doubts here, so now we are All data and behaviors related to functions are maintained together. If the application is large and has many functions, won't the setup function become very large? Wouldn't it become more difficult to maintain? Next, let's dismantle the huge setup function
<script>import { ref } from 'vue'function useShow() {
const showpFlag = ref(true)
function show() {
showpFlag.value = true
}
function hide() {
showpFlag.value = false
}
return { showpFlag, show, hide }}function useColor() {
const fontColor = ref('')
function changeRed() {
fontColor.value = 'red'
}
function changeBlue() {
fontColor.value = 'blue'
}
return { fontColor, changeRed, changeBlue }}export default {
name: 'App',
setup() {
// 功能一
const { showpFlag, show, hide } = useShow()
// 功能二
const { fontColor, changeRed, changeBlue } = useColor()
return { showpFlag, show, hide, fontColor, changeRed, changeBlue }
}}</script>Above, we separated the two functionally related codes by defining functional functions. into an independent small function, and then combine the two small functional functions in the setUp function. In this way, we can not only make the setup function refreshing, but also facilitate the maintenance of quick positioning functions
At this point we have not paid attention to the details of the api, but just realized the benefits that the combined api has given us. Next we will go into the details of the api and see how to use the new api↓
3. setup entry function
- The setup function is a new component option, which serves as the starting point (entry) of the combined API in the component.
- This cannot be used in setup, this Pointing to undefined
- The setup function will only be executed once when the component is initialized
- The setup function is executed before the beforeCreate life cycle hook is executed
export default {
  setup () {
    console.log('setup执行了')
    console.log(this)
  },
  beforeCreate() {
    console.log('beforeCreate执行了')
    console.log(this)
}}4. Responsive system API
4.1 reactive function
- Function: reactive is a function that receives an ordinary object, converts the object data into a responsive object and returns
Use steps
Import the reactive function from the vue framework
Call the reactive function in the setup function and Pass the object data in
In the setup function, return the return value after the reactive function is called in the form of an object
Code implementation
<template>
<div>{{ state.name }}</div>
<div>{{ state.age }}</div>
<button @click="state.name = 'pink'">改值</button>
</template>
<script>
import { reactive } from 'vue'
export default {
setup () {
const state = reactive({
name: 'cp',
age: 18
})
return {
state
}
}
}
</script>4.2 ref function
- Function: ref is a function that accepts a simple or complex type and returns a responsive and variable ref object
Use steps
Export the ref function from the vue framework
Call in the setup function ref function and pass in data (simple type or complex type)
In the setup function, return the return value after calling the ref function in the form of an object
Note: When using the ref result in the setup function, you need to access it through .value. When using it in the template, you do not need to add .value
<template>
<div>{{ money }}</div>
<button @click="changeMondy">改值</button>
</template>
<script>
import { ref } from 'vue'
export default {
setup() {
let money = ref(100)
console.log(money.value)
return {
money
}
}
}
</script>Summary instructions:
The ref function can receive a simple type value and return a changeable ref responsive object, thereby making up for the problem that the reactive function does not support simple types
reactive和ref函数都可以提供响应式数据的转换,具体什么时候需要使用哪个API社区还没有最佳实践,大家暂时可以使用自己熟练的API进行转换
推荐一种写法:只有我们明确知道要转换的对象内部的字段名称我们才使用reactive,否则就一律使用ref,从而降低在语法选择上的心智负担
4.3 toRefs 函数
- 场景: 经过reactive函数处理之后返回的对象,如果给这个对象解构或者展开,会让数据丢失响应式的能力,为了解决这个问题需要引入toRefs函数,使用 toRefs函数 可以保证该对象展开的每个属性都是响应式的
4.3.1 问题复现
还是之前的案例,如果我们想在模板中省略到state,直接书写name和age,你可能会想到,那我在return出去的时候把state中的属性解构出来不就好了
修改前
<template>
<div>{{ state.name }}</div>
<div>{{ state.age }}</div>
<button @click="state.name = 'pink'">改值</button>
</template>
<script>
import { reactive } from 'vue'
export default {
setup() {
const state = reactive({
name: 'cp',
age: 18
})
return {
state
}
}
}
</script>解构修改后
<template>
<div>{{ name }}</div>
<div>{{ age }}</div>
<button @click="name = 'pink'">改值</button>
</template>
<script>
import { reactive } from 'vue'
export default {
setup() {
const state = reactive({
name: 'cp',
age: 18
})
return {
...state
}
}
}
</script>- 点击改值按钮,发现视图已经不发生变化了,这就是我们所说的,如果解构reactive的返回值,将破坏调用响应式特性,就需要我们使用toRefs方法进行处理了
4.3.2 toRefs包裹处理
<template>
<div>{{ name }}</div>
<div>{{ age }}</div>
<button @click="name = 'pink'">改值</button>
</template>
<script>
import { reactive,toRefs } from 'vue'
export default {
setup() {
const state = reactive({
name: 'cp',
age: 18
})
return {
...toRefs(state)
}
}
}
</script>4.4 computed
- 在setup函数中使用计算属性函数
作用:根据现有响应式数据经过一定的计算得到全新的数据
使用步骤
从vue框架中导入computed 函数
在setup函数中执行computed函数,并传入一个函数,在函数中定义计算公式
把computed函数调用完的执行结果放到setup的return值对象中
<template>
{{ list }}
{{ filterList }} <button @click="changeList">change list</button></template><script>import { computed, ref } from 'vue'export default {
setup() {
const list = ref([1, 2, 3, 4, 5])
// 输入大于3的数字
const filterList = computed(() => {
return list.value.filter(item => item > 3)
})
// 修改list的函数
function changeList() {
list.value.push(6, 7, 8)
}
return {
list,
filterList,
changeList }
}}</script>4.5 watch 侦听器
- 在setup函数中侦听器的使用
作用:基于响应式数据的变化执行回调逻辑,和vue2中的watch的功能完全一致
普通监听
立即执行
深度监听
使用步骤
从vue框架中导入watch函数
在setup函数中执行watch函数开启对响应式数据的监听
watch函数接收三个常规参数
- 第一个参数为函数,返回你要监听变化的响应式数据
- 第二个参数为响应式数据变化之后要执行的回调函数
- 第三个参数为一个对象,在里面配置是否开启立刻执行或者深度监听
4.5.1 普通监听
<template>
{{ age }} <button @click="age++">change age</button></template><script>import { ref, watch } from 'vue'export default {
setup() {
const age = ref(18)
watch(() => {
// 返回你想要监听的响应式属性(ref产生的对象必须加.value)
return age.value }, () => {
// 数据变化之后的回调函数
console.log('age发生了变化')
})
return {
age }
}}</script>4.5.2 开启立刻执行
watch的效果默认状态下,只有监听的数据发生变化才会执行回调,如果你需要在一上来的时候就立刻执行一次,需要配置一下
immediate属性
<template>
{{ age }} <button @click="age++">change age</button></template><script>import { ref, watch } from 'vue'export default {
setup() {
const age = ref(18)
watch(() => {
// 返回你想要监听的响应式属性(ref产生的对象必须加.value)
return age.value }, () => {
// 数据变化之后的回调函数
console.log('age发生了变化')
},{ immediate: true})
return {
age }
}}</script>4.5.3 开启深度监听
当我们监听的数据是一个对象的时候,默认状态下,对象内部的属性发生变化是不会引起回调函数执行的,如果想让对象下面所有属性都能得到监听,需要开启
deep配置
<template>
{{ name }}
{{ info.age }} <button @click="name = 'pink'">change name</button>
<button @click="info.age++">change age</button></template><script>import { reactive, toRefs, watch } from 'vue'export default {
setup() {
const state = reactive({
name: 'cp',
info: {
age: 18
}
})
watch(() => {
return state }, () => {
// 数据变化之后的回调函数
console.log('age发生了变化')
}, {
deep: true
})
return {
...toRefs(state)
}
}}</script>4.5.4 更好的做法
使用watch的时候,尽量详细的表明你到底要监听哪个属性,避免使用deep引起的性能问题,比如我仅仅只是想在state对象的age属性变化的时候执行回调,可以这么写
<template>
{{ name }}
{{ info.age }} <button @click="name = 'pink'">change name</button>
<button @click="info.age++">change age</button></template><script>import { reactive, toRefs, watch } from 'vue'export default {
setup() {
const state = reactive({
name: 'cp',
info: {
age: 18
}
})
watch(() => {
// 详细的告知你要监听谁
return state.info.age }, () => {
// 数据变化之后的回调函数
console.log('age发生了变化')
})
return {
...toRefs(state)
}
}}</script>5. 生命周期函数
使用步骤
先从vue中导入以on打头的生命周期钩子函数
在setup函数中调用生命周期函数并传入回调函数
生命周期钩子函数可以调用多次
<template>
<div>生命周期函数</div>
</template>
<script>
import { onMounted } from 'vue'
export default {
setup() {
// 时机成熟 回调函数自动执行
onMounted(() => {
console.log('mouted生命周期执行了')
})
onMounted(() => {
console.log('mouted生命周期函数又执行了')
})
}
}
</script>| 选项式API | 组合式API |
|---|---|
beforeCreate | 不需要(直接写到setup函数中) |
created | 不需要(直接写到setup函数中) |
beforeMount | onBeforeMount |
mounted | onMounted |
beforeUpdate | onBeforeUpdate |
updated | onUpdated |
beforeDestroyed | onBeforeUnmount |
destroyed | onUnmounted |
6. 父子通信
在vue3的组合式API中,父传子的基础套路完全一样,基础思想依旧为:父传子是通过prop进行传入,子传父通过调用自定义事件完成
实现步骤
setup函数提供俩个参数,第一个参数为props,第二个参数为一个对象context
props为一个对象,内部包含了父组件传递过来的所有prop数据,context对象包含了attrs,slots, emit属性,其中的emit可以触发自定义事件的执行从而完成子传父
代码落地app.vue
<template>
<son :name="name" @get-msg="getMsg"></son></template><script>import { ref } from 'vue'import Son from './components/son'export default {
components: {
Son },
setup() {
const name = ref('cp')
function getMsg(msg) {
console.log(msg)
}
return {
name,
getMsg }
}}</script>components/son.vue
<template>
<div>
{{name}}
<button @click="setMsgToSon">set</button>
</div>
</template>
<script>
export default {
props: {
name: {
type: String
}
},
emits: ['get-msg'], // 声明当前组件触发的自定义事件
setup(props,{emit}) {
console.log(props.name)
function setMsgToSon(){
emit('get-msg','这是一条来自子组件的msg信息')
}
return {
setMsgToSon
}
}
}
</script>7. provide 和 inject
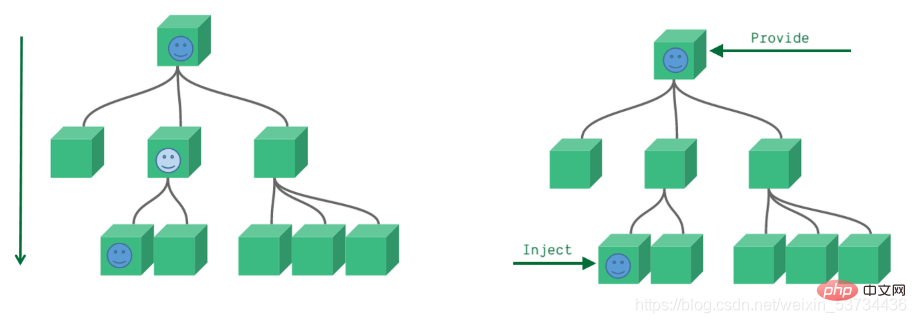
通常我们使用props进行父子之间的数据传递,但是如果组件嵌套层级较深,一层一层往下传递将会变的非常繁琐,有没有一种手段可以把这个过程简化一下呢,有的,就是我们马上要学习的provide 和 inject,它们配合起来可以方便的完成跨层传递数据
7.1 基础使用
- 在setup函数中使用provide和inject的基础用法
来个需求: 爷组件中有一份数据 传递给孙组件直接使用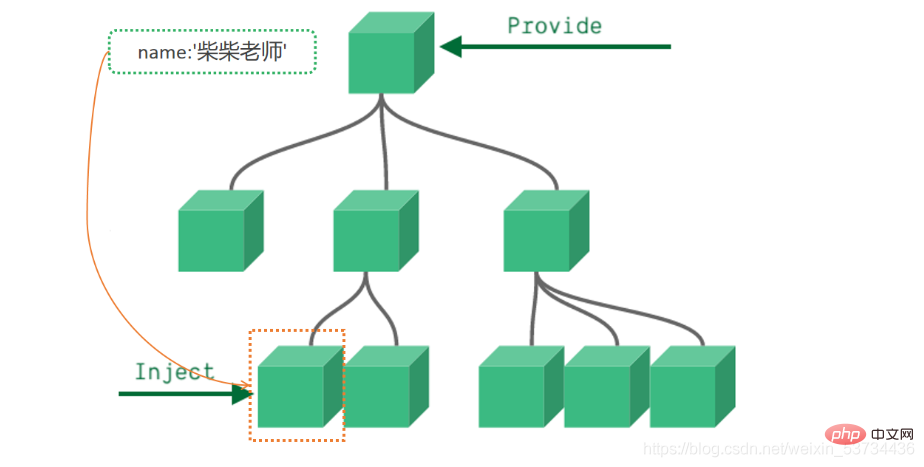
实现步骤:
顶层组件在setup方法中使用provide函数提供数据
任何底层组件在setup方法中使用inject函数获取数据
代码落地爷爷组件 - app.vue
<template>
<father></father></template><script>import Father from '@/components/Father'import { provide } from 'vue'export default {
components: {
Father },
setup() {
let name = '柴柴老师'
// 使用provide配置项注入数据 key - value
provide('name', name)
}}</script>孙组件 - components/Son.vue
<template>
我是子组件
{{ name }}</template><script>import { inject } from 'vue'export default {
setup() {
const name = inject('name')
return {
name }
}}</script>事实上,只要是后代组件,都可以方便的获取顶层组件提供的数据
7.2 传递响应式数据
provide默认情况下传递的数据不是响应式的,也就是如果对provide提供的数据进行修改,并不能响应式的影响到底层组件使用数据的地方,如果想要传递响应数据也非常简单,只需要将传递的数据使用ref或者reactive生成即可
- 通过provide/inject传递响应式数据
app.vue
<template>
<father></father>
<button @click="changeName">change name</button></template><script>import Father from '@/components/Father'import { provide, ref } from 'vue'export default {
components: {
Father },
setup() {
// 使用ref转换成响应式再传递
let name = ref('柴柴老师')
function changeName(){
name.value = 'pink'
}
provide('name', name)
return {
changeName }
}}</script>8. 模板中 ref 的使用
在模板中使用ref,我们都很清楚,它一般有三种使用场景
ref + 普通dom标签 获取真实dom对象
ref + 组件标签 获取组件实例对象
ref + v-for 获取由dom对象(实例对象)组成的数组 (不经常使用)
- 在setup函数中使用ref获取真实dom获取组件实例的方法
实现步骤
使用ref函数传入null创建 ref对象 =>
const hRef = ref(null)模板中通过定义ref属性等于1中创建的ref对象名称建立关联 =>
<h1 ref="hRef"></h1>使用 =>
hRef.value
代码落地components/RefComponent.vue
<template>
  我是一个普通的组件</template>
app.vue
<template>
<h1 id="我是普通dom标签">我是普通dom标签</h1>
<ref-comoonent ref="comRef"></ref-comoonent></template><script>import { onMounted, ref } from 'vue'import RefComoonent from '@/components/RefComponent'export default {
components: {
RefComoonent },
setup() {
const h1Ref = ref(null)
const comRef = ref(null)
onMounted(() => {
console.log(h1Ref.value)
console.log(comRef.value)
})
// 必须return
return {
h1Ref,
comRef }
}}</script>9. 来个案例吧 - Todos
核心功能
渲染列表数据 v-for
点击删除当前列表 splice + index
回车添加新项目 @keyup.enter=“addTodo” list.unshift
选择状态切换 v-model
多选和取消多选 计算属性的set和get
未完成任务数量统计 computed
<template>
<section class="todoapp">
<!-- 头部输入框区域 -->
<header class="header">
<h1 id="todos">todos</h1>
<input
class="new-todo"
placeholder="请输入要完成的任务"
autofocus
v-model="curTask"
@keyup.enter="add"
/>
</header>
<section class="main">
<!-- 全选切换input -->
<input id="toggle-all" class="toggle-all" type="checkbox" v-model="isAll"/>
<label for="toggle-all">标记所有已经完成</label>
<ul class="todo-list">
<!-- 任务列表 -->
<li v-for="(item, index) in list" :key="item.id">
<p class="view">
<!-- 双向绑定 flag -->
<input class="toggle" type="checkbox" v-model="item.flag" />
<label>{{ item.name }}</label>
<!-- 删除按钮 -->
<button class="destroy" @click="del(index)"></button>
</p>
</li>
</ul>
</section>
<footer class="footer">
<span class="todo-count"> 还未完成的任务有:<strong>{{count}}</strong>项 </span>
</footer>
</section></template><script>import { computed, ref } from 'vue'export default {
setup() {
const list = ref([
{ id: 1, name: '吃饭', flag: false },
{ id: 2, name: '睡觉', flag: false },
{ id: 3, name: '打豆豆', flag: true }
])
// 删除函数
function del(index) {
// index 要删除项的下标值
// splice
list.value.splice(index, 1)
}
const curTask = ref('')
function add() {
// 添加逻辑
list.value.unshift({
id: new Date(),
name: curTask.value,
flag: false
})
curTask.value = ''
}
// 全选取消全选
// {name:"cp"} console.log(info.name) info.name = 'pink'
const isAll = computed({
// 获取isAll数据的时候会执行get函数
get() {
// 当list列表中所有项的flag属性都为true 就为true
// every
return list.value.every(item => item.flag === true)
},
set(val) {
// 拿到isAll最新值 遍历一下list 把里面的flag属性设置为最新值
list.value.forEach(item => {
item.flag = val })
}
})
// 计算未完成的任务
const count = computed(()=>{
return list.value.filter(item=>item.flag === false).length })
return {
list,
del,
curTask,
add,
isAll,
count }
}}</script><style>html,
body {
margin: 0;
padding: 0;}button {
margin: 0;
padding: 0;
border: 0;
background: none;
font-size: 100%;
vertical-align: baseline;
font-family: inherit;
font-weight: inherit;
color: inherit;
-webkit-appearance: none;
appearance: none;
-webkit-font-smoothing: antialiased;
-moz-osx-font-smoothing: grayscale;}body {
font: 14px "Helvetica Neue", Helvetica, Arial, sans-serif;
line-height: 1.4em;
background: #f5f5f5;
color: #111111;
min-width: 230px;
max-width: 550px;
margin: 0 auto;
-webkit-font-smoothing: antialiased;
-moz-osx-font-smoothing: grayscale;
font-weight: 300;}:focus {
outline: 0;}.hidden {
display: none;}.todoapp {
background: #fff;
margin: 130px 0 40px 0;
position: relative;
box-shadow: 0 2px 4px 0 rgba(0, 0, 0, 0.2), 0 25px 50px 0 rgba(0, 0, 0, 0.1);}.todoapp input::-webkit-input-placeholder {
font-style: italic;
font-weight: 300;
color: rgba(0, 0, 0, 0.4);}.todoapp input::-moz-placeholder {
font-style: italic;
font-weight: 300;
color: rgba(0, 0, 0, 0.4);}.todoapp input::input-placeholder {
font-style: italic;
font-weight: 300;
color: rgba(0, 0, 0, 0.4);}.todoapp h1 {
position: absolute;
top: -140px;
width: 100%;
font-size: 80px;
font-weight: 200;
text-align: center;
color: #b83f45;
-webkit-text-rendering: optimizeLegibility;
-moz-text-rendering: optimizeLegibility;
text-rendering: optimizeLegibility;}.new-todo,
.edit {
position: relative;
margin: 0;
width: 100%;
font-size: 24px;
font-family: inherit;
font-weight: inherit;
line-height: 1.4em;
color: inherit;
padding: 6px;
border: 1px solid #999;
box-shadow: inset 0 -1px 5px 0 rgba(0, 0, 0, 0.2);
box-sizing: border-box;
-webkit-font-smoothing: antialiased;
-moz-osx-font-smoothing: grayscale;}.new-todo {
padding: 16px 16px 16px 60px;
border: none;
background: rgba(0, 0, 0, 0.003);
box-shadow: inset 0 -2px 1px rgba(0, 0, 0, 0.03);}.main {
position: relative;
z-index: 2;
border-top: 1px solid #e6e6e6;}.toggle-all {
width: 1px;
height: 1px;
border: none; /* Mobile Safari */
opacity: 0;
position: absolute;
right: 100%;
bottom: 100%;}.toggle-all + label {
width: 60px;
height: 34px;
font-size: 0;
position: absolute;
top: -52px;
left: -13px;
-webkit-transform: rotate(90deg);
transform: rotate(90deg);}.toggle-all + label:before {
content: "❯";
font-size: 22px;
color: #e6e6e6;
padding: 10px 27px 10px 27px;}.toggle-all:checked + label:before {
color: #737373;}.todo-list {
margin: 0;
padding: 0;
list-style: none;}.todo-list li {
position: relative;
font-size: 24px;
border-bottom: 1px solid #ededed;}.todo-list li:last-child {
border-bottom: none;}.todo-list li.editing {
border-bottom: none;
padding: 0;}.todo-list li.editing .edit {
display: block;
width: calc(100% - 43px);
padding: 12px 16px;
margin: 0 0 0 43px;}.todo-list li.editing .view {
display: none;}.todo-list li .toggle {
text-align: center;
width: 40px;
/* auto, since non-WebKit browsers doesn't support input styling */
height: auto;
position: absolute;
top: 0;
bottom: 0;
margin: auto 0;
border: none; /* Mobile Safari */
-webkit-appearance: none;
appearance: none;}.todo-list li .toggle {
opacity: 0;}.todo-list li .toggle + label {
background-image: url("data:image/svg+xml;utf8,%3Csvg%20xmlns%3D%22http%3A//www.w3.org/2000/svg%22%20width%3D%2240%22%20height%3D%2240%22%20viewBox%3D%22-10%20-18%20100%20135%22%3E%3Ccircle%20cx%3D%2250%22%20cy%3D%2250%22%20r%3D%2250%22%20fill%3D%22none%22%20stroke%3D%22%23ededed%22%20stroke-width%3D%223%22/%3E%3C/svg%3E");
background-repeat: no-repeat;
background-position: center left;}.todo-list li .toggle:checked + label {
background-image: url("data:image/svg+xml;utf8,%3Csvg%20xmlns%3D%22http%3A//www.w3.org/2000/svg%22%20width%3D%2240%22%20height%3D%2240%22%20viewBox%3D%22-10%20-18%20100%20135%22%3E%3Ccircle%20cx%3D%2250%22%20cy%3D%2250%22%20r%3D%2250%22%20fill%3D%22none%22%20stroke%3D%22%23bddad5%22%20stroke-width%3D%223%22/%3E%3Cpath%20fill%3D%22%235dc2af%22%20d%3D%22M72%2025L42%2071%2027%2056l-4%204%2020%2020%2034-52z%22/%3E%3C/svg%3E");}.todo-list li label {
word-break: break-all;
padding: 15px 15px 15px 60px;
display: block;
line-height: 1.2;
transition: color 0.4s;
font-weight: 400;
color: #4d4d4d;}.todo-list li.completed label {
color: #cdcdcd;
text-decoration: line-through;}.todo-list li .destroy {
display: none;
position: absolute;
top: 0;
right: 10px;
bottom: 0;
width: 40px;
height: 40px;
margin: auto 0;
font-size: 30px;
color: #cc9a9a;
margin-bottom: 11px;
transition: color 0.2s ease-out;}.todo-list li .destroy:hover {
color: #af5b5e;}.todo-list li .destroy:after {
content: "×";}.todo-list li:hover .destroy {
display: block;}.todo-list li .edit {
display: none;}.todo-list li.editing:last-child {
margin-bottom: -1px;}.footer {
padding: 10px 15px;
height: 20px;
text-align: center;
font-size: 15px;
border-top: 1px solid #e6e6e6;}.footer:before {
content: "";
position: absolute;
right: 0;
bottom: 0;
left: 0;
height: 50px;
overflow: hidden;
box-shadow: 0 1px 1px rgba(0, 0, 0, 0.2), 0 8px 0 -3px #f6f6f6,
0 9px 1px -3px rgba(0, 0, 0, 0.2), 0 16px 0 -6px #f6f6f6,
0 17px 2px -6px rgba(0, 0, 0, 0.2);}.todo-count {
float: left;
text-align: left;}.todo-count strong {
font-weight: 300;}.filters {
margin: 0;
padding: 0;
list-style: none;
position: absolute;
right: 0;
left: 0;}.filters li {
display: inline;}.filters li a {
color: inherit;
margin: 3px;
padding: 3px 7px;
text-decoration: none;
border: 1px solid transparent;
border-radius: 3px;}.filters li a:hover {
border-color: rgba(175, 47, 47, 0.1);}.filters li a.selected {
border-color: rgba(175, 47, 47, 0.2);}.clear-completed,
html .clear-completed:active {
float: right;
position: relative;
line-height: 20px;
text-decoration: none;
cursor: pointer;}.clear-completed:hover {
text-decoration: underline;}.info {
margin: 65px auto 0;
color: #4d4d4d;
font-size: 11px;
text-shadow: 0 1px 0 rgba(255, 255, 255, 0.5);
text-align: center;}.info p {
line-height: 1;}.info a {
color: inherit;
text-decoration: none;
font-weight: 400;}.info a:hover {
text-decoration: underline;}/*
Hack to remove background from Mobile Safari.
Can't use it globally since it destroys checkboxes in Firefox
*/@media screen and (-webkit-min-device-pixel-ratio: 0) {
.toggle-all,
.todo-list li .toggle {
background: none;
}
.todo-list li .toggle {
height: 40px;
}}@media (max-width: 430px) {
.footer {
height: 50px;
}
.filters {
bottom: 10px;
}}</style>The above is the detailed content of Super detailed! Graphics and text explain Vue3's combined API!. For more information, please follow other related articles on the PHP Chinese website!

Hot AI Tools

Undresser.AI Undress
AI-powered app for creating realistic nude photos

AI Clothes Remover
Online AI tool for removing clothes from photos.

Undress AI Tool
Undress images for free

Clothoff.io
AI clothes remover

AI Hentai Generator
Generate AI Hentai for free.

Hot Article

Hot Tools

Notepad++7.3.1
Easy-to-use and free code editor

SublimeText3 Chinese version
Chinese version, very easy to use

Zend Studio 13.0.1
Powerful PHP integrated development environment

Dreamweaver CS6
Visual web development tools

SublimeText3 Mac version
God-level code editing software (SublimeText3)

Hot Topics
 1386
1386
 52
52
 How to add functions to buttons for vue
Apr 08, 2025 am 08:51 AM
You can add a function to the Vue button by binding the button in the HTML template to a method. Define the method and write function logic in the Vue instance.
 How to use bootstrap in vue
Apr 07, 2025 pm 11:33 PM
Using Bootstrap in Vue.js is divided into five steps: Install Bootstrap. Import Bootstrap in main.js. Use the Bootstrap component directly in the template. Optional: Custom style. Optional: Use plug-ins.
 How to use watch in vue
Apr 07, 2025 pm 11:36 PM
The watch option in Vue.js allows developers to listen for changes in specific data. When the data changes, watch triggers a callback function to perform update views or other tasks. Its configuration options include immediate, which specifies whether to execute a callback immediately, and deep, which specifies whether to recursively listen to changes to objects or arrays.
 How to reference js file with vue.js
Apr 07, 2025 pm 11:27 PM
There are three ways to refer to JS files in Vue.js: directly specify the path using the <script> tag;; dynamic import using the mounted() lifecycle hook; and importing through the Vuex state management library.
 What does vue multi-page development mean?
Apr 07, 2025 pm 11:57 PM
Vue multi-page development is a way to build applications using the Vue.js framework, where the application is divided into separate pages: Code Maintenance: Splitting the application into multiple pages can make the code easier to manage and maintain. Modularity: Each page can be used as a separate module for easy reuse and replacement. Simple routing: Navigation between pages can be managed through simple routing configuration. SEO Optimization: Each page has its own URL, which helps SEO.
 How to return to previous page by vue
Apr 07, 2025 pm 11:30 PM
Vue.js has four methods to return to the previous page: $router.go(-1)$router.back() uses <router-link to="/" component window.history.back(), and the method selection depends on the scene.
 How to query the version of vue
Apr 07, 2025 pm 11:24 PM
You can query the Vue version by using Vue Devtools to view the Vue tab in the browser's console. Use npm to run the "npm list -g vue" command. Find the Vue item in the "dependencies" object of the package.json file. For Vue CLI projects, run the "vue --version" command. Check the version information in the <script> tag in the HTML file that refers to the Vue file.
 How to use function intercept vue
Apr 08, 2025 am 06:51 AM
Function interception in Vue is a technique used to limit the number of times a function is called within a specified time period and prevent performance problems. The implementation method is: import the lodash library: import { debounce } from 'lodash'; Use the debounce function to create an intercept function: const debouncedFunction = debounce(() => { / Logical / }, 500); Call the intercept function, and the control function is called at most once in 500 milliseconds.


