The best way to manage locally installed npm packages is to create a package.json file. This article will take you through the package.json file. I hope it will be helpful to you!
Understand package.json
Under the root directory of each project (package downloaded from npm, or other nodejs projects), generally There is a package.json file that defines the various modules required by the project, as well as the project configuration information (such as name, version, license, how to start the project, run scripts and other metadata). The npm install command automatically downloads the required modules based on this configuration file.
package.jsonThe file is a JSON object, and each member of the object is a setting of the current project. For example, name is the project name, and version is the version (following the format of "major version.minor version.minor version"). It will also play multiple roles in the project life cycle, including development, testing, and online versions.
The role of package.json
How to create package.json
1. Use the command line tool client CLI
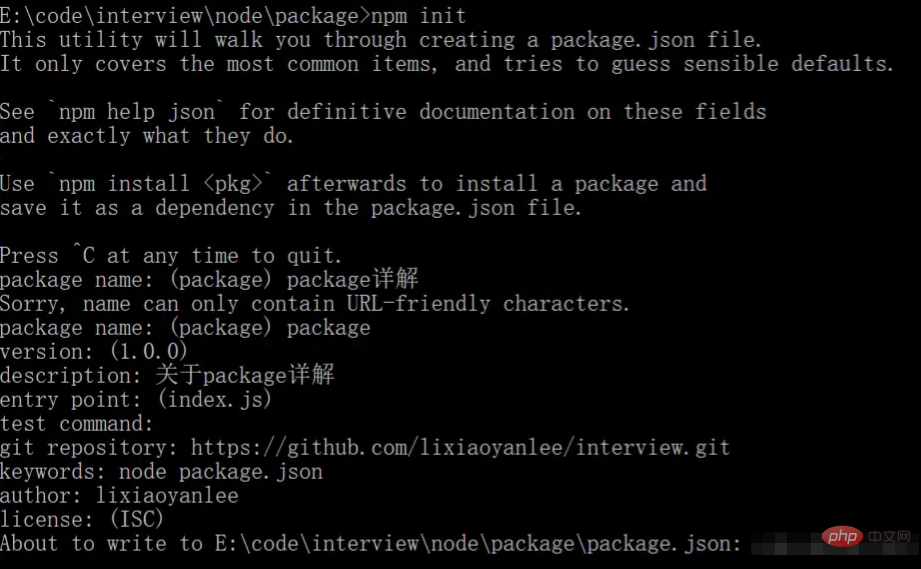
npm init
This will Start the command line questionnaire, which will be package.jsoncreated in the directory where you started the command.

2. Create the default Value
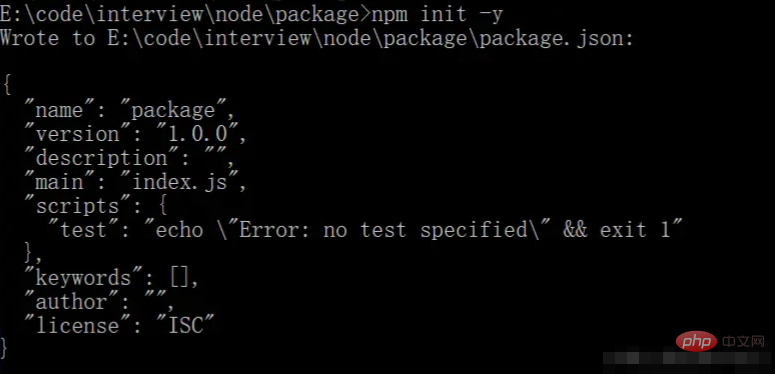
To get the default value package.json, npm inituse --yes or -y Flags run:
npm init -y
This method will package.json generate a default value using information extracted from the current directory, skipping the step of answering the question.

#3. Manually create
Create a new package.json file directly in the project root directory, and then enter the relevant content. Please see the notes on package.json below for details.
Detailed explanation of common fields in package.json file
1, name
Required field, current module\package The name must be less than or equal to 214 characters in length, cannot start with "." (dot) or "_" (underscore), and cannot contain uppercase letters.
This name may be passed into require() as a parameter, so it should be short, but also clear.
2, version
is a required field, the version number of the current package, the default is
1.0.0when created for the first time.
version must be parsable by a node-semver module that npm depends on. Defines the version iteration progress of the current project. (Follow the format of "major version. minor version. minor version")
Maybe many friends now don't pay attention to or don't care about the version number, and prefer to use the version number of the product, or the git hashcode method.
3. description
Optional field, must be a string. The description information of the current package is a string. It helps people find the package when using npm search.
If there is no description information in package.json, npm uses the first line of README.md in the project as the description information. This description information helps others search for your project, so it is recommended to write description information well.
4. main
optional field specifies the entry file for project loading.
The default value of this field is index.js under the module root directory.
5. scripts
Optional field,
scriptsis a hash object composed of script commands, which are executed in different life cycles of the package. The key is the life cycle event and the value is the command to be run. Specifies the npm command line abbreviation for running the script command. For example, start specifies the command to be executed when running npm run start. We can customize the command we want to run the script.
Reference: http://www.ruanyifeng.com/blog/2016/10/npm_scripts.html
scripts configuration execution script
1) Execute the command echo xxx
Why can it be executed?
当我执行 npm run的时候,就会自动新建一个 Shell,在这个 Shell 里面执行指定的脚本命令。因此,只要是 Shell(一般是 Bash)可以运行的命令,就可以写在 npm 脚本里面。会把当前目录下的node_modules/.bin也拷贝到当前的系统的path(只是临时拷贝,执行结束后,在将PATH变量恢复原样), 所以当前目录的node_modules/.bin子目录里面的所有脚本,都可以直接用脚本名调用,而不必加上路径。
例如:
我们用node执行一个node.js服务是,node + 文件 可以用node server.js; 我们也可以用webpack的打包前端文件,webpack-dev-server,当然webpack 和webpack-dev-server是要安装依赖的模块;
"scripts": {
    "build": "webpack --mode=development",
    "dev": "webpack-dev-server --mode=development --contentBase=./dist",
    "server":"node app.js"
}我们在命令行工具中输入npm run server ,就会调用node app.js帮我们运行。
简写形式:
npm start是npm run start
npm stop是npm run stop的简写
npm test是npm run test的简写
npm restart是npm run stop && npm run restart && npm run start的简写
常用脚本 -----网上收集转
// 删除目录
"clean": "rimraf dist/*",

// 本地搭建一个 HTTP 服务
"serve": "http-server -p 9090 dist/",

// 打开浏览器
"open:dev": "opener http://localhost:9090",

// 实时刷新
 "livereload": "live-reload --port 9091 dist/",

// 构建 HTML 文件
"build:html": "jade index.jade > dist/index.html",

// 只要 CSS 文件有变动,就重新执行构建
"watch:css": "watch 'npm run build:css' assets/styles/",

// 只要 HTML 文件有变动,就重新执行构建
"watch:html": "watch 'npm run build:html' assets/html",

// 部署到 Amazon S3
"deploy:prod": "s3-cli sync ./dist/ s3://example-com/prod-site/",

// 构建 favicon
"build:favicon": "node scripts/favicon.js",

"start": "cross-env NODE_ENV=production node server/index.js",
6、 dependencies、devDependencies
可选字段,
dependencies字段指定了项目运行所依赖的模块 ,devDependencies指定项目开发所需要的模块 。
值指向一个对象。该对象的各个成员,分别由模块名和对应的版本要求组成,表示依赖的模块及其版本范围。
默认创建的package.json没有,当我们安装npm install一个模块时就会生成。
npm install express
npm install express --save
npm install express --save-dev
上面代码表示单独安装express模块,
dependencies属性,--save参数表示将该模块写入dependencies属性,--save-dev表示将该模块写入devDependencies属性。7、bundledDependencies
可选字段,发布包时同时打包的其他依赖。
8、 peerDependencies
可选字段,兼容性依赖,如果你的项目或者模块,同时依赖另一个模块,但是所依赖的版本不一样。
比如,你的项目依赖A模块和B模块的1.0版,而A模块本身又依赖B模块的2.0版。
{
  "name": "chai-as-promised",
  "peerDependencies": {
    "chai": "1.x"
  }
}上面代码指定,安装chai-as-promised模块时,主程序chai必须一起安装,而且chai的版本必须是1.x。如果你的项目指定的依赖是chai的2.0版本,就会报错。
9、 bin
可选字段,bin字段用来指定各个内部命令对应的可执行文件的位置。
在项目根目录创建/bin/www文件
#! /usr/bin/env node
package.json中配置
"bin":{
  "lee-cli":"./bin/www"
}npm link 将package中的属性bin的值路径添加全局链接 创建快捷方式连接
在命令行中执行lee-cli就会执行bin/www文件。过程是:
在上面的例子中,www会建立符号链接node_modules/.bin/www。由于node_modules/.bin/目录会在运行时加入系统的PATH变量,因此在运行npm时,就可以不带路径,直接通过命令来调用这些脚本。
10、 config
config字段用于向环境变量输出值
{
  "name" : "package",
  "config" : { "port" : "8080" },
  "scripts" : { "start" : "node server.js" }
}如果想改变我们可以使用
npm config set package:port 80
11、engines
可选字段,指明了该模块运行的平台版本,比如 Node 的某个版本或者浏览器, 也可以指定适用的
npm版本 。
"engines" : {
"node" :
">=0.10.3 <p>12、license</p><blockquote><p>可选字段, 表示定义适用于package.json所描述代码的许可证。不同的协议有不同的限制。让用户知道他们有何权限来使用你的模块,以及使用该模块有哪些限制。</p></blockquote><p>可参考: <a href="https://choosealicense.com/" target="_blank" textvalue="choosealicense.com/">choosealicense.com/</a> 选择许可证。</p><p>如:MIT:最大许可,别人下载你的代码可以改你的代码,默认安装值。</p><p>13、author</p><blockquote><p>可选字段,项目开发者。</p></blockquote><p>14、private</p><blockquote><p>可选字段,布尔值,是否私有,设置为 true 时,npm 拒绝发布。</p></blockquote><p>这是防止私有包被以外发布的一种方法。如果你希望包装某个包只能被发布到特定的一个registry中(比如,一个内部的registry),则可以使用下面的publishConfig字典来描述以在publish-time重写registry配置参数。</p><p>15、keywords</p><blockquote><p>可选字段,项目关键字,是一个字符串数组。它可以帮助人们在使用npm search时找到这个包。</p></blockquote><p>16、os</p><blockquote><p>可选字段,指定模块可以在什么操作系统上运行</p></blockquote><p>17、style</p><blockquote><p>style指定供浏览器使用时,样式文件所在的位置。</p></blockquote><p>18、repository</p><blockquote><p>包代码存放的地方的类型,可以是 git 或 svn,git 可在 Github 上</p></blockquote><p>19、homepage</p><blockquote><p>可选字段,没有<a href="http://blog.csdn.net/woxueliuyun/article/details/39294375" target="_blank" textvalue="http://">http://</a>等带协议前缀的URL。</p></blockquote><p><strong>版本问题:</strong></p><blockquote>
<p>version:"1.0.0"</p>
<p>1.0.0:</p>
<p>第一位改变表示:不兼容老代码,大规模的更新,新版本发布;</p>
<p>第二位表示:增加了一些功能,向下兼容;</p>
<p>第三位表示:小的补丁,bug修改;</p>
</blockquote><p><strong>我们发表项目的时候,一盘使用npm + git</strong></p>npm version patch (patch打补丁) 这种会改变版本的第三位;使用git tag 执行即会自动在git上版本号npm version minor这种改变的版本号的第二位;同步git版本;npm version major 这种改变版本号的第一位;同步git版本;npm version [<newversion> | major | minor | patch | premajor | preminor | prepatch | prerelease | from-git] major:主版本号 minor:次版本号 patch:补丁号 premajor:预备主版本 prepatch:预备次版本 prerelease:预发布版本</newversion>
ps:注意,如果报错:Git working directory not clean
是说明你现在需要git status是clean的。
git add .
git commit -m"package.json详解"
npm versin monir -m"增加版本号"
git push -u origin master
如何制定规则?
作为使用者,我们可以在 package.json 文件中写明我们可以接受这个包的更新程度(假设当前依赖的是 1.2.4 版本):
如果只打算接受补丁版本的更新(也就是最后一位的改变),就可以这么写:
 1.2
 1.2.x
 ~1.2.4
如果接受小版本的更新(第二位的改变),就可以这么写:
1
1.x
^1.2.4
如果可以接受大版本的更新(自然接受小版本和补丁版本的改变),就可以这么写:
*x
小结一下:总共三种版本变化类型,接受依赖包哪种类型的更新,就把版本号准确写到前一位。
版本周期、阶段:
例如:
2.1.0-beta.1 一般这样用户不会安装这种的,这种可以用内侧、测试人员使用。
依赖包的版本问题
| 实例 | 说明 |
|---|---|
| ~1.2.3 | 主版本+次要版本+补丁版本;1.2.3 |
| ~1.2 | 主版本+次要版本;1.2.0 |
| ~1 | 主版本;1.0.0 |
| 符号 | 实例 | 版本范围 | 说明 |
|---|---|---|---|
| 1.0.0 | 1.0.0 | 锁定1.0.0版本,必须这个版本。 | |
| ^会匹配最新的大版本依赖包 | ^1.2.3、^0.2.3 | >=1.2.3 =0.2.3 | 表示安装1.x.x的最新版本(不低于1.2.3,包括1.3.0),但是不安装2.x.x,也就是说安装时不改变大版本号。需要注意的是,如果大版本号为0,则插入号的行为与波浪号相同,这是因为此时处于开发阶段,即使是次要版本号变动,也可能带来程序的不兼容。(主版本) |
| ~会匹配最近的小版本依赖包 | ~1.2.3 | >=1.2.3 | 表示安装1.2.x的最新版本(不低于1.2.3),但是不安装1.3.x,也就是说安装时不改变大版本号和次要版本号。 |
| >= | >=2.1.0 | >=2.1.0 | 大于等于2.1.0 |
| 小于等于2.0.0 | |||
| laster | 安装最新的版本 | ||
| * | >=0.0.0 | 任何版本 | |
| - | 1.2.3 - 2.3.4 | >=1.2.3 |
区分安装<span style="font-size: 18px;">Dependencies</span>和<span style="font-size: 18px;">dependencies</span>?
devDependencies是开发所需要的模块,所以我们可以在开发过程中需要的安装上去,来提高我们的开发效率,比如一些知名的第三方库, webpack、rollUp、less、babel这些。 就没必要在生成环境安装。
以下类库都建议安装到devDependencies:
依赖包(指定、更新、本地、使用、卸载)
1、安装本地依赖包
npm install jquery
这个命令会在当前目录创建一个 node_modules 目录,然后下载我们指定的包到这个目录中。
2、指定安装版本,可以在package name后@版本号。
如果包的名称以包开头@,则它是一个范围包。
npm install jquery@3.4.1
npm install jquery@">=1.1.0 <p>更新之后,dependencies内的版本号也会改变。</p><p>3、更新依赖包</p><pre class="brush:php;toolbar:false">npm update jquery
4、使用包
let jquery = require('jquery');<script>//这个需要注意路径</script>
6、卸载依赖包
npm uninstall jquery
Semantic versioning(语义化版本规则)
https://docs.npmjs.com/about-semantic-versioning
https://github.com/npm/node-semver
package.json注意事项
根据上边我们在使用npm init会询问我们填几项内容,有的可以不填,有的必须填,这些必填都是一个package.json内容必须要具备的字段:name和version,如果没有,无法执行install
x.x.x
其他注意事项:
更多node相关知识,请访问:nodejs 教程!
The above is the detailed content of An in-depth analysis of the package.json file. For more information, please follow other related articles on the PHP Chinese website!
 How to read py files in python
 Why can't I access the Ethereum browser?
 How to use insert statement in mysql
 div scroll bar
 How to export word from powerdesigner
 What is the difference between webstorm and idea?
 How to register on Matcha Exchange
 localstorage usage
 What should I do if my iPad cannot be charged?