
This article brings you relevant knowledge about vue, which mainly introduces issues related to the use of VUE template instructions. Directives are the template syntax provided by vue for developers. Let’s take a look at the basic structure used to assist developers in rendering pages. I hope it will be helpful to everyone.

[Related recommendations: javascript video tutorial, web front-end】
Directives are template syntax provided by vue for developers to assist developers in rendering the basic structure of the page.
The instructions in vue can be divided into the following six categories according to different uses:
Content rendering instructions v-text { { }} v-html
Attribute binding instruction v-bind => :
@
Difference:
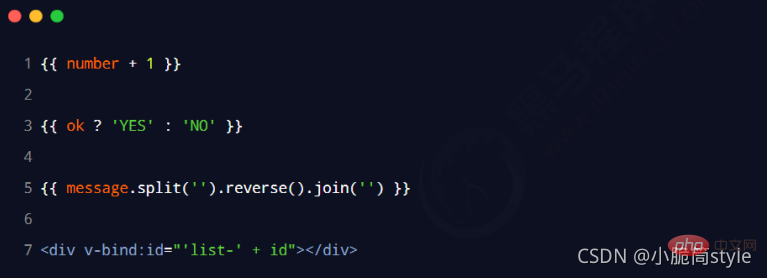
{ }} syntax is interpolation expression. Does not overwrite the default text content in the element.
to the attribute of the element, you need to use it v-bind Attribute binding instructionSince the
is used very frequently in development, vue officially provides the abbreviation for it Form (abbreviated to English :) Code example:
nbsp;html>
<meta>
<meta>
<meta>
<title>v-bind 属性绑定指令</title>
<!-- 1.导入vue 的库文件,在window 全局就有了vue这个构造函数 -->
<script></script>
<!-- 3.vue 能控制下面这个div 帮我们把数据填充到div内部 -->
<div>
<input>
<hr>
<img src="/static/imghw/default1.png" data-src="photo" class="lazy" alt="Detailed explanation of the use of vue's template syntax instructions" >
<hr>
<div>tips翻转的结果是:{{ tips.split('').reverse().join('')}}</div>
</div>
<!-- 2.创建vue实例对象 -->
<script>
// 创建vue的实例对象
const vw = new Vue({
el: '#app',
// data 对象就是要渲染到页面上的数据
data: {
tips: "请输入内容",
photo: "https://cdn.segmentfault.com/r-ce71be5c/static/logo-b.d865fc97.svg"
}
})
</script>
 event binding instructions
to assist programmers in binding event listeners to DOM elements. The syntax format is as follows:
Note: Native DOM objects have native events such as onclick, oninput, and onkeyup. After replacing them with vue’s event binding form, 
are: v-on:click, v-on:input, v-on:keyup
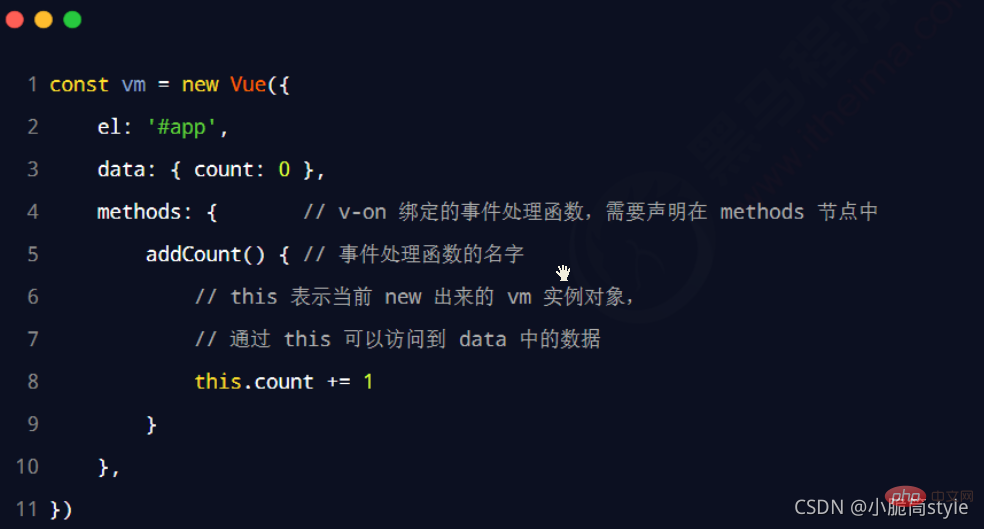
The event processing function bound by v-on needs to be declared in the methods node
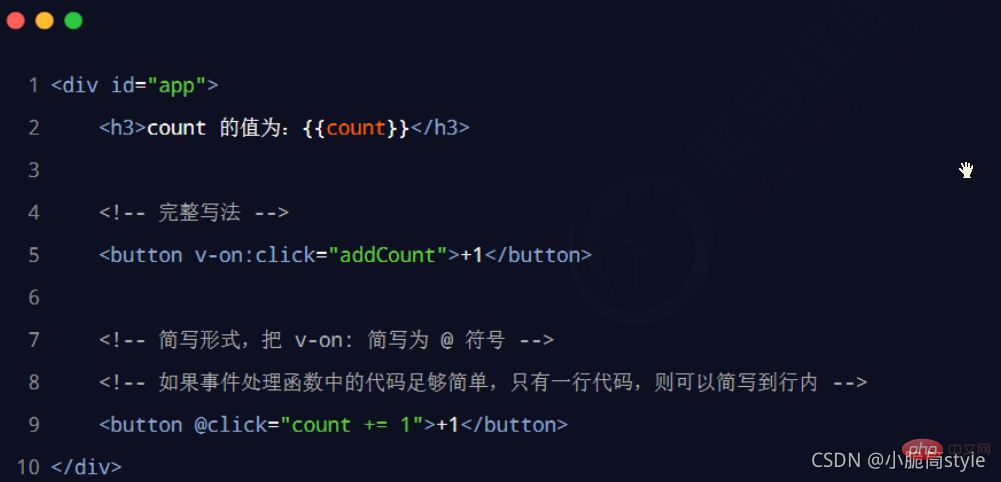
 Since the v-on instruction is used very frequently in development, vue officially provides an abbreviation for it (the abbreviation is
in English).
 Code example:
nbsp;html>
<meta>
<meta>
<meta>
<title>v-on 事件绑定指令</title>
<!-- 3.希望vue 能控制下面这个div 帮我们把数据填充到div内部 -->
<div>
<h3>count的值为{{count}}</h3>
<!-- 可以给函数加(形参) -->
<!-- <button v-on:click="add(2)">+1</button>
<button v-on:click="sub">-1</button> -->
<!-- v-on 简写@ -->
<button>+1</button>
<button>-1</button>
</div>
<!-- 1.导入vue 的库文件,在window 全局就有了vue这个构造函数 -->
<script></script>
<!-- 2.创建vue实例对象 -->
<script>
// 创建vue的实例对象
const vm = new Vue({
el: '#app',
// data 对象就是要渲染到页面上的数据
data: {
count: 0
},
methods:{
// add: function(){
// console.log("OK");
// }, 简写
add(n){
// 控制台打印详细信息出来
console.log(vm);
// this.count += 1;
this.count += n;
},
sub(){
this.count -= 1;
}
}
})
</script>
Event modifier
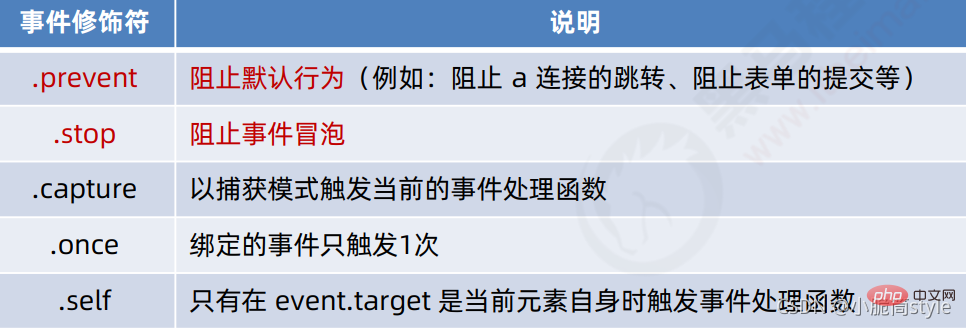
or event.stopPropagation() is a very common requirement. Therefore, vue provides the concept of event modifiers to assist programmers to more conveniently control the triggering of events. The five commonly used event modifiers are as follows:
 The syntax format is as follows:
 Code example:
nbsp;html>
<meta>
<meta>
<meta>
<title>事件修饰符</title>
<!-- 3.希望vue 能控制下面这个div 帮我们把数据填充到div内部 -->
<!-- <div id="app">{{ username }}</div> -->
<div>
<a>跳转到百度页面</a>
</div>
<!-- 1.导入vue 的库文件,在window 全局就有了vue这个构造函数 -->
<script></script>
<!-- 2.创建vue实例对象 -->
<script>
// 创建vue的实例对象
const vw = new Vue({
el: '#app',
// data 对象就是要渲染到页面上的数据
data: {
},
methods:{
show(e){
// 在控制台输出,阻止浏览器跳转
e.preventDefault()
console.log('点击了a连接');
}
}
})
</script>
to assist developers when does not operate the DOM Under the premise, quickly obtain the form data. nbsp;html>
<meta>
<meta>
<meta>
<title>双向绑定指令 v-model</title>
<div>
<!-- 1. v-model.number 自动将用户输入的值转为数值类型 -->
<input> +
<input> =
<span>{{ num1 + num2}}</span>
<hr>
<!-- 2.trim 自动过滤用户输入收尾空白字符 -->
<input>
<button>获取用户名</button>
</div>
<script></script>
<script>
const vw = new Vue({
el: '#app',
data: {
name: "小脆筒",
num1: 1,
num2: 2,
},
methods:{
show(){
console.log(`用户名是:"$this.name"`);
}
}
})
</script>
In order to facilitate the processing of user input, vue provides 3 modifiers for the v-model directive, which are:


条件渲染指令用来辅助开发者按需控制 DOM 的显示与隐藏。条件渲染指令有如下两个,分别是:
v-show
 v-if 和 v-show 的区别
实现原理不同:
v-if 指令会动态地创建或移除 DOM 元素,从而控制元素在页面上的显示与隐藏;
v-show 指令会动态为元素添加或移除 style=“display: none;” 样式,从而控制元素的显示与隐藏
性能消耗不同:
v-if 有更高的切换开销,而 v-show 有更高的初始渲染开销。因此:
如果需要非常频繁地切换,则使用 v-show 较好
如果在运行时条件很少改变,则使用 v-if 较好
代码案例:
nbsp;html>
<meta>
<meta>
<meta>
<title>条件渲染指令</title>
<div>
<p>v-if 控制</p>
<p>v-show控制</p>
</div>
<script></script>
<script>
const vw = new Vue({
el: '#app',
data:{
// 如果为true,都显示;否则控制台只显示v-show代码被隐藏,v-if直接被移除了
flag: true
}
})
</script>
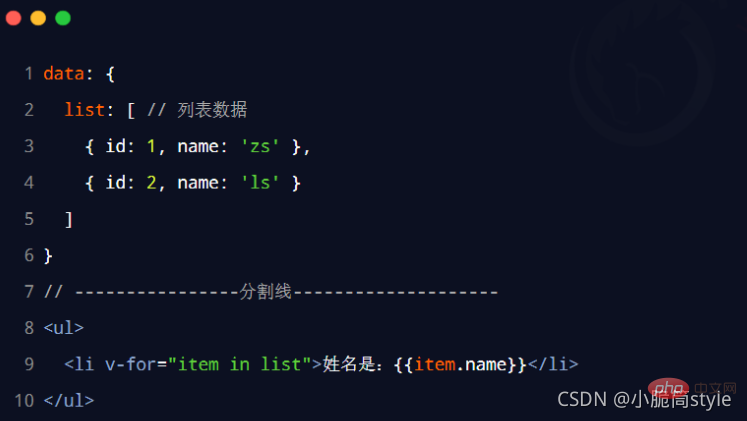
vue 提供了 v-for 列表渲染指令,用来辅助开发者基于一个数组来循环渲染一个列表结构。
v-for 指令需要使用 item in items 形式的特殊语法,其中:
items 是待循环的数组
item 是被循环的每一项
【相关推荐:javascript视频教程、web前端】
The above is the detailed content of Detailed explanation of the use of vue's template syntax instructions. For more information, please follow other related articles on the PHP Chinese website!